
Quick Summary:
MXF is a broadcast video format (used by Sony, Canon, Panasonic), and many software applications, such as iMovie, typically cannot open such files directly. The solution is to convert your MXF files to the MOV format. Using H.264 allows for quick previewing and smaller file sizes; if you need to perform smooth lossless editing in Final Cut Pro, you can opt for the Apple ProRes 422 format. You can use desktop software to batch-process large card-based file folders, utilize free tools like HandBrake, or employ online converters to quickly process individual files.
If you shoot on pro cameras like Sony FX6, Canon C300, or Panasonic P2, you know MXF files well. They're great for high-quality video and multi-track audio. But if you want to play, share, and edit them, you will find it difficult. To have better compatibility with everyday media players and Apple devices, many people choose to convert MXF to MOV. In this guide, we will share the 3 best ways to convert MXF files to MOV without quality loss.

AnyMP4 Video Converter Ultimate is a solid desktop tool designed to handle heavy batch processing. Unlike quick online tools, it taps into your computer's GPU acceleration, making transcode times significantly faster. To convert MXF files to MOV, it provides various MOV profiles with different parameters to meet your different needs. With the editing tools, you can easily adjust and improve the video effects.
It supports raw MXF multi-track audio and native Apple ProRes 422 export, which is a lifesaver if you're prepping heavy camera files for Final Cut Pro or Premiere. It is a paid program, but for handling huge shooting days, it saves tons of time.
Now, let's see how to use this powerful converter to convert MXF to MOV.
1. Click the download buttons below to download and install AnyMP4 Video Converter Ultimate on your Windows or Mac computer.
Secure Download
Secure Download
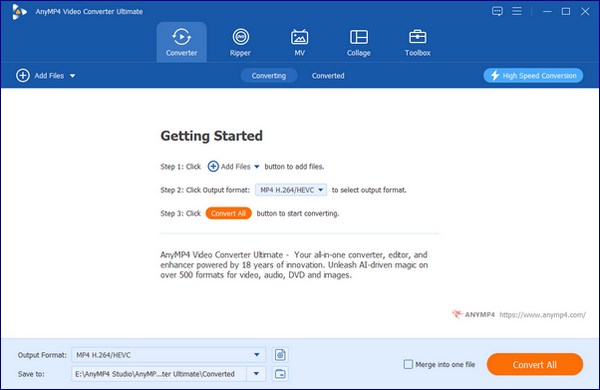
Launch the software and choose the Converter section on the top menu. Then, click Add Files to import the MXF files.
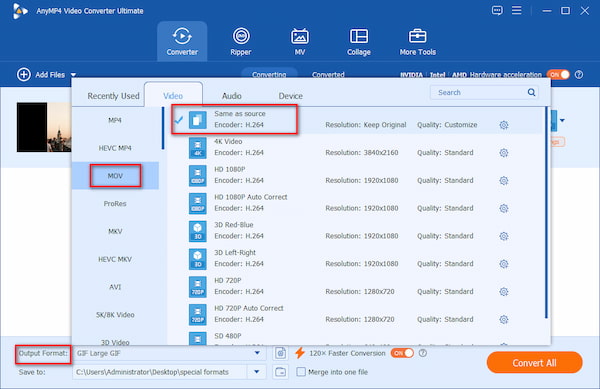
2. Next, go to the Output Format section and select MOV, Same as source, as the output format. You can also click the gear icon to customize the encoder, resolution, bitrate, and other parameters.
Select ProRes 422 if you plan to edit, or H.264 if you just need a small file for QuickTime viewing.
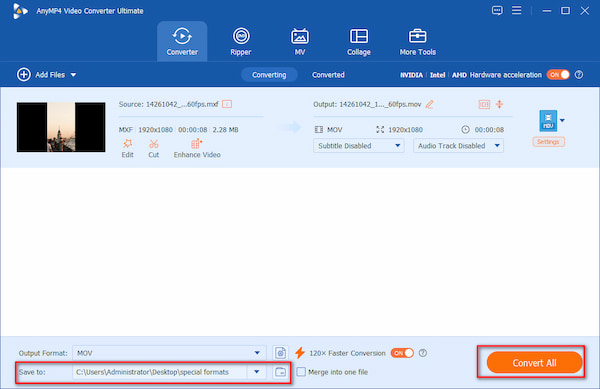
3. Lastly, change the default download folder and click Convert All to start the MXF to MOV conversion.
Remember to enable hardware acceleration to improve your conversion efficiency.
In our test, when turning on GPU acceleration, the conversion time dropped to under 45 seconds. When loading the exported MOV files into and Final Cut Pro, there are no dropped frames or audio sync issues. Though it is a paid tool, you can try its free version first to evaluate it.
HandBrake is probably the most popular free video converter out there, and it handles raw MXF files without breaking a sweat. It's completely open-source and gives you deep control over bitrates, frame rates, and audio codecs. Before beginning to use it, you should be aware of some recent updates: some users have found that HandBrake does not support direct export to the .mov container—it can only output in .mp4, .webm, or .mkv formats. However, starting from version 1.11.0, to accommodate new professional-grade encoders (such as ProRes and DNxHR), HandBrake officially introduced support for.mov output containers. Please update your HandBrake to the latest version to enable this feature.
Now, see the detailed guide on using HandBrake to convert MXF to MOV.
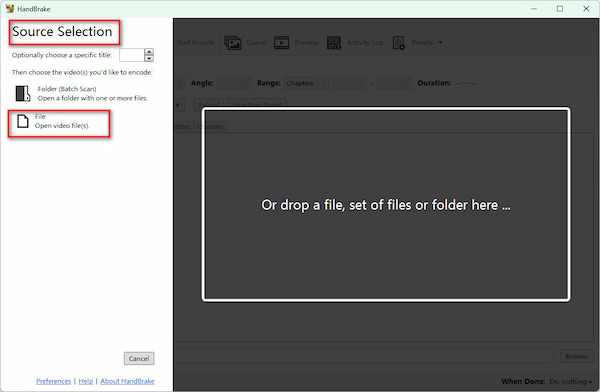
1. Download the latest version of HandBrake from its official website and install it on your computer. Open it, and in the Source Selection sidebar, click File to import the MXF file you want to convert.
If you have installed HandBrake on your computer, it will prompt you to update it to the latest version.
2. In its main interface, choose Format as MOV under the Summary section. You can also open the Preset drop-down list to choose a desired profile.
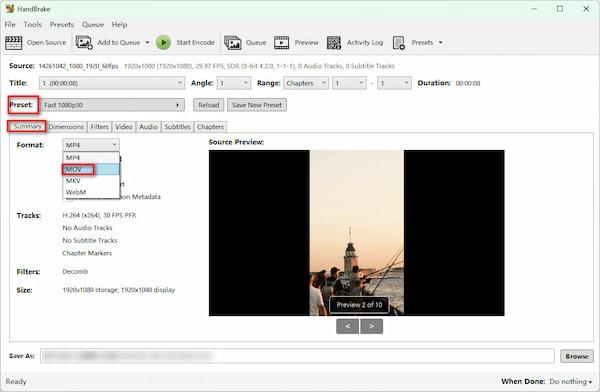
3. Explore other settings to optimize your output video effects. Lastly, click Browse at the bottom to set a download folder and select the top Start Encode button to start the conversion.
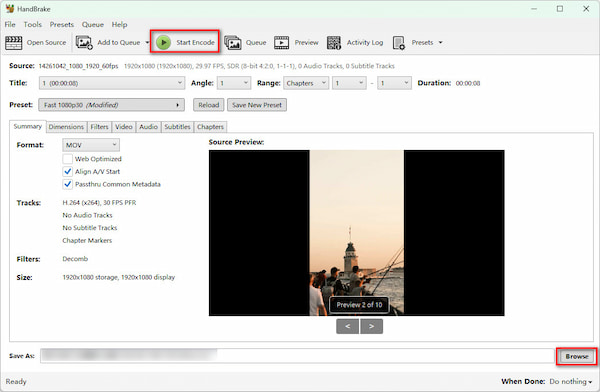
HandBrake is a reliable and free choice for MXF file conversions. It is suitable for workflows such as professional video editing, post-production, or archiving that require lossless or high-quality intermediate formats. But encoding CPU-heavy H.264 presets can take a while on older machines.
If you only have one or two short MXF clips and don't feel like installing any software on your computer, CloudConvert is one of the better web-based converters available. It actually lets you convert MXF directly to MOV right inside your browser, and it even gives you options to choose your video codec (like H.264 or ProRes). It's super convenient for quick fixes on the fly. That said, because it relies on uploading files to the cloud, it's not really practical for massive camera cards unless you have gigabit fiber internet.
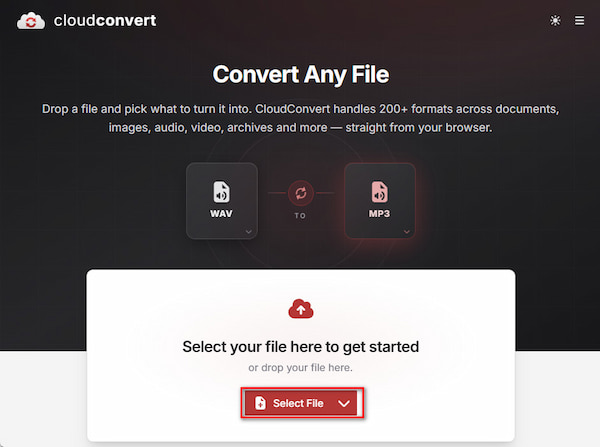
1. Open CloudConvert in your browser and click the red Select File button to add the MXF file.
Please pay close attention to the file size limits. The free version of CloudConvert has upper limits on file size and daily conversion limits. The maximum supported file size is 1 GB. Since original camera MXF files can be extremely large (each video segment typically ranges from several GBs), it is recommended to use this method only for short previews or small video clips.
2. Select Select Format > Video > MOV to proceed. Then, you can select the Options button to further adjust the output parameters.
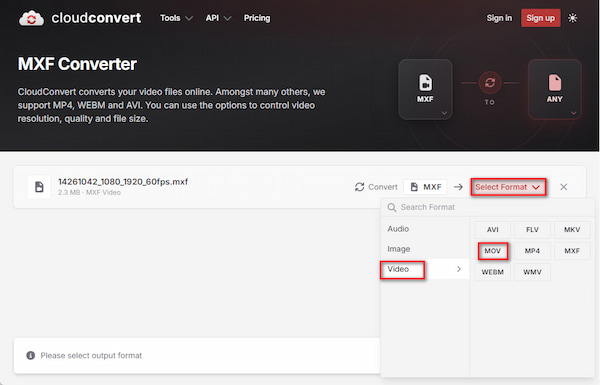
3. After that, click the bottom Convert button to begin the video conversion process. When it is done, click Download to save the exported MOV file to your computer.
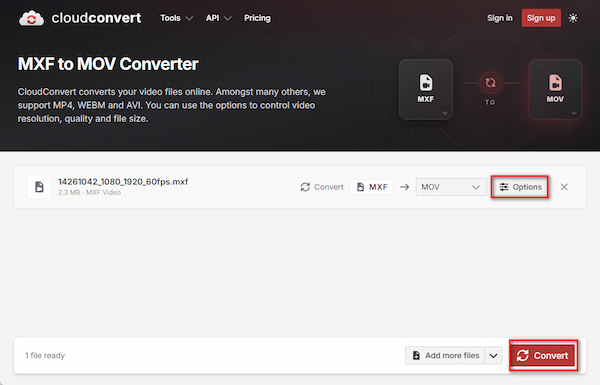
CloudConvert works like a charm for short 100MB clips when you're away from your main editing rig. But for full shooting days, uploading gigabytes of MXF footage over home Wi-Fi will quickly become a bottleneck—stick to desktop tools for serious workflows.
How to convert MXF to MOV on Mac without losing quality for Final Cut Pro?
You can use FFmpeg to convert MXF to MOV, and you can set the video codec to Apple ProRes 422, which is FCP's native format.
Is there a free way to convert MXF to Apple ProRes MOV?
Yes. Many free tools can do this, such as FFmpeg and the free version.
How to batch convert large MXF camera card files to MOV quickly?
You can use the AnyMP4 Video Converter Ultimate to batch-input and convert MXF files to MOV. With GPU acceleration, the process will be fast and smooth.
What is the best FFmpeg command to rewrap MXF to MOV without re-encoding?
This command is suitable: ffmpeg -i input.mxf -c:v copy -c:a pcm_s16le output.mov.
This article talks about the 3 different ways to convert MXF to MOV. Each way has unique features and is suitable for different situations. If you want to process large MXF files and convert them at high speed, AnyMP4 Video Converter Ultimate is good for its batch conversion and GPU acceleration. If you want to convert several MXF files for free, HandBrake is enough. If you want a fast and convenient way to handle small MXF clips, CloudConvert also provides an easy workflow.
 Updated by Alice Thorne to Convert Video
More readings
 5 Ways to Convert MP4 to MP3 Free - Extract Audio from Video
It is easy to extract audio from MP4. Learn about 5 ways from this guide to convert MP4 to MP3 online or offline without quality loss on Windows and Mac.
 2026 Convert RMVB to MP4 with 3 Best Tools (No Quality Loss)
Need to convert RMVB to MP4? Discover 3 pro-grade methods to fix playback failures, batch transcode files seamlessly, and preserve original video quality.
 MKV to WAV Guide: 3 Best Tools to Extract Lossless Audio
Read this MKV to WAV guide to learn how to extract WAV from MKV safely and flawlessly with the best desktop and online tools.
 How to Turn WAV to Video for Social Media in 4 Ways
Want to upload your WAV audio to IG, YouTube, or TikTok? Discover 4 quick ways to convert WAV to video. Add visuals to your audio and export high-quality video.
 Add your comments to join the discussion here