Adobe Screen Recorder Review: Is Captivate Worth It for Screen Capture
Quick Verdict:
Adobe Captivate is a powerhouse for professional instructional designers who need complex, interactive eLearning simulations. However, as a standalone screen recorder, it is overwhelmingly complex and expensive. If you simply need to capture high-quality videos for YouTube, gaming, or quick tutorials without a steep learning curve, a lightweight alternative like AnyMP4 Screen Recorder is a much smarter and more cost-effective choice.
When you want to capture smart videos for eLearning or video tutorials, Adobe Screen Recorder enables you to create responsive content with a powerful authoring tool. In this article, we will provide a detailed tutorial to help our readers learn how to record eLearning videos using Adobe Captivate. We will provide a detailed step-by-step guide to recording the screen using the software, as well as the best screen recording alternative for taking eLearning videos.
Part 1. Quick Verdict About Adobe Captivate
Adobe Captivate is a powerhouse for professional instructional designers who need complex, interactive eLearning simulations. However, as a standalone screen recorder, it is overwhelmingly complex and expensive. If you simply need to capture high-quality videos for YouTube, gaming, or quick tutorials without a steep learning curve, a lightweight alternative like AnyMP4 Screen Recorder is a much smarter and more cost-effective choice. As such, the alternative may be considered one of the best screen recording tools for eLearning.
Part 2. What is Adobe Screen Recorder
Adobe Captivate is the exclusive AI-supported eLearning tool designed to produce interactive and immersive online education materials, such as quizzes, training, and simulations, without the need for advanced coding skills. As such, the program is equipped with a reliable screen recorder feature, thus making Adobe Captivate functionally reliable as a screen recorder tool.
Learn more details about how to record the screen with Adobe Captivate by following our step-by-step guide below:
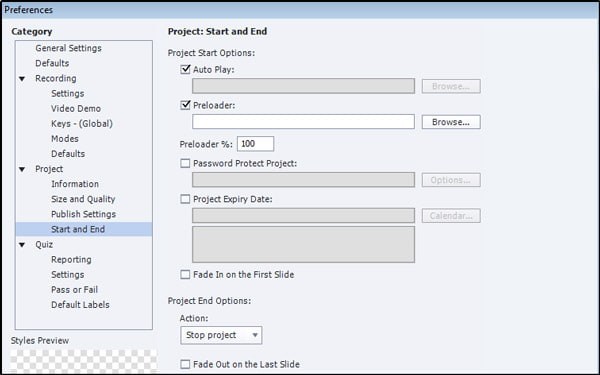
1. Before recording a video tutorial with the Adobe screen recorder, you can go to the
Preferences option from the Edit menu. After that, you can tweak the video and audio settings from the Size and Quality option under the Project option.
2. Choose the File menu and choose the Video Demo option from the Record a New option. After that, you can click the Screen Area option based on what you want to record and specify the associated options, such as the Screen Area, Custom Size, Full Screen as desired.
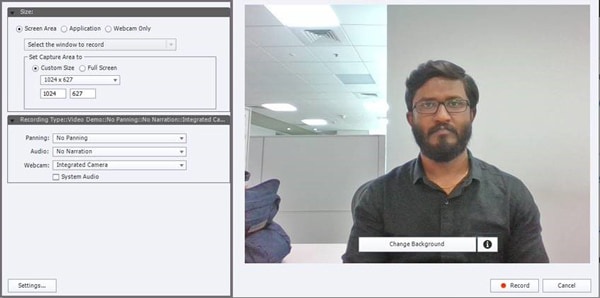
3. If you want to add narration during the recording process, you can select the desired audio channel, such as the System Audio to record the audio files from your computer. After that, you can click the Record option to get the desired recorded file.
4. Once you have stopped the recording, you can locate the first slide in the work area of Adobe screen capture. All of your slides are shown in the filmstrip, as well as the movement of our mouse on the screen within the Demo mode as desired.
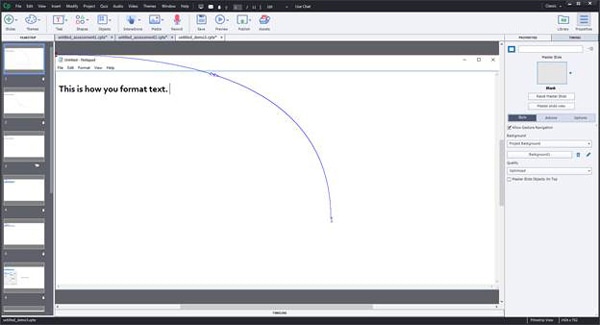
5. After that, you can playback the recorded video within preview mode. You have the option of publishing the video to the Internet, such as YouTube, eLearning system, or saving it to your computer. You can also edit the video before publishing or saving the file. (Find Adobe PDF editor here.)
To learn whether Adobe Captivate is good for screen recording, make sure to read the program’s key screen recording features in the next section of the article.
Part 3. Key Screen Recording Features in Adobe Captivate
Responsive Screen Recording
To help their users enjoy an automated screen recording process, Adobe Captivate automatically adapts to record your screen regardless of what device you are using. This was made possible by the program automatically rearranging the content on your screen based on screen size whenever you are recording using a desktop, tablet, or smartphone. Additionally, it can capture screen recordings with Adobe system audio to improve your eLearning materials.
Panning and System Audio Integration
To provide more control to its users, Adobe Captivate allows its users to record a larger screen area while being supported by a free panning system that makes moving the focus of the screen possible via simple mouse movement or remote control. You may also customize your presentations to include system audio or not.
Interactive Simulations
Finally, the best feature available in the program as an eLearning software is its built-in Watch, Try, and Be Tested functions. Which gives the users a seamless feature to test the knowledge or skills that their students or audience learned.
Part 4. Pros and Cons of Adobe Screen Recorder
For a quick overview of the strengths and limitations of the program, we have provided Adobe Captivate’s pros and cons below:
PROS
- Equipped with advanced tools for producing quizzes, learning courses, and simulations.
- Integrated with the Adobe ecosystem, giving it access to Adobe Cloud and other multimedia tools.
- Strong screen capture tools optimized for producing tutorials and learning materials.
CONS
- Steep monthly subscription pricing.
- Its learning curve is extremely steep. Very hard to learn.
- Most of its features are far too advanced, especially if you only want to use it as a screen recorder.
Part 5. Pricing: How Much Does it Cost
If you want to learn how much Adobe Captivate’s premium pricing is, make sure to read all of its paid plans:
| Adobe Captivate Pricing Plans |
Cost |
| Individual Subscription |
$33.99 per month (billed annually) |
| Free Trial |
Free (7 Days) |
| Education/Student Plan |
$399 one-time or special educational offers. |
| Team & Enterprise |
Customizable |
Among these pricing plans, the Education/Student Plan may be considered the best value option since Adobe Captivate is primarily designed for it. If you only want to use the software as a screen recording tool, we recommend using the alternative screen capture tool we have provided in the next section.
Part 6. Best Adobe Screen Recorder Alternative
AnyMP4 Screen Recorder as an Alternative
While Adobe Captivate shines in corporate training environments, its hefty price tag and bloated interface make it overkill for 90% of everyday users. If you are frustrated by Adobe's steep learning curve, you need a tool that 'just works' out of the box.
This is where AnyMP4 Screen Recorder steps in as the perfect alternative. It gives you the HD recording quality of Adobe without the headache, allowing you to record screens, gameplay, and webcams seamlessly.
If you just need to capture files to YouTube or other social media sites, AnyMP4 Screen Recorder is one of the most versatile and simple screen recorders to capture onscreen activities, including screen video, microphone, webcam, system sound, and more.
Moreover, you can also tweak the video/audio settings, add a mouse cursor/callouts/watermark, edit the screen recording, and even manage the recorded files as an Adobe screen recorder.
Recommendation
- Capture onscreen activities, such as videos, audio files, and snapshots.
- Tweak the frame rate, video/audio quality, recording hotkeys, and more.
- Add annotations, shapes, watermarks, callouts, and other elements.
- Manage the recorded files, such as viewing, deleting, sharing on social media, etc.
1. Download and install the Adobe screen recorder alternative. You can launch the program on your computer. Click the Video Recorder menu to choose the Gear icon to tweak the mouse cursor, hotkeys, video settings, and other parameters.
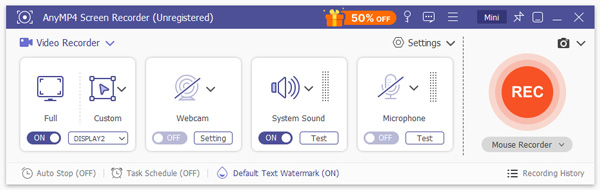
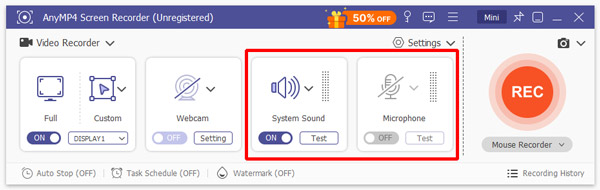
2. Go back to the home interface and select the Video Recorder menu. Tweak the special window with the Custom option and drag the red point on the side, or input the width and length of the bar to select the size. You can also enable the Webcam option and the System Sound option.
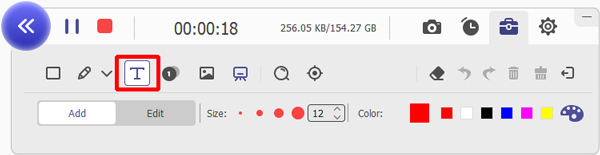
3. After that, you can click on the REC button to capture the videos for the eLearning file. During the recording process, you can make a drawing, add annotations, tweak the color/size, and more. Of course, you can also take a snapshot by clicking the Camera icon.
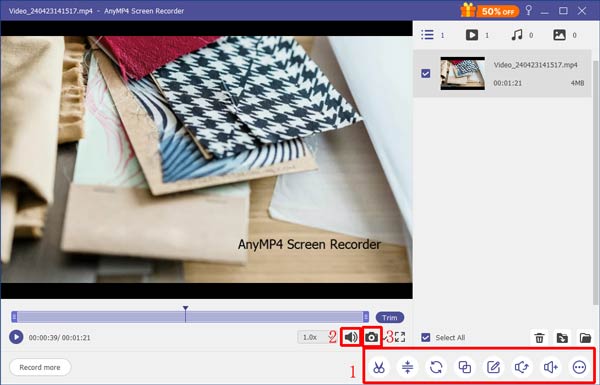
4. If you want to stop recording, click the red square in the top left corner. You can also adjust the start point and the end point, tweak the audio volume, or even re-record the file. Go to the Recording History icon to manage the recorded video with ease.
Adobe Captivate vs. AnyMP4 Screen Recorder
| Feature / Dimension |
Adobe Captivate (Screen Recording) |
AnyMP4 Screen Recorder |
| Best For |
Professional eLearning & Interactive Simulations |
YouTubers, Gamers, Quick Tutorials & Meetings |
| Learning Curve |
Very Steep (Requires training) |
Extremely Easy (Beginner-friendly) |
| Interface |
Heavy and Complex |
Lightweight and Intuitive |
| Real-time Annotation |
Limited during recording |
Yes (Draw, add text, arrows in real-time) |
| Pricing |
Expensive Subscription ($33.99/month) |
Affordable one-time fee or low subscription |
| System Resource Usage |
High (Prone to lag on older PCs) |
Low (Smooth 60fps recording) |
Part 7. FAQs About Adobe Screen Recorder
What is the Panning Feature of Adobe Screen Recorder?
It allows you to record the screen that is outside the red recording area. Once you have enabled the panning feature within the Adobe screen capture, you can click the mouse outside of the recording area. It moves the recording area to include the area on the screen where you clicked.
How to Import Media and Audio into Adobe Screen Recorder?"
To import WAV and MP3 onto the objects and slides in Adobe Screen Recorder, you can click the Audio menu and select the Object option from the Import to option. Then you can select the sound effect and click the Open button to preview the sound.
Does Adobe have a free screen recorder?
No, Adobe does not offer a dedicated, free desktop screen recorder. Its screen recording feature is built into Adobe Captivate, which requires a paid subscription after the initial free trial.
Is Adobe Captivate good for recording YouTube videos?
While it can record high-quality video, Adobe Captivate is generally too complex and resource-heavy for standard YouTube tutorials. Creators usually prefer lightweight tools like AnyMP4 Screen Recorder or OBS for YouTube content.
How do I record system audio with Adobe Screen Recorder?
To record internal system sound alongside your microphone in Adobe Captivate, you need to configure the audio settings before starting the "Video Demo" mode and ensure "System Audio" is checked in the recording preferences.
Conclusion
When you want to learn more details about the Adobe screen recorder, you can learn more about a brief tutorial within the article. If Adobe Captivate is too complicated for you, or you just need some video tutorials for YouTube, AnyMP4 Screen Recorder is one of the best Adobe screen capture alternatives you can take into consideration.