How to Convert WebM to WAV Without Audio Sync Issues
Quick Summary
To convert WebM to WAV cleanly without timeline lag, extract the audio stream and convert it into uncompressed 16-bit or 24-bit PCM WAV at a locked 48kHz sample rate:
- For quick, single web clips (<50MB): Use a free browser-based tool like AnyMP4 Free Audio Converter Online to extract the sound instantly without installing software.
- For detailed audio editing & trimming: Use Audacity, but make sure to install the optional FFmpeg library first so it can recognize video containers.
- For command-line power users: Run the FFmpeg command ffmpeg -i input.webm -vn -c:a pcm_s16le output.wav to strip video and export PCM audio instantly.
- For video editors, podcasters & large batches: Use AnyMP4 Video Converter Ultimate to batch-demux gigabytes of video with GPU acceleration while locking the sample rate to 48kHz to prevent audio drift.
Have you ever tried dropping a downloaded web WebM video into your video editor, only to watch your computer freeze up? Or worse, the sound plays two seconds behind the speaker's lips? If yes, then you are not alone.
WebM files are everywhere across the web, but they can be a real headache to edit. The easiest fix is to convert WebM to WAV before you touch your timeline. Read this guide to know why this happens and look at the best ways to get clean, uncompressed audio out of your WebM videos.
Why You Need to Extract WAV Audio from WebM Video
Think of a WebM file like a tightly packed suitcase. Inside that suitcase, two completely different things are crammed together: a VP8/VP9 video codec (the moving picture) and a compressed Vorbis/Opus audio stream (the sound).
Web browsers like this setup because it keeps file sizes small for smooth streaming. But the moment you drop that file into a video editor, your computer has to work overtime to unpack and decode both heavy streams at once.
WebM NLE Timeline Sync
Most Non-Linear Editors (NLEs) like Adobe Premiere Pro, DaVinci Resolve, or Final Cut Pro are built for standard broadcast media, not web streams.
When you scrub back and forth on your editing timeline, your computer's processor has to work overtime to decode the compressed Opus audio on the fly. This causes major playback stutter. Even worse, web videos often use fluctuating frame rates. This leads to nasty audio drift, where your sound slowly slips out of sync with the speaker's mouth as the video plays.
Demux Vorbis and Opus Streams into Uncompressed PCM Audio
To fix this mess, you need to perform video demuxing, which just means pulling the audio track out of the video suitcase completely.
Converting that audio track into a standard WAV file gives you pure, uncompressed PCM audio. When you lock that WAV file to a broadcast-standard sample rate (48kHz), your editing software can read the raw sound data instantly. You get a smooth, scrubbable timeline with rock-solid NLE timeline sync.
Quick Online: Convert WebM to WAV Instantly
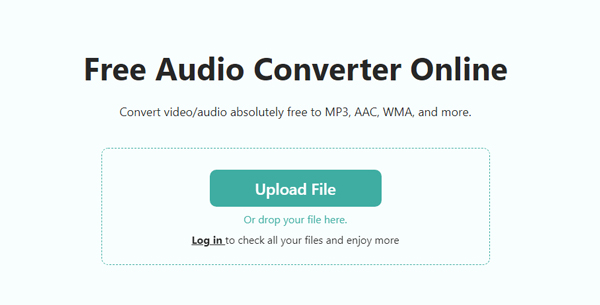
If you only have one small WebM video and do not want to install any new apps, an online tool is your fastest choice. AnyMP4 Free Audio Converter Online extracts the WAV audio stream from your WebM file right inside your browser on a computer and a mobile phone. Unlike other online converters covered in flashing ads and fake download buttons, it runs cleanly and keeps your computer safe with a quick and clean interface. It lets you get your WAV file without adding watermarks or forcing you to create an account.
1. Open your browser and go to the AnyMP4 Free Audio Converter Online page.
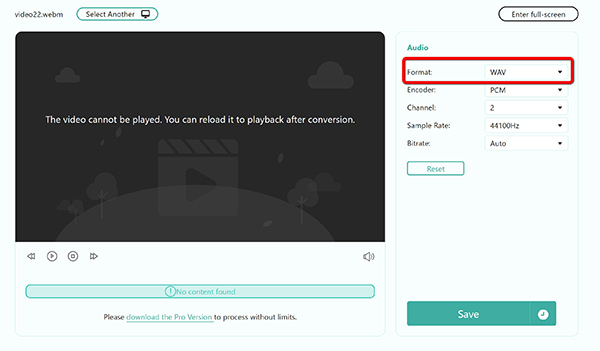
2. Select WAV from the list of audio output formats on the right side. Besides, you can change the audio encoder, frame rate, bitrate, and more audio settings.
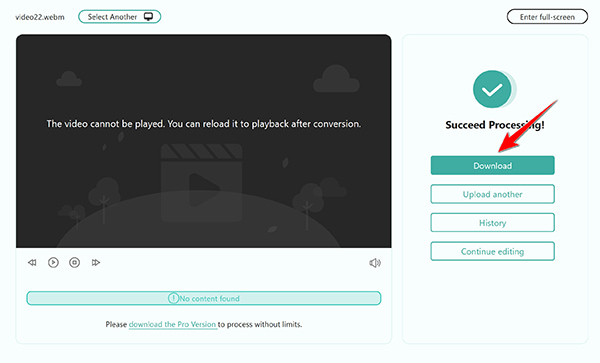
3. Click Save to start converting WebM to WAV. Once the conversion is done, just download the new WAV file on your computer.
Web extraction is perfect for a 50 to 100 MB meme video or short clip. However, I noticed that if you try to upload a large WebM webinar recording, the browser tab will aggressively consume RAM and likely crash before the demuxing process finishes. Keep your web uploads strictly to short, lightweight clips.
Open-Source Audio Editor: Convert WebM to WAV in Audacity
Audacity is a free audio tool for Windows and Mac, offering deep editing and waveform inspection features. But here is the catch: Audacity cannot open WebM files natively out-of-the-box.
It forces you to hunt down, download, and manually link an external FFmpeg.dll library before it even recognizes the container format. If you need a free WebM to WAV converter for Mac or Windows and do not mind the setup curve, it gets the job done.
To understand how web media formats differ under the hood, take a look at our guide on what is WebM.
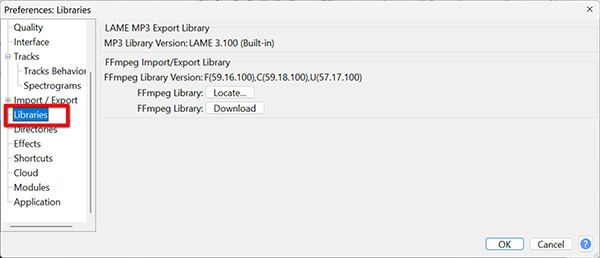
Before dragging your file into the workspace, you must link the FFmpeg library in your preferences.
1. Open Audacity. Go to Edit > Preferences > Libraries (or Audacity > Preferences > Libraries on Mac) and verify your external FFmpeg library is linked.
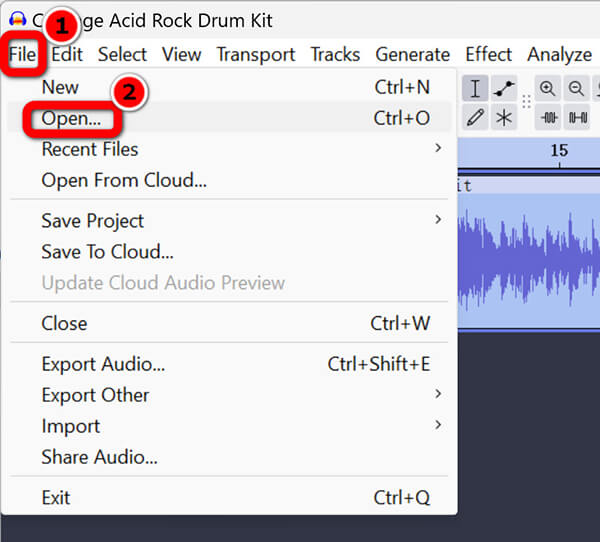
2. Go to File > Open and select your WebM video. Audacity will strip the video track and display the raw audio waveform.
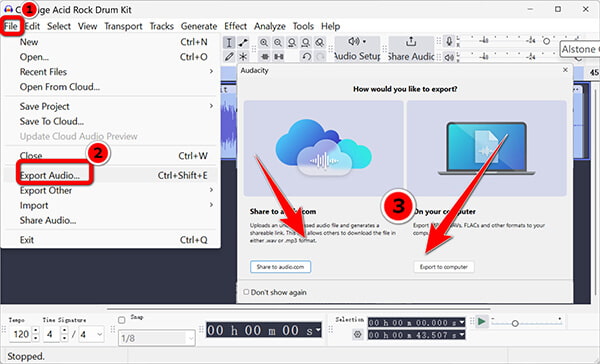
3. Click File > Export Audio > Select the place you want to save the exported WAV file from local computer or cloud service.
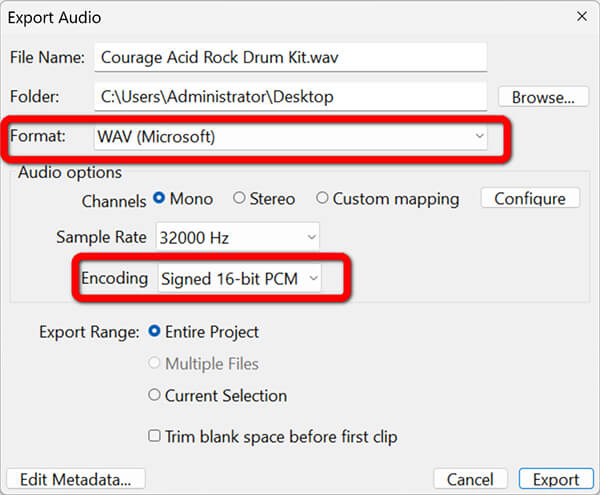
4. In the Export Audio window, select WAV from the Format dropdown list. Then set the sample rate as 32000 or 48000 Hz (48kHz) at the project rate menu, and choose the Encoding. Then click Export.
If you drag a WebM directly into a fresh install of Audacity, it throws an error immediately. I spent 15 minutes hunting down the external FFmpeg library online, installing it, and linking it in the preferences just to get the waveform to appear. It is powerful, but the setup friction for just one file is exhausting.
If you ever need to inspect or listen to raw audio outputs without loading an entire editor, having a solid WAV player handy makes spot-checking quick.
2 Free Methods: VLC Media Player and FFmpeg Command Line
For users who already have VLC installed or prefer working directly inside a terminal, these free options let you rip uncompressed audio from WebM.
Option A: VLC Media Player (Desktop App)
VLC plays almost any media file under the sun, but its internal conversion tool is buried behind a confusing series of menu screens.
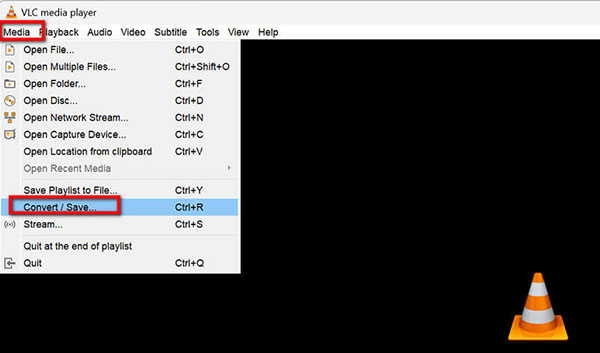
1. Open VLC and click Media > Convert / Save (or File > Convert / Stream on macOS).
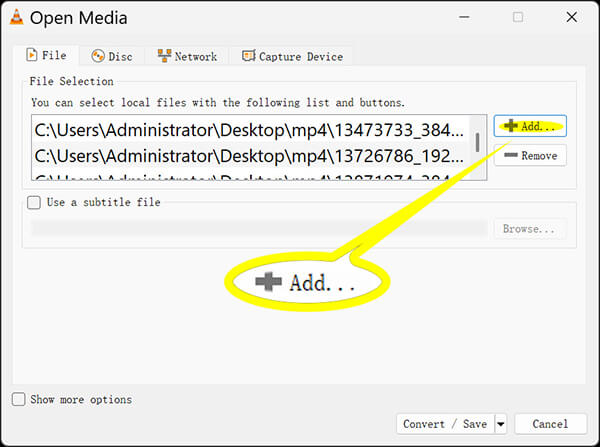
2. Click Add and choose your WebM file, then click the Convert / Save button at the bottom.
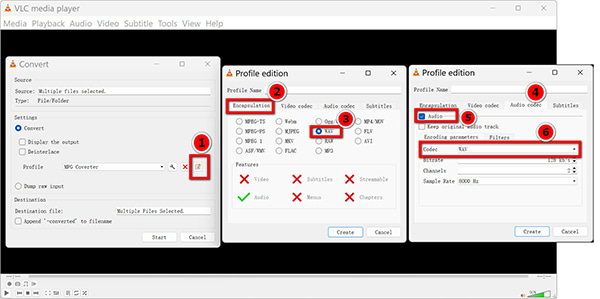
3. In the Profile section, click the Wrench icon to edit the conversion profile.
Under Encapsulation, select WAV. Under Audio codec, check the Audio box, select WAV / PCM, and set the sample rate to 48000 Hz.
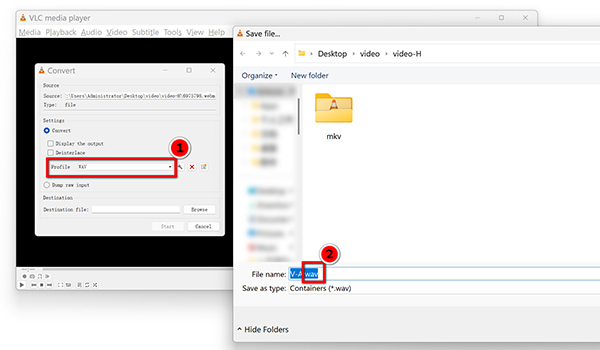
4. Pick your destination folder and click Start to convert WebM to WAV instantly.
If you run into playback issues while previewing files before conversion, check out our guide on finding a dedicated WebM player to check your media.
Since VLC is built to be a media player, extracting audio can feel a bit like a workaround. I used the 'Convert/Save' menu, but because I forgot to click the tiny wrench icon and change the encapsulation to 'Raw Audio', VLC ended up giving me a completely empty, unplayable 0-byte file. Make sure you double-check all your profile settings before you hit start.
Option B: FFmpeg Command Line (For Power Users)
FFmpeg is a command-line tool with no graphical interface, so it can feel a bit intimidating. You have to type exact commands to strip out the video track without crashing the window.
1. Open your Terminal (macOS) or Command Prompt (Windows)
- • Command Prompt (Windows): Press Win + R to open the Run box, type cmd, and hit Enter. You can also press the Windows key, type cmd into the search bar, and click on Command Prompt.
- • Terminal (macOS): Press Command + Spacebar to open Spotlight, type terminal, and hit Enter. You can also find it by opening Finder, going to Applications, opening the Utilities folder, and double-clicking Terminal.
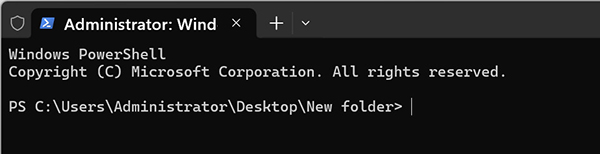
2. Run this exact command to convert a WebM file to WAV audio:
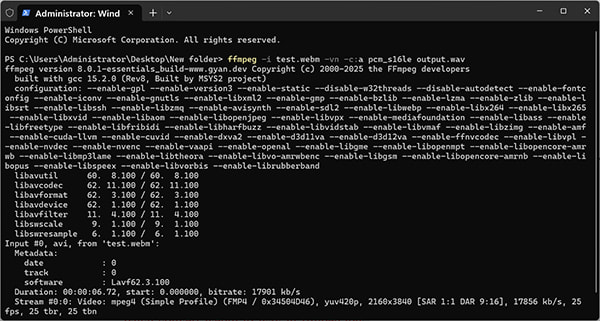
ffmpeg -i input.webm -vn -c:a pcm_s16le output.wav
- • -i input.webm: Points directly to your source video.
- • -vn: Disables the video track entirely (strips the VP8/VP9 stream).
- • -c:a pcm_s16le: Encodes the audio stream as uncompressed 16-bit PCM WAV.
- • output.wav: Generates your clean audio file.
3. Run this exact command to convert multiple WebM to WAV:
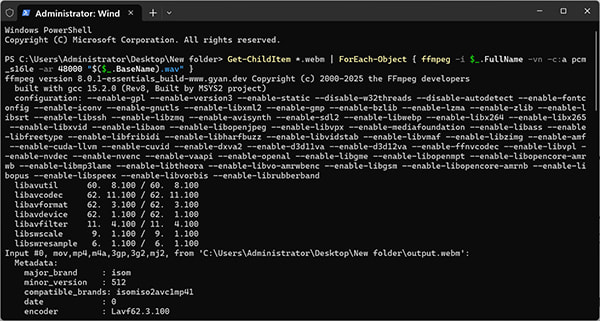
• For PowerShell:
Get-ChildItem *.webm | ForEach-Object { ffmpeg -i $_.FullName -vn -c:a pcm_s16le -ar 48000 "$($_.BaseName).wav" }
• For DOS:
for %i in (*.webm) do ffmpeg -i "%i" -vn -c:a pcm_s16le -ar 48000 "%~ni.wav"
Note
If you run this in a .bat batch script, replace %i and %~ni with %%i and %%~ni
• For macOS / Linux (Terminal / Bash / Zsh):
for file in *.webm; do ffmpeg -i "$file" -vn -c:a pcm_s16le -ar 48000 "${file%.webm}.wav"; done
After that, you can find the converted WAV file in the same folder as the source WebM file.
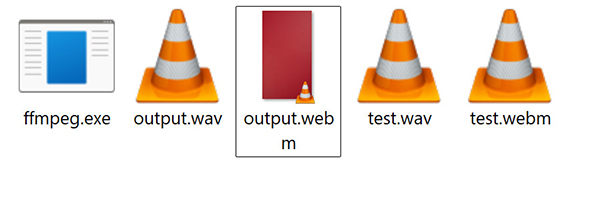
Double-check your flags before hitting Enter. If you forget to type the -vn flag, FFmpeg will try to process the massive VP9 video track alongside the audio, skyrocketing your CPU usage to 100% and taking ten times longer.
Video Editor's Choice: How to Batch Convert WebM to Lossless WAV Offline
When you have a dozen gameplay captures or an entire archive of podcast recordings, converting files one by one is painful.
AnyMP4 Video Converter Ultimate natively solves the Audacity FFmpeg.dll headache and eliminates VLC's 0-byte nightmare. It is a powerhouse offline extractor that batch-rips gigabytes of WebM podcast videos via GPU acceleration. At the same time, it strictly locks the WAV sample rate to 48kHz PCM to mathematically prevent audio drift in Premiere Pro and other NLEs. It lets you batch convert WebM to lossless WAV files in just two clicks.
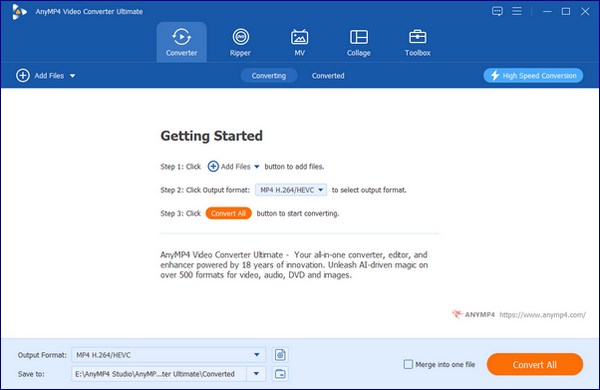
1. Free download and launch AnyMP4 Video Converter Ultimate on your PC or Mac.
Drag and drop your entire batch of WebM videos directly into the main window.
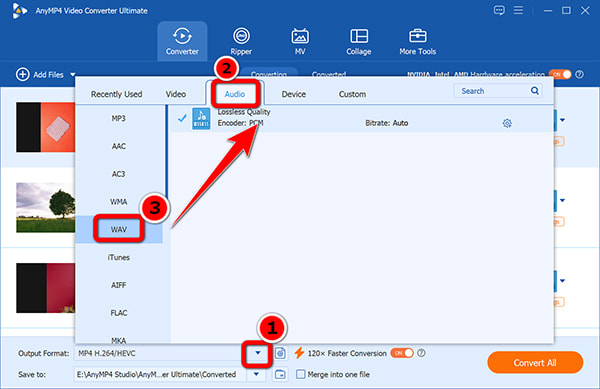
2. Click the Output Format dropdown in the bottom-left corner. Navigate to the Audio tab, select WAV, and pick the lossless quality.
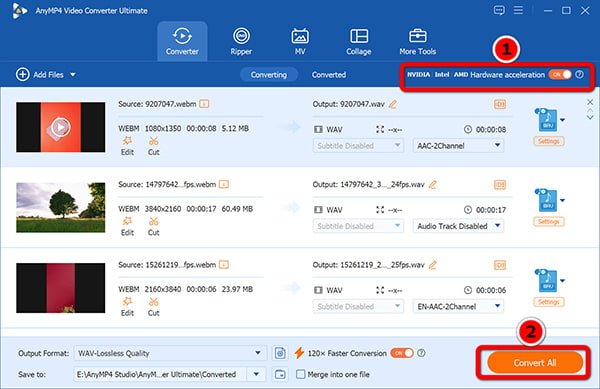
3. Choose your output folder at the bottom, enable the GPU acceleration at the top-right corner, and click Convert All to start the WebM to WAV conversion.
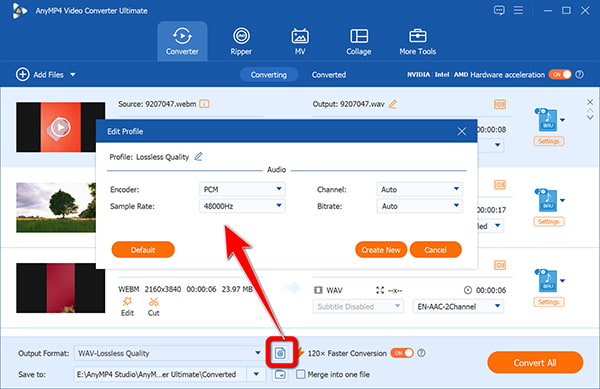
Do not just click 'Convert All' blindly. WebM videos often use fluctuating sample rates for web streaming. You MUST click the gear icon (Custom Profile) and lock the WAV sample rate to exactly 48000 Hz. If you leave it on 'Auto', you run the risk of severe audio drift when aligning the WAV with your video track later.
Which Is the Best Software to Batch Convert WebM to Lossless WAV
We tested all 5 tools on a standard PC using a test batch of 20 WebM clips (800MB total) encoded with VP9 video and Opus audio. Here is how they stacked up across our lab metrics:
If you often work with mixed web containers, learning about MKV vs WebM can also help you choose the right capture format.
|
Demuxing Success Rate |
Batch Speed (20 Files, 800MB) |
Setup & UI Friction |
Timeline Sync Integrity |
| AnyMP4 Free Audio Converter Online |
92% (fails on files > 500MB) |
N/A (manual single-file) |
0 clicks (runs in browser) |
Matches source |
| Audacity |
100% (only if FFmpeg linked) |
14m 12s (via Macro chain) |
High (requires manual DLL setup) |
Matches source |
| VLC Media Player |
65% (user error prone) |
18m 45s (slow transcode) |
High (8 hidden clicks) |
Prone to drift |
| FFmpeg CLI |
99% (rock solid) |
2m 14s (via batch script) |
High (requires Terminal/CMD knowledge) |
Stable |
| AnyMP4 Video Converter Ultimate |
100% (native engine) |
1m 18s (via GPU) |
Low (2 clicks) |
Flawlessly locked to 48kHz |
FAQs
Why does my extracted WAV file sound out of sync with the original WebM video?
This usually happens because of variable frame rates or mismatched sample rates. Web audio is often saved at 44.1kHz using floating timestamps. When you drop that into a 48kHz video project, the sound slowly drifts out of place over time. Converting your file to an uncompressed 48kHz PCM WAV fixes this by locking the audio clock in place.
Can I extract audio from a WebM video using Windows Media Player?
No. Windows Media Player does not have built-in support for VP8/VP9 video or Vorbis/Opus audio streams. It cannot open WebM files or separate the audio from the video. You will need to use a browser-based extractor or a dedicated converter app instead.
Is extracting Vorbis audio from WebM to WAV a lossless process?
Technically, converting from Vorbis or Opus to WAV is not completely lossless because Vorbis and Opus are compressed web formats to begin with. However, demuxing and saving as uncompressed PCM WAV creates a 1:1 decoded copy without adding any extra compression artifacts or generation loss.
Why did Audacity give me an "Import Error" when I dragged my WebM file in?
Audacity is an audio editor that lacks built-in demuxers for video containers. When you drop a WebM video into Audacity without the external FFmpeg library installed and linked in your preferences, it cannot read the file. Once you link the library, the error goes away.
Conclusion
Choosing the best way to convert WebM to WAV depends on your project size and workflow:
- • For casual users with a short clip (under 3 minutes): Use AnyMP4 Free Audio Converter Online. It pulls the audio right inside your browser, requires no software installation, and has no annoying ads.
- • For tech-savvy tinkerers: Use FFmpeg CLI or Audacity. They give you full control over your settings for free, as long as you do not mind typing terminal commands or finding manual plugins.
- • For video editors, podcasters, and large archives: Use AnyMP4 Video Converter Ultimate. It processes gigabytes of files offline using your computer's hardware, requires no setup, and locks your audio to 48kHz PCM so your timeline stays perfectly in sync.



 Add your comments to join the discussion here