How to Convert WebM to MP3: 4 Best Ways (Lossless & Fast)
At a Glance:
- Best for High-Quality & Large Files: AnyMP4 Video Converter Ultimate (Extracts 320kbps MP3 in seconds with GPU acceleration).
- Best for Quick, Small Files: AnyMP4 Free Online Video Converter (No installation needed).
- Best Free Open-Source: VLC Media Player (Requires manual codec tweaking).
- Key Takeaway: For WebM files over 100MB or when audio fidelity matters, desktop software is significantly faster and more secure than cloud tools.
You download a crisp WebM video or record a live browser stream. You drop the file onto your phone or plug it into your car stereo, and... nothing happens. It simply won't play. Or worse, you try to upload a 2GB podcast video to a free website, and you end up staring at a loading bar for three hours. It is a total headache. We know exactly how frustrating it is when your media refuses to cooperate, but we got the solution, just convert WebM to MP3. In this guide, we will show you exactly 4 ways to extract audio from WebM in high-quality with 320kbps without limits.
Why You Need to Convert WebM to MP3
WebM is an awesome format for web browsers. It compresses video data perfectly so YouTube videos load fast. But it is terrible for pure audio playback.
Most built-in car stereos, older smartphones, and basic music apps simply won't read a WebM file. MP3, however, remains the undisputed king of audio formats. It is the industry standard. It works universally on literally any device. By turning your WebM file into an MP3, you instantly fix the compatibility issue forever. Plus, stripping away the video data saves a massive amount of storage space on your hard drive.
Method 1: The Best Way to Convert WebM to MP3 Losslessly (Recommended)
Let's cut right to the chase. If you want the best results without the headache, you need a dedicated desktop tool. We highly recommend using AnyMP4 Video Converter Ultimate. Using this software is incredibly straightforward. You don't need to be a tech wizard. The interface does all the heavy lifting for you, allowing you to batch-process dozens of files at once.
- • Lightning-Fast Batch Processing: It uses GPU Hardware Acceleration (NVENC/QSV). Stop waiting for slow cloud uploads. You can convert a 2-hour WebM podcast into an MP3 in seconds directly on your hard drive. This frees up your CPU so your computer doesn't freeze up while you work.
- • Studio-Grade Audio Extraction: It supports custom audio bitrates up to 320kbps. Don't settle for the muddy 128kbps audio that free web tools force on you. Preserve the crystal-clear Opus or Vorbis audio from your original WebM files.
- • Zero Privacy Risks: It offers 100% offline processing. Are you converting sensitive meeting recordings or personal streams? Keep your files completely offline. You get zero uploads to third-party servers and zero file size limits.
1. Download and install AnyMP4 Video Converter Ultimate on your Windows 11/10 PC or Mac.
Open the program. Click the big + icon in the center or click Add Files to load up your WebM videos. If you want to batch convert WebM files, just put them in one folder to add them in one time.
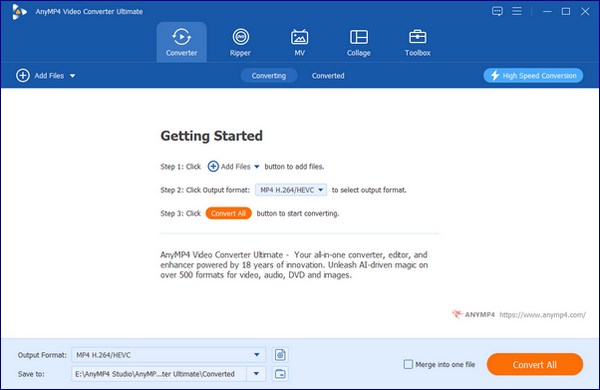
2. Look at the bottom left corner. Click the Output Format dropdown menu. Switch to the Audio tab, pick MP3, and select the High Quality preset.
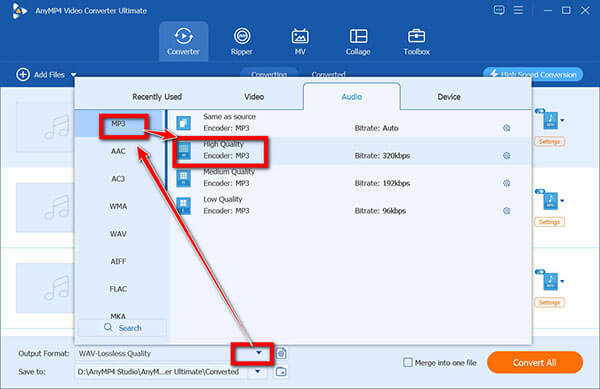
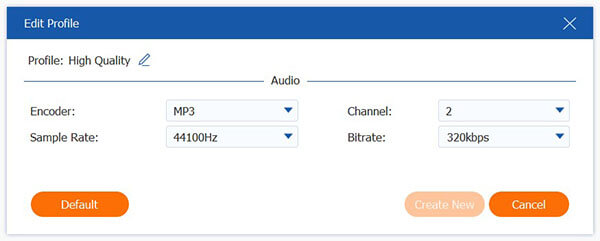
Want maximum quality? Click the Custom profile icon next to the preset. Change the bitrate to 320kbps and hit OK.
3. Click the big orange Convert All button in the bottom right to start converting WebM to MP3. Do not forget to enable the GPU acceleration at the top-right corner to speed up the WebM to MP3 conversion process.
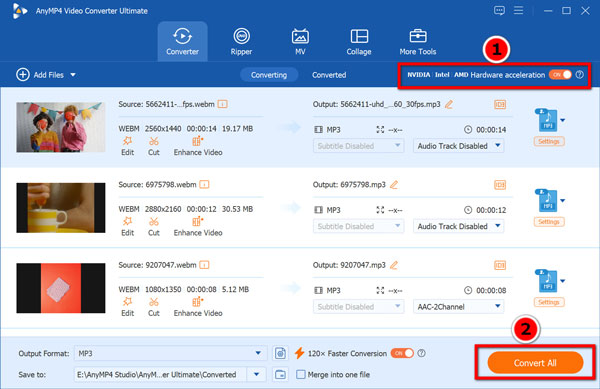
This is the absolute easiest and fastest way to get pristine MP3s from giant WebM files. The hardware acceleration is a total game-changer. You save time, you save quality, and your data stays private.
Method 2: How to Convert WebM to MP3 Online for Free
Sometimes you just have a tiny file. You don't want to install new software for a one-off task. We completely understand. For those moments, AnyMP4 Free Online Video Converter is a fantastic, lightweight alternative. This is a browser-based tool. It handles the heavy computing on a secure cloud server and simply gives you the final download link.
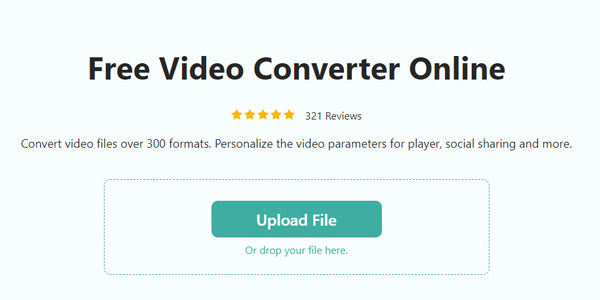
1. Open your web browser and go to the AnyMP4 Free Online Video Converter page. Click the Upload File button to select the WebM file from your computer.
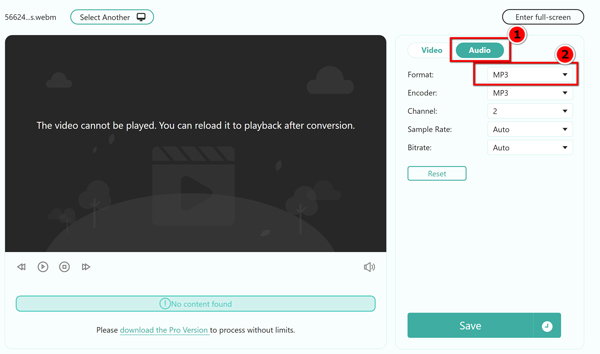
2. Switch to the Audio tab, and select MP3 from the list. Besides, you can adjust the bitrate to 320kbps to output a high-quality audio file.
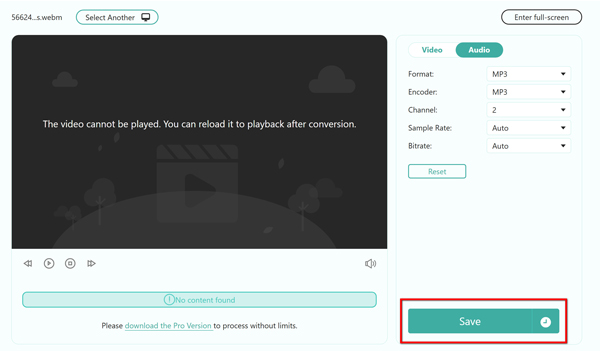
3. Click Save, this freeware will process your WebM file, and once the process is done, you can download the converted MP3 to your computer.
This web tool is perfect for short, quick clips. Just keep in mind that big files will take much longer because you are at the mercy of your internet upload speeds. The only drawback is that it only supports handling WebM to MP3 conversion one by one. For batch conversion, you can turn to its pro version to download the desktop software.
Method 3: How to Convert WebM to MP3 in VLC Media Player (Free Open-Source Method)
Are you a bit of a geek? Do you already use VLC to watch movies? You can actually use VLC to convert video to MP3 as an audio converter. It is completely free and open-source. This makes it a solid choice for free-tier users. VLC has a hidden conversion feature. You basically tell the media player to stream the video's audio into a brand-new file instead of playing it on your screen.
1. Open VLC Media Player. Click on Media in the top left corner, then select Convert / Save.
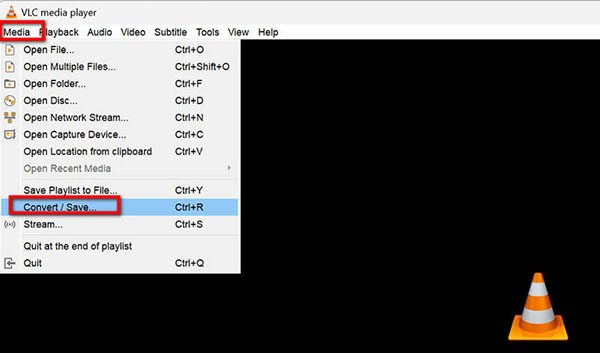
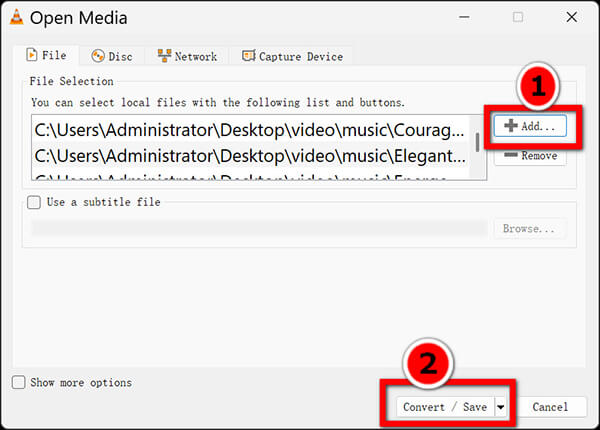
2. In the new window, click the Add button to drop in your WebM file. Then click the Convert / Save button at the bottom.
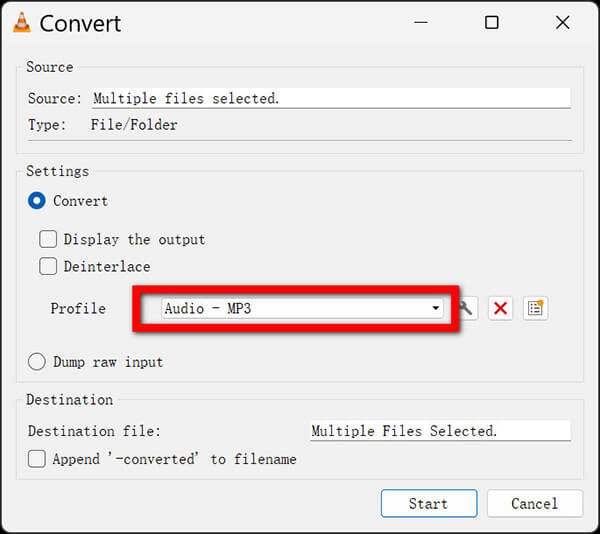
3. Look for the Profile dropdown menu. Select Audio - MP3.
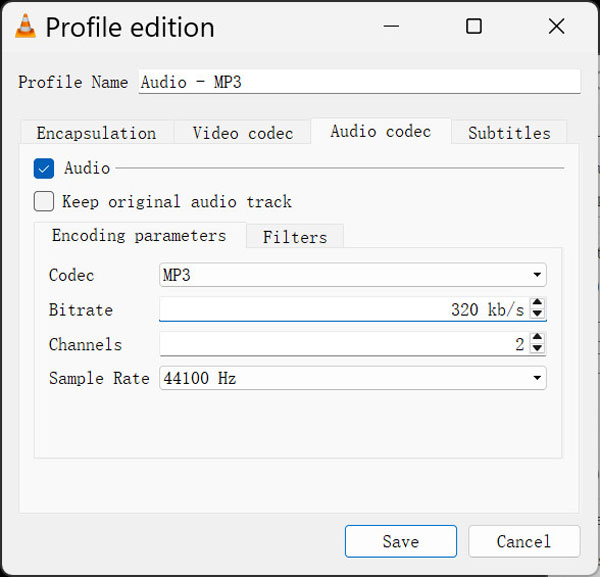
4. To ensure good sound, click the wrench icon (Edit selected profile) next to the dropdown. Go to the Audio codec tab and change the bitrate to 256kbps or 320kbps. Click Save.
5. Click Browse to pick where you want to save the final file, type a name for it, and hit Start.
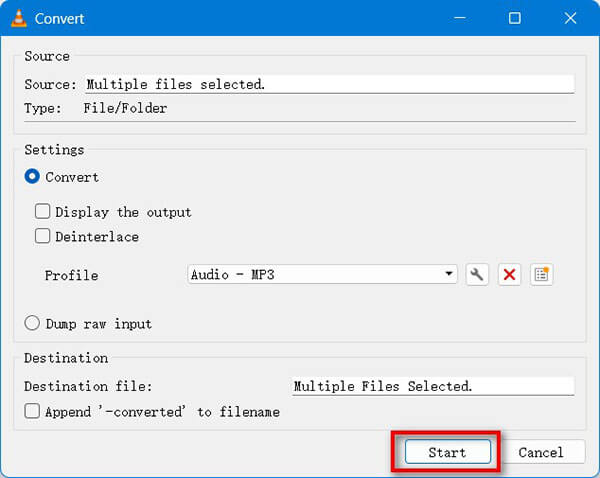
VLC is a great free fallback option. However, the interface is clunky, and it famously lacks batch conversion support for certain file workflows. Because it doesn't use your graphics card, processing big files takes a long time.
Method 4: How to Use FFmpeg to Extract MP3 from WebM (The Power User Way)
If you hate clicking through slow menus and want to feel like a tech wizard, this one is for you. FFmpeg has no user interface. There are no shiny buttons, no sliders, and no fancy graphics. It is a strict command-line tool.
We love FFmpeg because it is insanely fast and completely free. It is actually the secret engine that powers a lot of paid video software on the market today. To use this method, you type a single line of code into your computer's terminal. It tells your operating system to strip out the video and re-encode the audio stream directly. It uses almost zero RAM, so your computer won't lag at all.
1. Download FFmpeg from the official website and install it on your system.
2. Open your Command Prompt (if you are on Windows) or Terminal (if you are on a Mac).
3. Type cd followed by a space, then drag and drop the folder containing your WebM file directly into the terminal window. Hit Enter.
Mistake to avoid: Do not drag your actual .webm video file into the black window. If you do, your computer will immediately spit out a "The directory name is invalid" error. The cd command stands for "change directory", and it can only walk into folders, not files!
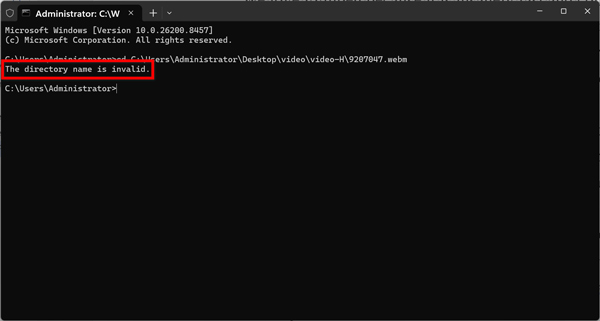
For example, if your WebM file folder is in the folder of WebM-Folder, then here you just need to type:
cd C:\Users\Administrator\Desktop\video\video-H
4. Once you are successfully inside the folder, copy and paste this exact command into the window:
ffmpeg -i input.webm -vn -ab 320k output.mp3
Note: Change input.webm to your actual file name, and change output.mp3 to whatever you want to call your new audio file.
Here is the example:
ffmpeg -i 9207047.webm -vn -ab 320k output.mp3
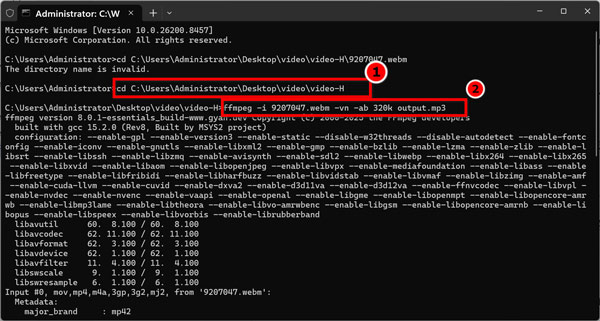
5. Press Enter on your keyboard. White text will flash across your screen, and your MP3 is ready in seconds.
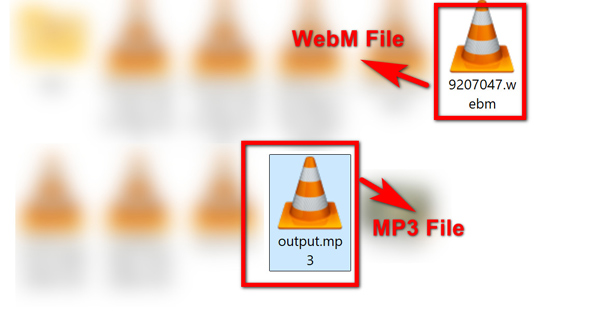
FFmpeg is easily the fastest option on this list. It took just 9 seconds to handle our giant test file. But here is the catch: if you mess up a single letter or space in that command, it breaks. Use this if you like short cuts; skip it if you hate looking at code.
When Converting WebM to MP3, Will You Lose Audio Quality?
WebM files usually use Opus or Vorbis for their audio codecs. These are highly advanced, efficient formats that pack amazing sound into small file sizes.
A lot of people try to take the lazy route. They just right-click their file and rename the .webm extension to .mp3. Do not do this. It is totally useless. Your computer will just get confused, and the file will break.
When you convert a file, you are translating the audio data from one language (Opus/Vorbis) to another (MP3). If you use a cheap web tool, it often crushes the bitrate down to 128kbps automatically. That is why the resulting audio sounds muddy. It creates a weird "underwater sound" distortion. You lose the crisp highs and the deep bass.
To keep the audio pristine, you must use a professional encoder. You need software that can remap the original bitrate correctly. By setting your MP3 output to 320kbps with a tool like AnyMP4 Video Converter Ultimate, you give the audio data enough room to breathe. The result? Zero perceived quality loss. It sounds exactly like the original recording.
FAQs
Does extracting MP3 from a WebM (Opus audio) file reduce the original sound quality?
It entirely depends on your tool. If you use software that supports a custom 320 kbps output, you won't notice any drop in quality. If you use a basic free bitrate converter tool that compresses the file to 128kbps, the sound will drop noticeably.
How can I batch-convert multiple 1GB+ WebM gameplay recordings to MP3 without crashing the browser?
Stop using web browsers for massive files. Browsers crash when memory load gets too high. You need to use a desktop program with GPU-accelerated hardware, like AnyMP4 Video Converter Ultimate. It processes giant batch queues directly on your hardware safely.
Why does the audio sound "muffled" when I use free online WebM to MP3 converters?
Free tools save money on expensive server costs by heavily compressing your uploads. They compress the file's bitrate to speed up processing. That aggressive compression distorts the frequencies, resulting in a muffled, low-quality sound.
Can I extract only a specific 30-second audio clip from a 2-hour WebM video directly?
Yes! High-end desktop tools include a built-in trimmer. You can easily trim the video to the exact 30 seconds you need before converting it. This saves you tons of processing time.
Conclusion
So, which method should you actually use to convert WebM to MP3? Let's make it simple.
The right choice simply depends on what you are trying to do:
- • If you love typing terminal code and want a free shortcut, FFmpeg is blazing fast.
- • If you have zero budget and don't mind a clunky interface, VLC Media Player works in a pinch.
- • If you just need to extract audio from a tiny 50MB clip to drop into a Discord chat, AnyMP4 Free Online Video Converter is quick and painless.
- • If you are a podcast creator, student, or video editor who needs to batch process hundreds of megabytes of WebM files and demands lossless 320kbps audio quality, AnyMP4 Video Converter Ultimate is the absolute best choice. It gets the job done faster and better.






 Add your comments to join the discussion here