 Store
Store- Multimedia
For Windows
- Converter Tools
- Video Converter Ultimate

- Video Converter
- 4K Converter
- MP4 Converter
- Audio Converter
For Mac
- BD/DVD
For Windows
- DVD Tools
- DVD Ripper
- DVD Copy
- DVD Creator
- DVD Converter
- DVD Toolkit
For Mac
- Mobile
For Windows
For Mac
- Utility
- Freeware

User Guide
Get Started
Download & Install
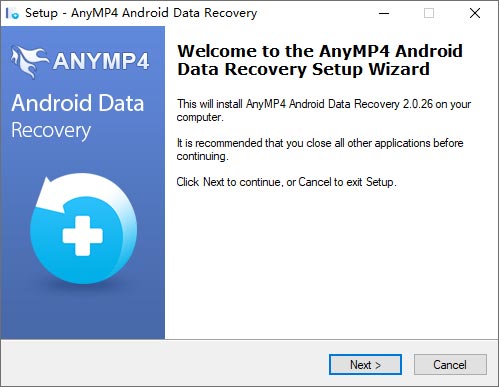
Click the Free Download button above to download AnyMP4 Android Data Recovery on your computer. Then, click the downloaded installation file and then follow the on-screen instruction to install it.
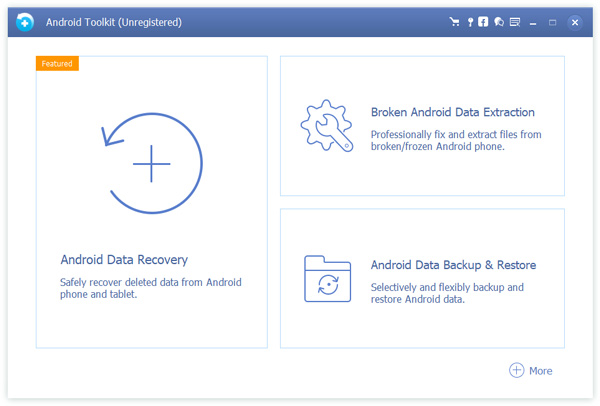
After the installation, double click on the program icon to run it. Then you’ll get the main interface of AnyMP4 Android Data Recovery as below.
Register
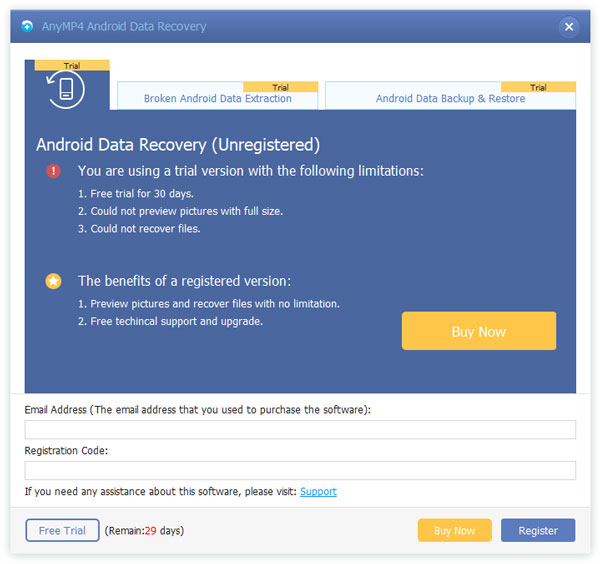
To enjoy full features of AnyMP4 Android Data Recovery, you need to finish the registration. Launch AnyMP4 Android Data Recovery again. There is a key icon on the top of the application. Click it to open the register window.
Then, enter your email address and the registration code, and then click the Register button.
Update
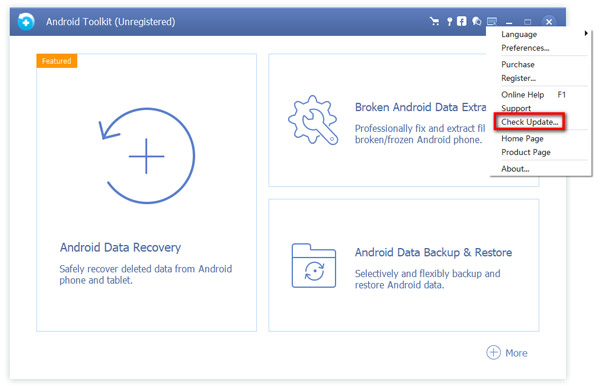
To update AnyMP4 Android Data Recovery, you can find the Check Update… option under the Menu tab to have a check. If there is an update, you can download and install it instantly.
Or you can go to the official site to download the newest version.
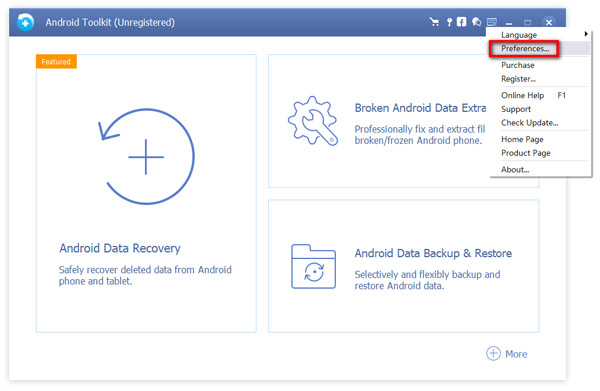
Preferences
Before recovering your data from your Android phone, you are able to set a path for your recovered files. Just click the Menu tab on the top of this window, and choose the Preferences… option.
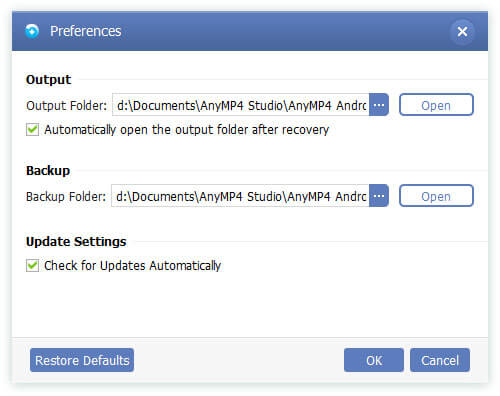
In the Preferences window, you can set the path for your output folder and backup folder. Besides, you can tick the box ahead of the Check for Updates Automatically to let you know the updates timely.
Recover Android Data
Phone data would be lost in a lot of situations, not only in physical damages like smashed, but also in the wrong operation like failed upgrade and deleted by accident. Thus an all-round Android Data Recovery is necessary for you to retrieve data your want, and AnyMP4 Android Data Recovery is just the software you need. Below are the steps to retrieve the data from Android.
Step 1 Launch AnyMP4 Android Data Recovery application
To begin with, run the program on your computer, and choose the Android Data Recovery feature from the main window.
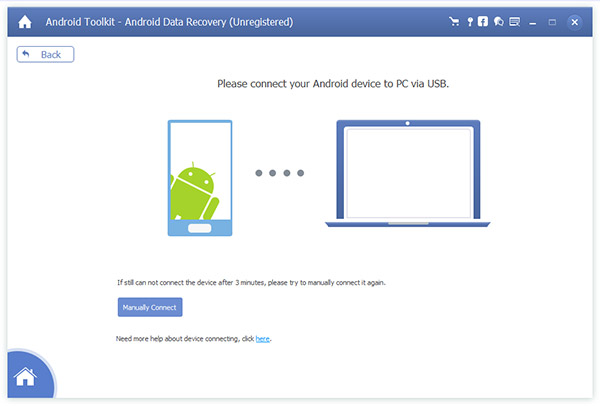
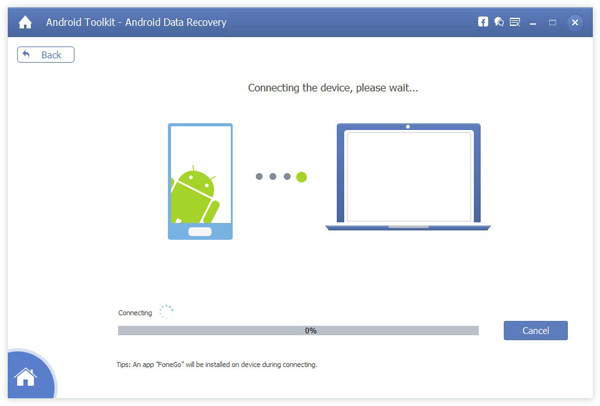
Step 2 Connect your device to the computer.
Then, you need to connect your Android device to the computer.
If your phone is not connected to computer, check if you have installed the USB driver.
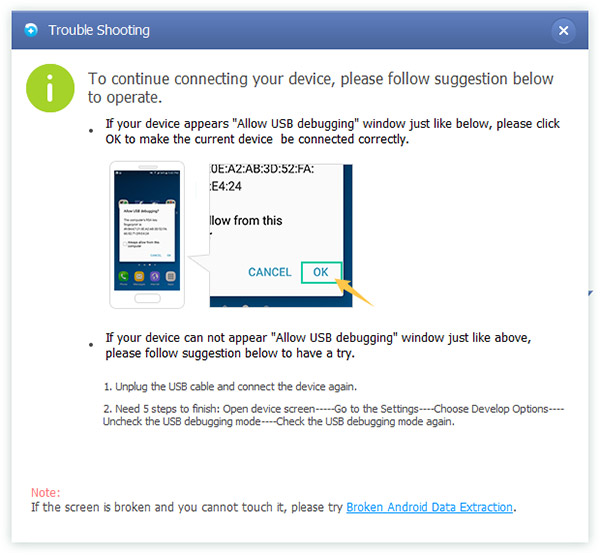
In the process of connecting, the software needs your authorization. Besides, the software will detect the version of your Android device automatically, and teach you how to open the USB debugging mode on your phone. After finishing the operations on your phone, click the OK button of the program.
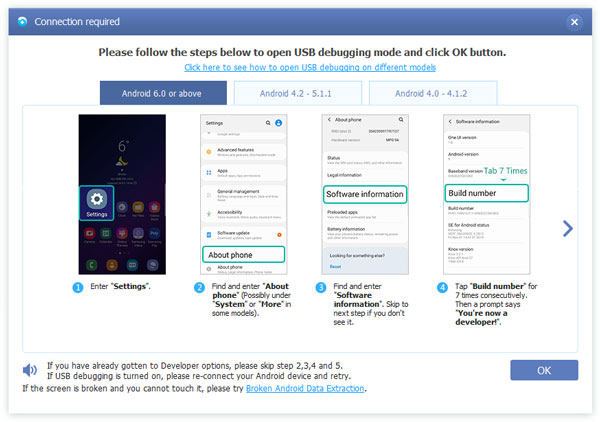
When the “Allow USB debugging” window appears on your device, you need to click OK on your phone to make the program continue connecting your device.
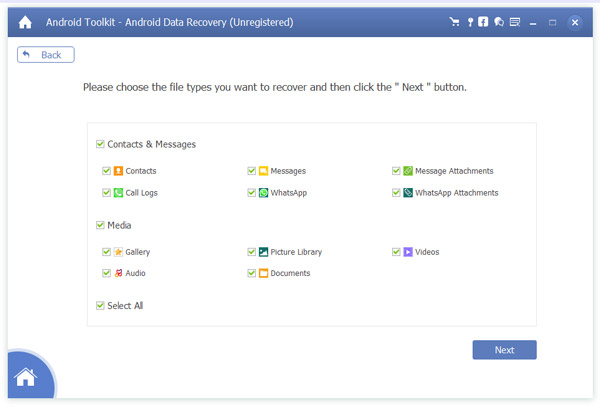
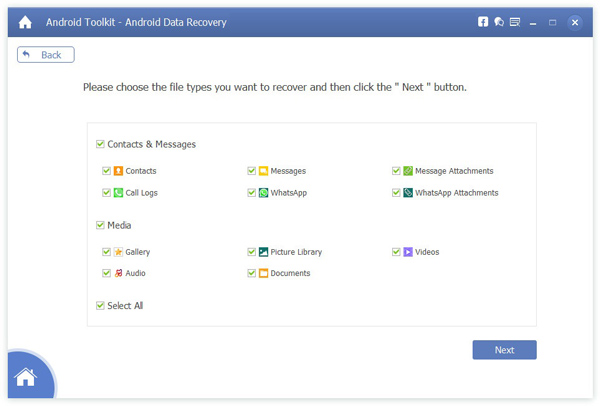
Step 3 Select the types of data to recover
After connection, all file types will be shown in the main interface, and then you can tick off the file types you want to recover and click Next.
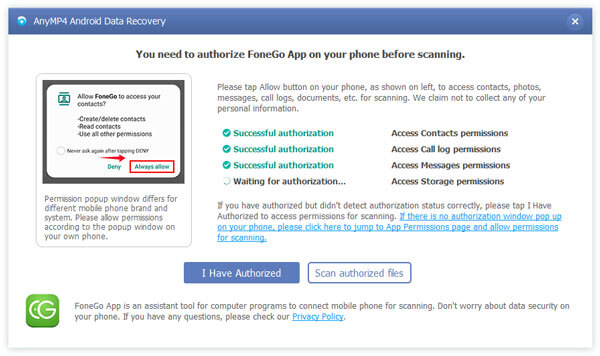
Before scanning, the program will prompt you to authorize the FoneGo app on your phone to gain access to your contacts, photos, messages, call logs, etc. for scanning. When the authorization window pops up on your device, just tap the Always allow option to allow permissions for scanning. Then, click on I Have Authorized to move on. Then, the program will scan your device automatically.
Step 4 Preview and recover the data on Android
Once the scanning of your Android phone is over, all items will be listed out in detail. You can preview each specific item.
If you want can’t find the data you need, just click the Deep Scan button to get more lost data.
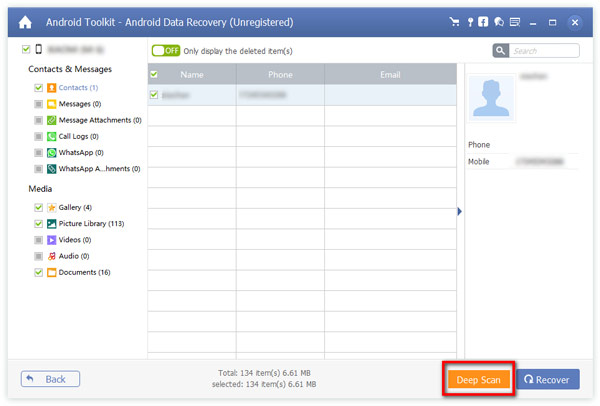
When you find the deleted files, select those you need to and then press on the Recover button to export them to your computer.
Then, set the path for your recovered data, and then click Recover to start the recovery process.
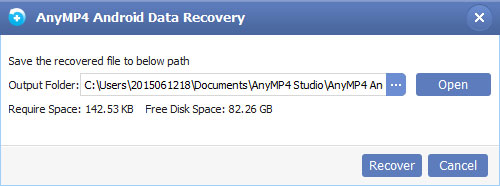
When the recovery process is finished successfully, the chosen files will be saved in the folder you chose before, and this folder will be popped up automatically.
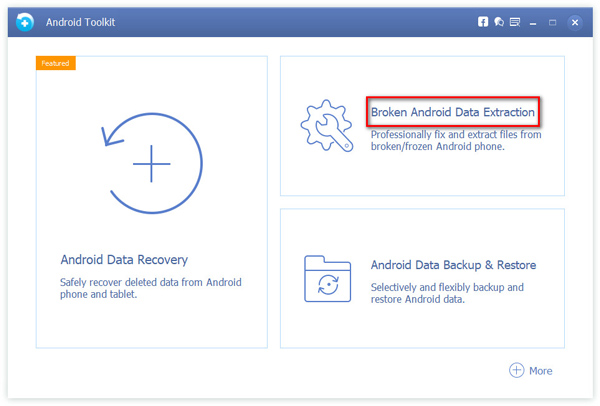
Broken Android Data Recovery
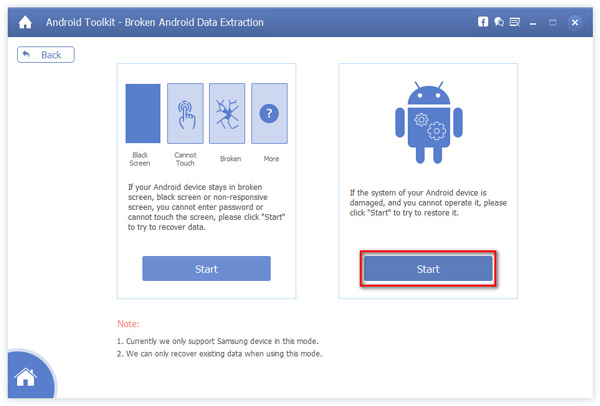
Sometimes your Android device may stay on a broken screen so that you cannot touch the screen. Sometimes the system of your Android device may be damaged, and you cannot operate it. You worry about the data in your Android device, but you do not know how to do it. Under this circumstance, you can use AnyMP4 Broken Android Data Recovery to fix and extract files from your broken or frozen android phone.
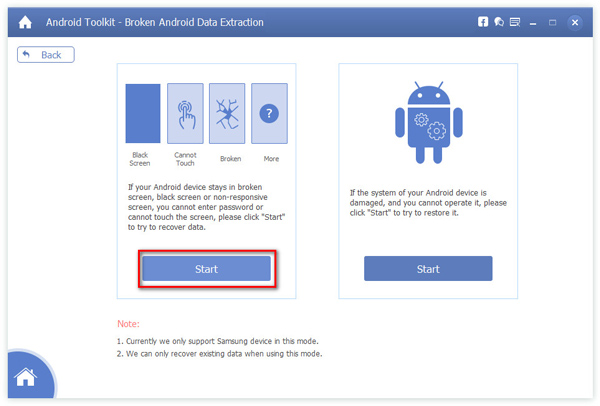
Extract Data from Android Phone with Screen Problems
If your Android phone has screen problems such as broken screen, black screen, or non-responsible screen, and you cannot enter the password. You can do as following steps to extract data from your Android device.
Step 1 Run AnyMP4 Broken Android Data Recovery
Open the program and choose the Broken Android Data Extraction feature on the interface.
Step 2 Start extracting data from the broken Android phone
When your Android device has a broken screen or other screen problems, you can click the left Start button.
Step 3 Select the name and model of your Android device
You should choose the name and model of your Android device here. And up to now, the software supports SAMSUNG Galaxy Note 5/4/3, Galaxy S6/S5/S4, and Galaxy Tab. After selecting, please click the Confirm button.
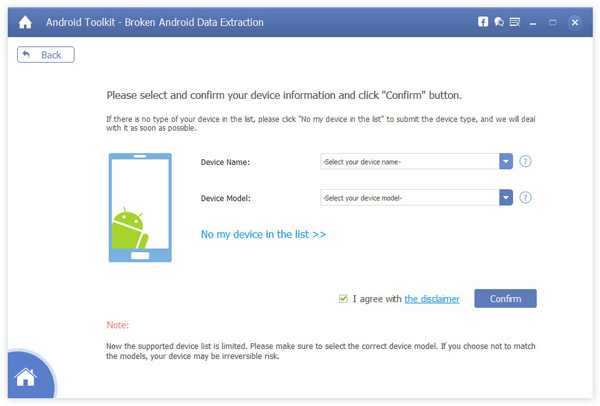
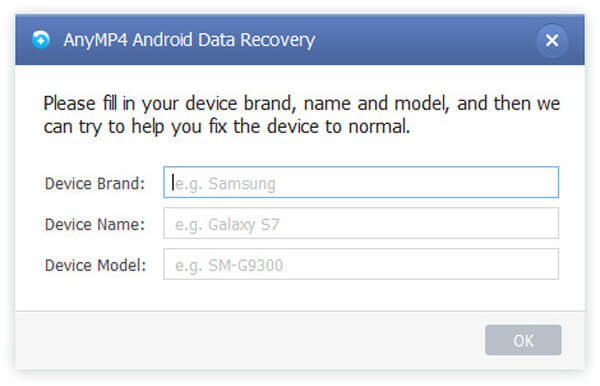
If your Android device is not in this list, you can click these blue characters No my device in the list and fill in the brand, name, and model of your device here. Later, the software can try to help you fix the device to normal as soon as possible.
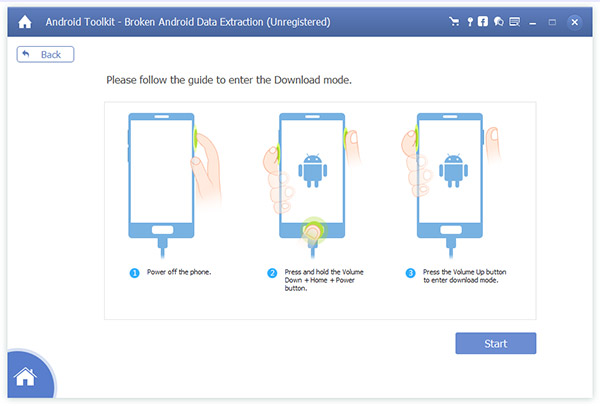
Step 4 Enter the Download mode
Connect your Android phone to your computer, click the Start button at the lower right of the window, and then turn off your device. Later, press and hold the Volume Down key, the Home key, and the Power Key at the same time. Finally, press the Volume Up key and you can enter the Download mode.
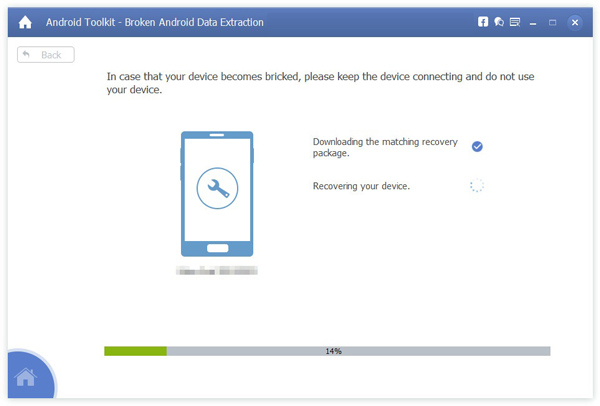
Step 5 Scan your Android devcie
After completing the steps above, the Recovering your device window will pop up, and your device will be scanned.
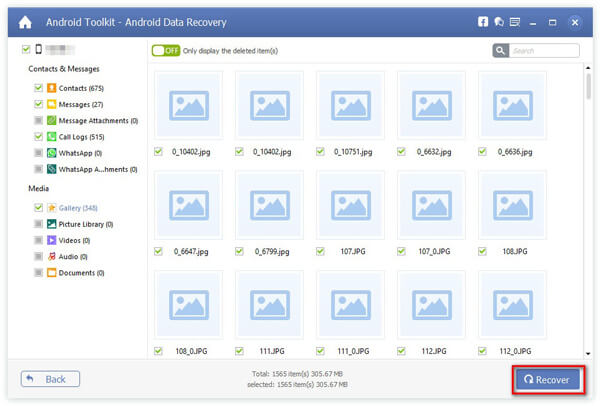
Step 6 Select the types of data to recover
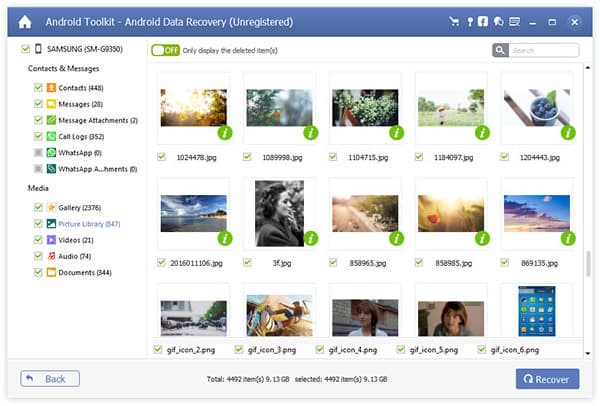
Your Android data are divided into 11 types such as Contacts, Messages, Message Attachments, Call Logs, WhatsApp, WhatsApp Attachments, Gallery, Picture Library, Videos, Audio, and Documents here. And you can choose the data you want to extract or recover here by clicking the Recover button at the lower of the window. Besides, you also can decide to show the deleted data only or not by clicking the ON-OFF button of only displaying the deleted item(s). What’s more, inputting the name of your file to search it in the search bar at the upper right of the window is allowed.
Fix Files from Frozen Android Phone
When the system of your Android device is damaged so that you cannot operate it, you can restore your data based on the following instructions.
Step 1 Open AnyMP4 Broken Android Data Recovery program
Launch the software and choose the Broken Android Data Extraction feature on the interface.
Step 2 Start fixing data from Frozen Android Phone
If your Android device has system problems like being stuck in the Startup screen, you can choose the right Start button.
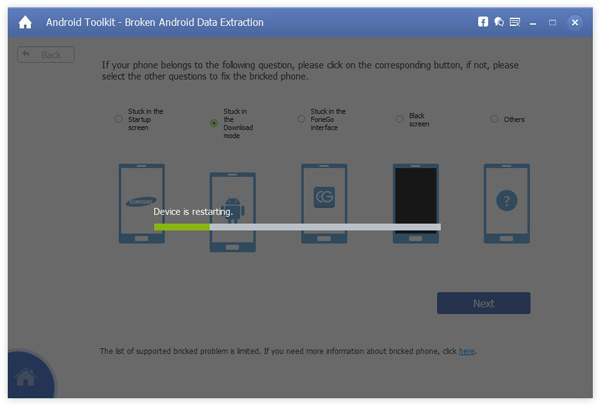
Step 3 Choose the problem of your Android phone
AnyMP4 Broken Android Data Recovery supports fixing the following questions of your Android device, such as Stuck in the Startup screen, Stuck in the Download mode, Stuck in the FoneGo interface, Black screen, and other questions. For example, if your Android phone is stuck in the Download mode, you can click the corresponding button. Then, click the Next button. Later, your device will be restarted.
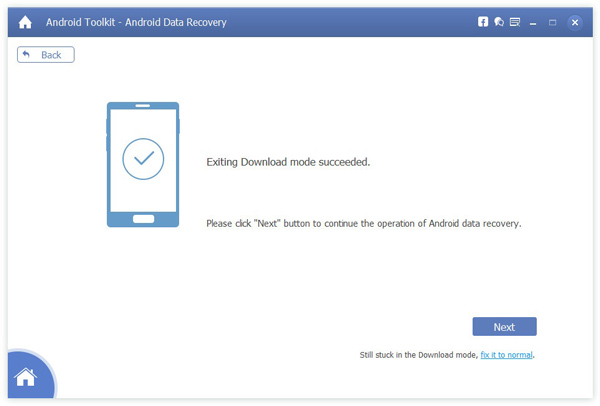
Step 4 Go to recover your Android data
After the exiting download mode, please click the Next button. And you can begin to recover your Android data.
Step 5 Connect your device to the computer
Later, you can see the window of connecting your device to your computer.
Step 6 Choose the types of files to recover
Select the files you want to recover from your frozen Android data by checking the box of different types. Then click the Next button to enter the recovering window. This function enables you to recover data of Contacts, Messages, Message Attachments, Call Logs, WhatsApp, WhatsApp Attachments, Gallery, Picture Library, Videos, Audio, and Documents.
Step 7 Recover your android files
You can fix files you want from your frozen Android device here by choosing the Recover button at the bottom right of the interface. And you can choose the types of data here too. In addition, you also can decide to only present the deleted files or not by clicking the ON-OFF button of only displaying the deleted item(s). Apart from those, inputting the name of your file to search it in the search bar at the upper right of the interface is allowed.
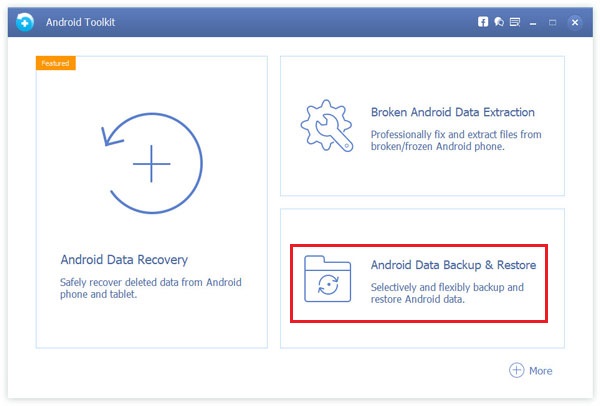
Back up & Restore Android Data
Commonly, the phone data are lost in some situations like the phone is physically damaged or the data are deleted accidentally. It is necessary to back up the phone data on another device to be restored when they are lost. And Anymp4 Android Data Backup and Restore can help you complete this action.
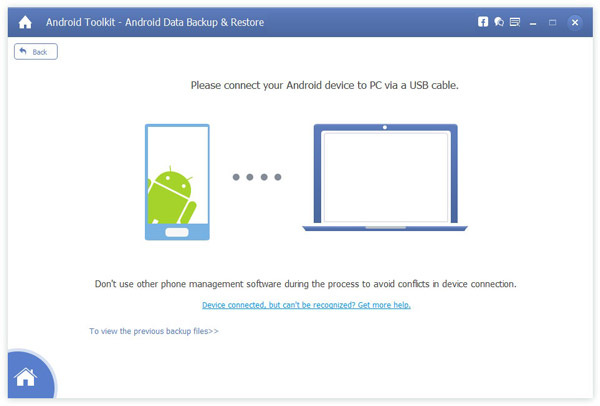
Back up Android Data
Step 1 Open the software, and then choose the Android Data Backup and Restore feature.
Step 2 Click the Device Data Backup button.
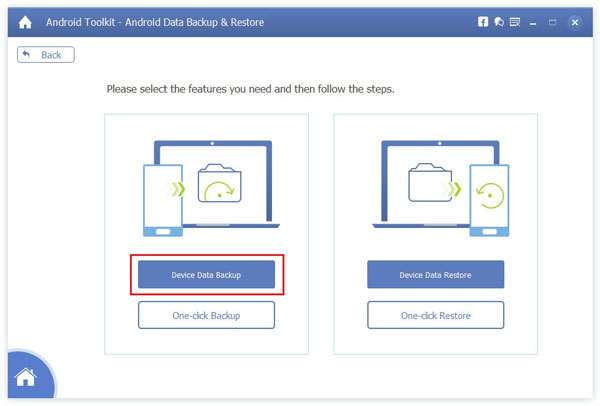
Step 3 Connect your Android device to the computer via a USB cable.
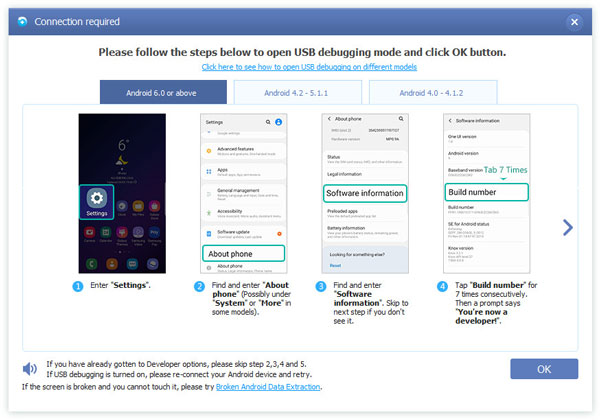
If you are the first time to use this feature, while connecting your Android device to the computer, the Connection Required window will pop up for your authorization. It will also detect the version of your Android device. Besides, it needs you to open USB debugging mode, and you can follow the given instructions and click the OK button to complete that.
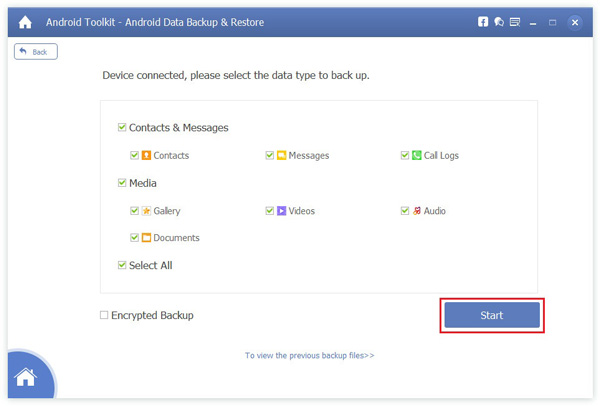
Step 4 You can select the data type you want to back up here, such as contacts, messages, call logs, gallery, videos, audio, and documents. You can also select all of these to back up. If you want your data to be backed up as encrypted files, check the box of Encrypted Backup and set a password. Then click the Start button.
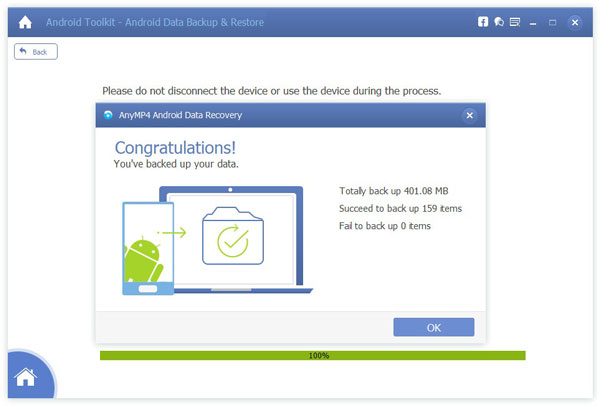
Wait for a while, and the data of your Android device will be backed up.
Besides, you also can click the One-click Backup button to back up all files of your Android device without the selecting process.
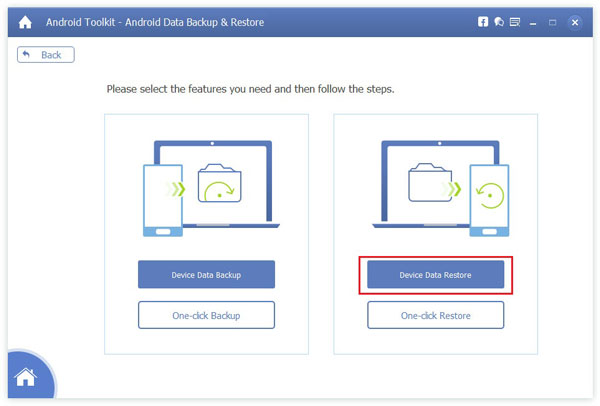
Restore Android Data
Step 1 Open the software, and then choose the Android Data Backup and Restore feature.
Step 2 Click the Device Data Restore/One-click Restore button.
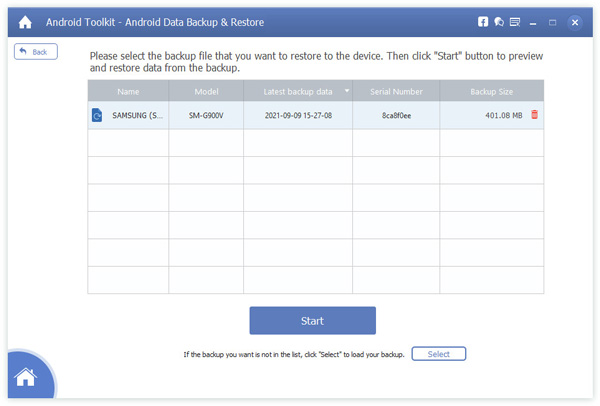
Step 3 Choose a backup data file to restore, and if there is no backup file you want in this list, you can click Select to choose other files. Then, click the Start button.
Step 4 You can preview the backup data file you choose at this interface, and select data you want to restore. Besides, you can choose what device you want to restore between your Android device and the computer by clicking the button Restore to Device/Restore to PC located at the lower right of this interface.
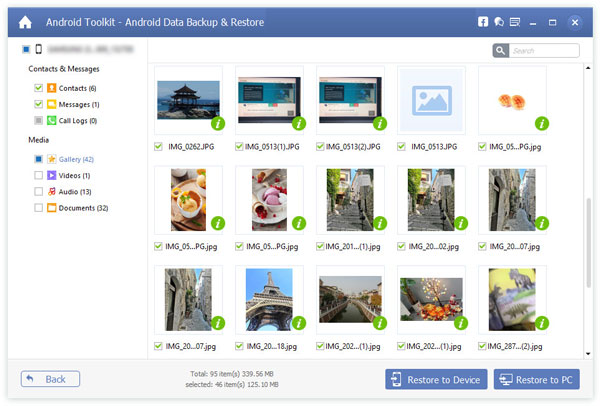
Apart from that, you also can click the One-click Restore button to restore the whole file you want to restore without the selecting process.
More Tips for Recovering Different Android Data
Best Photo Recovery APP for Android
Recover Lost/Deleted Android Contacts
Recover Deleted Call Logs History from Android
Recover Deleted Videos from Android Phone or Tablet
Recover Deleted/Lost Text Messages on Android With/Without PC