Secure Download
Secure Download
Xfinity is one of the leading cable and internet service providers in the United States of America. Although the rise in popularity of streaming services and smart TV devices has added new competitors to the brand, Xfinity has still managed to sustain its role in the market, largely due to its reliability and brand awareness. One of the strongest advantages of Xfinity users over modern streaming services is their built-in recording feature, accessible through the Xfinity remote control. Despite that, the steps to record on Xfinity still take a few practices to learn, and that is exactly what we will provide in this article today. We will provide two different tutorials on Xfinity recording: one using Xfinity’s official remote control and another using screen recorder software for Xfinity Stream. Please continue reading the article below to learn more.

Yes, you can. Televisions subscribed to Xfinity’s services have a built-in recorder function that can be accessed within the remote control provided to their users. The same is true for the Xfinity Stream app, which is accessible for digital platforms such as Windows, Mac, Android, and iOS devices.
Unfortunately, the recording function for all platforms where Xfinity is available is only accessible within its Saved and Recording sections. This means that videos recorded using the tool cannot be extracted as digital files and cannot be shared across different devices. With that in mind, the recording function in Xfinity is more similar to having the episodes saved for offline use.
Moreover, Xfinity Cloud DVR’s storage restrictions might be too limiting if you plan on recording TV series with long episodes. This is because the feature has a limited recording capacity, allowing only 150 hours of HD recordings, and a simultaneous recording limit of six at a time.
If you are using a lighter model, such as the Xfinity Cloud DVR Lite, your recording limit will be as low as 20 hours of HD recording and only two concurrent recordings at a time.
To learn how to record on Xfinity, please continue reading below for our detailed guide on using the Xfinity remote or screen recorder software.
As mentioned above, this article will feature two tutorials on the different recording options available in Xfinity. First, we will provide a tutorial on using the Xfinity Remote for recording. Afterward, we will provide a quick introduction to the featured screen recorder software for Xfinity Stream.
Without further ado, you can now read our tutorial on how to use the Xfinity Remote for recording.
1. Open Xfinity on your television and search for the program that you want to record.
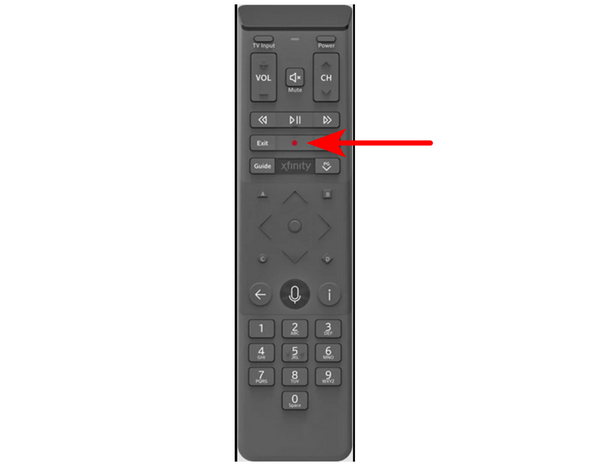
2. When you are on the title screen of the selected program, press the Record button on your remote control.
3. After clicking the Record button, select the recording option that you want to use.
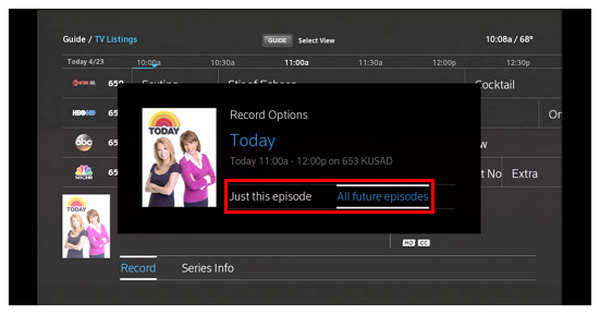
Once the recording option has been selected, Xfinity will start recording your chosen program.
Since Xfinity Stream is the computer- and mobile-based offering of Xfinity’s services, using computer-based screen recorder software is the more convenient option for users who want to record Xfinity content. With that in mind, we will feature the easiest-to-use and most powerful option on the screen recorder market today for our provided tutorial with none other than AnyMP4 Screen Recorder.
As its name suggests, this software is a dedicated screen recorder made for Windows and Mac computers. In terms of recording modes and quality, this option is clearly top-notch, as it features a total of seven recording modes, all of which are supported with Scheduled Recording, making it ideal for capturing TV episodes. This will allow you to record Xfinity programs without needing to stay on your computer at all times.
Moreover, the recording quality it is capable of is sufficient to capture screen recordings up to 4K UHD resolution. This means that the tool is capable of recording Xfinity videos, even if their resolution exceeds the ultra-HD standard, without quality loss in both the video and audio departments. All these features make the tool a superb option for recording modern releases on Xfinity.
Regardless of these impressive features, be aware that AnyMP4 Screen Recorder has its own limitations, as it cannot bypass privacy measures set by Xfinity, such as High-bandwidth Digital Content Protection (HDCP) and Digital Rights Management (DRM). Due to these measures, recordings captured by the program will likely encounter a black screen.
To learn how to use this option for Xfinity recording, please read our guide below. Don’t forget to download the software first for an easier time following our provided tutorial.
Secure Download
Secure Download
1. Open Xfinity and set the content that you want to record on Full Screen.

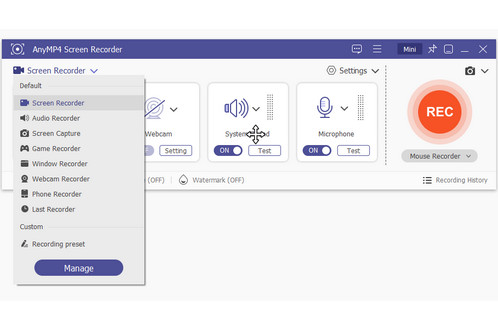
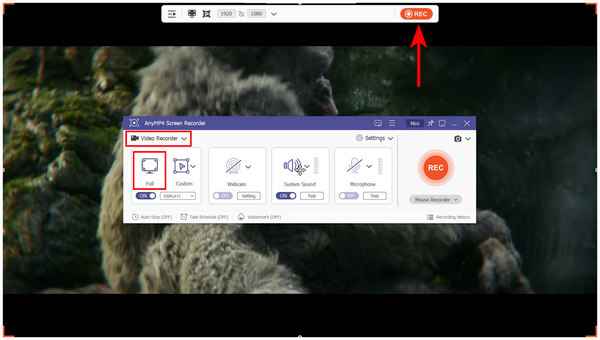
2. Now that your Xfinity content is set to full screen, open AnyMP4 Screen Recorder and use the Video Recorder mode. Then, set the recording display to Full Screen. Finally, click on REC to start the screen recording.
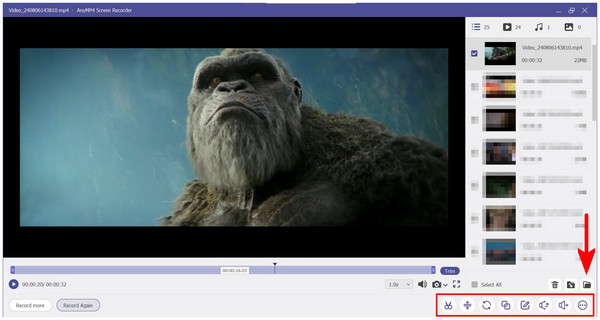
3. After the recording process, you can now edit the recorded video. If you wish, use the essential Editing Tools available in the post-recording window. Otherwise, simply click on the Folder button to locate the MP4 file of the Xfinity recording.
By following these three simple steps, recording Xfinity content on your computer is now easy. This is much more convenient than the built-in recording option in Xfinity, as AnyMP4 Screen Recorder can provide you with an MP4 file of your Xfinity recording.
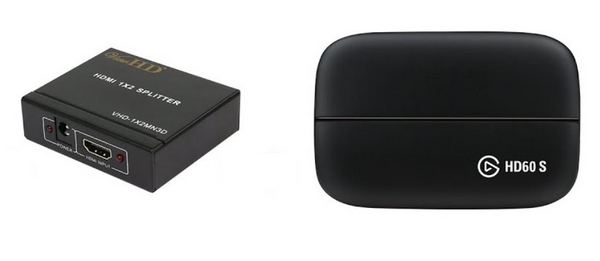
Since both options above have significant limitations, we have to introduce a hardware-based tool for recording Xfinity content without any storage restrictions or black screen issues. With that in mind, use the HDCP Stripper Device and a Capture Card.
Unlike the previous options, this hardware-based solution captures recordings by setting up a top box output for your Xfinity television. With the help of the Capture Card, you will be able to convert your media recording into a digital video, which makes this option a reliable archiving method.
Unfortunately, this solution requires the most setup, as it involves purchasing both hardware, setting them up, connecting them to your computer, and learning the necessary steps to make the hardware work. With that in mind, this option requires its users to check for a dedicated tutorial online to make recordings with the tool possible.
If you wish to continue using Xfinity’s recorder, this section of the article provides a short guide on how to locate your recorded shows on it. Please read our four-step tutorial to learn how to do so.
1. Click the Xfinity button on your remote control to open the on-screen Menu.

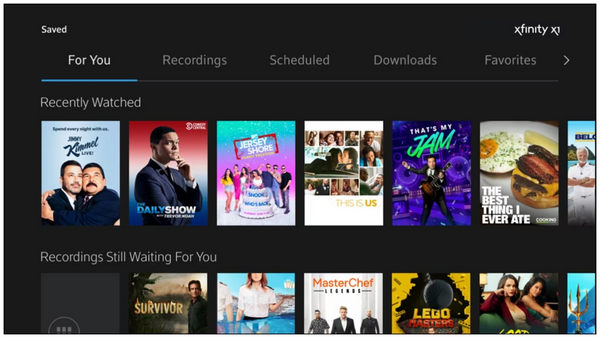
2. Once the Xfinity Menu is opened, use the remote control's navigation button to go to the Saved section.

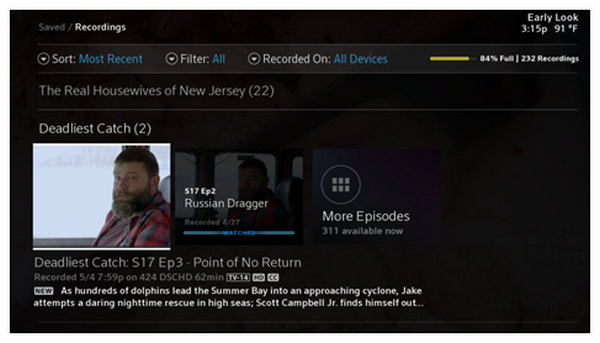
3. Next, navigate to Recordings and select the recorded content title you want to watch.

4. Finally, select the episode that you want to watch from the recorded titles that you selected.
After following these four simple steps, you can now watch any videos that you have previously saved on your Xfinity-powered TV.
How many shows can you record at once on Xfinity?
On Xfinity, you can record as many as six programs at once. However, be cautious when recording multiple titles simultaneously, as this may affect the recording priority. The latest selected recording will be the first program saved.
How to stop recording on Xfinity?
Simply click the REC button on your remote control again to stop the recording process. Xfinity also has an automatic stop option that you can set up. This is the solution to stop recording on Xfinity.
How to Fix an Xfinity DVR That Is Not Recording Scheduled Shows?
This problem is commonly rooted in Xfinity recording conflicts. Xfinity’s automatic recording system will prioritize the more recently scheduled recording that you set. For a seamless recording process, avoid scheduling multiple recordings simultaneously.
Can I record Peacock on Xfinity?
No, you cannot. Even though Peacock is available on Xfinity, it cannot be recorded on it. Peacock offers a separate recording feature as part of its Premium Plus plan.
How to watch recorded shows on Xfinity?
You have to locate the Recordings section in Xfinity’s menu. This is accessible in the Saved menu. Use the Xfinity button on your remote control to open the menu.
Why do I get a black screen when recording Xfinity Stream?
Xfinity content is protected by a Digital Rights Management (DRM) system. This prevents third-party recording by automatically detecting the presence of such activity. This system causes the black screen.
Does Xfinity content have HDCP protection?
Yes, it has. High-bandwidth Digital Content Protection (HDCP) is active on digital content from Xfinity. This is also responsible for black screens when recording Xfinity on their website.
Can I download my Xfinity Cloud DVR recordings as MP4 files?
No, you cannot. Captured Xfinity content from their Cloud DVR feature cannot be downloaded as a digital file. This includes MP4 files and other video formats.
How do I increase my Xfinity DVR storage limit?
The only option to increase the Xfinity recording limit is by subscribing to more expensive plans within their premium options. Among the offerings of Xfinity, the Premium DVR option is the most expensive. It provides a total of 300 hours of HD recordings.
Now that we have provided multiple options for recording on Xfinity, we hope that this article has helped you decide which option is best. For maximum practicality, we recommend using AnyMP4 Screen Recorder.
Please share this article online to help other users looking for an Xfinity recording guide.
Secure Download
Secure Download
 Posted by Alice Thorne to Record Audio
More readings
 How to Fix Laggy OBS Recording in 2026 [Best Method]
When recording in OBS, you may encounter some problems, such as laggy recording. So, how to fix this problem? Read this post for the best way to fix it.
 Best Solution on How to Record Google Hangouts Conversation
Do you use Google Hangouts for video chatting? How to record it? In this post, we introduce you best solutions to record Google Hangouts Conversation.
 Record Omegle Video Call and Session on Computer & Mobile
Want to save your Omegle video calls? Discover the best tool to record chats on Windows, Mac, and mobile phone to save your Omegle call, chat and sessions.
 BigBlueButton How to Record a Session or Presentation
How do you record on BigBlueButton? How to use BigBlueButton to record a shared screen? This post tells how to record BigBlueButton session in details.