The Sony PlayStation 4 has become one of the most popular game consoles worldwide. Capturing your gameplay is essential for content creators, streamers, and anyone who wants to relive their best gaming moments. That may be why so many people asked how to record PS4 gameplay on forums and social media. Fortunately, the PS4 offers multiple ways to record gameplay. Each method has its own benefits, limitations, and technical requirements, making it important to choose the right approach based on your goals, hardware, and desired video quality. Have a look at the brief guide, and you will get what you want.
The Sony PS4's built-in Share button offers the fastest way to capture gameplay. By default, the system continuously records recent gameplay in the background, allowing you to save moments after they happen. You can also manually start recording to capture longer sessions.
1. Configure Video Settings
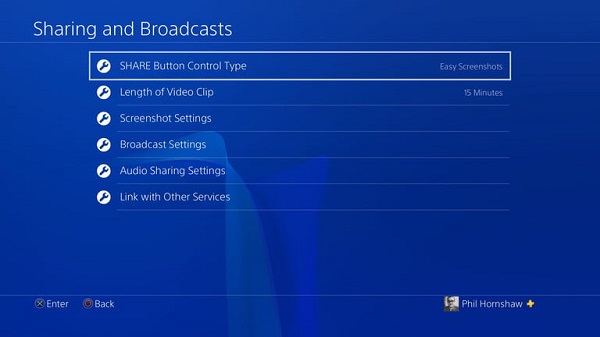
Press the SHARE button on your device and navigate to Sharing and Broadcast Settings. Under Length of Video Clip, adjust the recording duration (from 30 seconds up to 60 minutes).
2. Fire Up Game Recording on PS4
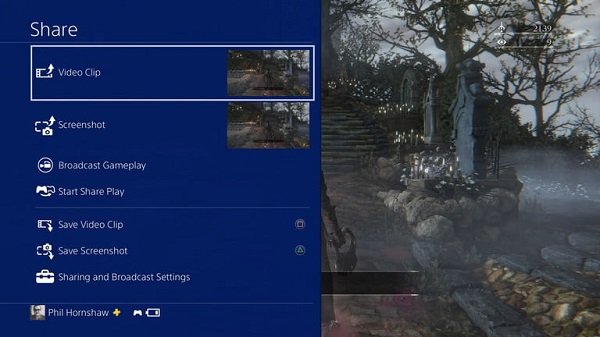
Double-press the SHARE button to start recording for your preset duration. To stop manually, double-press it again. Alternatively, press and hold the SHARE button and select Save Video Clip to capture recent gameplay.
Starting a new recording will overwrite your previous unsaved gameplay. Avoid double-pressing the Share button if you intend to save your current clip. Please note that this guide doesn’t apply to PlayStation 3. To record PS3 gameplay, check the provided link.
The PS4 provides two recording modes tailored to different gameplay needs: Instant Replay and Continuous Recording. Instant Replay utilizes a background buffer that constantly captures your recent activity. It allows you to save unexpected highlights after they occur by selecting Save Video Clip. In contrast, Continuous Recording is triggered by double-pressing the SHARE button and continues until manually stopped. By adjusting the clip length settings, you can manage storage space while ensuring you never miss important in-game highlights.
Though PS4's built-in recording is convenient, it comes with quality trade-offs that professional creators should keep in mind:
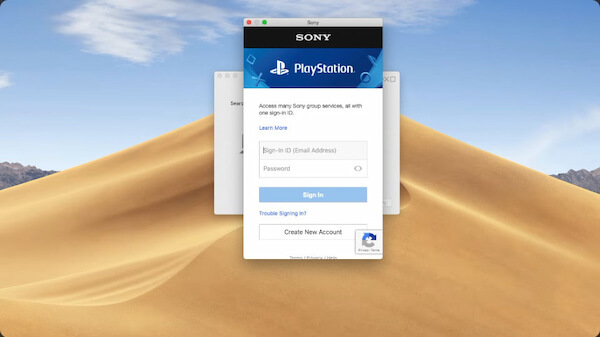
The PS Remote Play is the most practical way to record footage without a capture card. This official streaming feature displays your console screen on a Windows or Mac, allowing you to play and record gameplay directly from your computer.
1. Prepare Your Console
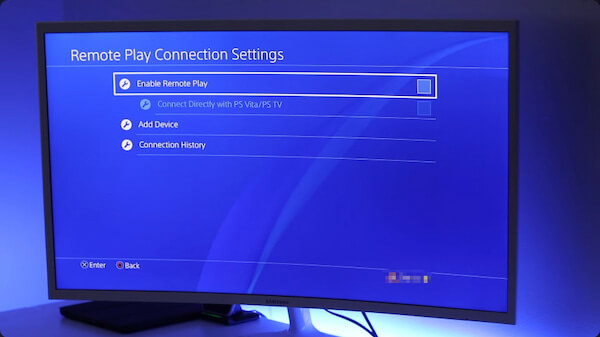
Download PS Remote Play from the PlayStation website to your PC. On PS4, go to Settings, select Remote Play Connection Settings, and check Enable Remote Play. Next, return to Settings, proceed to Account Management, and select Activate as Your Primary PS4.
2. Connect and Stream
Plug your DualShock 4 into your PC via USB. Open the Remote Play app on your PC and sign in with your PlayStation Network account. Select PS4, and the app will automatically detect and mirror your console's screen on your monitor.
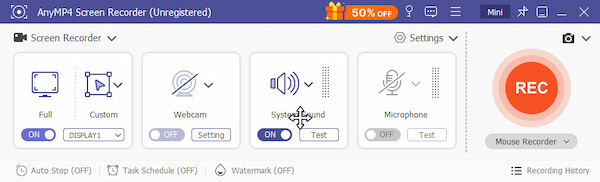
Once you mirror the Sony PlayStation 4 gameplay to your computer via Remote Play, the next step is to capture the live feed using AnyMP4 Screen Recorder. This method works like recording any on-screen activity. It is a multimodal recording software that can capture gameplay streamed via PS4 Remote Play. It lets you capture a specific window, a custom region, or the full screen. Additionally, you can record game audio and microphone input simultaneously, and even overlay webcam video for reactions or facecam footage.
1. Launch the screen recorder
Get started by securing the free download of AnyMP4 Screen Recorder. Install the software on your system and complete the installation. Once the setup process is complete, run the software to access the main dashboard.
Secure Download
Secure Download
2. Select the Remote Play window
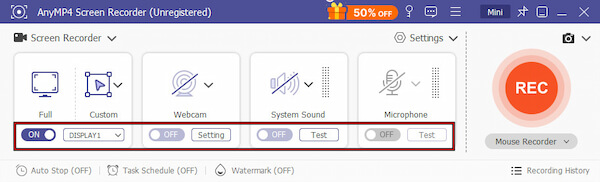
By default, the software opens to the Screen Recorder mode. On the Display tab, set the recording area to capture the Remote Play app window. You may also record the full screen if you prefer. Then enable System Sound to capture in-game audio, and enable the Microphone for voice commentary.
3. Start PS4 Gameplay Recording
Click REC, then begin playing on your PS4. The software will capture the mirrored gameplay feed. During recording, click the Toolbox button to access the drawing and annotation tools. When finished, click Stop. In the preview, use the Advanced Trimmer to trim unwanted sections.
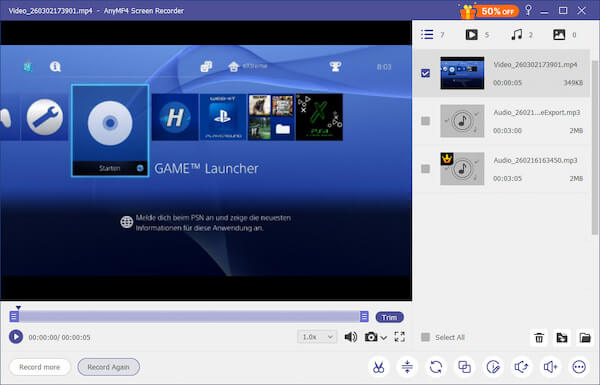
AnyMP4 Screen Recorder supports high-resolution recording up to 4K at 60fps. Beyond real-time capture, it includes post-recording tools to refine your videos. Most notably, the Advanced Trimmer lets you cut out unwanted segments of your gameplay. It also supports additional features such as background noise reduction, cursor effects, hotkey control, and scheduled recording. This software makes it a strong alternative to the PS4's native recording features, offering greater control and higher quality.
The overall recording gameplay quality depends heavily on your internet connection and local network stability. Since Remote Play streams gameplay in real time from your console to your PC, performance can fluctuate based on bandwidth, signal strength, and network congestion. Before relying on this method for content creation, it's important to understand the limitations.
Before you connect a capture card to your Sony PlayStation 4, you must first disable HDCP. HDCP prevents video capture and will cause a black screen if left enabled. Disabling HDCP is completely safe for gameplay recording and is required for any HDMI capture workflow.
1. From the PS4 home screen, scroll up to the function area and select Settings. Scroll down, select System, and uncheck the Enable HDCP label to turn it off.
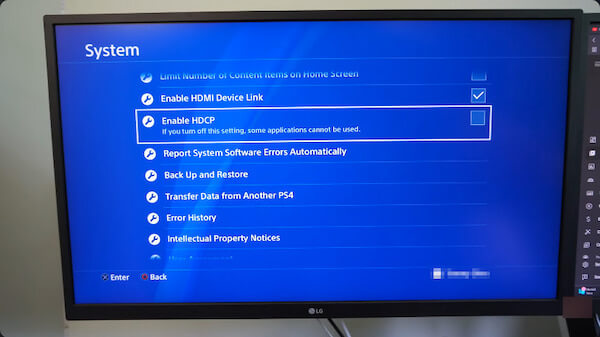
2. Some systems may require a restart. If prompted, restart your PS4 to apply the changes. Once HDCP is disabled, your capture card will receive a clean HDMI signal.
HDCP must remain disabled while recording gameplay with a capture card. If you see a black screen in your capture software, turn off the HDCP.
After disabling HDCP on your Sony PlayStation 4, connect your capture card. Then, configure your PC for high-quality recording. Using a dedicated capture card allows you to record gameplay at full resolution and frame rate with minimal latency.
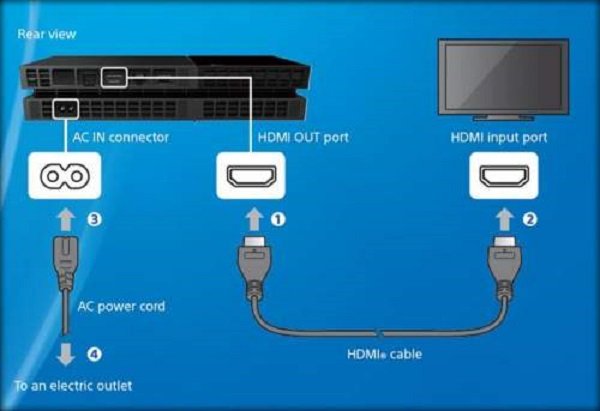
1. Connect the Capture Card to Your PS4 and TV
Connect an HDMI cable from the PS4 HDMI OUT to the capture card HDMI IN. Then, connect HDMI cable from the capture card's HDMI OUT to your TV. Plug the capture card into a USB 3.0 port on your computer, then turn on both devices to verify that the signal appears on your TV.
2. Set Up PC Recording Software
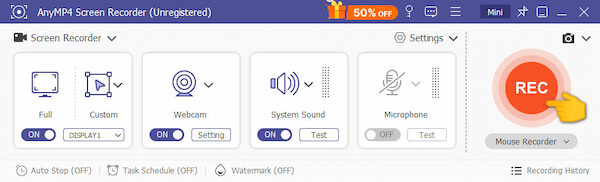
Use your capture card's bundled software or a recorder like AnyMP4 Screen Recorder. Set your capture card as the primary video input. Enable System Sound and optional Microphone or Webcam inputs. For the best results, configure the recording settings.
3. Record Gameplay
Click REC or Record in the software before starting your game. Then, play your game as usual. The capture card will send a clean feed to your PC. Stop recording when finished. Export the recording in your chosen format and resolution.
Many creators prefer capture cards because of their true 1080p/60fps or higher recording quality. Although this method requires additional hardware, it delivers the best possible recording quality and consistency. It makes it the top choice for serious content creators.
By default, the PS4 does not combine game audio and party chat into a single recording track. Using a MixAmp or a compatible audio mixer lets you route all audio sources into your recording software. It ensures you capture both your microphone and party chat clearly.
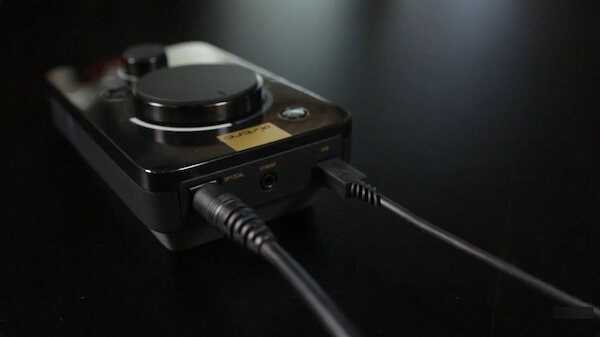
1. Connect Your Headset to the MixAmp
Plug your gaming headset into the MixAmp using the provided 3.5mm or USB connection. Ensure your headset microphone is active and working. Use the MixAmp's dial or software settings to balance game audio and chat audio. Confirm that both channels are audible in the headset.
2. Connect the MixAmp to Your Recording Device
If using a capture card, connect the MixAmp's output to the PC via USB or optical cable. If recording via Remote Play, set the MixAmp as the audio input device in your recording software. Open your preferred software and select the MixAmp as the microphone/system audio input. Adjust volume levels to achieve an optimal balance between game sound, chat, and commentary.
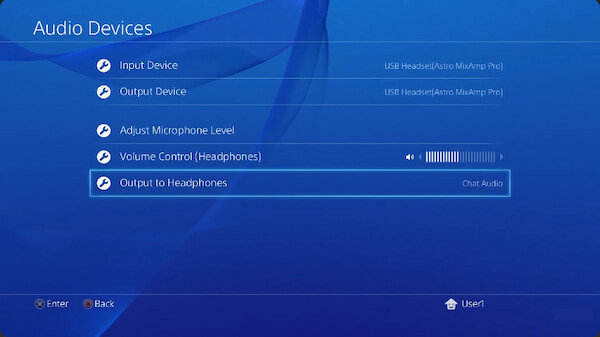
MixAmp ensures it records all voices and in-game audio seamlessly. This setup is essential for anyone who wants their PS4 gameplay videos to include live commentary and interactions with friends.
Once you've recorded your PS4 gameplay, the next step is to transfer and share your clips. This way, they can be edited, archived, or distributed to your audience. The PS4 offers flexible options for both offline and online sharing, letting you either move videos to a USB drive for personal use or upload them directly to social media platforms.
Option 1: Transfer Clips via USB
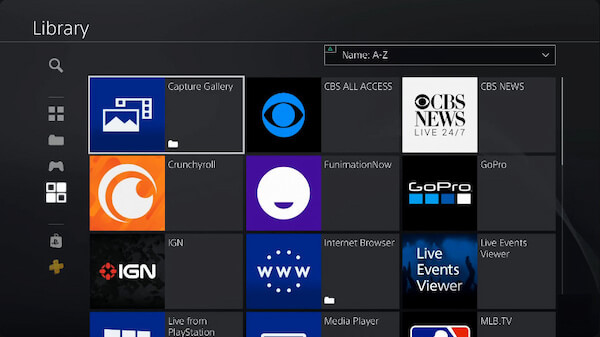
1. Access Capture Gallery
From the PS4 home screen, go to the Library and select the Capture Gallery. Highlight the video clip and press the Options button on the controller.
2. Move clips to PC
Select Copy to USB Storage Device, choose the clips you want to transfer, and confirm. Safely remove the USB drive from the PS4, then plug it into your computer. Then, copy the files to your editing software or storage drive for further use.

Option 2: Upload Clips Directly to Social Media
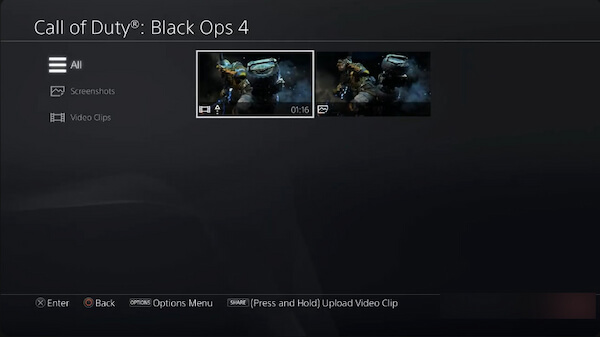
1. Select Clip in Capture Gallery
Highlight the video, press Options, and select Share. Follow the on-screen prompts to add titles, descriptions, tags, and privacy settings.
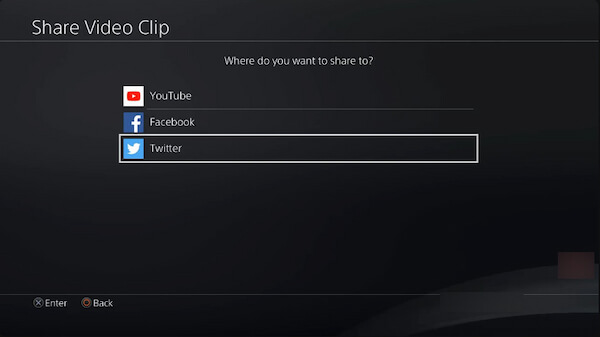
2. Link Social Accounts
Select the linked social media platform from the list. Confirm your selections and press Share to post the video directly from your PS4.
For USB transfers, choose exFAT for larger files to avoid size limitations. For social media uploads, trimming clips before sharing ensures concise, engaging content.
Q: Why do I see a black screen when I connect my PS4 to a capture card?
A: This is caused by HDCP or High-bandwidth Digital Content Protection. HDCP prevents unauthorized recording of protected content, including video from streaming apps or games.
Q: What is the maximum resolution/frame rate for the PS4's built-in recorder?
A: The PS4's native recording feature is convenient but limited. It can record up to 1080p at 30 fps. The system uses lossy compression, which reduces file size but slightly lowers visual fidelity.
Q: How do I record my party chat audio along with the gameplay?
A: The PS4 does not natively mix party chat with game audio in recorded clips. To capture both, you need a MixAmp or a compatible capture card with multi-channel audio support. Connect your headset through the MixAmp, route game and chat audio to your PC or capture card, and select it as the input in your recording software.
Q: Is PS4 Remote Play a better option than a capture card?
A: It depends on your priorities. Remote Play is convenient and requires no extra hardware, but it is network-dependent. It can cause latency, lower resolution, or dropped frames. A dedicated capture card provides full 1080p/60fps or higher, minimal latency, and reliable long-term recording.
This post shared how to record gameplay on Sony PS4. As you can see, you have several methods to achieve the task. For quick highlights and social sharing, the built-in SHARE button provides a convenient, no-hardware solution. If you prefer more flexibility, Remote Play lets you mirror gameplay to a PC and capture both game audio and voice with AnyMP4 Screen Recorder. For professional-quality output, a capture card paired with HDCP-disabled PS4 settings delivers the highest resolution, frame rate, and reliable long-duration recording.
Secure Download
Secure Download
 Posted by Alice Thorne to Record Video
More readings
 8 Best DVD Recorders of Amazon to Record DVD or VHS Files
When you need to record some TV programs as DVD, what should be the best DVD recorders you should choose? Just find the 8 recommended ones from the article.
 Can PS4 Play DVDs With/Without Internet? (2026 Explained)
Yes. Here, you can find free and easy ways to watch standard DVDs on your PlayStation 4 directly, or convert DVDs to digital videos for easy playback.
 Best 10 Video Editors for Chromebook: 2026 Latest Picks
Are you looking for a video editor for Chromebook? You are certainly in the right place! Come and discover the video editor we have listed in this post.
 [2026] 4 Best Free DVD Player Software for Windows 7/8
This post lists the four best free DVD player software for Windows 7/8/10/11 to freely play DVDs on a PC. Read on to learn more and find the most suitable one.