Is it illegal to record a Twitch stream? This is a common question among Twitch users, and the answer depends on the purpose of the recording. In actuality, recording streams on Twitch is considered legal for personal use. But, if the content is distributed or used for commercial purposes, it is illegal. In this post, we will show you several approaches on how to record Twitch streams. This way, you can revisit memorable moments or learn new techniques from your favorite creators anytime.
Twitch is a live-streaming service that focuses on gaming content and interactive content. It’s a great place to share your passions and connect with your viewers. Now, referring to the question: Does Twitch record streams, the answer is yes! Twitch streams are recorded and can be saved for viewing later. By default, Twitch uses its Video on Demand system to archive broadcasts online. However, these recordings are only accessible for up to 7 days before automatic deletion. If you want to keep these recordings beyond the VOD expiration, you can save recordings locally using dedicated screen recording software. This helps grow your channel and allows your community to watch content they may have missed.
Xbox Game Bar is a customizable overlay built on the Windows 10/11 system to record and screenshot on-screen activities. It allows you to capture any active window, including Twitch, along with the stream’s audio. Best of all, it is lightweight and can be accessed easily by simply pressing several key combinations.
How do I record my Twitch stream on Xbox? Check the guide below:
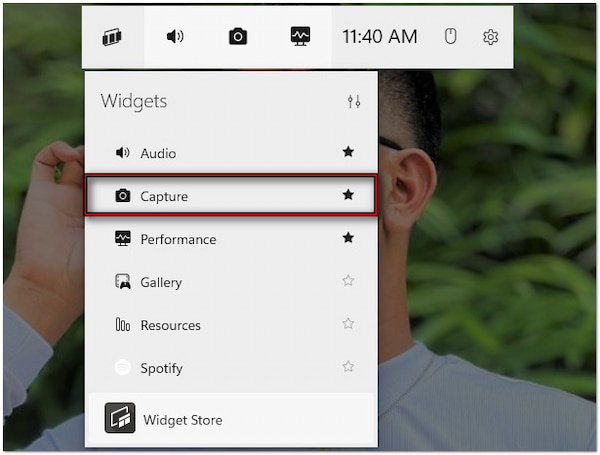
1.Press the Windows + G key combinations to launch the Xbox Game Bar on your computer. In the Widget Menu bar, click Capture and select the Start Recording option. Make sure the Twitch window is active before initiating the recording.
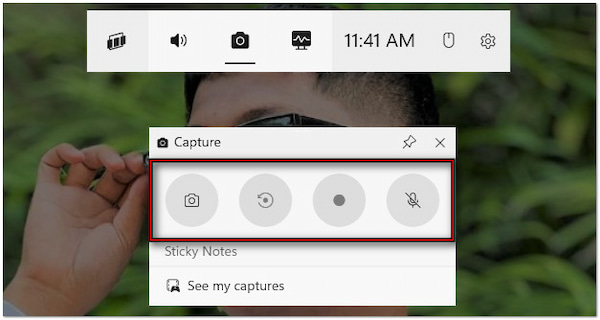
2.During Twitch stream recording, you can take a screenshot by pressing Windows + Alt + PrtScn key combinations. On the other hand, press the Windows + Alt + G key combinations to capture the last 30 seconds of the stream.
3.Once you’re done with the stream, simply press Windows + Alt + R to end the recording. Now, move to the Widget Menu bar and select Gallery to access the recorded Twitch stream. Apart from the recorded clips, you’ll also find the screenshots in this section.
Xbox Game Bar offers quick access to capture Twitch streams. It can also record LOL gameplay and other computer games. However, this built-in recorder has limitations, such as limited customization options for recording area settings, and lacks multiple input support.
Most of the modern smartphones come with a built-in screen recording feature. It allows you to record Twitch VODs on the go. In just a few taps, you will be able to record live streams directly from your phone. Similar to the previous method, it doesn’t require you to download an additional app as it is accessible on your device’s Control Center/Quick Settings.
Here’s how to record Twitch streams on phone:
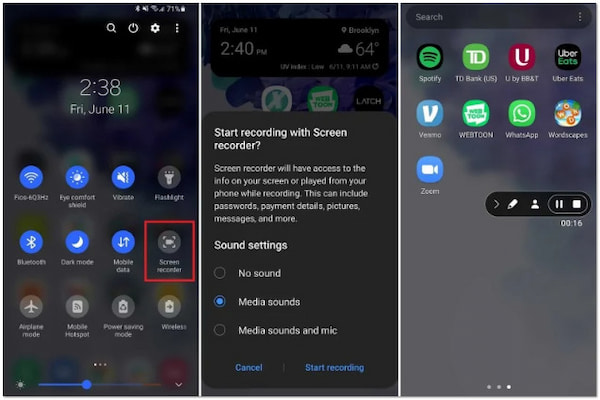
1.In the Twitch app, start the stream you want to record. Swipe down from the top of your display to access the Control Center/Quick Settings. Tap the Screen Recorder feature to activate the floating bar on your mobile device’s display.
2.When everything is prepared, and you’re ready to proceed, tap the Record button to begin the recording. A countdown timer will appear, giving you time to switch back to the Twitch stream. Once the recording begins, the indicator will be displayed, confirming the progress.
3.Once you have captured all the necessary content, tap the indicator to cease the recording. The recorded stream will be saved to your device’s gallery or Photos app automatically. From there, review the recordings and make basic edits if needed.
Mobile phones’ built-in screen recording features provide a convenient solution for capturing Twitch streams. However, not all phones support the inclusion of system audio in the recording. Plus, they lack the option to capture a display within a custom recording area.
AnyMP4 Screen Recorder is a feature-rich tool that lets you record Twitch streams as a viewer. It offers seven different recording modes to capture your on-screen activities. This includes Screen Recorder, Audio Recorder, Screen Capture, Game Recorder, Window Recorder, Webcam Recorder, and Phone Recorder.
Furthermore, AnyMP4 Screen Recorder allows recording screens in full, specific windows, or fixed regions. Plus, it supports simultaneous audio input from your system sound and microphone. But what makes it truly unique is the inclusion of drawing and annotation tools. These tools can be used to add highlights, shapes, arrows, lines, callouts, texts, and more.
Here’s how to record Twitch streams using AnyMP4 Screen Recorder:
1.Get started by downloading AnyMP4 Screen Recorder for free. Install the screen recording software and wait for the installation process to complete. Once the installation finishes, launch AnyMP4 Screen Recorder on your computer right away.
Secure Download
Secure Download
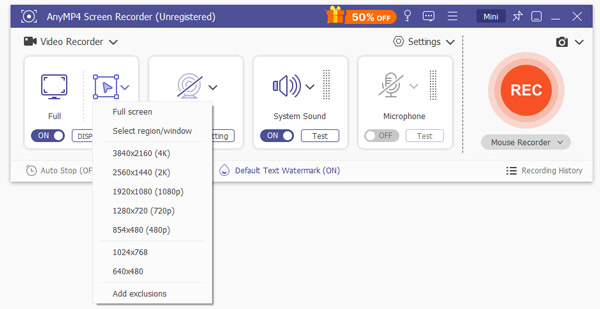
2.Upon opening the software, you will be headed to the Screen Recorder mode by default. Now, choose your preferred recording area in the Default tab. Select Full to capture the entire screen or Custom to focus only on the Twitch stream.
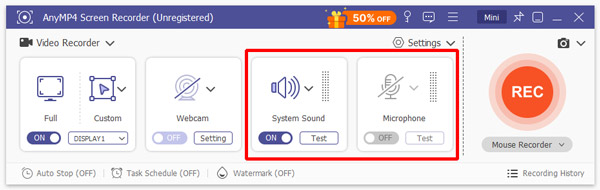
3.The Twitch stream isn’t engaging to watch without a sound. In the same menu bar, toggle System Sound on to capture the stream’s audio. Optionally, you can turn on the Microphone to to include your voice in the recording.
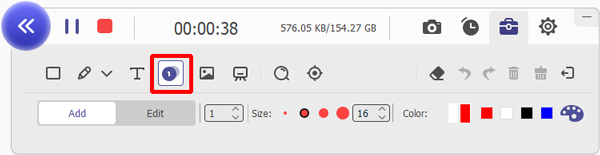
4.After setting everything up, click the big REC button to initiate the recording. A three-second countdown will give you time to prepare before the recording begins. During the recording, a floating bar will be displayed with essential tools:
Camera: Take a screenshot to capture highlights from the stream without pausing the recording.

Toolbox: Provides access to several drawing and annotation tools. Click the T button to add the customizable text you want to your videos. You can change its font style, size, and color.
5.After capturing the Twitch stream, click the Red Square button to stop the recording. The preview window will pop up, enabling you to review the recorded stream. If needed, use the additional tools to trim, compress, convert, and more.

That’s how to record Twitch streams as a viewer in AnyMP4 Screen Recorder! Provided the features it has to offer, it simply shows that AnyMP4 Screen Recorder is a go-to platform for recording computer screens. If interested, you might want to check how to record TV shows.
OBS Studio is a highly popular software for recording and live-streaming gameplay. It provides the option to add multiple video and audio sources, apply filters, and configure output settings to save Twitch streams in high quality. It is ideal for professional and skilled users who need full control over their screen recording.
Here’s how to record streams on Twitch using OBS Studio:
1.In the OBS Studio, move to the Settings tab and configure the recording settings. Navigate to the Output section and choose a destination where the recordings will be stored. Remember, select a location that’s easy to access for later viewing.
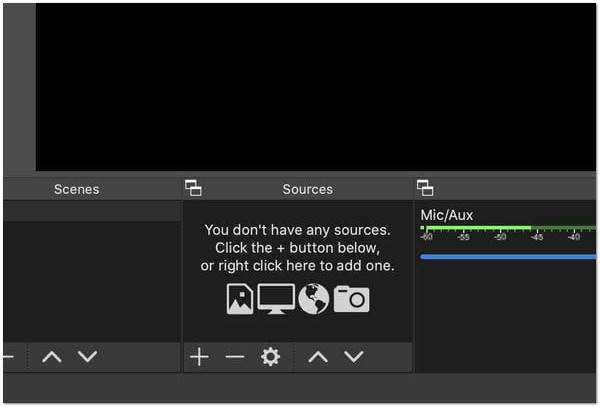
2.Switch back to the OBS Studio’s interface and proceed to the Sources panel. Open Twitch and navigate to the stream you want to record. Then, click + in the Sources panel and select Monitor Capture or Window Capture.
3.Once the Twitch stream appears correctly in the OBS preview, click the Start Recording button. The software will begin capturing the stream, including video and audio. Once the recording is completed, simply click the Stop Recording button to end.
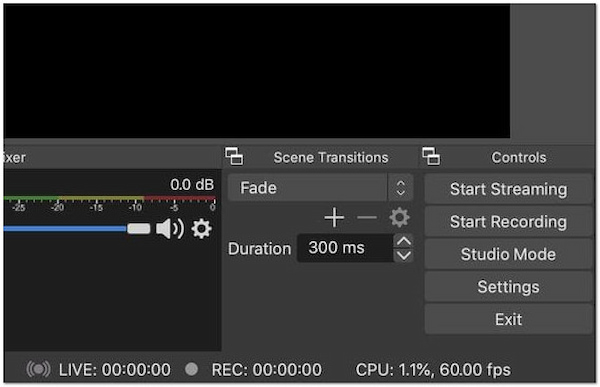
OBS Studio is a great tool for recording on-screen activities with multiple input sources. However, you should be aware that it can be intimidating for first-time users due to its complex interface. It takes time to master the best settings for optimal recording.
This post provided various methods to record Twitch streams, ensuring there’s an option for everyone. These tools make it easier to save streams for private viewing. But if you’re looking for the best software that can elevate your recording experience, AnyMP4 Screen Recorder is what you need. Its customizable recording areas, multiple audio inputs, and annotation tools make it the perfect solution for high-quality recordings. Just ensure to use the featured software for personal purposes and your private viewing only.
 Posted by Riley Mitchell to Record Video
Related Articles
 Record NFL Games on YouTube TV and Never Miss a Fumble
Check this and learn how to record NFL games on YouTube TV. Save your money and watch on your own schedule. Learn about limitations and explore alternatives.
 100% Working Ways to Make a Sound on TikTok like Professionals
How to create your sound on TikTok? You can learn a complete guide to add voiceover, music library, and more to your video posts.
 How to Record a Video Call on Facebook Messenger Hassle-Free
Learn how to record a video call on Facebook Messenger using built-in features or third-party tools. Capture and save your memorable conversations today!
 How to Put Music On Instagram Story, Posts, and Reels
Want to learn how to add music to Instagram posts, stories, or reels? Read this article guide to learn how to improve the entertaining value of your posts.