Capturing and sharing your Nintendo Switch gameplay has become a must for gamers, streamers, and content creators. However, the Nintendo Switch’s built-in screen recording feature only saves the last 30 seconds of gameplay. Although this is useful for quick highlights, it falls short for full matches and HD recordings. In this post, you’ll learn how to record Switch gameplay beyond the 30-second limit using different methods. This includes the console’s native capture feature, capture cards, and third-party recording software. Whether you want longer recordings, higher resolution, or streaming-ready clips, this tutorial will help you unlock the full potential of your Nintendo Switch gaming experience.
The Nintendo Switch comes with a built-in capture feature that can save screenshots and short video clips. By default, this feature only records the last 30 seconds of your gameplay. It is perfect for capturing quick highlights or surprise moments, but not ideal for longer gaming sessions.
Here’s how to record Switch gameplay using built-in capture feature:
1.Ensure your Nintendo Switch is up to date with the latest system software.
2.While playing a game, press and hold the Capture button on the left Joy-Con.
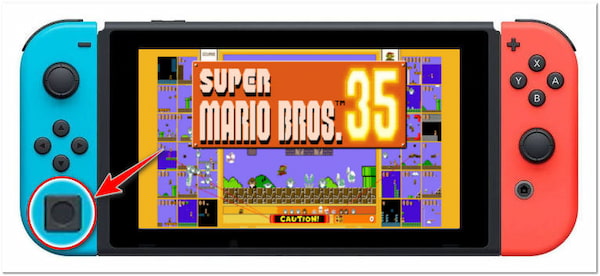
You’ll hear a sound effect indicating that the last 30 seconds of your gameplay have been captured.
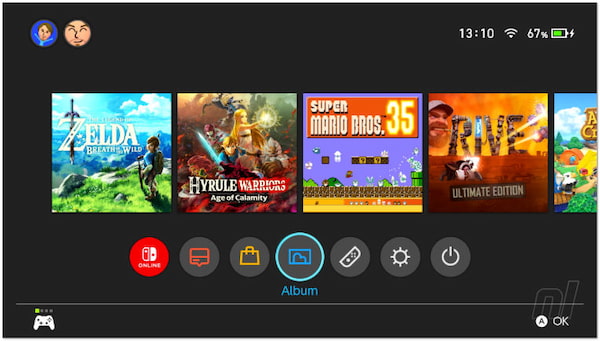
3.Go to the Album on your Nintendo Switch’s home screen to view and edit clips.
Using the Nintendo Switch’s built-in capture features gives you convenience. It’s readily available on all Nintendo Switch devices without additional hardware or software. However, the built-in feature records only the previous 30 seconds of gameplay, which can be restrictive for longer recordings.
To record Switch gameplay without time limits, a capture card is essential. Popular options include Elgato HD60 S / 4K60 S+ and AVerMedia Live Gamer Portable 2 Plus. Elgato is widely used by streamers, reliable for 1080p or 4K recording. Meanwhile, AVerMedia is portable and easy for on-the-go recording.
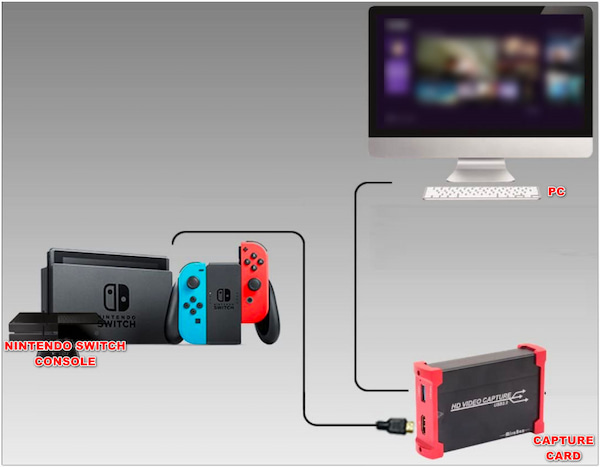
1. Invest in a capture card compatible with the Nintendo Switch. Connect your Nintendo Switch to the capture card using an HDMI cable.
2. Connect the capture card to the PC using the appropriate connection. Download and install the capture card’s associated software on your computer.
3. Set the Switch’s TV Output to 1080p under System Settings, then select TV Output for HD recording. Start your Nintendo Switch, launch your game, and click the Record button in the capture software. Once you’re finished recording, click the Stop button in the capture software.
Using a capture card provides you with high-quality recordings with minimal lag. Also, you can record gameplay for extended durations, suitable for Let’s Play videos or live streaming. However, Capture cards can be expensive, making them less accessible for casual gamers. Besides that, installing a capture card requires technical knowledge. (Check more game video editors here.)
Once your capture card is ready, AnyMP4 Screen Recorder can handle the actual recording. It is the best switch recorder that allows you to bypass the 30-second limitation of the built-in capture feature. It can produce high-quality, full-length gameplay with up to 4K video resolution with no lags. This multimodal recorder can capture commentary through a microphone and ensure a smooth audio-video synchronization for streaming or content creation.
Always test a short clip first to make sure audio and video are in sync and that latency is minimal before starting a long recording session.
Recommendation
Here’s how to record Switch gameplay using AnyMP4 Screen Recorder:
1.Beforehand, click the Free Download button below to acquire AnyMP4 Screen Recorder. After downloading the program, install it on your computer.
Secure Download
Secure Download
2.Connect the HDMI cable’s end to the Nintendo Switch’s output port and the capture card’s HDMI input port. Next, connect the capture card to your computer via USB. On your Nintendo Switch, navigate to System Settings, select TV Output, and configure the TV Output to 1080p for HD recording. Ensure the console is properly docked if using TV output.
Using high-quality HDMI cables helps reduce lag and ensures stable video transmission.
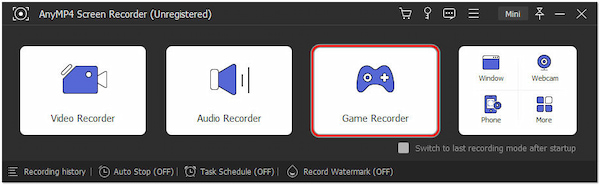
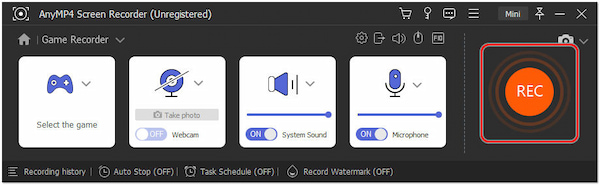
3.Launch AnyMP4 Screen Recorder and select Game Recorder as your recording mode. In the Game Recorder window, select your capture card as the video source. Set your desired resolution and frame rate for the best results. Don’t forget to enable system audio to capture game sound.
4.Click the REC button in AnyMP4 Screen Recorder to start recording. Play your Nintendo Switch game, and the software will capture the gameplay.
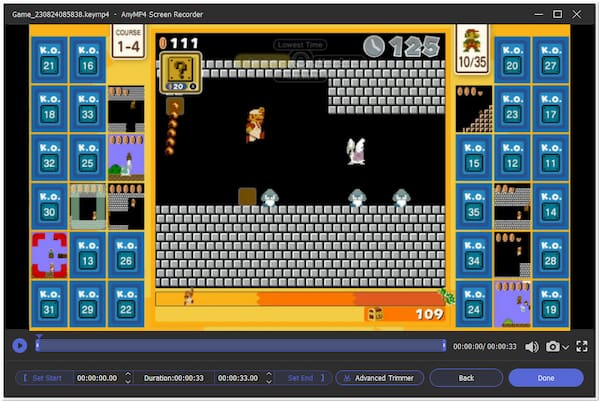
5.Click the Stop button once you finish your gameplay session.. A Preview window will appear, allowing you to trim, cut, or save your recording.
Recording Nintendo Switch gameplay via streaming using AnyMP4 Screen Recorder allows you to capture high-quality footage for sharing or content creation. It is a powerful tool for capturing Nintendo Switch gameplay, offering a user-friendly experience and various customization options.
How do you record on Nintendo Switch for more than 30 seconds?
To record Nintendo Switch gameplay for over 30 seconds, use AnyMP4 Screen Recorder and follow the earlier steps. It allows you to record gameplay for extended durations, making it a suitable choice for capturing longer gameplay sessions.
Why can’t I record some games on Switch?
Not all Nintendo Switch games support the console’s built-in capture feature. Some games turn off this feature to prevent spoilers or for other reasons. In such cases, you won’t be able to use the native capture feature to record gameplay. However, external capture cards or recording software like AnyMP4 Screen Recorder can often handle these restrictions.
Can you play 60 seconds on Nintendo?
NO! The Nintendo Switch’s native capture feature allows you to record the previous thirty seconds of gameplay, not 60 seconds. It captures short video clips and screenshots. However, using an external capture card or recording software like AnyMP4 Screen Recorder, you can record gameplay for longer durations, including 60 seconds or more.
How does recording the last 30 seconds work?
The Nintendo Switch’s built-in capture feature allows you to save the last thirty seconds of gameplay. When you press the capture button, it essentially saves the previous 30 seconds of gameplay footage as a video clip. It is a useful feature for capturing unexpected moments or achievements in games.
What games can you record on Nintendo Switch?
Most Nintendo Switch games support the built-in capture feature, allowing you to record and save gameplay clips and screenshots. However, there are exceptions. Games that restrict or turn off this feature do so for various reasons, including preventing spoilers or maintaining the game’s integrity.
Do I need an HDMI Splitter?
You only need an HDMI splitter if you are trying to bypass High-Bandwidth Digital Content Protection (HDCP). Some streaming apps on the Nintendo Switch use HDCP to prevent recording. While most standard gameplay isn't restricted, a splitter can help if your capture card displays a protected content error.
Why does my Switch recording have no sound?
Missing audio is usually caused by incorrect settings or HDCP interference. If your software picks up video but no sound, ensure your capture card’s audio input is enabled in your recording software. Additionally, go to the Switch System Settings and ensure TV Sound is set to Stereo rather than Surround Sound.
Are there differences when recording Switch Lite gameplay?
Yes, and they are significant. The Nintendo Switch Lite lacks the internal hardware to output video via USB-C. Because it cannot be docked, it cannot connect to a standard capture card. To record Switch Lite gameplay, you would need to use an external camera or a professional hardware modification.
Does recording Switch gameplay affect the game's performance?
No. Recording gameplay does not impact the console's performance. Since the video processing is handled externally by your capture card and PC, the Switch doesn't know it's being recorded. Even using the Switch’s built-in 30-second capture button has a negligible impact, as the console is designed to handle that background task natively.
In the vibrant gaming world, recording and sharing your Nintendo Switch gameplay is a gateway to connecting with fellow gamers and reliving your most triumphant gaming feats. With the guidance provided in this how to record Switch gameplay guide and the capabilities of AnyMP4 Screen Recorder, you now possess the tools and knowledge needed to elevate your gaming journey. So, whether you’re diving into the world of content creation or just preserving cherished moments, remember that the power to capture and share your Switch gameplay adventures is firmly in your hands. Happy gaming and recording!
Secure Download
Secure Download
 Posted by Riley Mitchell to Record Video
More readings
 Two Proven Ways to Record Gameplay on Play Station 4 for
In this tutorial, we will show you how to record PS4 gameplay either using the built-in digital video recorder or with a professional PS4 game recorder.
 What Is LoiLo Game Recorder and How to Use It to Capture Gameplay
As a game recording application, LoiLo Game Recorder is free and it has no watermark. You can get a complete review and guide in this article.
 Top 17 Game Recording Applications for Windows and Mac
If you are looking for a game recording tool for Windows or Mac, here is a list that helps you make the best decision and produce high-quality gameplay videos.
 Recoding Valorant Gameplay using Software and Online Tools
Let us save the incredible experience of gaming. See this post and discover how to record Valorant gameplay using the best software and online tools.