Secure Download
Secure Download
The Oculus Quest 2 is a beacon of innovation in the captivating virtual reality world, offering users an immersive escape into fantastical realms and gaming adventures. This remarkable headset transports you to places beyond your imagination, enabling you to wield lightsabers, explore alien worlds, and engage in epic battles. Yet, as you journey through these virtual landscapes, you may wish to share your experiences to capture the awe-inspiring moments that unfold within Quest 2. It is where recording becomes invaluable.
In this post, we will teach you how to record on Oculus Quest 2, exploring both the built-in recording feature of the headset itself and the powerful capabilities of AnyMP4 Screen Recorder. Together, we’ll navigate the steps and uncover the potential for preserving and sharing your virtual reality escapades.

The answer to “Can You Record Oculus Quest?” would be YES! You can record your Oculus Quest gameplay and experiences. Recording Oculus Quest gameplay can be a great way to capture and share your VR experiences with others or for personal use. There are two methods you can use to record your Oculus Quest. The first method is using the built-in recording feature. The Oculus Quest has an in-built feature that allows you to record gameplay. On the other hand, if you want more control over recording and potentially better quality, you can use third-party screen recording software. It involves connecting your Oculus Quest to a computer and using software like AnyMP4 Screen Recorder to record Oculus Quest 2 gameplay.
The Oculus Quest 2, an immensely popular virtual reality headset, has a built-in recording feature allowing users to capture and share their experiences. The built-in recording feature is incredibly straightforward to use. With just a few clicks within the Oculus menu, you can start and stop recording your gameplay or activities.
Here’s how to screen record on Oculus Quest 2:
1. Before you start, enable Developer Mode on your Oculus Quest 2. Though this step is optional, it can be useful if you want to access additional features. Sign up as a developer through the Oculus Developer Dashboard to enable this mode.
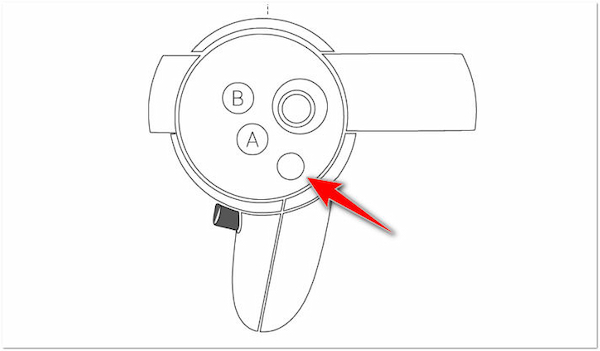
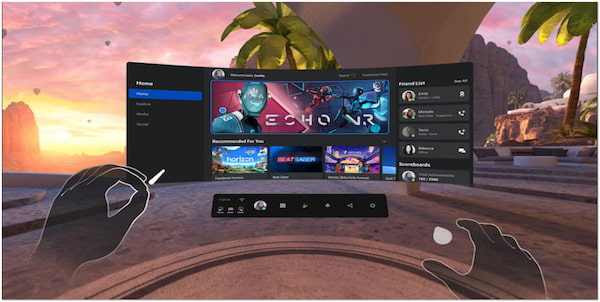
2. Put on your Oculus Quest 2 headset. Press the Oculus button on your right-hand controller in the VR environment to open the Oculus menu. In the Oculus menu, navigate to the Sharing tab.
3. Choose to record video, audio, or both. After you’ve selected your recording preferences, return to the VR environment by pressing the Oculus button again. Open the game or application you want to record.
4. To stop recording, press the Oculus button on your controller again to bring up the Oculus menu. Navigate to the Sharing tab once more. Select Stop Recording to finish the recording. Your recordings will be saved on your Oculus Quest 2.
The built-in recording feature of the Oculus Quest 2 is a convenient way to capture and share your virtual reality experiences. However, the recorded videos may be subject to some compression, potentially leading to a slight reduction in video quality. Moreover, if you need to refine your gameplay video recording file, you can freely download game editor software.
Note: Native recordings may be subject to some compression, potentially leading to a slight reduction in video quality. For a Quest 2 recording blurry fix, you can optimize settings via ADB command recording below.
For higher-quality recordings beyond the default settings, you can tweak the Oculus Quest 2 native recording via ADB (Android Debug Bridge) commands. This method lets you adjust resolution, bitrate, and frame rate to capture sharper, smoother videos.
1. Install SideQuest and be sure to complete the setup process. Then, plug the headset into your PC using a USB cable. In SideQuest, go to the menu bar and click Run ADB Commands and select Custom Command.
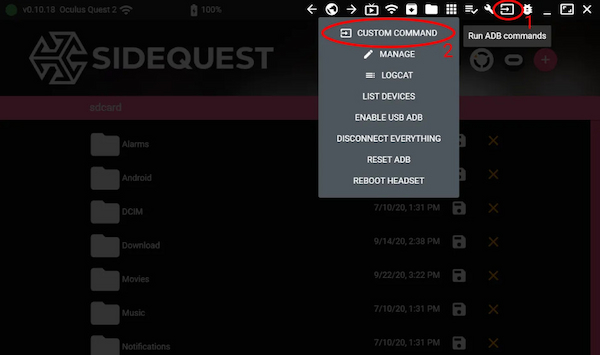
2. Enter the following commands, one line at a time, pressing Run Command after each:
adb shell setprop debug.oculus.capture.width 1440
adb shell setprop debug.oculus.capture.height 1080
adb shell setprop debug.oculus.fullRateCapture 1
adb shell setprop debug.oculus.capture.bitrate 30000000
3. After running these commands, you can disconnect the headset from your PC. Use the Oculus Quest 2 Record Video feature as usual. The settings applied via SideQuest will allow you to capture higher-quality videos.
Note: Resetting your headset will revert these settings to default. Always test a short recording first to ensure performance is stable.
Using this method ensures your Quest 2 high bitrate recording is smooth, detailed, and ready for any VR video sharing format you choose.
If you want high-quality VR recordings without dealing with complicated settings or codec configurations, AnyMP4 Screen Recorder is the best Oculus Quest 2 recorder. It extends your Oculus Quest 2 VR experience to your PC, offering reliable performance and high-quality capture even in complex scenarios. recording through a PC via Oculus Air Link recording or Oculus Link gives you several advantages. This includes higher bitrate, less compression, and more consistent frame rates. Native Quest 2 recording is limited by headset processing power and storage constraints. This can introduce compression artifacts and slightly lower visual quality. Meanwhile, using a PC eliminates these hardware limitations and allows more flexibility with audio and video sources.
Recommendation
Here’s how to record Oculus Quest 2 gameplay using AnyMP4 Screen Recorder.
1. Ensure your Oculus Quest 2 is turned on and working properly, and prepare the Oculus Quest 2 screen recorder. If you haven’t already, click the Free Download button below to acquire AnyMP4 Screen Recorder and install it on your computer.
Secure Download
Secure Download
2. Connect your Oculus Quest 2 to your computer using a USB cable. Put on your Oculus Quest 2 headset and activate Oculus Link. It will allow your Oculus Quest 2 to be recognized as a PC VR headset by your computer.
Note: To record Oculus Quest 2 gameplay, you must use the Oculus Link feature to connect your headset to your computer. Make sure you have Oculus Link set up and installed on your computer.
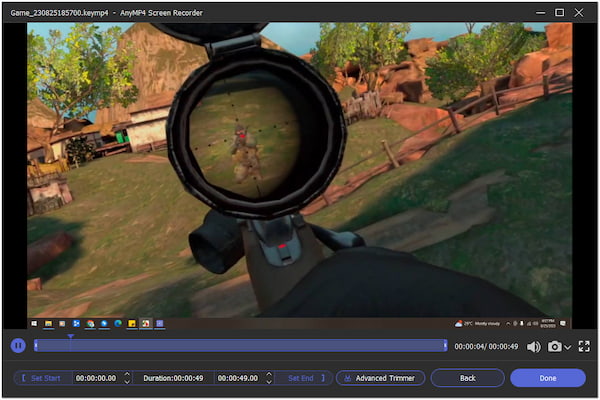
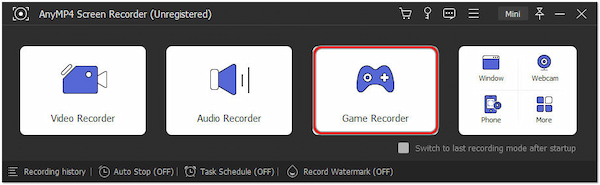
3. Launch the AnyMP4 Screen Recorder on your computer and navigate to the Game Recorder tab. The Game Recording Mode will require administrator privileges; click OK to run it as the administrator.
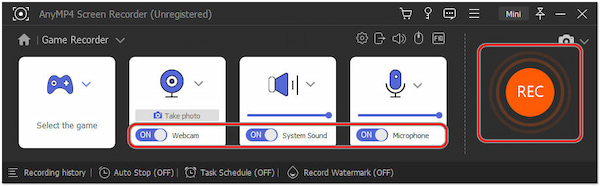
4. In the Game Recorder window, configure your recording settings. You can enable the System Sound, Microphone, and other recording preferences. Once you’ve configured your recording settings, click REC to begin recording.
5. Put on your Oculus Quest 2 headset and start the game or application you want to record. When you’re finished recording, return to your computer and click the Stop button in AnyMP4 Screen Recorder to stop the recording.
AnyMP4 Screen Recorder is a powerful game recording tool for recording Oculus Quest 2 content on your computer. Its extensive customization options and advanced features make it a great choice for users seeking more control and higher-quality recordings.
Does the Oculus Quest 2 record you?
The Oculus Quest 2 has a built-in recording feature that lets you record gameplay and activities within the virtual reality environment. It typically records what’s happening in the game or application, including your in-game actions and interactions with the virtual world. Still, it doesn’t record your physical movements or appearance outside the virtual environment.
Can you record Oculus Quest streaming to the Xbox?
The Oculus Quest 2 is primarily a standalone VR headset and doesn’t natively support streaming to an Xbox console. However, you can cast your Oculus Quest 2 gameplay to a smartphone or compatible TV for others to watch. It would help to have external recording equipment like a smartphone screen recorder app or a PC capture card to record this casted content.
Where are Oculus Quest game records stored?
Recorded videos on the Oculus Quest 2 are typically stored in the Videos folder within the Oculus Quest 2’s internal storage. You can access them via the Oculus Quest 2’s Gallery app.
Does the Quest 2 record audio?
YES! When you use the built-in Oculus Quest 2 recording feature, it records both video and audio. It means it captures the sounds from the game or application you’re using and any in-game or in-app voice chat or audio commentary you provide.
How do I record 4K on Oculus Quest 2?
The Oculus Quest 2’s built-in recording feature typically records at a maximum resolution of 1080p. It doesn’t natively support 4K recording. For 4K recording, you must use third-party capture equipment and software that supports 4K video capture, like AnyMP4 Screen Recorder. You can follow the provided steps earlier and configure the recording settings to perform it.
Can the recording FOV (Field of View) be adjusted?
The default built-in recording captures a slightly narrow FOV. The native Quest 2 settings don’t allow full FOV adjustment. However, using ADB command recording or PC recording via Oculus Air Link recording can capture a wider view.
How can I add third-party background music to VR videos?
After recording, you can import your VR footage into video editing software. Then, add background music tracks in post-production. This is useful for creating content in a preferred VR video sharing format.
Can the user's UI/HUD be hidden during VR video recording?
Yes! In some apps, the Oculus Quest 2 built-in recording settings allow hiding UI elements or HUD overlays. If not available in-game, PC recording software like AnyMP4 Screen Recorder provides options to crop these elements during capture.
What should I do if the screen lags while recording via Air Link?
Screen lag is usually caused by network bandwidth limitations. To reduce lag, ensure both your PC and Quest 2 are on a 5GHz Wi-Fi network. Also, minimize other devices using bandwidth.
In the how to record on Oculus Quest 2 guide, we’ve discovered two dynamic tools that empower users to transform their virtual reality experiences into cherished memories and engaging content. The built-in recording feature of the Oculus Quest 2 is straightforward and user-friendly. On the other hand, AnyMP4 Screen Recorder broadens your horizons, offering advanced features and customization options. Whether you opt for the simplicity of the built-in feature or the flexibility of AnyMP4 Screen Recorder, remember that the Oculus Quest 2 isn’t just a portal to virtual worlds; it’s a canvas for sharing your stories. Your adventures deserve to be cherished, your victories celebrated, and your tales shared. So, embrace the joy of recording, and may your virtual reality journey continue to inspire and captivate. Happy recording!
 Posted by Alice Thorne to Record Video
More readings
 The Ultimate Guide to Record Xbox 360 Gameplay Video with Ease
How to capture and record high quality gameplay videos from Xbox 360? Just learn more about the ultimate guide to capture a satisfied gameplay video here.
 Best Recording Software for PUBG with Audio for Mobile and Computer
How to Record PUBG with internal audio on your Android phone or computer? Just learn more about the most recommended screen recorders for PUBG gameplay here.
 4 100% Working Methods to Record LOL Gameplay on PCs and Mac
We'll show you how to record League of Legends gameplay using Windows 10 Game Bar, Mac QuickTime, the built-in recording function and more options.
 Recoding Valorant Gameplay using Software and Online Tools
Let us save the incredible experience of gaming. See this post and discover how to record Valorant gameplay using the best software and online tools.