Steam has become the ultimate place for accessing some of the hottest games available. Beyond playing games, Steam encourages players to connect, share, and showcase their gaming moments with the community. Several content creators share their gameplay videos to entertain, educate, and engage other players. In this post, we will get into the process of how to record a video on Steam. This way, you can capture epic gameplay, share highlights, and create engaging content for others. So, what are you waiting for? Let’s keep going.

Steam is a leading digital game distribution platform developed by Valve Corporation. It serves as a go-to platform for purchasing, downloading, and managing games. In addition, it offers features like community forums, achievements, live streaming, and a marketplace for in-game items. Recently, Steam has introduced a feature that allows gamers to capture their gameplay. It enables them to record memorable moments, showcase achievements, and create content for social sharing. The introduction of the Game Recording Beta feature provides an integrated tool to record games directly within the platform. Players can choose between automatic background recording or manual recording.
Steam, a highly popular gaming platform, has released a screen recording feature in its Beta version. This allows gamers to record Steam gameplay without needing additional software. Recordings can be captured automatically or manually by pressing Ctrl + F11. It can capture the last 240 minutes as temporary clips for replay or save.
Here’s how to record gameplay on Steam with its built-in recording feature:
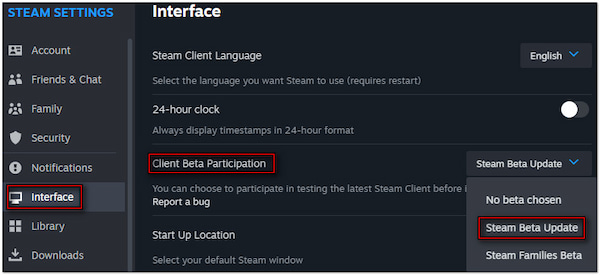
1. On the Steam homepage, click the Steam option in the top menu and select Settings. Proceed to the Interface tab and look for the Client Beta Participation section. Click the dropdown next to it and switch the default option to Steam Beta Update. Then, you'll need to click the Restart button to update Steam to the Beta version.
2. Repeat the previous step, but this time, go to the Game Recording tab and choose your recording mode. There are three recording modes available: Recording Off, Record in Background, and Record Manually. These modes allow you to:
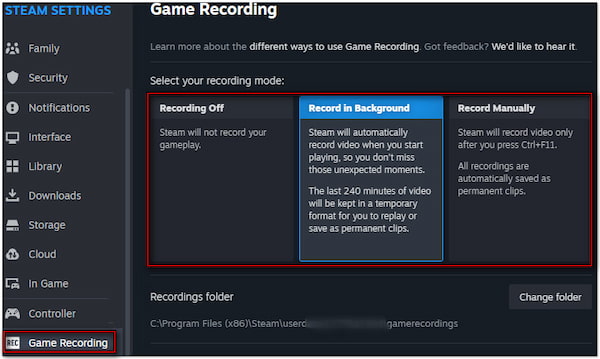
Record Off: Steam won’t record the gameplay.
Record in Background: Steam will record automatically upon starting the game.
Record Manually: Steam will record after pressing the Ctrl + F11 key combinations.
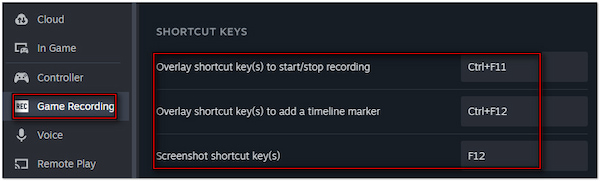
Pro Tip: Under the SHORTCUT KEYS section, you can set up Steam video recording hotkeys. Specify the shortcut key for start/stop recording, timeline marker, screenshot key, etc.
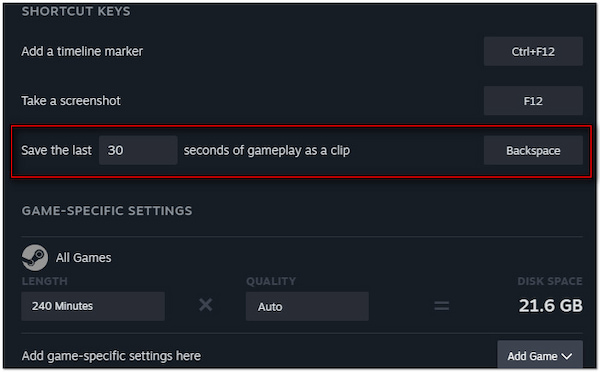
3. Next, launch the game, knowing the recording was set up and ready. For Record in Background, you have the option to save the last 30 seconds of the gameplay as a clip. Simply set up the hotkey and adjust the recording duration if needed.
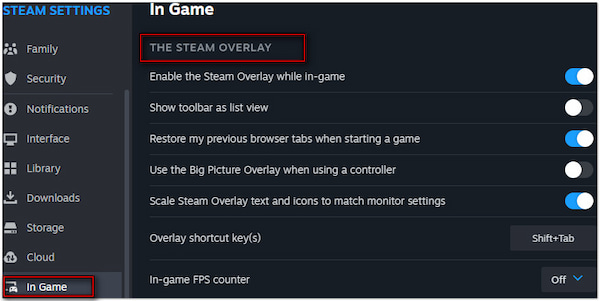
4. Move to the In Game tab for more in-game settings configurations. Press the Shift + Tab key combinations to turn on the Steam Overlay in-game. Apart from that, you can also enable other settings like In-game FPS counter, screenshot notifications, etc.
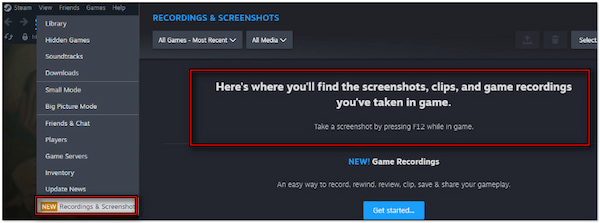
5. Once the gameplay recording is over, click View in the top menu. Proceed to the Recordings & Screenshots tab to access the game recordings and screenshots you have taken in the game. If needed, clip, save, and share the recording by clicking Get Started.
That’s how to record gameplay on PC Steam using its built-in feature! Although convenient, Steam’s built-in recording feature lacks customization options, such as setting up a recording area. If you want to learn how to record video on Mac, just check this out!
Steam’s built-in recording feature only works for games started on Steam. In other words, it cannot record non-content games and other desktop screen activities. If you need flexible screen recording software, AnyMP4 Screen Recorder is your one-stop solution. It provides seven recording modes, including Screen Recorder, Audio Recorder, Screen Capture, Game Recorder, Window Recorder, Webcam Recorder, and Phone Recorder.
In addition, AnyMP4 Screen Recorder allows customization of recording settings. It allows you to choose your preferred recording area, add system sound and microphone input, overlay the webcam, add a custom watermark, and more. Aside from that, it includes drawing and annotation tools to make your video recording more engaging. The best part? It can capture your gameplay in 4K resolution without limitation on time length.
Here’s how to record a video on Steam with AnyMP4 Screen Recorder:
1. Start by getting the free download of AnyMP4 Screen Recorder. Install the one-stop screen recording software and wait for the installation process to finish. Once the installation is completed, launch the AnyMP4 Screen Recorder on your computer.
Secure Download
Secure Download
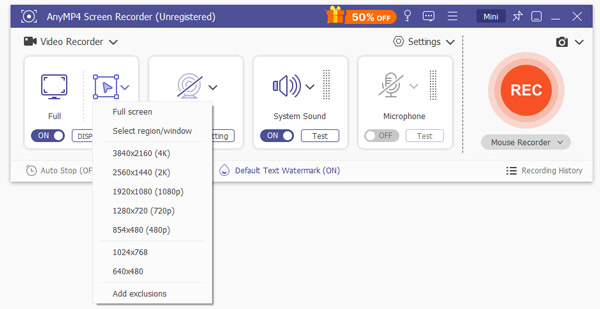
2. Once the software opens, you’ll be headed to the Screen Recorder mode by default. In the first tab, select your preferred recording area to record gameplay on Steam. Choose Full to capture the entire Steam gameplay or Custom to focus only on the video.
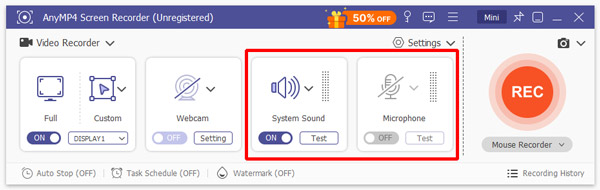
3. The Steam gameplay isn’t entertaining without sound effects. In the same menu bar, toggle on the Sound System to capture game audio. Also, you can turn on the Microphone to include your voice in the recording. If needed, adjust their volumes for the best results.
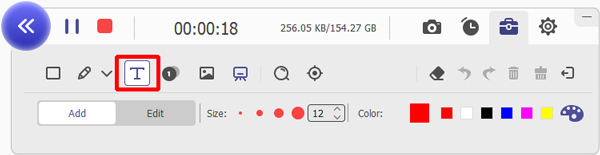
4. Once everything is good to go, click the big REC button to start the recording. A three-second countdown gives you time to prepare before the recording starts. During the recording, a floating bar will appear with helpful tools:
Camera: Take a screenshot to capture Steam gameplay without pausing the recording.

Toolbox: Access drawing and annotation tools and use them to add customizable borders, lines, arrows, etc. Apart from that, you can also input text, callouts, and even custom images.
5. After capturing the Steam gameplay, click the Red Square button to stop the recording. By doing so, it will bring up the preview window, where you can watch the recorded clip. Before saving, you can edit the recording by trimming the unnecessary clips.

Given the features offered by AnyMP4 Screen Recorder, it shows that it is the best video recording software you could ever have. It has several recording modes for your specific recording needs. Plus, its countless features make it more truly worth considering.
Sharing gameplay on Steam is a way to showcase your skill and memorable in-game moments. Posting them on Steam lets you relive those moments and help you connect with other gamers who share similar interests. If you want to know how it works, check the guides below:
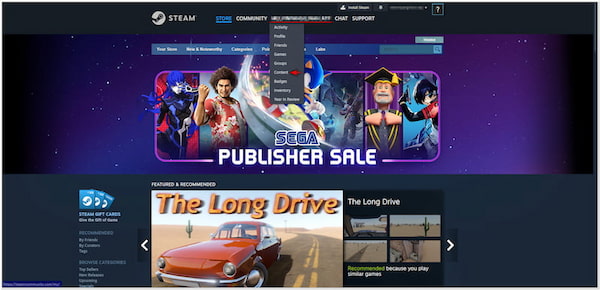
1. Open a browser and reach the official website of Steam. Input your account name, enter your password, and click Sign In. On the Steam homepage, click your username and select the Content option to access the page of your activities.
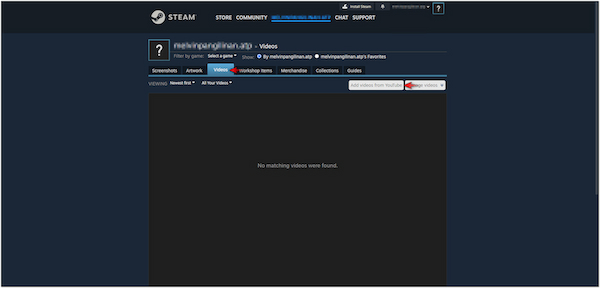
2. Once in, switch to the Videos tab and click the Add Videos from YouTube button. Select the recorded gameplay to import and share it on your Steam profile. Remember, you can only add videos to Steam that you have previously uploaded to YouTube.
3. After you’ve added the recorded videos from YouTube, go back to your Steam profile. In the Video tab, put a checkmark on the recorded videos you want to post. Then, click the Add Video button to successfully post the recorded game to your profile.
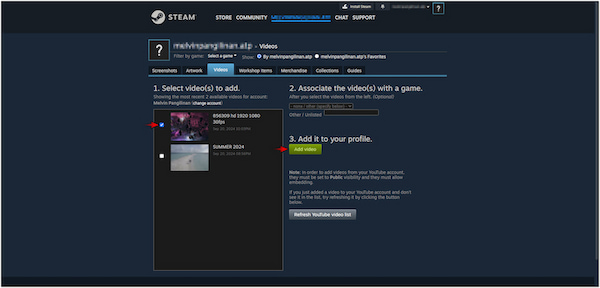
Important Note: Linking your YouTube account to Steam is essential, mainly if it is your first time to share a video on the platform. After you have successfully linked your YouTube account, you will be able to select the existing video and add it to your Steam profile.
Mastering how to record a video on Steam lets you capture and share your most exciting gaming moments. Steam’s built-in recording feature offers a simple way to get started. However, it comes with its limitations in terms of customization and flexibility. If you’re looking for more advanced recording options, AnyMP4 Screen Recorder is the perfect tool for you. This software allows you to capture your gameplay with more control and features. It lets you customize recording settings, capture gameplay in 4K resolution, add drawings and annotations, etc.
 Posted by Riley Mitchell to Record Video
More readings
 How to Record 3DS Gameplay With/Without Capture Card
Learn how to record 3DS gameplay like a pro. Discover tips, tools, and techniques for capturing the Nintendo 3DS gaming moments and sharing them with the world.
 How to Record Switch Gameplay More Than 30 Seconds
Learn how to record Switch gameplay with step-by-step guide using built-in features, capture cards, and third-party apps. Start your game recording today!
 5 Best Game Recorder PC for Capturing Your Epic Moments
Looking to record your PC gaming sessions? Explore the best game recorder for PC we have listed. Record, relive, and share gaming experiences with ease.
 How to Record Webcam Videos on Windows and Mac
Learn how to record webcam videos with ease. Explore five tools and methods for high-quality webcam recordings in this comprehensive guide.