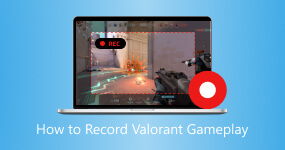
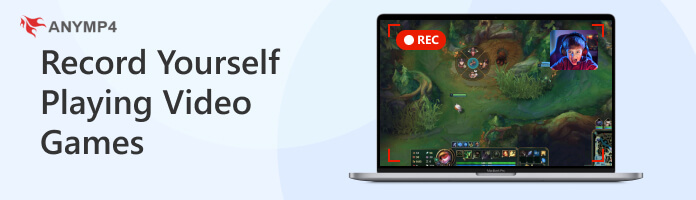
How to Record Yourself Playing Video Games in High Quality
Often, gamers record their gameplay to demonstrate strategies and tricks to help other players navigate challenging games. They share it on various platforms to entertain and engage their audiences. This scenario highlights why having the right recording tool is essential for gamers. This post will show you several ways to record yourself playing video games. An option is available whether you’re using a desktop, phone, or browser. So, without further discussion, let’s explore all of them.
Part 1. Record Yourself Playing Video Games with a Professional Game Recorder
Compatibility: Mac OS X 10.9 or later and Windows XP, Vista, 7, 8, 10, or 11
AnyMP4 Screen Recorder is a professional screen recorder that captures playing games with customization options. The software allows recording gameplay in up to 4K resolution at 120 fps. Plus, you can include multiple inputs, including a webcam, system sound, and microphone. But what makes it truly remarkable is its ability to save recordings in various formats. These are MP4, MOV, WMV, MKV, F4V, WebM, MPEG-TS, GIF, etc.
FEATURES:
- Record yourself while playing games without a duration limit.
- Schedule gameplay recording at your preferred time and date.
- Comes with a screenshot tool, drawing tools, and annotation tools.
- Built-in advanced video trimmer, file compressor, media converter, etc.
Here’s how to record yourself playing video games using AnyMP4 Screen Recorder:
1.Start by downloading the AnyMP4 Screen Recorder for free. Install the professional game recorder and allow the installation process to finish. Once the installation is complete, launch the AnyMP4 Screen Recorder on your computer afterward.
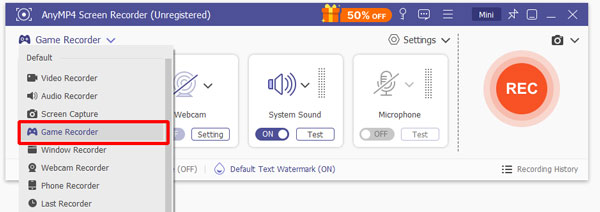
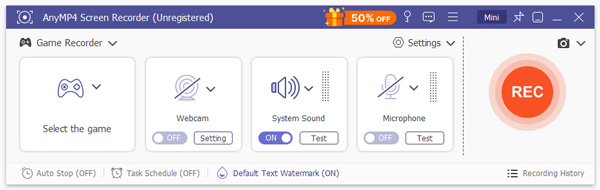
2.Upon opening the software, you’ll be taken to Screen Recorder mode by default. Though it can record video games, there is a specific mode for capturing gameplay. Click the dropdown arrow next to it and choose the Game Recorder mode. Just so you know, this mode is built for high-performance game recording, ensuring no lags during recording.
Important Note: Don’t forget to grant the administrator access to operate. To do so, check the Always Run as Administrator box and click OK to run the software as the administrator.
3.Locate the video game you want to record yourself in the Select the Game tab. Then, toggle the System Sound and Microphone on. Turning these buttons on allows you to capture both the in-game sounds and include your voice in the recording.
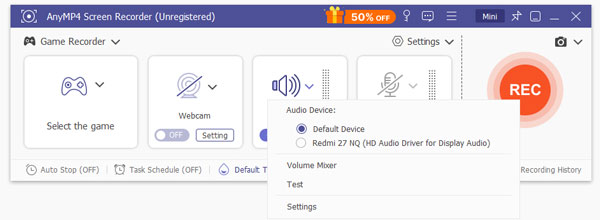
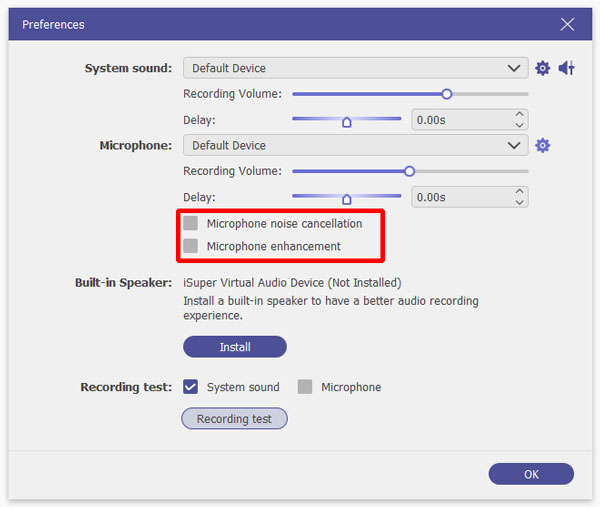
Pro Tip: Turn on the Webcam to include yourself in the recording. In addition, you can configure the audio recording settings for the best results. It includes System Sound/Microphone recording volume, Microphone noise cancellation, and Microphone enhancement.
4.Once everything is prepared and you’re good to go, click the big REC button. The selected game window will open, and a three-second countdown will begin. Please be informed that you won’t be able to adjust the window range while recording.
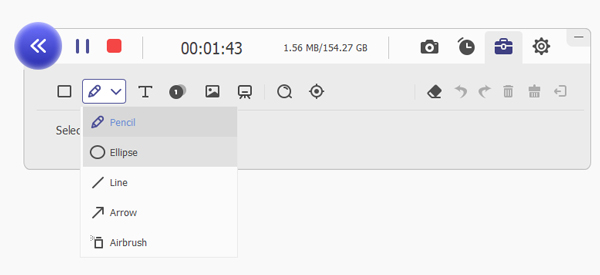
Pro Tip: Under the game window, you will find a floating bar. This bar comes with several tools that can be used while recording games. Click the Camera button to take screenshots of your game highlights. Also, you can use the annotation tools that are accessible in the Toolbox. Some tools you can use are lines, shapes, borders, texts, etc.
5.At the end of the game, click the Red Square button to end the recording. The game you have recorded will be saved to your local file, and the preview window will pop up. You can make edits from here, such as trimming, boosting sound, extracting sound, etc.

That’s how to record while playing a game in AnyMP4 Screen Recorder. This software provides extensive features to ensure you have everything you need when recording gameplay. Apart from Game Recorder, it also offers Screen Recorder, Audio Recorder, Window Recorder, Webcam Recorder, Phone Recorder, and Screen Capture.
Part 2. Record Yourself Playing Video Games with Windows Built-in Recording Tool
Compatibility: Windows 10 and Windows 11
Xbox Game Bar is a customizable overlay on Windows that allows users to record and screenshot screen activities. It lets you record any active window, including games, along with in-game sounds. This built-in recorder tool can be accessed quickly by pressing a key combination.
Here’s how to record yourself playing video games on PC:
1.Press the Windows + G keys to run the Xbox Game Bar on your computer. Proceed to the Widget Menu and select the Capture option to access the recording modes. In the Capture tab, choose your preferred recording mode to capture yourself playing games.
2.Using the Windows + Alt + R combinations, you can skip the interface and start recording immediately. Press the Windows + Alt + PrtScn keys to take screenshots during recording. If you want to capture the last 30 seconds of your game, press Windows + Alt + G.
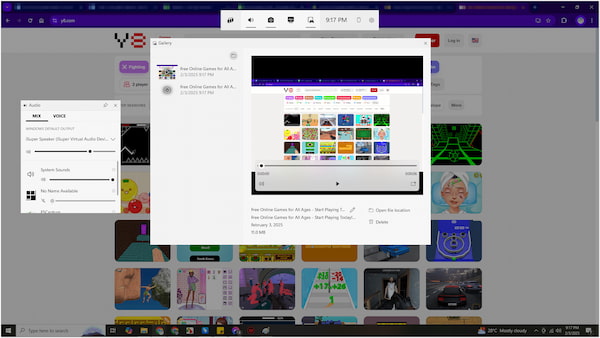
3.The recording continues until you stop it manually using the Windows + Alt + R key combinations. Switch to the Widget Menu and select Gallery to access the captured gameplay. You can also find the screenshots taken during the recording in this section.
You now know how to use Xbox Game Bar to capture your gameplay. So easy, right? But you should know that the recording quality maxes out at 1080p at 60fps.
Part 3. Record Yourself Playing Video Games with an Online Recorder
VEED is an internet-based tool that provides several features, including the ability to record playing games. It offers various recording layouts, like Camera, Audio, Screen, Screen & Camera, Slides & Camera, and Slides. Plus, it allows customization of gameplay recording.
How do I record myself playing video games? Just check the following guides below:
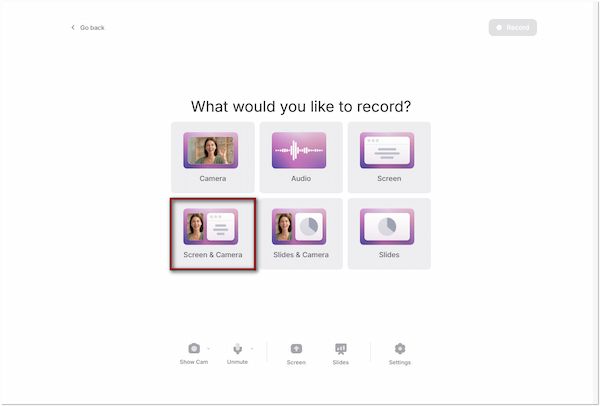
1.Navigate to Veed.io and select the Record Video from the dashboard. Since you want to record yourself playing games, choose the Screen & Camera option. Then, locate the game you want to record: Chrome Tab, Window, or Entire Screen, and click Share to proceed.
2.After the screen is shared, customize the appearance of your recording. Change the screen layout, resize the recording dimension, replace the background with color/image, and overlay a prompter. Once done with customizations, click Record to start game recording.

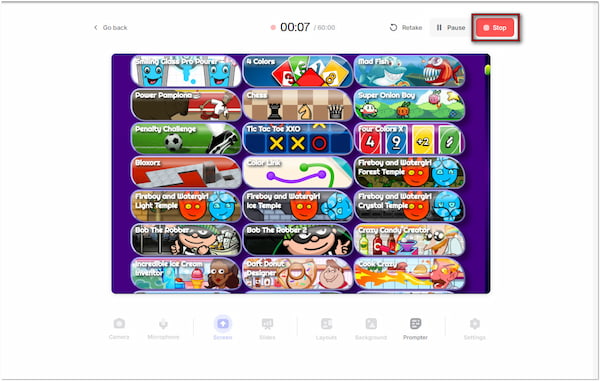
3.Turn on the Camera to include your face in the recording. If needed, unmute the Microphone to capture your voice. Once you’re done with the game recording, click Stop to end the game recording. If your recording didn’t go as planned, click the Retake button to start over.
4.After ending the recording, you will see the preview window. Here, you can add new scenes, change the customization applied beforehand, and even edit the recording. Click done and select the Continue with Watermark option to export the recording successfully.
VEED is a good enough option for recording quick games online. But here’s the deal: VEED’s free plan only allows 60 minutes of recording. In addition, it caps the quality of the recording at 720p. You must upgrade into a paid plan if you wish to record without limitations.
Part 4. Record Yourself Playing Video Games on Phone with Built-in Recording Tool
Compatibility: Android 11 or later and iOS 11 or later
Most modern phones are integrated with built-in recording features, enabling you to screen record on the go. You can access the feature and use it in just a few taps. The good thing is that you don’t need to install additional apps at all.
Here’s how do you record while playing a game on a phone:
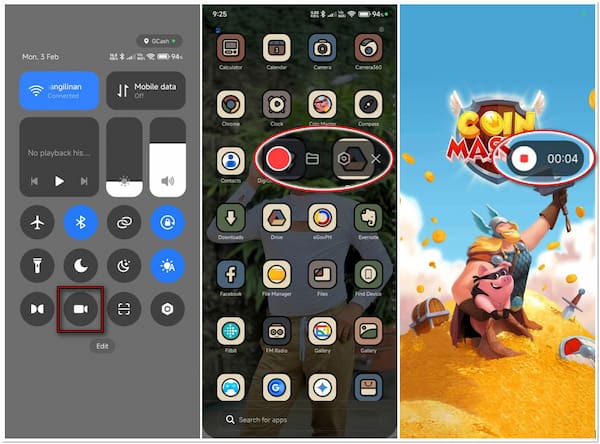
1.Launch the video game you want to record yourself. Swipe down from the top/bottom of your display to access the Quick Settings. Tap the Screen Recorder feature to activate the floating bar on your mobile phone’s display.
2.Once the game you want to record yourself is ready, tap Record to start recording. Usually, there’s a countdown timer that appears, giving you time to prepare. An indicator will appear once the video game recording begins, confirming the recording process.
3.When the game is over, end the recording by tapping the indicator on your display. The recorded video games are saved to your mobile phone’s gallery automatically. Move to your gallery to check the recordings and make edits if needed.
This demonstration only applies to Android devices, but the steps on iDevices are closely similar. For the detailed guide using iDevices, learn here how to record iPhone screen.
Conclusion
Mastering how to record yourself playing video games is an essential practice to showcase skills and provide tricks to fellow players. With so many tools available, you can effortlessly capture your gameplay on any device. But if you want an ultimate game recording experience, AnyMP4 Screen Recorder is our top recommended tool. It provides extensive features, high-quality recording, multiple input recording, and more.