
At a Glance:
To convert iTunes to MP3, you have two real options.
When you try to play your favorite iTunes tracks on a car stereo or a non-Apple device, you quickly realize it’s a no-go. A quick Google search tells you the fix is simple: just convert iTunes to MP3.
But in reality? The process is agonizingly slow, or the button is completely grayed out.
Let's clear the air right now. Your iTunes music files are probably NOT encrypted. Ever since 2009, Apple dropped DRM copy protection for iTunes Store purchases. If you are dealing with standard, DRM-free M4A files, like ripped CDs or recent digital purchases, they are completely open.The real reason you’re failing to convert them isn't encryption. It’s the fact that Apple’s native batch-conversion workflow is an absolute user-hostile nightmare. Trying to change hundreds of songs at once forces you to jump through hidden menus, completely scrambling your folder structure.
Stop wasting your time. Follow this guide to change your standard iTunes files into a universal MP3 format without losing your mind.
| Batch Conversion Speed | Keeps ID3 Tags | Max Bitrate | Ease of Use | Best For | |
|---|---|---|---|---|---|
| AnyMP4 Video Converter Ultimate | Extremely Fast (120x Hardware Sync) | Yes, perfectly intact | Up to 320kbps | Very Simple (Drag & Drop) | Power users with large music libraries |
| Apple Music App (Mac) | Slow (One-by-one background queue) | Yes | Up to 320kbps | Medium (Buried settings) | Mac users converting a few loose files |
| iTunes App (Windows) | Slow (High CPU usage) | Yes | Up to 320kbps | Medium (Clunky UI) | Windows users wanting a native free tool |
| AnyMP4 Free Online Converter | Dependent on upload speeds | Partially | Up to 320kbps | Easy | Quick, single-track conversions |
If your files are unprotected local tracks, ripped CDs, or post-2009 iTunes purchases, AnyMP4 Video Converter Ultimate is an absolute lifesaver. While Apple's built-in tools take hours to crawl through massive collections, AnyMP4 uses 120x faster hardware acceleration and multi-threading to batch-convert an entire folder of M4A tracks in minutes, saving you tons of time.
The best part? You get zero quality loss and absolute organization. Instead of losing punch like you often do with standard iTunes conversions, this tool lets you crank the output up to a high-quality 320kbps while tweaking the sample rate to match your source perfectly. It sounds flawless on high-end headphones.
Plus, it completely solves the nightmare of losing your album artwork or track numbers. The built-in metadata editor keeps all native ID3 tags intact, so your new MP3 folder won't turn into a messy graveyard of Unknown Artists.
How to use it:
1. Free download and launch AnyMP4 Video Converter Ultimate on your PC or Mac.
Secure Download
Secure Download
Click Add Files or simply drag and drop your exported iTunes M4A files into the main dashboard.
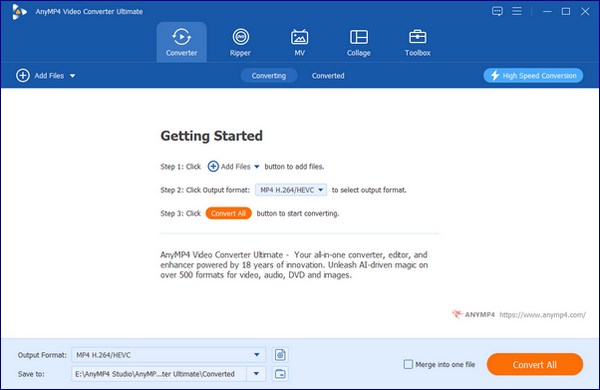
If you want to keep your file structures perfectly clean, click the drop-down arrow next to Add Files and select Add Folder. This lets you import entire artist or album directories at once, saving you from manual selection fatigue.
2. Click the Output Format dropdown menu in the bottom left corner, select the Audio tab, and choose MP3 (Select High Quality - 320kbps).
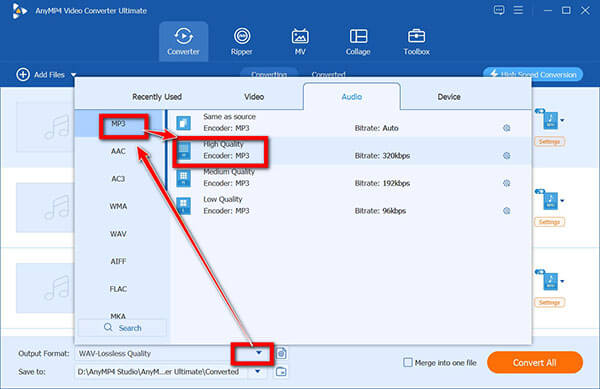
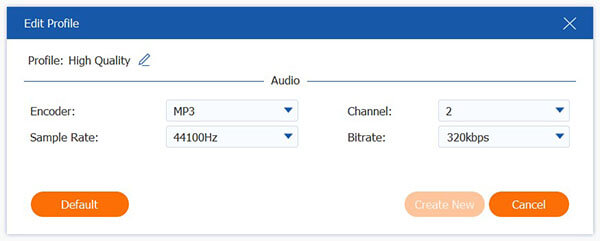
Pro skill: Click the Gear icon (Custom Profile) next to the 320kbps preset. Ensure the Sample Rate is set to 44100 Hz or 48000 Hz to match your original source. This tiny tweak prevents the software from resampling your audio and creating digital artifacts.
3. Back to the main interface of this software, set your custom destination folder at the bottom of the screen so you know exactly where your files are going. Hit the Convert All button to start converting M4B to MP3.
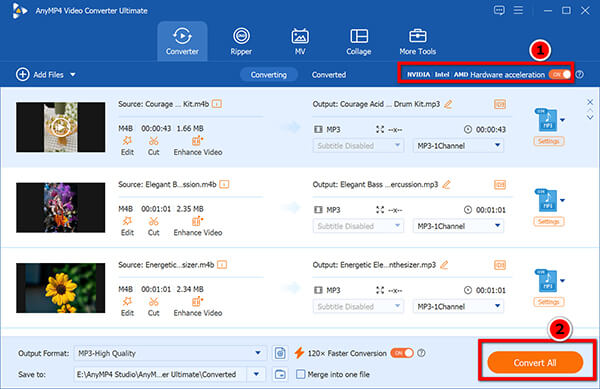
While this software is a total powerhouse for your local, DRM-free M4A music collection, don't expect it to perform illegal miracles. If you drag in a batch of heavily encrypted M4P tracks you grabbed off an active Apple Music subscription, the tool will straight-up tell you it can't read them. It's an honest limitation dictated by international copyright laws, not a flaw in the tool itself. But if your files are clean, unprotected M4As, the sheer, blistering speed of its multi-threaded hardware sync makes watching Apple's native software convert files one by one look like watching paint dry in the 1990s.
If you are running a modern Mac on macOS Sonoma or later, standalone iTunes is dead. Its features now live inside the Apple Music app. This native route is entirely free, but it is built for converting a few loose files, not migrating an entire music archive. The real catch here is that Apple buries the option under a completely unrelated menu. If you try to process a large playlist this way, the app handles the queue in a slow background thread that eats up your Mac's processing juice, and it doesn't offer any custom paths for your new files.
1. Open the Apple Music app on your Mac.
2. In the top menu bar, click Music and select Settings (or Preferences).
3. Head to the Files tab and click Import Settings. Change Import Using to MP3 Encoder.
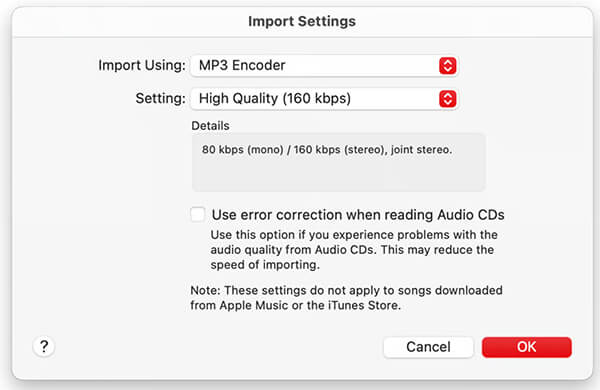
Don't just click OK. Click the Setting dropdown right below it, choose Custom..., and manually crank the bitrate to 320 kbps. Also, check Use High Efficiency Encoding to prevent your Mac from muddying up your audio track.
4. Go back to your library and highlight the DRM-free M4A tracks you want to change.
To select multiple scattered tracks instantly, hold down the Command (⌘) key while clicking. If they are in a solid block, click the first track, hold Shift, and click the last one.
5. Click File in the top menu, hover over Convert, and click Create MP3 Version.
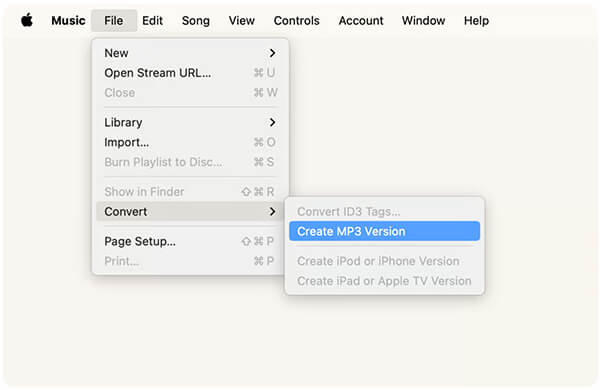
Then you will find the generated MP3 files in the same folder as the iTunes files.
Apple's user-hostile UI design logic in this app is genuinely maddening. You want to convert a local file that is already sitting on your drive, yet the option is hidden under Import Settings—a menu meant for ripping physical CDs! To make matters worse, once the conversion finishes, there is zero notification. The app just silently drops a duplicate file right next to the original with the exact same name. You are forced to manually right-click every single track and hit Get Info just to play detective and figure out which one is the MP3. It is 2026, and this prehistoric workflow is still surviving in macOS.
For Windows 11 users or those running legacy Macs, the classic iTunes desktop client is still your native free option. It gets the job done without third-party tools, but the interface feels like a sluggish relic from a decade ago.
Just like the Mac version, the conversion settings are tangled up with your disc-ripping preferences. It is an unoptimized pipeline, meaning trying to run a heavy batch conversion will put your computer's CPU through an absolute meat grinder.
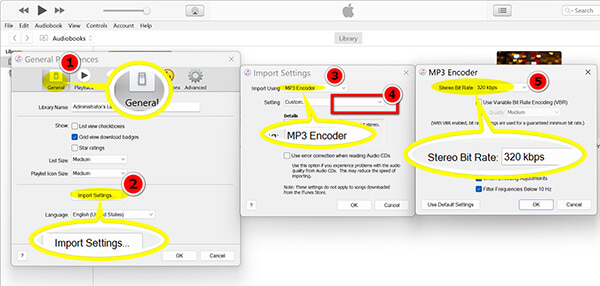
1. Open iTunes for Windows. Click Edit in the top menu bar and select Preferences.
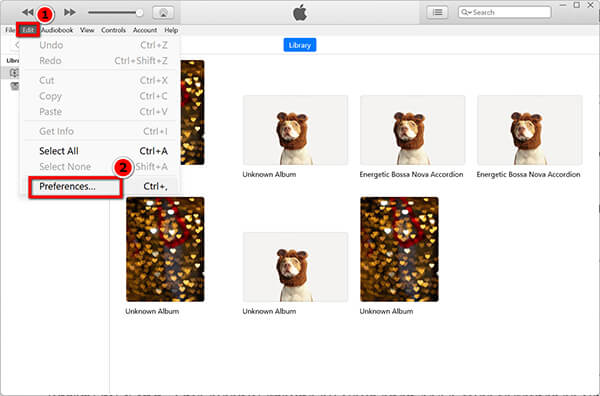
2. Under the General tab, find and click the Import Settings... button.
3. Set the Import Using dropdown to MP3 Encoder and push the quality preset to High Quality (320 kbps). Click OK.
4. Go to your music library and highlight the songs you need to change.
Click the View menu at the top and select As List. Then, click the column headers to sort your library by Kind. This cleanly groups all your open M4A files together so you can batch-select them in one second without accidentally clicking protected cloud files.
5. Click File in the upper-left corner, hover over Convert, and hit Create MP3 Version.
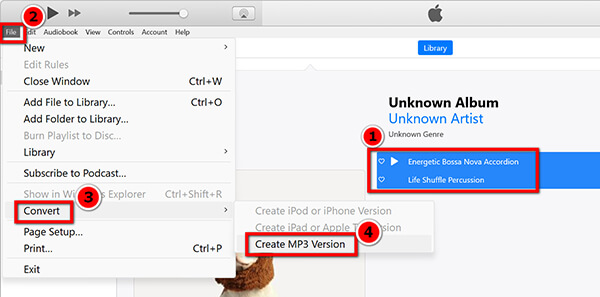
The Windows version of iTunes is a bloated, sluggish piece of code that loves to freeze up without warning. The moment you select a few hundred songs and click Create MP3 Version, your PC fans start screaming like a jet engine while the progress bar moves at a snail's pace. Because iTunes throws a tantrum whenever it interacts with the native Windows file system, if an external drive disconnects for a split second during processing, your entire media library index can easily be corrupted, leaving you with a graveyard of broken links and annoying yellow exclamation marks.
If you are stuck on a Chromebook or simply refuse to install desktop software to change just one or two loose M4A files, an online tool like AnyMP4 Free Online Audio Converter is your best shortcut. It runs straight inside your web browser.
There are no registration paywalls or software packages to worry about here. You simply upload, adjust your quality options, and grab your file. However, keep your expectations low if you are trying to feed it an entire music catalog.
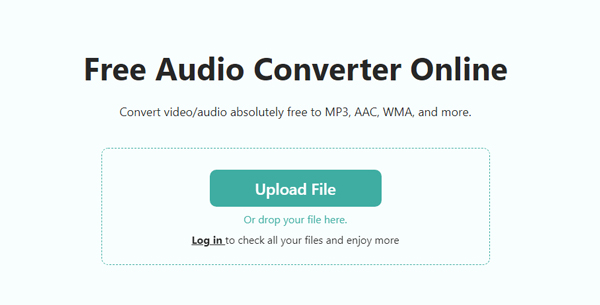
1. Open your browser and navigate AnyMP4 Free Online Audio Converter.
Click Upload Files to Convert to select and load your local iTunes M4A tracks.
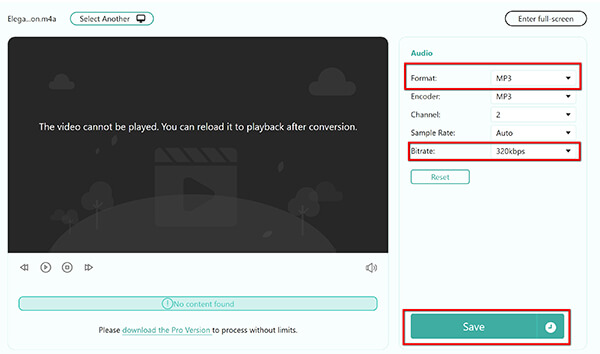
2. Select MP3 from the format list on the right side.
Before hitting Save, manually verify that the audio bitrate is pushed to 320kbps so the server doesn't compress your audio quality.
3. Click Save to start converting iTunes file to MP3 audio directly, and you can download it to your local download folder once the conversion process is completed.
While web-based tools save you from installing desktop software, they force you to rely completely on the mercy of your internet connection. If your network's upload speed isn't great, sitting through the upload phase for high-quality audio files will make you want to rip your hair out. Worse yet, the online freeware does not support batch conversion, and you need to process them one by one. For anything larger than a couple of loose tracks, online conversion is a massive waste of time.
Does converting iTunes (M4A) to MP3 reduce sound quality?
Yes, theoretically it does. Both M4A (AAC) and MP3 are lossy audio formats, meaning they discard uncompressed data to keep file sizes low. When you convert an already compressed M4A file over to MP3, you introduce a slight phenomenon known as generation loss. To fix a lossless MP3 file, we highly recommend setting the destination MP3 encoder bitrate to the absolute maximum of 320kbps within your conversion software.
Why won't iTunes let me convert a song to MP3?
There are two main culprits behind this frustrating issue. First, check your preferences, and the MP3 Encoder might not be selected inside your Import Settings menu yet. If it's set to AAC, the option won't appear.
Second, if the option is grayed out entirely, you are dealing with a DRM-protected M4P file purchased from the iTunes Store before 2009, or an offline file downloaded via a modern Apple Music subscription. Apple locks these files down to prevent sharing, meaning native tools cannot convert them.
How do I convert Apple Music to MP3 without iTunes?
If you want to step outside the restrictive Apple ecosystem entirely, your best bet is avoiding iTunes altogether. You should look toward using professional third-party desktop utilities like AnyMP4 Video Converter Ultimate. This software allows you to handle local M4A audio extraction and batch format changing directly on your desktop storage without relying on iTunes background processes.
How do I find where iTunes saves my converted MP3 files?
Locating your freshly converted MP3 tracks is easily one of the most frustrating parts of using Apple's native software. By default, the software buries files deep within your system drive.
This complex layout is precisely why many users switch to third-party conversion software. Dedicated tools let you pick a clear, simple destination path—like your desktop or a dedicated USB flash drive, right before you hit start.
Converting iTunes to MP3 shouldn't feel like fighting your own computer. If you only need to change one or two standard M4A files, the free, built-in settings inside iTunes or the Mac Apple Music app will get the job done. It’s slow and buried under clunky menus, but it works without extra software. However, if you are handling a massive batch conversion of an entire album or playlist collection, relying on Apple's unoptimized tools is a recipe for a major headache. For bulk conversion, AnyMP4 Video Converter Ultimate is essential for saving time, ensuring a true 320 kbps bitrate, and keeping your album artwork perfectly intact. Free download this tool to see how fast it flies through your library.
Secure Download
Secure Download
 Updated by Alice Thorne to Convert Audio
 More readings
 How to Convert M4A to MP3 in 2026 (High Quality & Batch)
Learn 5 fast ways to convert M4A to MP3 on Windows/Mac and Online. Video conversion with zero quality loss and custom bitrate (up to 320kbps).
 4 Best Ways to Convert FLAC to MP3 (2026: Lossless Quality & Batch)
Looking for the fastest FLAC to MP3 converter? Get AnyMP4, VLC, and online tool to batch convert while keeping 320kbps quality and ID3 tags on Windows/Mac.
 How to Convert MP3 to FLAC Safely (2026 Batch Processing Guide)
How to convert MP3 to FLAC without losing your ID3 tags or album art? Learn from the top 4 offline and online methods for batch conversion.
 4 Best Hi-Res Methods to Convert iTunes to FLAC Format
Upgrade your music library with iTunes to FLAC conversion. Explore Hi-Res solutions using desktop and online tools for better sound and compatibility.
 Add your comments to join the discussion here