 Store
Store- Multimedia
For Windows
- Converter Tools
- Video Converter Ultimate

- Video Converter
- 4K Converter
- MP4 Converter
- Audio Converter
For Mac
- BD/DVD
For Windows
- DVD Tools
- DVD Ripper
- DVD Copy
- DVD Creator
- DVD Converter
- DVD Toolkit
For Mac
- Mobile
For Windows
For Mac
- Utility
- Freeware

User Guide
Get Started
AnyMP4 Video Converter is a video converting tool that allows you to quickly convert videos to a wide range of video formats without quality loss. Check this tutorial and learn how to convert videos with AnyMP4 Video Converter.
Download & Install
Download AnyMP4 Video Converter by clicking the download button in the floating bar and then follow the on-screen instructions to install it on your computer. It is compatible with Windows 11, Windows 10, Windows 8.1 / 8, Windows 7, Windows Vista, Windows XP (SP2 or later), and you can quickly install it.
After the successful installation, launch it and continue the next steps to use it.
Register
There are limited features offered in the trial version of AnyMP4 Video Converter. To unlock all the functions freely, you should register it.
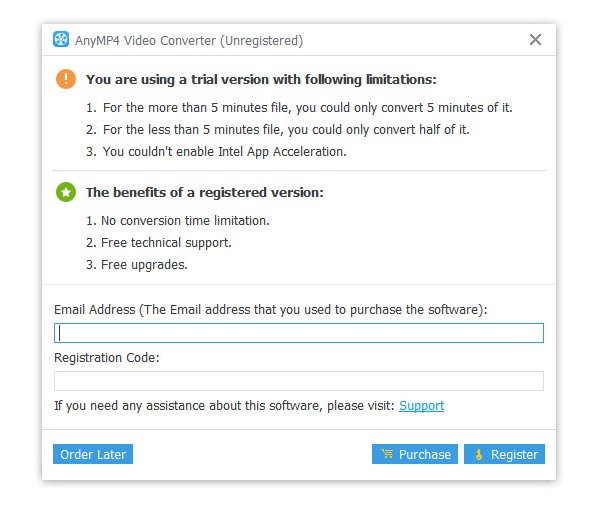
The register window will pop up on your first run. Besides, you find the registration icon from the top-right menu (A lock image), and click it to register this software with your E-mail address and registration code.
Note: After you purchased it successfully, the registration code will be sent to the email address that you filled in the order form.
Email Address: The email address that you used to purchase this software and fill in the order form.
Registration Code: A string of characters marked as Activation key, license code KEYCODE(S) in the order confirmation letter you received after the successful purchase.
After typing the email address and registration code, you should click the Register button at the bottom-right corner to activate this software in full functions.
Update
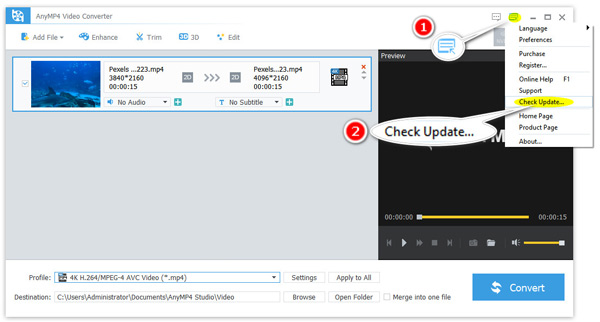
AnyMP4 always works hard to update the software for users to fix some bugs and bring new features. To update AnyMP4 Video Converter, you are left 2 ways.
Update AnyMP4 Video Converter manually:
Click the Menu icon at the top-right bar. Then select Check Update.... Once there is an update of this software, it will pop up and ask you if you would like to download and install the latest version.
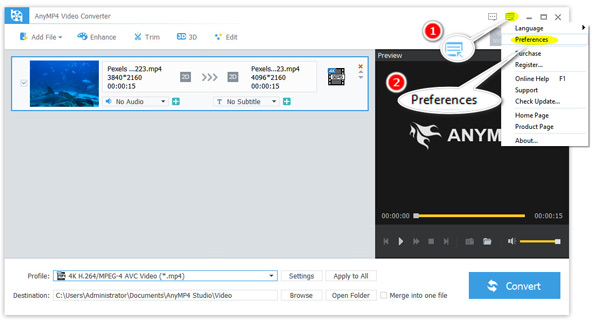
Step 1. Find the Menu option from the top-right bar, and choose Preferences from the drop-down list.
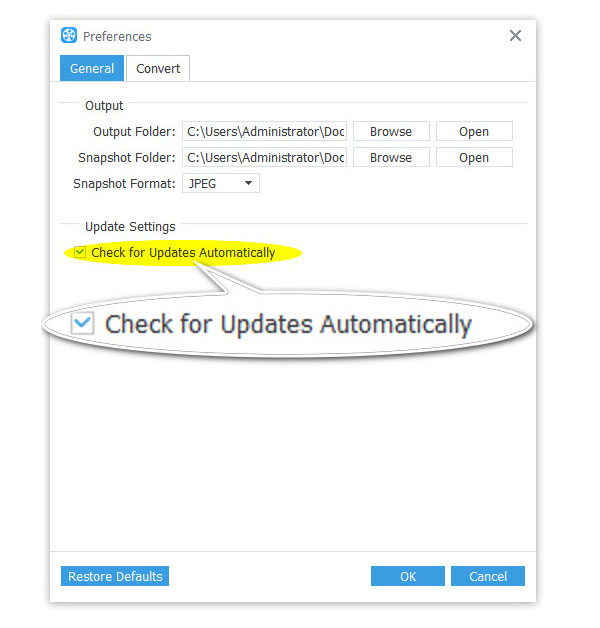
Step 2. In the default General tab, and select the checkbox of Check for Updates Automatically. Then click OK. Whenever there is an update, the latest version will be downloaded automatically when your computer is an Internet connection.
Preferences
Before you start a video or audio conversion, you can make your preferences to change the output folder, CPU acceleration, and so on.
Step 1. Find the Menu option from the top-right bar, and choose Preferences from the drop-down list.
Step 2. Find the Menu option from the top-right bar, and choose Preferences from the drop-down list.

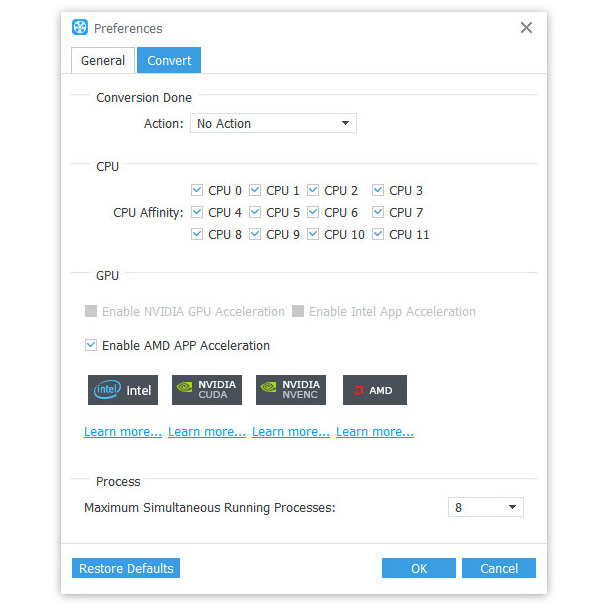
Step 3. Then switch to the Convert tab. You can change the Action when the conversion is done. You can also set the Maximum Simultaneous Running Process when converting multiple files. The CPU and GPU acceleration will speed up your video and audio conversion greatly if you enable it.
Finally, click OK to save the settings.
Convert Video/Audio
AnyMP4 Video Converter is a video converting tool. Follow the steps here to start a quick video and audio conversion on your computer.
Step 1 Run AnyMP4 Video Converter on your PC.
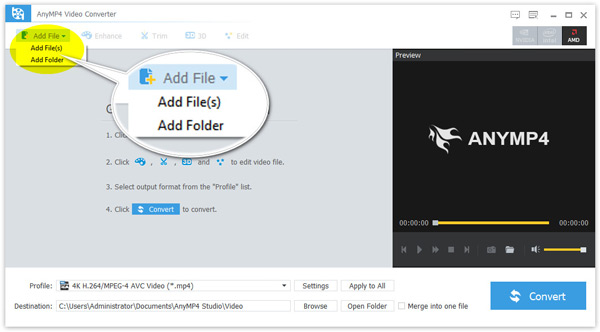
Step 2 Click Add File button at the top-left menu to choose Add File(s) or Add Folder.
This software also lets you drag and drop the video or audio files from your computer hard drive to this video converter.
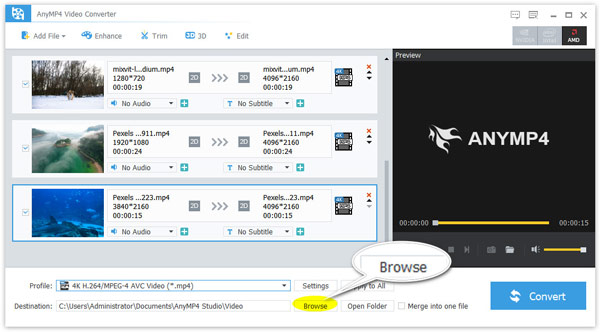
Step 3 Click the Profile drop-down list and select the target format.
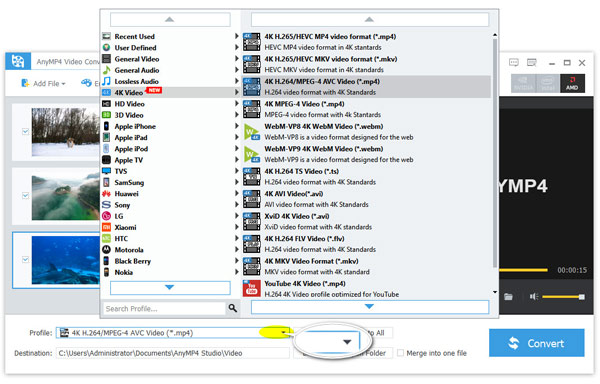
To customize every output file, you can also find the profile by clicking the output icon on the right side.

The Settings option next to the Profile lets you customize the profile video codec, sample rate, bitrate, resolution, and more.
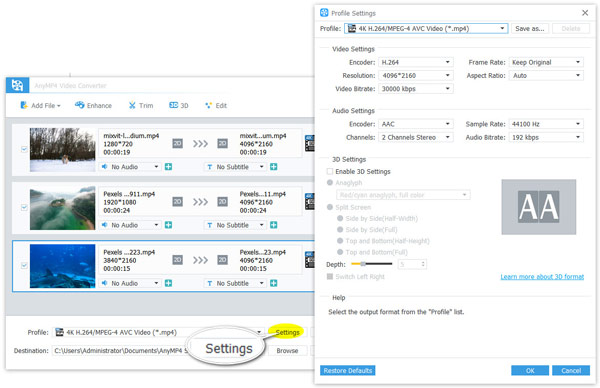
Click the Browse option at the bottom to change the output folder.
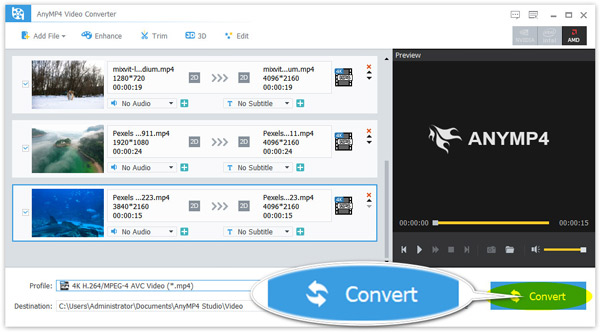
Step 4. While all the changes are made well, click Convert to start the video and audio conversion.
Edit Video
AnyMP4 Video Converter offers versatile video and audio editing features to refine your video and audio files.
Rotate Video
Step 1. Select a video file
Select one video file after you import video files to Video Converter, and click the Edit icon at the top toolbar.
Step 2. Rotate and flip a video
Then you will go to the Edit window, and there 4 options on the top-right side. With the options, you can rotate a video in 90 clockwise or 90 counterclockwise, or flip a video vertically or horizontally.
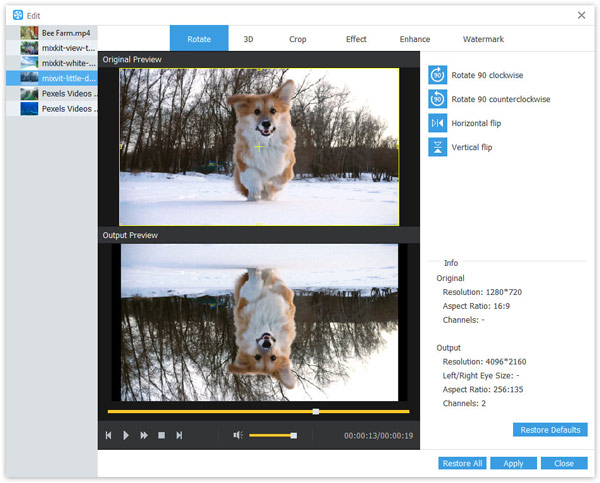
To rotate another video file, just select it from the left sidebar.
The Restore All option lets you get rid of all the editing effects applied and get an original video file.
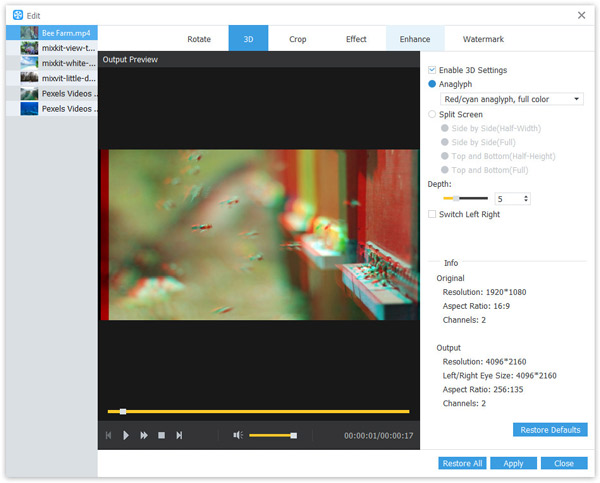
Convert 3D Video
Step 1. Select a video
Select one video file from the imported video files, and click the 3D option at the top menu.
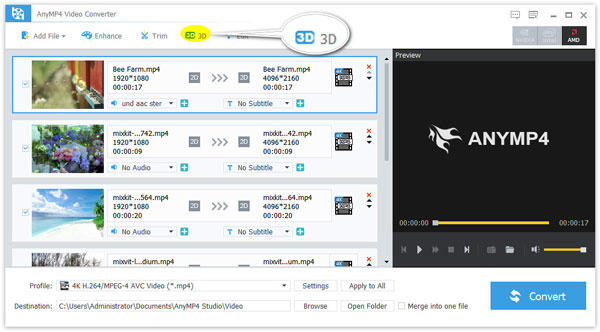
Step 2. Convert 3D video
Then you can start 3D video editing through Anaglyph or Split Screen.
Enable the option of Enable 3D Settings at the top box, and choose the 3D mode from Anaglyph or Split Screen.
Based on your needs to select the 3D mode. Finally, click Apply.
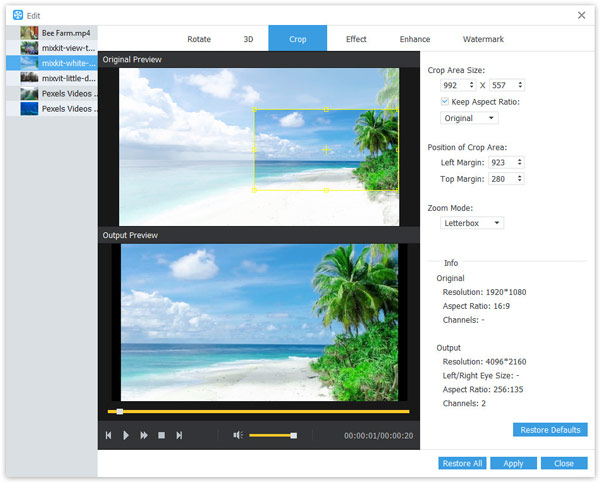
Crop Video
Step 1. Select one video file
Select one video file after you add video files to this program, and click the Edit icon at the top toolbar.
Step 2. Crop video
Switch to the Crop tab, where you can move the yellow frame border in the preview window to adjust the crop area.
Alternatively, you can set the crop value by choosing from the right options to confirm that.
While ticking the box of Keep Aspect Ratio, the cropping area will always keep the aspect ratio you selected.
Finally, the Zoom Mode lets you pick up the preferred zoom modes from Letterbox, Medium, Pan & Scan, and Full.
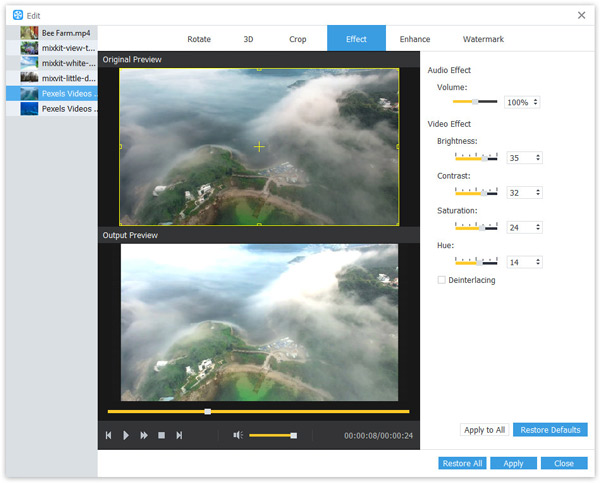
Effect
Step 1. Choose a video file
Select one video file after you add video files to this program, and click the Edit icon at the top toolbar.
Step 2. Adjust video effects
Here, you should switch to the Effect tab.
Here, you can adjust the video brightness, contrast, saturation, and hue to change the whole video effect.
If you would like, you can also change the audio volume to silence a video or make a video loud.
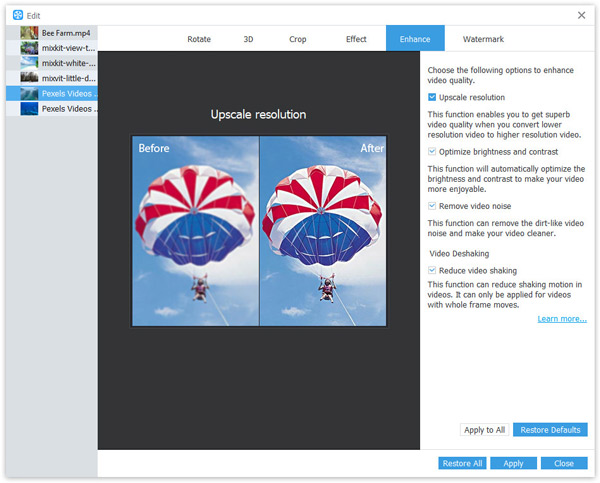
Enhance Video
Step 1. Add a video file
After importing video files to this program, click the Enhance icon at the top menu.
Step 2. Enhance video in 4 ways
Here are 4 ways of enhancing a video file, Upscale resolution, Optimize brightness and contrast, Remove video noise, and Reduce video shaking.
Select the checkbox of those options, and your video quality will be improved greatly.
Watermark Video
Step 1. Add a video file
After loading the video files to this program, select the one you want to watermark, and click the Edit icon at the top toolbar.
Step 2. Watermark video
Navigate to the Watermark tab, and checkmark the option of Enable Watermark.
Then tick the box of Text or Picture to insert a text or image as your video watermark.
The other options let you adjust the text font style, size, color, and set the watermark position and transparency, and more.

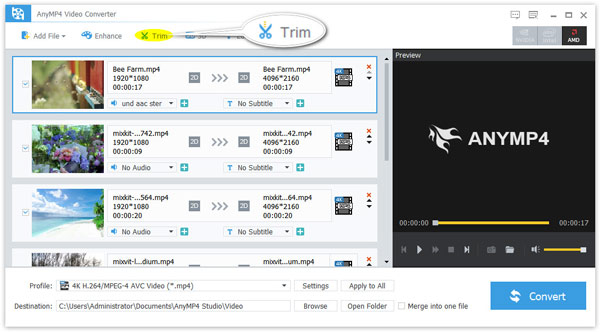
Trim & Merge
Step 1. Select the video or audio file
After importing the video or audio files into this program, just click and select it.
Then click the Trim option at the top menu to go to the Trim window.
Step 2. Split or trim video or audio
Here, you can move the progress bar to set the starting and ending point.
Besides, you can confirm the clip part by setting the Start and End value.
Then use the New Clip or Split option to create a new video/audio clip or split one file into 2 clips.
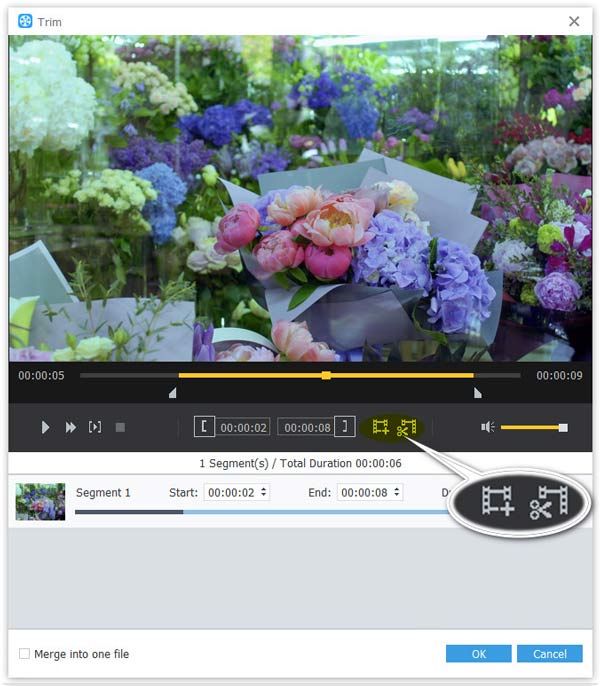
The Merge into one file option will help you combine several files in a new order after you adjust the clip order by clicking the move-up or move-down icon on the right side.
