Store
Store- Multimedia
For Windows
- Converter Tools
- Video Converter Ultimate

- Video Converter
- 4K Converter
- MP4 Converter
- Audio Converter
For Mac
- BD/DVD
For Windows
- DVD Tools
- DVD Ripper
- DVD Copy
- DVD Creator
- DVD Converter
- DVD Toolkit
For Mac
- Mobile
For Windows
For Mac
- Utility
- Freeware

User Guide
Get Started
Download & Install
Free download AnyMP4 DVD Creator from its official page.
Double click the downloaded installation .exe file and follow the on-screen instructions to start the installation process.
To uninstall this software, there are 2 ways:
Method 1: Click the Windows Start menu, go to All Programs, find AnyMP4 DVD Creator, and select Uninstall.
Method 2: Click the Windows Start menu, go to Settings, and select Control Panel to open Windows Control Panel. Then double click Add or Uninstall Programs/Uninstall a program, find and select the AnyMP4 DVD Creator entry, and click Uninstall.
Register
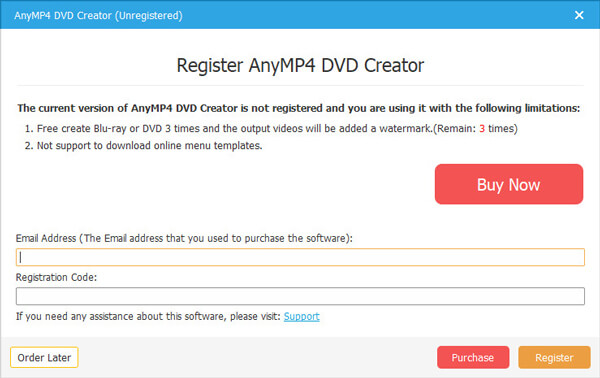
The free trial version of AnyMP4 DVD Creator has limitations.
To enjoy the full features without any limitation, you need to register the software with your email address and registration code.
Step 1 Click the Menu icon from the top right corner of the interface and choose Register to enter the Registration Center.

Step 2 Enter the Emial Address that you used to purchase this product and the Registration Code. Then, click the bottom right Register to activate your account. Otherwise, you can click the Purchase button to buy it.
Update
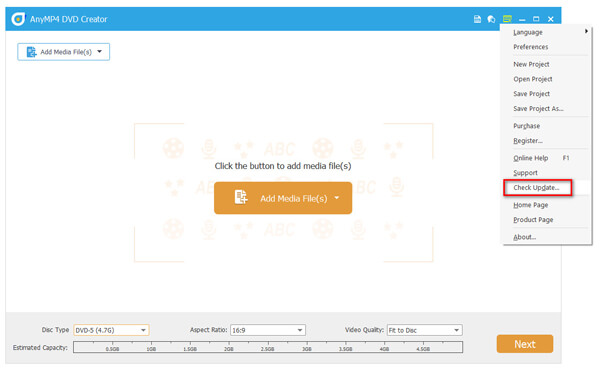
There are 3 ways offered by AnyMP4 DVD Creator to notify users to update to enjoy new features and fix some bugs.
Method 1: Click the Menu icon and choose Check Update. If there’s an update, you can download and install it immediately.
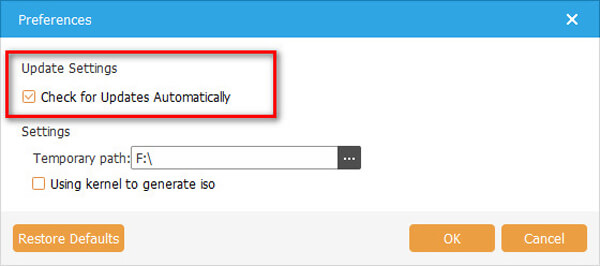
Method 2: Choose Preference under the menu. Then tick the 'Check for Updates Automatically' option. Then, you’ll get a message when an update is available. You can check the 'Update automatically while exiting program' option at the same time.
Method 3: Go to our product page and download the latest version.
Create Videos to DVD
AnyMP4 DVD Creator is a professional DVD and Blu-ray burning program that can convert almost any video format into a DVD/Blu-ray disc, folder, and ISO file on PC.
Step 1 Download AnyMP4 DVD Creator
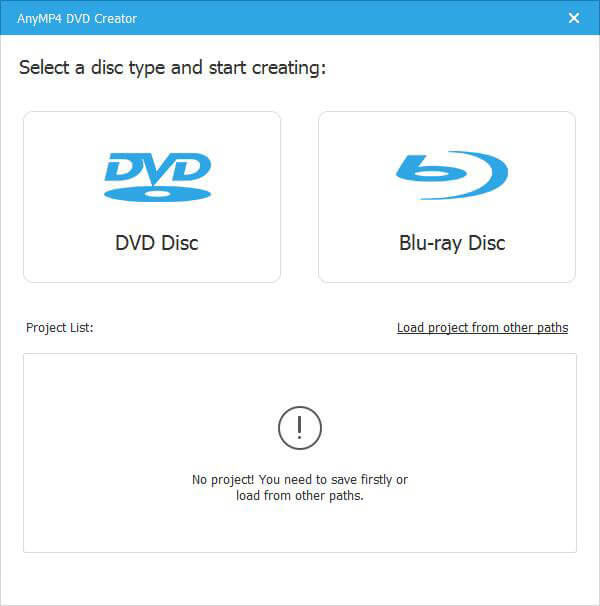
Click the download buttons to download and install AnyMP4 DVD Creator on your computer. Launch it on your computer. Choose the DVD Disc mode in the pop-up window.
Note: Remember to insert a blank DVD disc into the optical drive in advance.
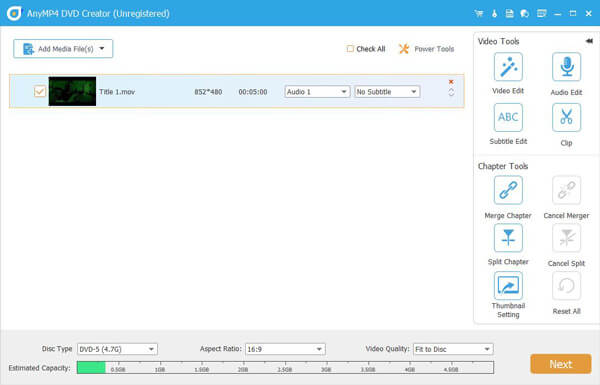
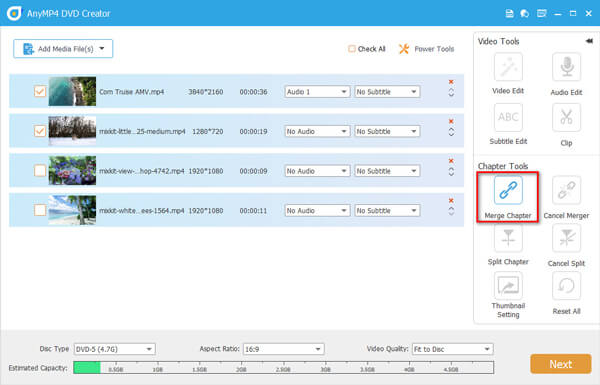
Step 2 Import Videos for Burning
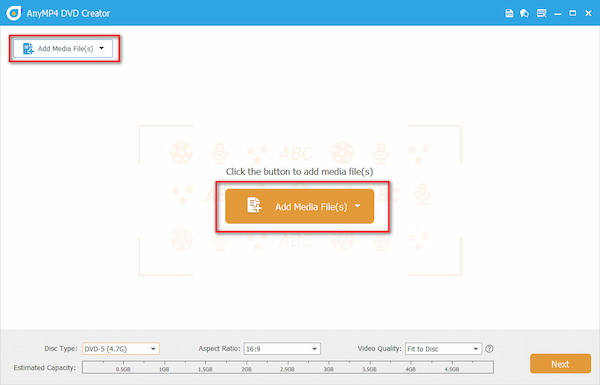
Click the central Add Media File(s) button to import the video files you want to burn to a DVD disc. At the bottom, you can see and configure the Disc Type, Aspect Ratio, and Video Quality.
Step 3 Edit Video Effects
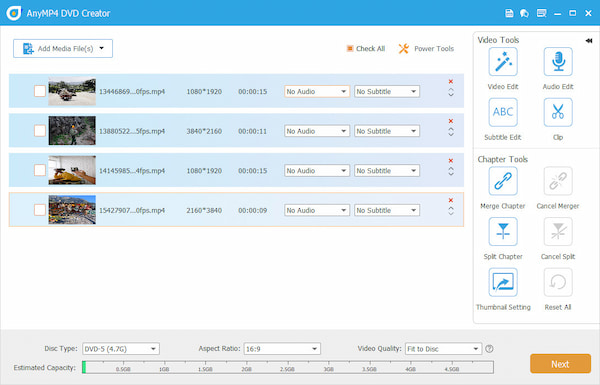
There are various editing tools for you to adjust video effects. You can choose and edit videos with ease. You can click the Power Tools button to open and close the sidebar.
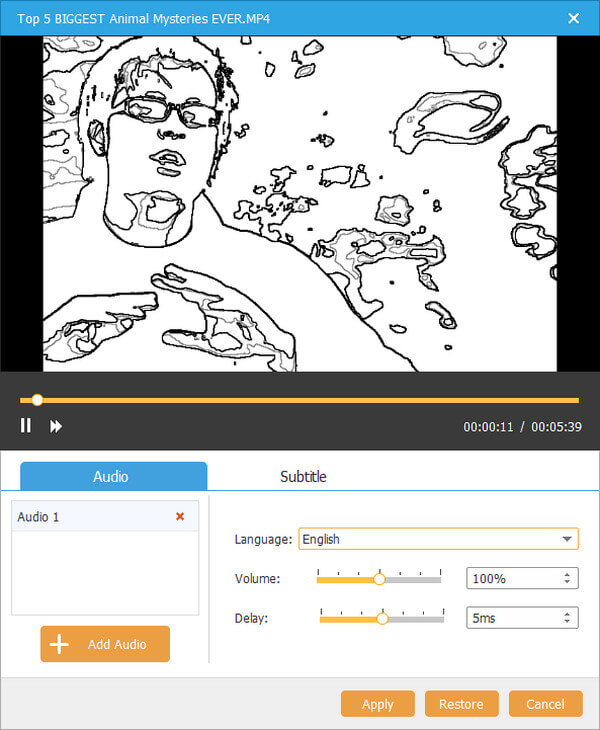
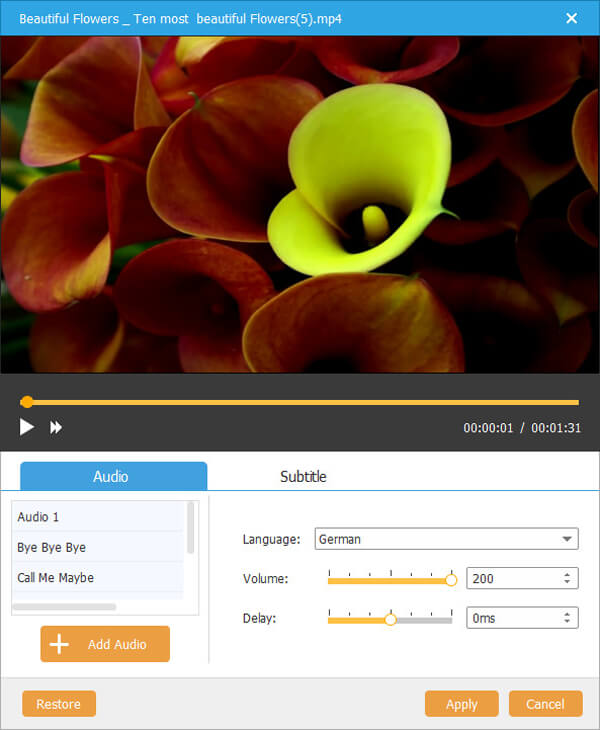
Check the video file and click the Audio bar or Subtitle bar on the right; you will come to the Edit Audio/Subtitle window. Here you can hit the Add Audio or Add Subtitle to insert an external audio track or subtitle, and adjust just setting by dragging the progress bar.
Adjust language, position, transparency, and delay in the Subtitle option.
Adjust language, volume, and delay in the Audio option. Lastly, click the bottom Apply to save the changes.
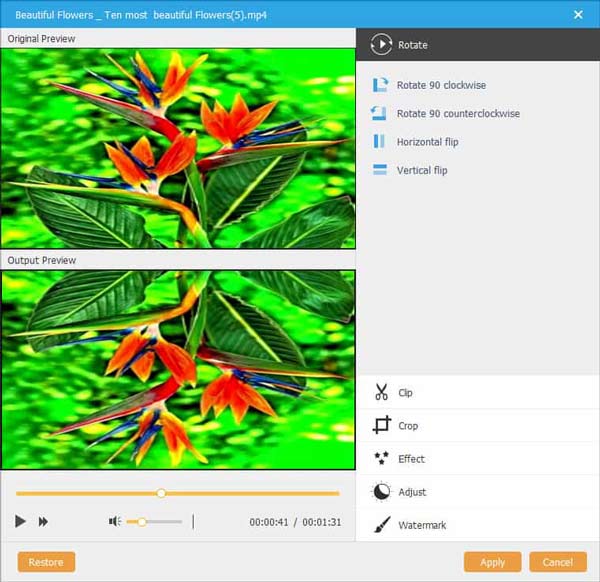
Back to the main interface, check the video, and click Power Tools. Here are powerful tools on the right.
The first part is Video tools. Click the Video Edit icon, and you can see 6 options on the right list. They are Rotate, Clip, Crop, Effect, Adjust, and Watermark. As you see, here is also the way to the Edit Audio/Subtitle window.
The second part is the chapter tools. Here you can merge or split the chapter and make some thumbnail settings.
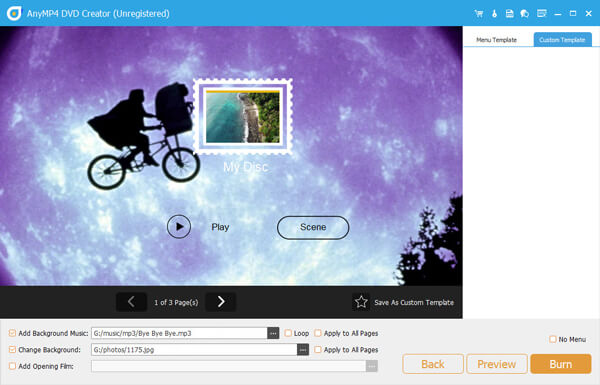
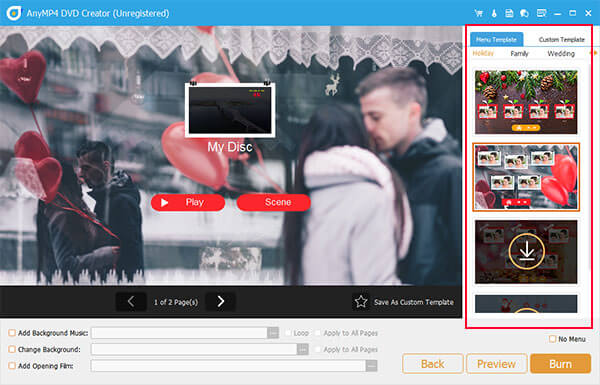
Step 4 Choose and Edit Menu Templates.
After you make sure the editing settings, then click Next.
In the following window, you can select a menu template for your disc. If you do not want to add the menu, just click No Menu on the bottom right corner. Furthermore, you can also add background music, change the background, and add an opening film. After doing these, click Burn.
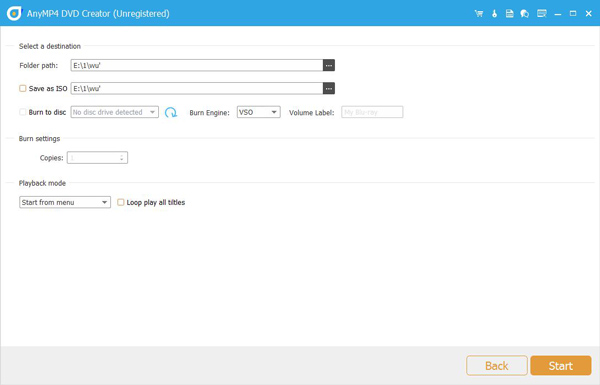
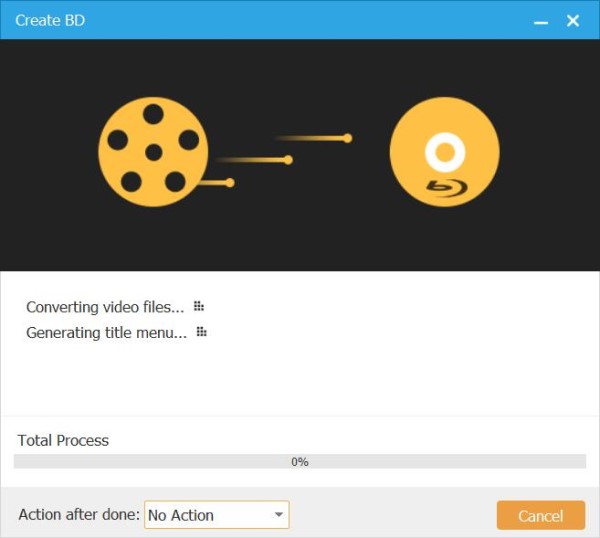
Step 5 Set the Path and Start Burning
In the final window, you need to go to the Folder path to set a download folder. Check the Save as ISO option if you need.
For DVD burning, you can set the TV Standard as NTSC or PAL.
Then click Start to begin the authoring process.
Note: During the process, you can click the Back button to return to the previous pages to adjust your settings.
Burn Videos to Blu-ray
Besides creating a video to DVD, this tool can also burn videos to Blu-ray on your computer.
Step 1 Choose Blu-ray Disc
Insert a blank Blu-ray into the Blu-ray drive. Download and install AnyMP4 DVD Creator on your computer. Double click to launch it and choose Blu-ray Disc option.
Step 2 Similar to the DVD burning process, click Add Media File(s) to import videos to the software. Configure various settings and click Next to proceed.
Step 3 Choose a desired menu template and click Burn to go to the final step. Set a download folder and click Start to create a Blu-ray.
Merge/Split Chapters
If you want to add several shorter titles into one chapter, then you can merge the chapters.
Just tick the box before the added video files, and click Merge Chapter, then the selected chapters will be merged into one.
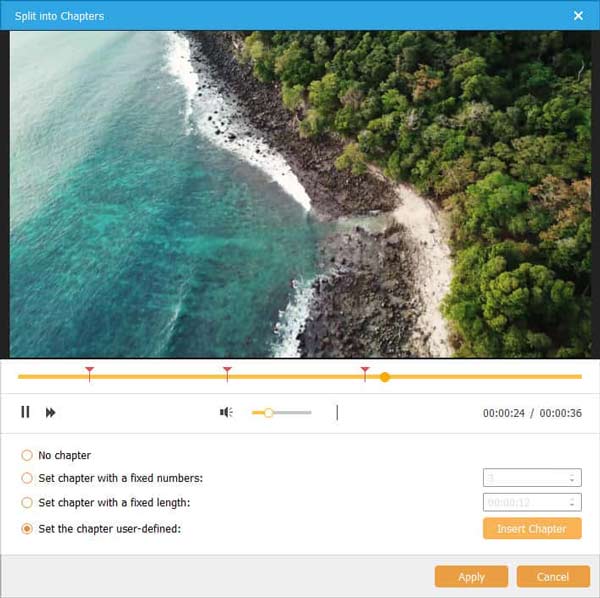
Besides, you can split one chapter into several ones. Select one chapter, and click Split Chapter, then you can split the chapter into clips by fixed number, fixed length, and user-defined.
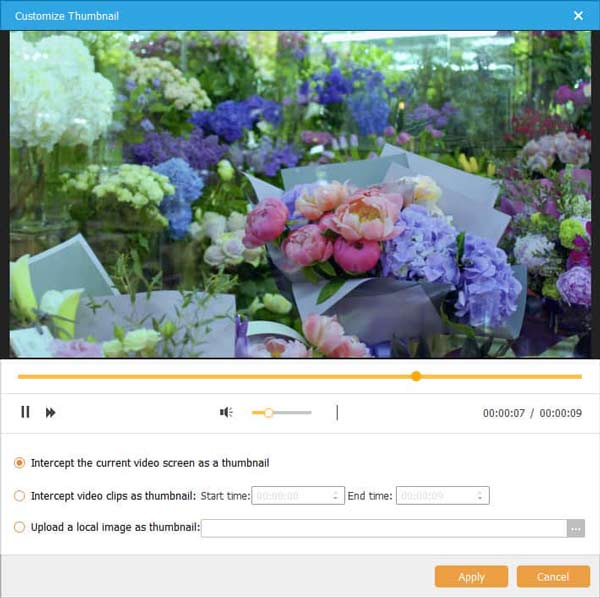
For each chapter thumbnail, you can customize them one by one. Select the chapter you want to customize, and click Thumbnail Settings, then use one screenshot of the video chapter, or upload a local image. What’s more, you can set a video clip as the chapter thumbnail.
Video Subtitle and Audio Tracks Adjustment
Edit Subtitles
Select one video chapter, and click Subtitle Edit on the right pane.
Then click Add Subtitle to load the local subtitles in SRT, ASS, SSA, UTF, and more formats to the selected video chapter.
The right helper tools let you adjust the subtitle font size, font style, and font color.
Language: Click the drop-down button to choose a language to sign the subtitle.
Position: Drag the Vertical Position control slider to adjust the position of the subtitle.
Transparency: You can set the subtitle transparency to display in the video chapter.
Delay: If there is a delay between the subtitle and the audio track, you can drag the Subtitle Delay control slider to make the subtitle sync with the audio track when playing a video file. Also, you can enter a value in the Subtitle Delay textbox directly or adjust the delay value with the up and down button. In addition, please note that if the subtitle is ahead of the audio track, adjust the delay time forward; otherwise adjust the delay time backward. The burning effect is the same as the preview effect.
After the above settings, click Apply to save all the parameters.

Tips:
Click the Restore button to return to the original settings of the selected subtitle.
You can add 32 subtitles at most.
If you uncheck a subtitle item, the corresponding subtitle will not be burned.
All the above settings are only effective to the currently selected subtitle.
Edit Audio Tracks
Select the video chapter, and click Audio Edit on the right pane to start editing the audio track for the video file.
Click Add Audio to add the music files to this video chapter as the background audio.
Language
Click the drop-down button to choose a language to sign the audio track. Please note that changing the language will not change the content of the audio track.
Volume
Drag the Volume control slider to adjust the output volume of the selected audio track. Also, you can enter a value between 0%-200% in the volume textbox directly or adjust the volume value with the up and down button.
Delay
Set a delay time to synchronize your video with the added audio track.
Video Edit
Rotate
Select the video chapter, and click Power Tools in the main interface. Then navigate the Video Edit option to enter the video editing window.
Then navigate the Rotate tab.
Here you can rotate a video in 90 counterclockwise and clockwise. Besides, you can flip a video vertically and horizontally.
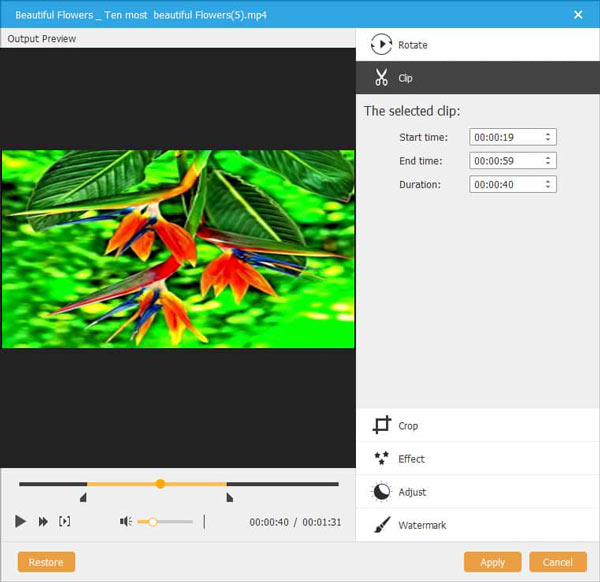
Clip
If you have a video chapter with some unwanted parts in it, just use the Clip feature.
Set the starting and ending time and click Apply to start keeping a selected video clip.
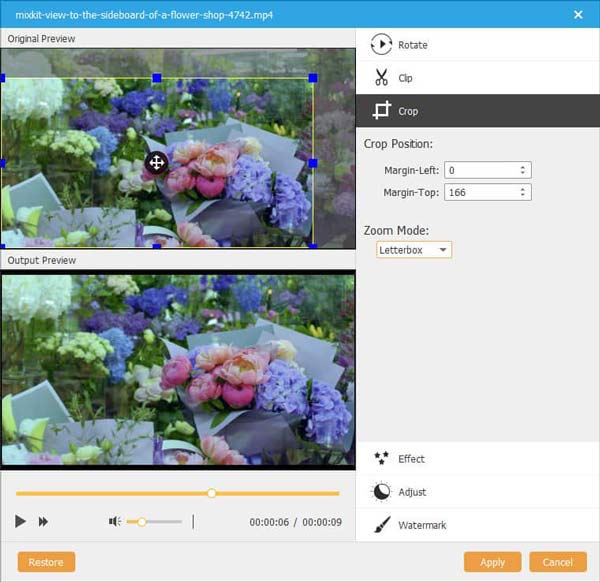
Crop
For a video with a black edge, you can use the Crop function.
Method 1: Crop by adjusting the crop frame. The crop frame is the yellow line around the movie video. There are eight small adjustment boxes on the crop frame. Each adjustment box allows you to crop the movie video from a different position. To crop your movie video, you can just move your mouse cursor to an adjustment box and drag the crop frame.
Method 2: Crop by setting the crop values. There are 2 crop values at the bottom of the window: Margin-Left, and Margin-Top. You can set each value to crop your movie video, and the crop frame will move accordingly.
While selecting the crop area, do not forget to set Zoom Mode.
Letterbox: Stretch video to the needed aspect ratio and keep the cropped video aspect ratio simultaneously. Fill in the lacking part in black.
Pan & Scan: Stretch video to the needed aspect ratio and cut the surplus part.
Full: Stretch video to the needed aspect ratio in full screen.
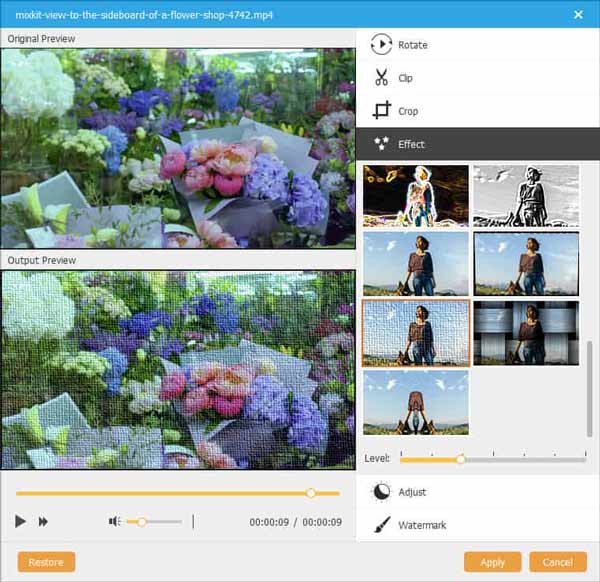
Effect
Apart from adjusting the video effects, you can use the filter effects of AnyMP4 DVD Creator by going to the Effect tab.
Select from the filter effects listed on the right pane like Blur, Mosaic, Gray, Sharpen, Pixelate, and more.
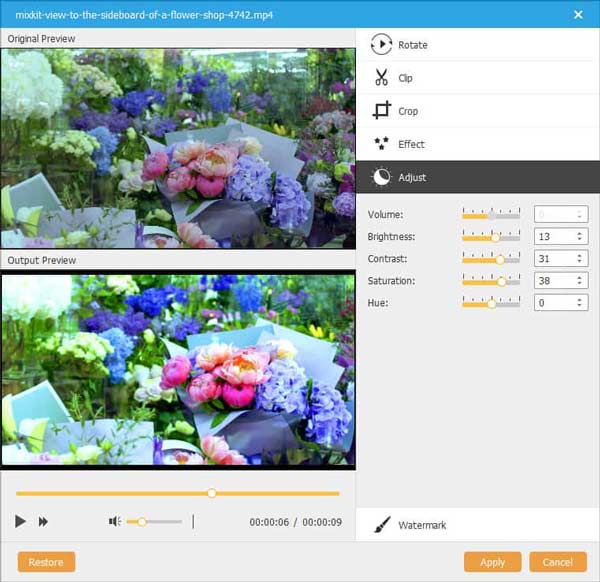
Adjust
If you want to create a different video style, you can use the Adjust tab.
Drag the slider bar or enter the value to set the Brightness, Contrast, Saturation, Hue, and Volume. Also, you can click the up or down arrow to set them. After finishing settings, click OK.
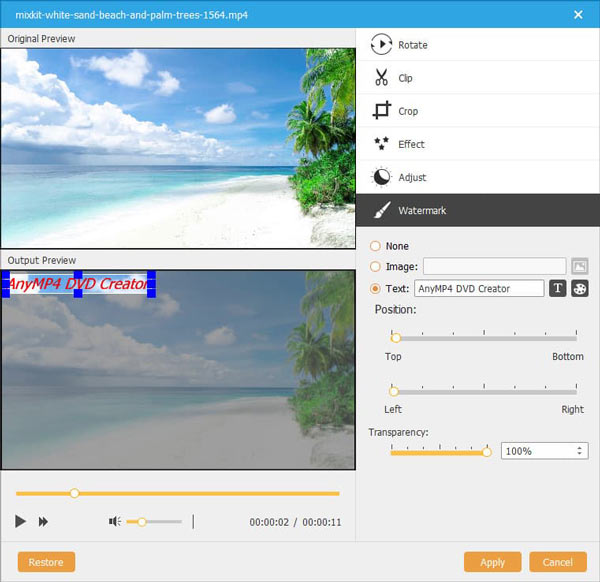
Watermark
Click Watermark tab to add the text or image watermark on the video screen.
Image: Tick the box before Image, and add the image you attempt to use to set a watermark.
Text: After checking the box of Text, type the text you attempt to use as a watermark in the text area. Click Font to open the font window to edit the font of the text, and click Color to open the color window to choose a font color.
Adjust the place and size of the watermark: Move the sidebar of Left/Right and Top and Bottom to adjust the place of watermark. You can also drag the watermark to any place on the video screen.
Adjust the transparency of the watermark: Move the sidebar of Transparency to adjust the transparency of the watermark.
Edit Menu
After choosing the Next option, and you are coming to the menu editing window.
As shown in the picture above, there are various menu templates for weddings, travel, family, holiday, and more from the right corner under Menu Template.
The button and text are feasible for you to edit like change the title, move the position, and more.
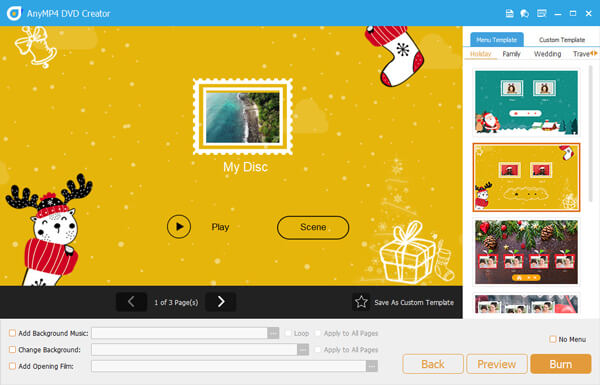
If you do not like those ready-made menu templates, just click the Custom Template button at the right corner to make it. Then set the background music, change the background picture with another picture, and add the opening film.