Store
Store- Multimedia
For Windows
- Converter Tools
- Video Converter Ultimate

- Video Converter
- 4K Converter
- MP4 Converter
- Audio Converter
For Mac
- BD/DVD
For Windows
- DVD Tools
- DVD Ripper
- DVD Copy
- DVD Creator
- DVD Converter
- DVD Toolkit
For Mac
- Mobile
For Windows
For Mac
- Utility
- Freeware

User Guide
Introduction
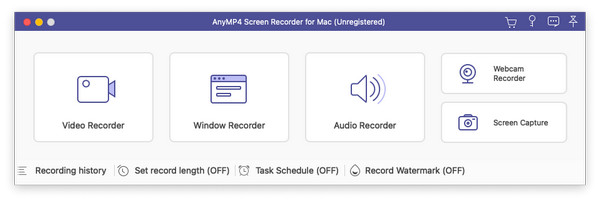
AnyMP4 Screen Recorder for Mac can help you record videos or audio with its multiple practical functions. With it, you can record any on-screen activities you like in original images/sound quality. It can record games smoothly with its 60 fps frame rate and capture screen in PNG/JPG/GIF/BMP/TIFF format. You also can use it to record webcam for Live and take screenshots. What's more? You can edit your videos or pictures in recording. Adding shapes, text and numbers and set the color of these are OK for its advanced editing function. Here are the details of Screen Recorder for Mac.
Install and Register
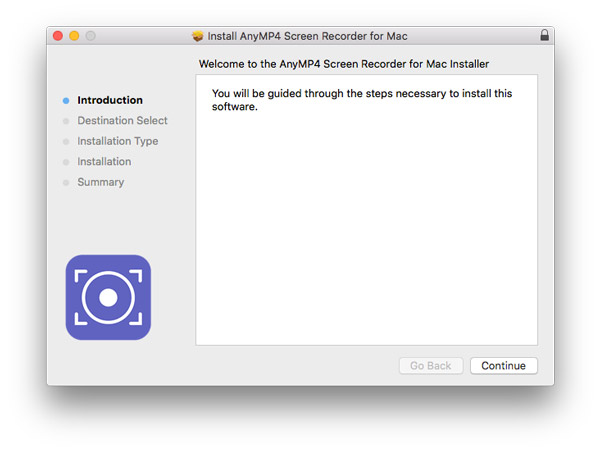
Install Software
After you finished downloading the ZIP file of Screen Recorder, find it in the destination folder and open it. It will show the next window.
Click "Continue" and you will see the following window. As you see, it slip to the "Installation Type" part. No part of "Destination Select".
If you do not want to install this software in the default destination, click "Change Install Location" on the right bottom corner to select your save path.
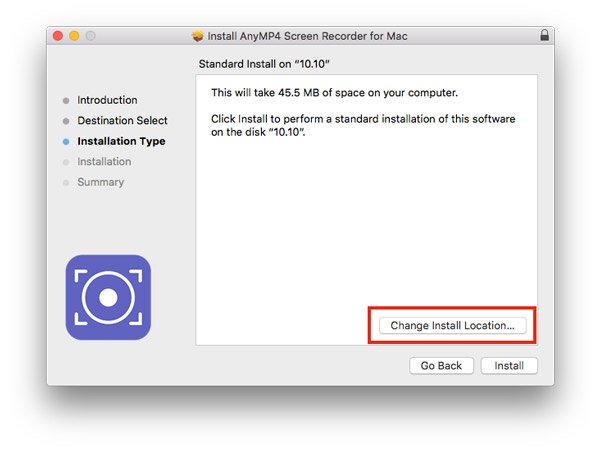
After you have set the installing path, click "Install" on bottom right corner.
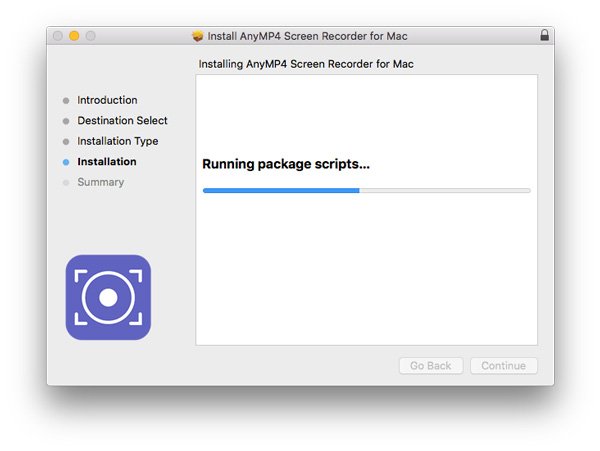
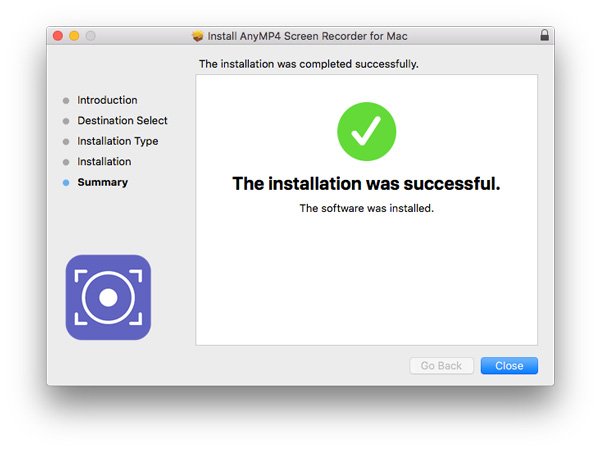
After a few seconds, it will remind you it is done.
Register Software
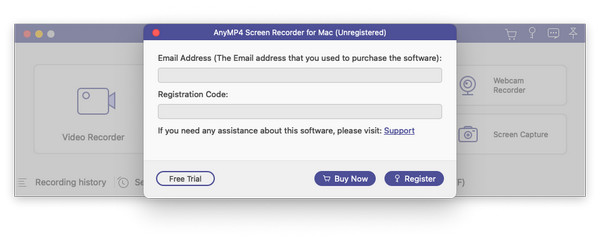
To register this screen recording software, you can click "Register" on the right bottom corner in the pop-up window which will appear every time you open the software.

After clicking the "Register" button, it will show you the little window to input your email address which you use to receive the registration code and registration code. Then click "Register" to register.
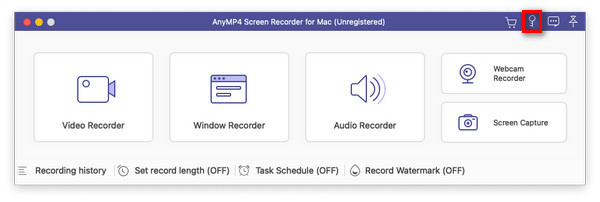
By the way, you also can click the key icon on the top right corner of the main interface. Please input your email address which you use to receive the registration code and registration code, then click "Register" to register.
Email Address: The email address is the email you used when you bought the program.
Registration Code: Copy and paste the registration code you received after the successful purchase in your email inbox.
1.The registration code will be sent to you via email. If you have not received an email from us, please contact our support team.
2. The free trial version only allows you to save 3 minutes of your recordings. If you want to unlock the limitation, then please purchased the full version here.
Set preferences
For personal needs, we also offer various preferences to make the recording more wonderful and easier.
On the middle corner of "Video Recorder" and "Audio Recorder", here are four little icon for you to set preferences.
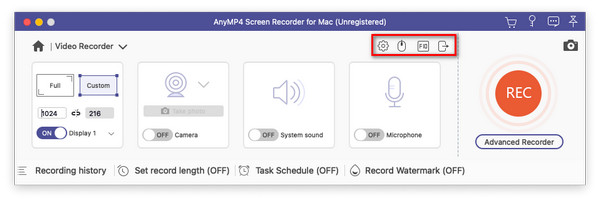
Recording
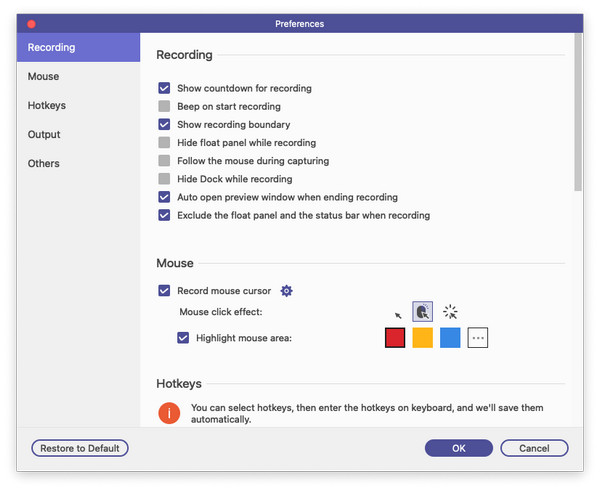
Click the gear icon and you will see the window of the recording settings.

In this pop-up window, you can seven choices. These are show countdown before recording, beep on start recording, show recording boundary, hide float bar while recording, allow to move the recording region while recording, hide dock while recording, and auto open preview window when ending recording.
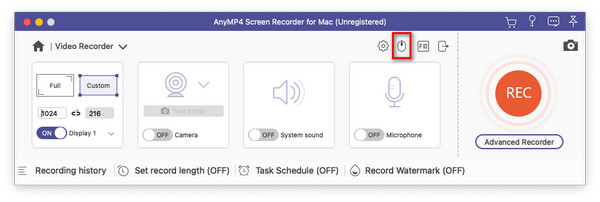
Mouse
By clicking the mouse icon on the interface or rolling your mouse on the preference interface, you can see the mouse settings.
You can tick record mouse clicks and record mouse area, even the colors of these.
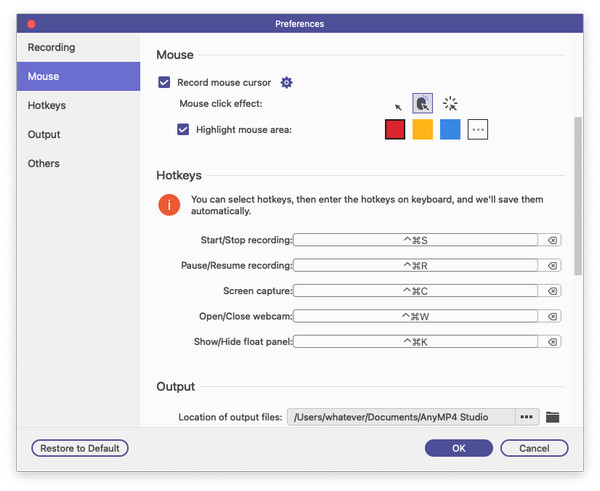
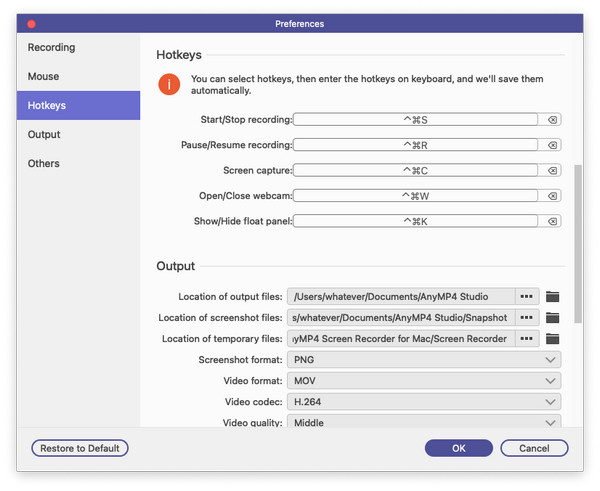
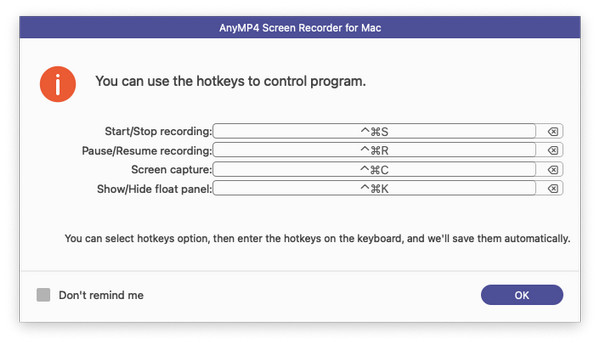
Hotkeys
To be easier to use, Screen Recorder for Mac also offers users the hotkeys settings to simplify your operation by clicking the FIQ icon or rolling your mouse on the preference interface. What can you select?
Start/stop record
Pause/resume record
Screen capture
Open/close webcam
Show/hide float panel
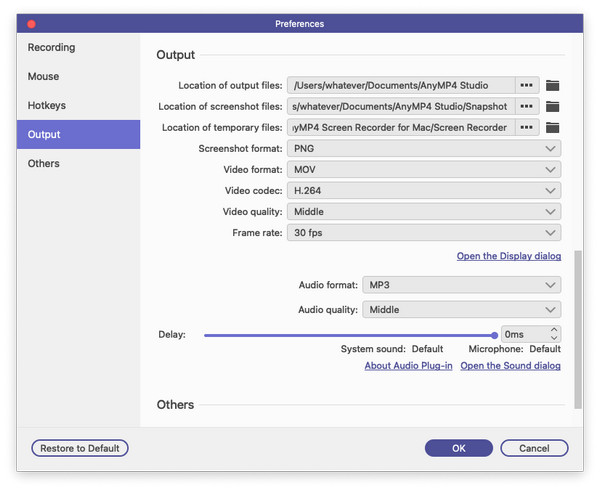
Output
To set output files, you can click the out icon of the interface or click "Output" option on the preference interface. In this part, you can set video format and codex, frame rate, etc.
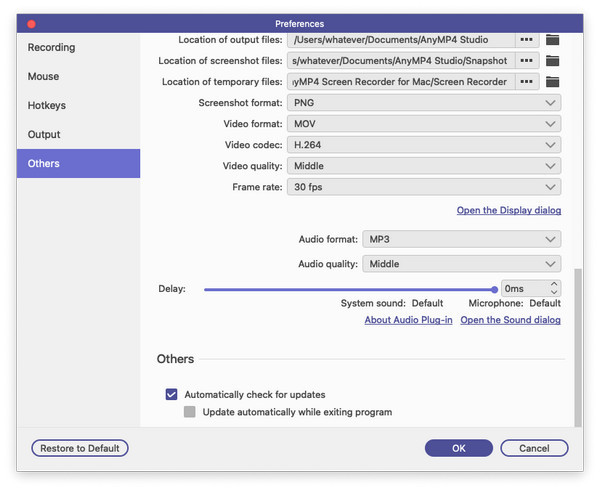
Others
To get in this part, you need open one of the other four preferences and click "others" option on the right bar.
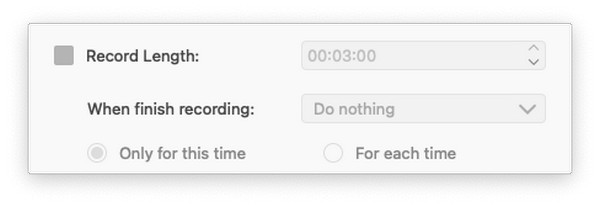
Set Record Length
In the interface of "Video Recorder" and "Audio Recorder", you can see the "Set Record Length" on the bottom left corner.
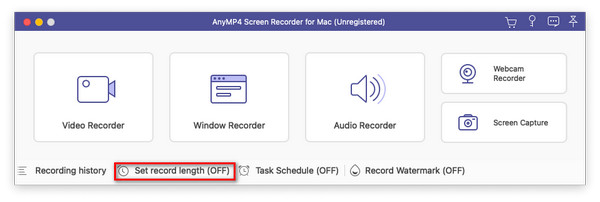
By setting the length of recording, you do not need to compute when to stop. The software will automatically stop recording for you.
Video Recorder
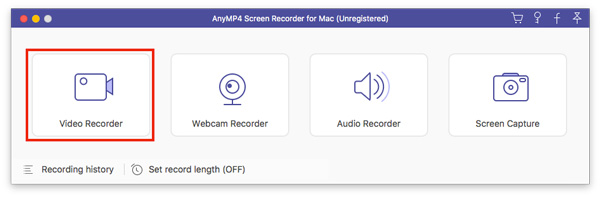
Step 1 Launch Screen Recorder for Mac
After installing this screen recording software, you can run it on your Mac.
Step 2 Recording area selection
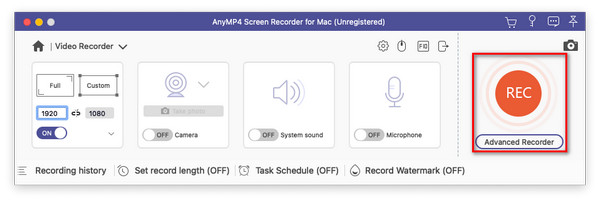
Choose the option "Video Recorder" from the main interface. Before to record videos with this recording software, you need to select the size of the recording area at first.
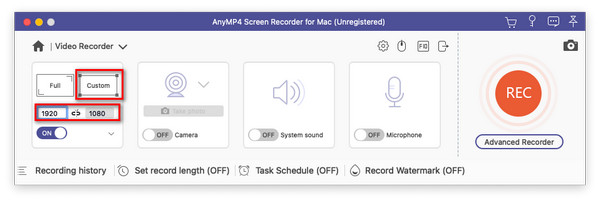
After clicking "Video Recorder", it will show you the red dotted line on the edge of your Mac screen. The area in it just is the recording area. To select the size of the recording area, you can drag the red point on the side.

And you also can input the width and length on the bar to select the size.
It also has some normal size of the screen. Click "Custom" to choose fixed region. There are five types: 1920×1080, 1280×720, 854×480, 1024×768 and 640×480.
And you also can select region/window directly.
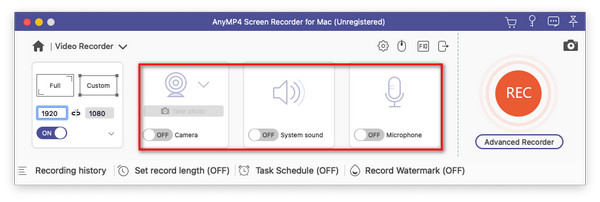
Step 3 Customize audio settings
If you are going to record a video conference, or record the Skype chat, you may need to select both system sound and the microphone. Click the system sound and microphone to make sure the checkmarks appear. You also can open the inside camera to record its pictures and take photos.
Step 4 Record Mac screen
After setting the recording area and audio settings, click "REC" on the right side to begin recording.
And it will show you the hotkeys for using more easily. And you also can change these.
then you will see the little bar like the following one.
You also can take snapshot by clicking the camera icon.

During the recording, you are able to make drawing or add annotations based on your need by clicking the writing icon.

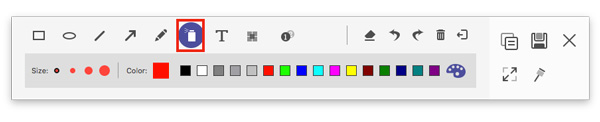
1. Draw the border, line, arrows and any shape you need. You can select the size and color of it. It always means emphasizing.
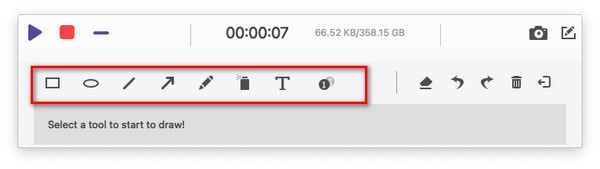
2. Air brush. You also can select the size and color of it. It would add powder effect to your recorded videos.
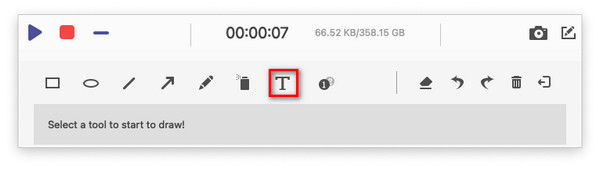
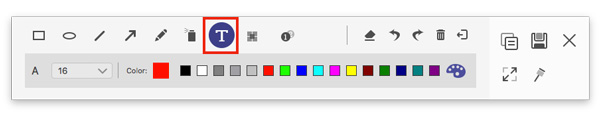
3. Text. By clicking the big T icon, you can input the words you want into your videos.
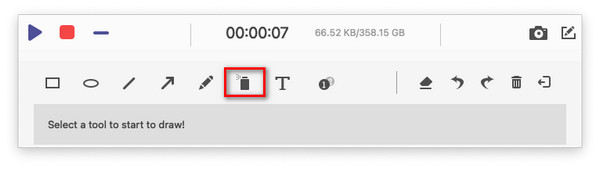
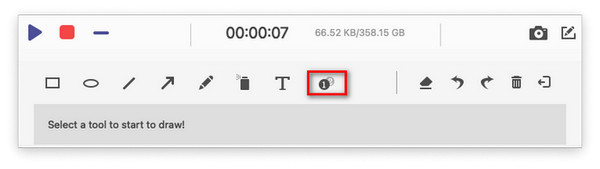
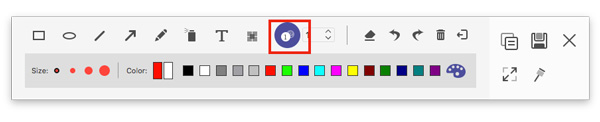
4. Callout. Using this, you can mark the order of the content. Apart from the size and color, you also can set the color of the number and its background in color and select the next beginning number by clicking the up and down keys beside the callout.
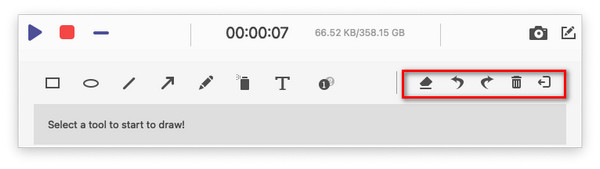
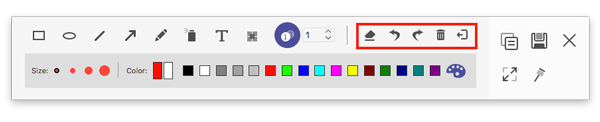
In case you make the wrong effect, you can click eraser icon to clear the wrong effect or click the dustbin icon to clear all items you add. You also can click undo and redo icons to adjust the effect you add just.
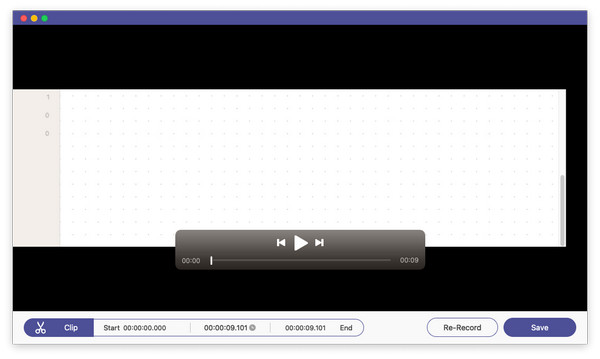
Step 5 Save the recorded video
Click the red square on the top left corner to finish recording.

It will show the video you have recorded. And you can preview it immediately.
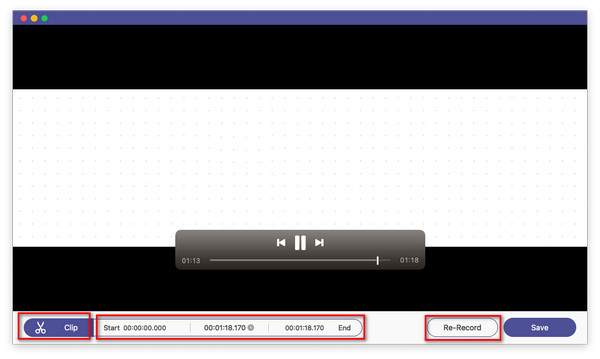
1. You can clip the video by clicking clip button.
2. Set the start time and the end time.
3. Adjust the volume
4. Re-record and save the video.
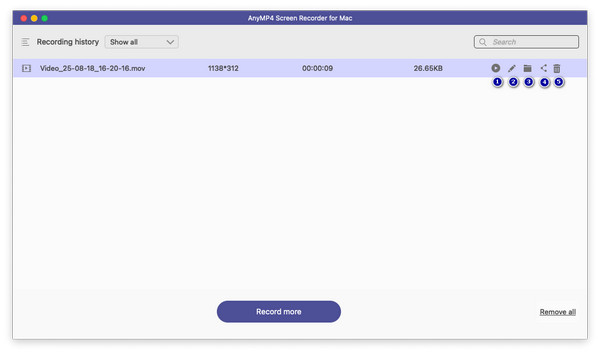
After clicking "Save", it will show all recorded files to you in a few seconds. It also offers other tools on the right-side bar for you.
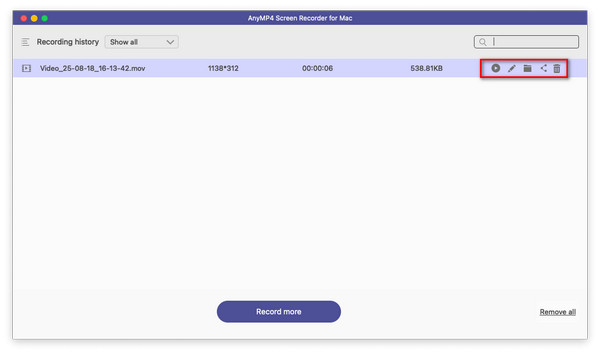
1. Preview the video.
2. Rename the video.
3. Open the folder saving files.
4. Share the video with others.
5. Delete the video.
Windows Recorder
Step 1 Open Windows Recorder
Select Windows Recorder in the main interface of the software.
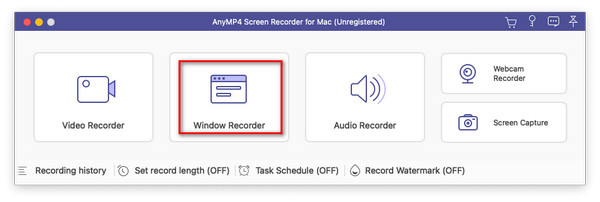
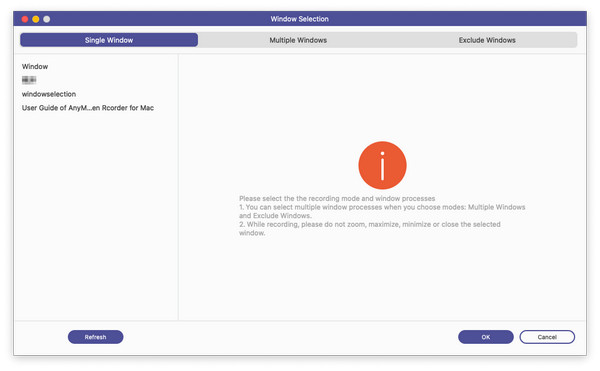
Step 2 Choose One Desired Recording Mode
Choose one recording mode from the Single Window, Multiple Windows, and Exclude Windows options in the pop-up window. After choosing the mode, select the window you want to record and click OK to return to the interface.
Step 3 Record Windows
Click REC to start recording the selected windows.
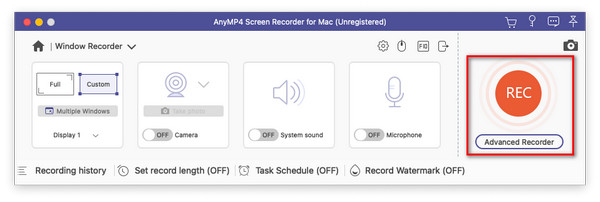
After completing the recording, click the red square button to end the recording.

Step 4 Edit and Save Recorded Video
Then, you are allowed to edit the recorded video in the new window. After that, click Save to go ahead.
Lastly, it will open a window to show your recent recording, and you can use various settings.
1. Preview the video.
2. Rename the video.
3. Open the folder saving files.
4. Share the video with others.
5. Delete the video.
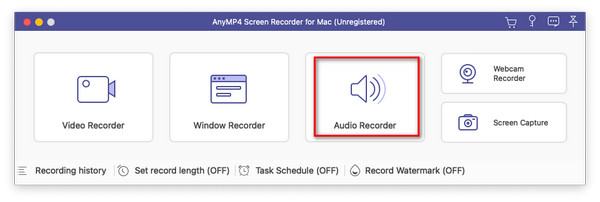
Audio Recorder
Step 1 Launch Screen Recorder for Mac
Run it on your Mac, after installing this screen recording software.
Step 2 Choose the option "Audio Recorder" from the main interface.
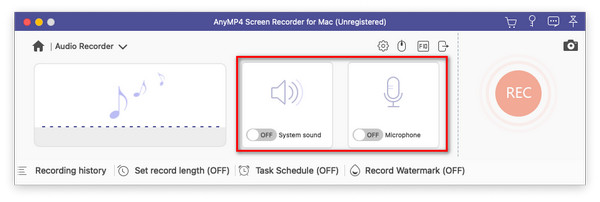
Step 3 Customize audio settings
Click the system sound and microphone to make sure the checkmarks appear. You also can take photo by clicking the camera icon on the top right corner.
Step 4 Start to record
Click "REC" on the right side of this video screen recorder to begin recording.
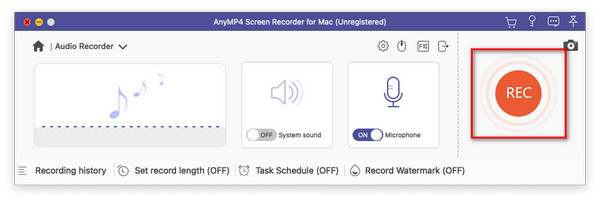
And it will show you the hotkeys. You also can change them.

Then it will show you the recording bar.

Step 5 Save the recorded audio
If you want to end recording, click the red square on the left to finish recording. It will show the video you record. And you can preview it immediately.
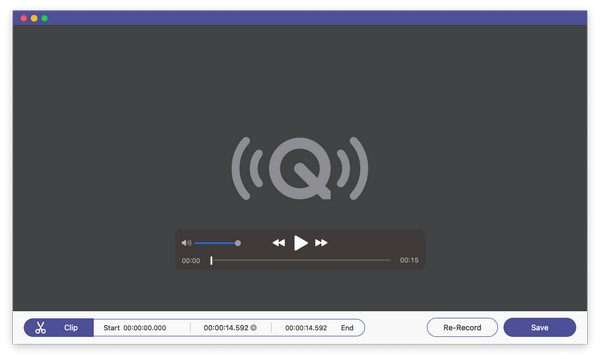
1. You can clip the audio by clicking clip button.
2. Select the start time and the end time.
3. Adjust the volume of the audio.
4. Re-record and save the audio.
After you click "Save" button, the window showing all recorded files will pop up for you.
See the right of the file you select. Here are five little functions.
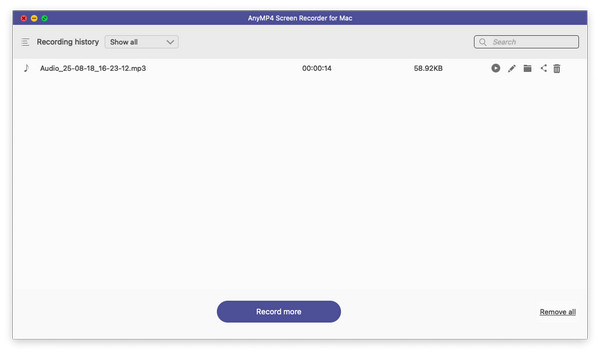
1. Preview the audio.
2. Rename the audio.
3. Open the folder saving files.
4. Share the audio with others.
5. Delete the audio.
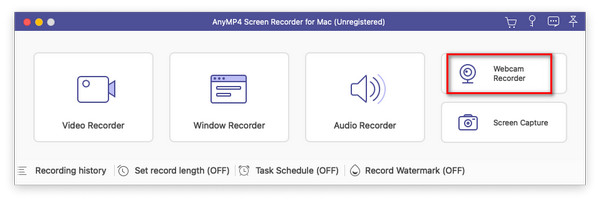
Webcam Recorder
Step 1 Launch Screen Recorder for Mac
After installing this webcam recording software, run it on your Mac.
Step 2 Enter Webcam Recorder
Select the "Webcam Recorder" on the interface.
Then it will pop up the recording screen of your camera inside Mac. On the bottom, you can click the icon of microphone to open the microphone and tick the camera icon to take photos.
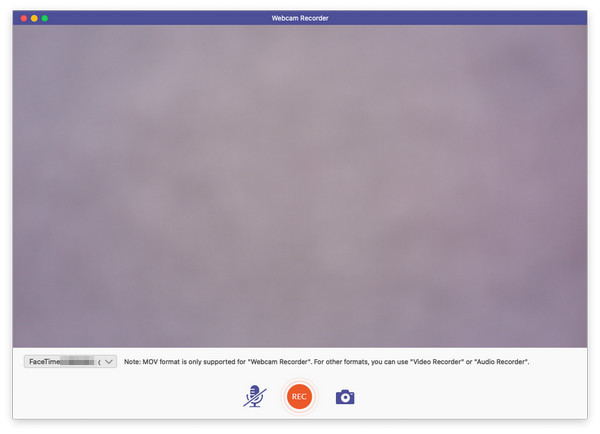
Step 3 Start Recording
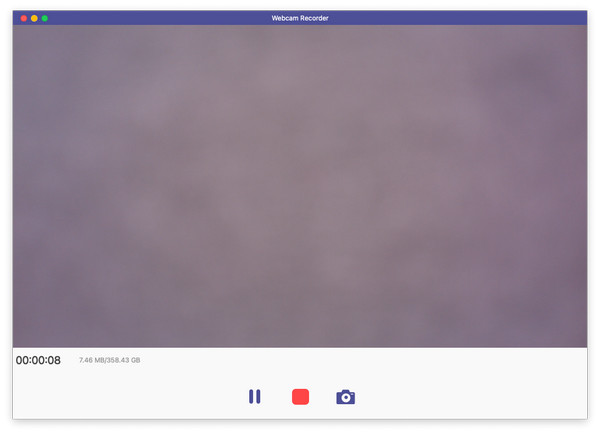
Click the "REC" on the bottom middle of the window.
And you also can take snapshot in the recording process.

Step 4 Save the recording
Click the red square on the bottom middle of the recording window.
It will show the video you have recorded. In this window, here are the things you can do.
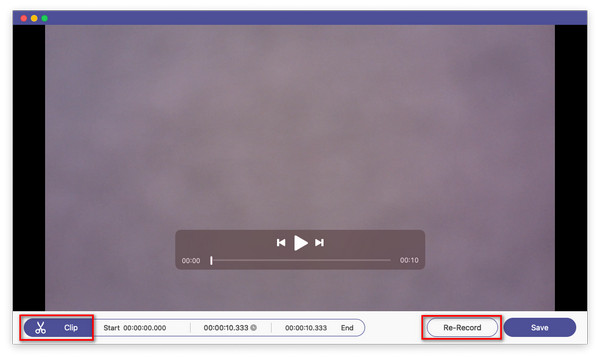
1. Preview, fast forward and fast backward the video.
2. You can clip the video by clicking clip button.
3. Set the start time and the end time.
4. Re-record and save the video.
After clicking "Save", it will show all recorded files to you in a few seconds. It also offers other tools on the right-side bar for you.
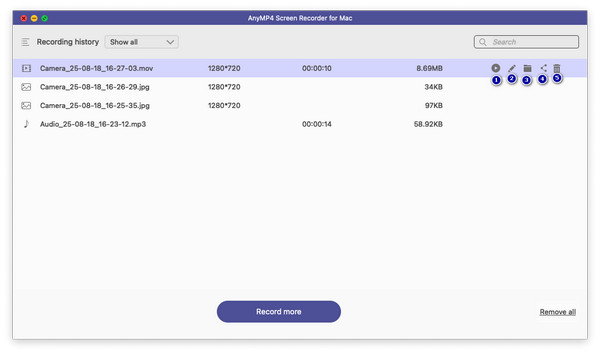
1. Preview the video.
2. Rename the video.
3. Open the folder saving files.
4. Share the video with others.
5. Delete the video.
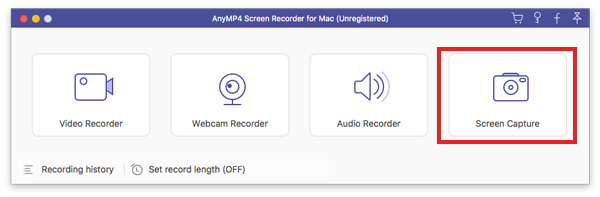
Screen Capture
Step 1 Launch Screen Recorder for Mac
Download, install Screen Recorder for Mac on your MacBook Pro/Air or iMac. Then double click the icon of this software.
Step 2 Choose Screen Capture
Choose the option " Screen Capture " from the main interface.
Then your mouse will be the shape of a cross. You can select the area you want.
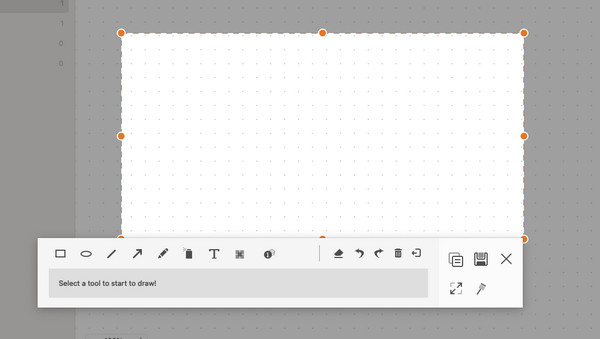
Step 3 Draw or annotate the capture
After you size the screen, it will automatically capture it for you. And you can see the next window.
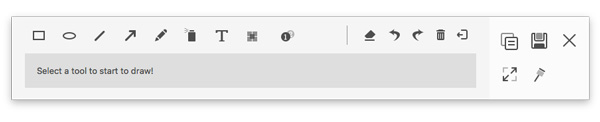
1. Draw the border, line, arrows and any shape you need. You can select the size and color of it. It always means emphasizing.
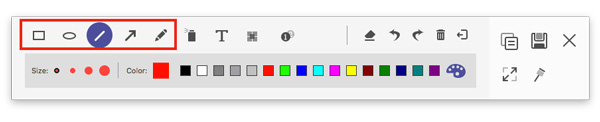
2. Air brush. You also can select the size and color of it. It would add powder effect to your recorded videos.
3. Text. By clicking the big T icon, You can input the words you want into your videos.
4. Callout. Using this, you can mark the order of the content. Apart from the size and color, you also can set the color of the number and its background in color and select the next beginning number by clicking the up and down keys beside the callout.
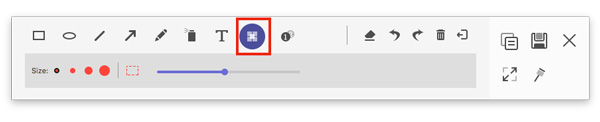
5. Blur. By clicking four little squares, you can select the target area and set the degree of blurring by dragging.
If you make the wrong editing, you can click eraser icon to clear the wrong effect or click the dustbin icon to clear all items you add. You also can click undo and redo icons to adjust the effect you add just.
And in the right side, you also have five choices to make.
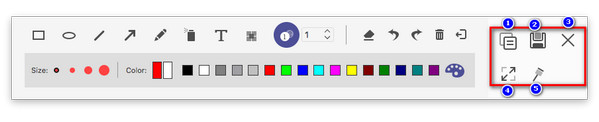
1. Copy the screenshot to put it to other places.
2. Save the screenshot you made
3. Close the window to delete the screenshot
4. Full screen to preview the screenshot
5. Pin to screen.
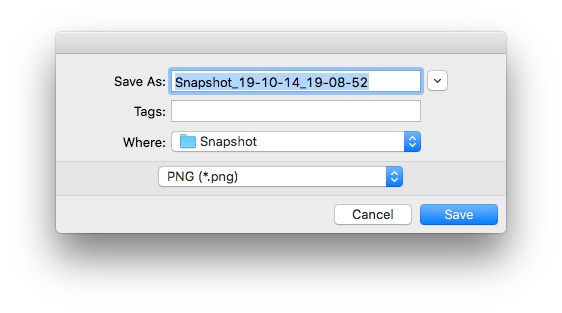
Step 4 Save the screenshot
Click disk icon to save picture you made. It will pop up a window for you to select the save path, name the picture and select the format.
Then click "Save" to save the picture.