Store
Store- Multimedia
For Windows
- Converter Tools
- Video Converter Ultimate

- Video Converter
- 4K Converter
- MP4 Converter
- Audio Converter
For Mac
- BD/DVD
For Windows
- DVD Tools
- DVD Ripper
- DVD Copy
- DVD Creator
- DVD Converter
- DVD Toolkit
For Mac
- Mobile
For Windows
For Mac
- Utility
- Freeware

User Guide
Get Started
Download and Install
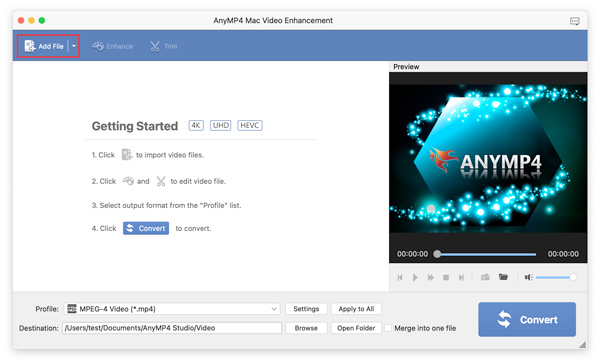
Download the software AnyMP4 Mac Video Enhancement from the official website and then install it on your Mac computer. Open it after installing.
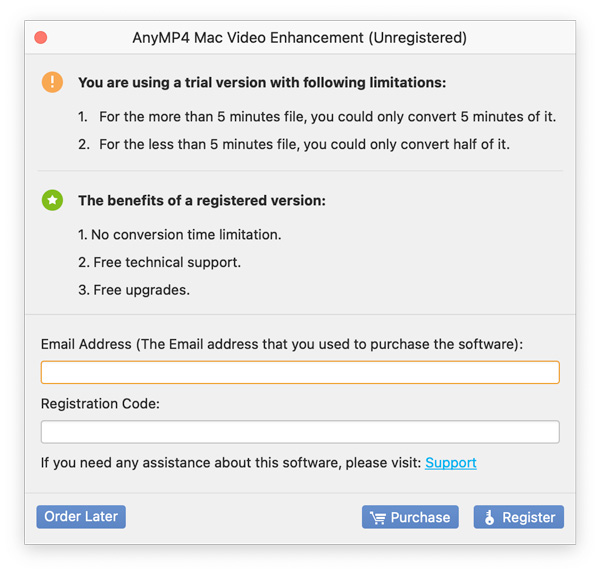
Register
To enjoy all features of AnyMP4 Mac Video Enhancement, please register it. Because the trial version of Mac Video Enhancement has some limitations like time limitations when you use it.
Click the Register this product icon at the upper right of the interface to go to the registration window.
Then choose the Register button after entering your email address and registration code to finish the registration process.
Update
You can go to the official website of our AnyMp4 Mac Video Enhancement and download the latest version to update.
Edit Video File
There are some basic editing features for you to use in AnyMP4 Video Enhancement.
Set the Background Music
If you want to take the original audio out of your video or add a piece of new background music to your video, you can do as the following instructions.
Step 1 Add video file
Run the program on your Mac computer. And add the video you need to edit by clicking the Add File option.
Step 2 Add background music
You can add the new background music to your video by clicking the Add Audio icon.

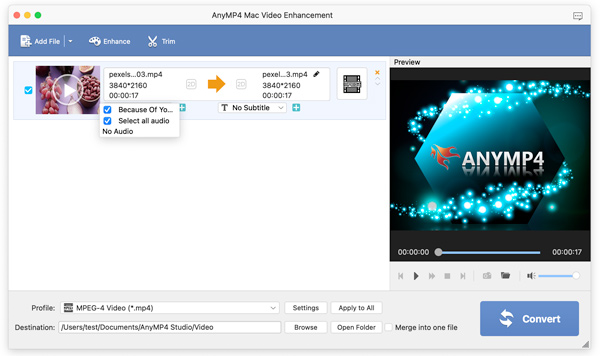
Step 3 Set background audio
Choose the left pull-down icon. And then click the No Audio to make your video not have audio; click the Select all audio to make your video have all audios you choose; click the audio you want to choose to make your video has the only one background audio.
Set Subtitle
When your video has no subtitle or you want to add a new subtitle to your video, you can do based on the following instructions.
Step 1 Add video file
Run the program on your Mac computer. And add the video you need to edit by clicking the Add File option.
Step 2 Add subtitle
Then you can add the subtitle to your video by clicking the Add Subtitle icon.
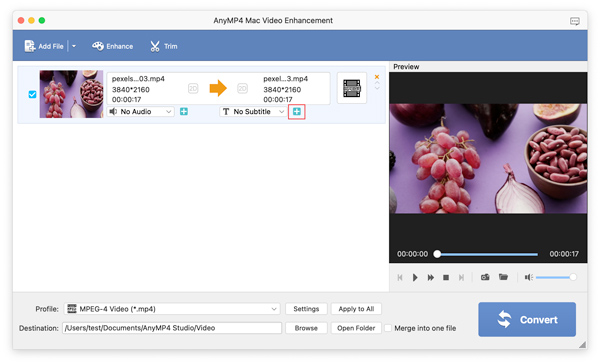
Step 3 Set subtitle
Later you can choose to add a new subtitle by clicking the right pull-down icon; you also can click the No Subtitle to make your video without subtitle.

Trim Video
If you want to let one part of your video become a new clip or cut off a part of your video, you can do according to following instructions.
Step 1 Add video file
Run the program on your Mac computer. And add the video you need to edit by clicking the Add File option.
Step 2 Cut video file
Choose the Trim tab and then you can move your mouse on small cursors located under the progress bar to cut your video.
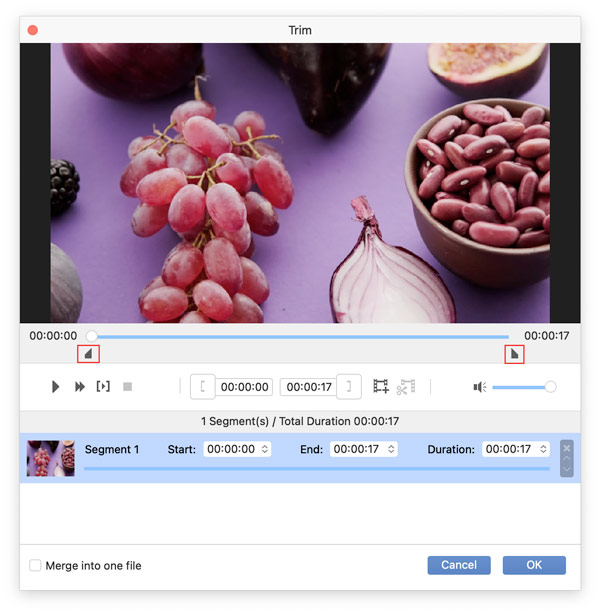
Step 3 Turn video into two segments
Later click the New clip icon, and your video will be divided into two parts: one part is the clip between the two small cursors and another part is the clip between the Pause mark and the End cursor.
Step 4 Split the longer segment
While you are clicking the longer segment, you can click the Split icon to use the split feature.
Step 5 Finish the trimming process
After trimming, you can enable these clips to become a whole video by checking the box of Merge into one file. Finally, choose the OK button and these segments will be put on the Add File window.
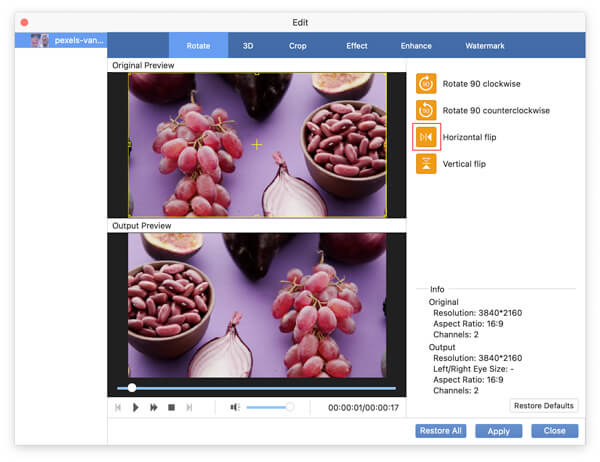
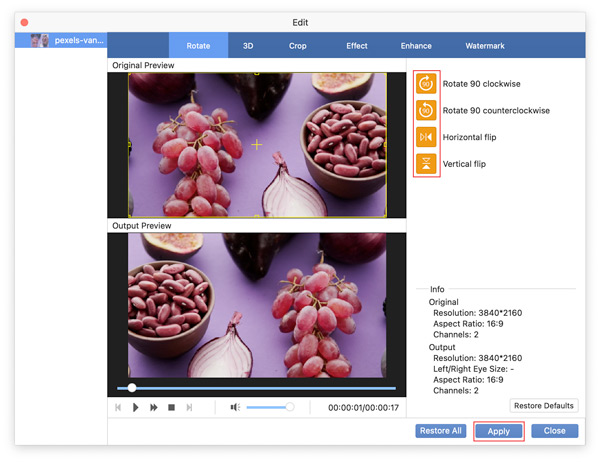
Rotate Video File
Sometimes, you use your mobile phone to take a video, while, when you play it on your computer, the video has a wrong angle. Thus, if you want to change the angle of your video, you can do according to the following instructions.
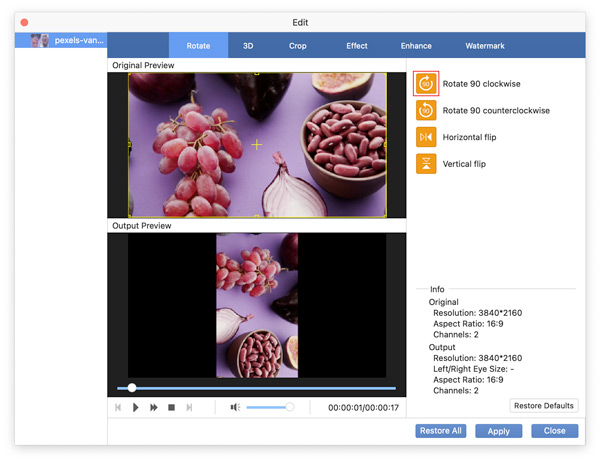
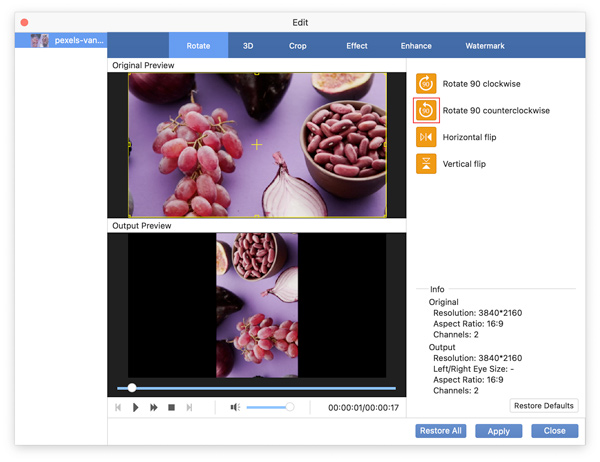
Step 1 Go to the Rotate feature window
Run the program on your Mac computer. And add the video you need to edit by clicking the Add File option. Later you can choose the Enhance tab and enter the Rotate feature.

Step 2 Rotate the video file
You can click the orange icon next to the Rotate 90 clockwise to rotate your video 90 clockwise here. And in the left half of the window, you can preview the result.
You can click the orange icon next to the Rotate 90 counterclockwise to rotate your video 90 counterclockwise here. And in the left half of the window, you can preview the result.
You can click the orange icon next to the Horizontal flip to flip your video horizontally here. And in the left half of the window, you can preview the result.
You can click the orange icon next to the Vertical flip to flip your video vertically here. And in the left half of the window, you can preview the result.
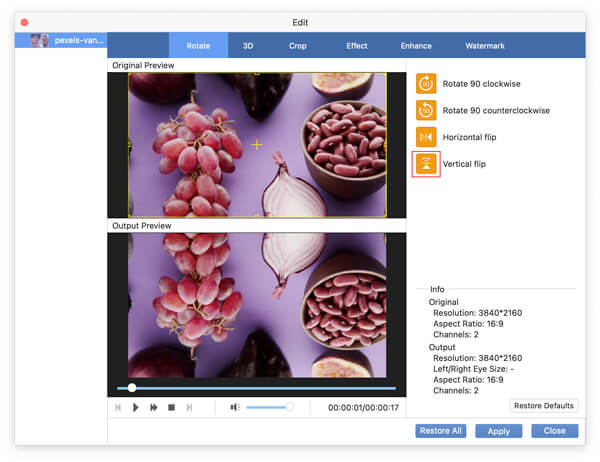
Step 3 Complete the rotating process
To save changes, you can click the Apply button. Choose the Restore Defaults button, when you need to clear away the changes you have made at the Rotate interface. Besides, you can choose the Restore All button, when you need to clear away the changes you have made in the software.
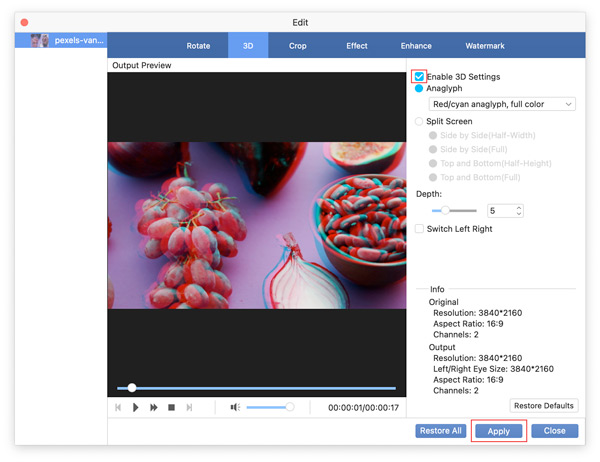
Turn 2D Video into 3D
When you need to make your 2D video become a 3D video, you can do based on the following instructions.
Step 1 Go to the 3D feature window
Run the program on your Mac computer. And add the video you need to edit by clicking the Add File option. Later you can choose the Enhance tab and enter the 3D feature.
Step 2 Turn the 2D video into 3D
After checking the box of Enable 3D Settings, you can choose the 3D settings you need. And in the left half of the window, you can preview the result.
When you want to select the anaglyph style of the 3D video you want to make, you should click the Anaglyph option and click the pull-down next to it. For instance, to make your video like this picture shows, you can select the Red/cyan anaglyph, full color.

If you need to split your video screen, you can check the Split Screen option. Click the Side by Side (Half-Width) or Side by Side (Full) option, and the you can split your video screen side by side with half-width or full size. You also can click the Top and Bottom (Half-Height) or Top and Bottom (Full) option to split your video screen up and down with half-height or full size. For instance, to make your video like this picture shows, you can check the Side by Side (Half-Width).
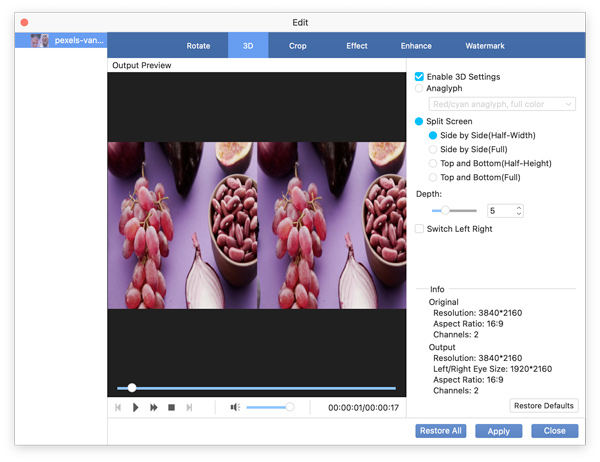
Notice: The Anaglyph function and the Split Screen function cannot be used at the same time.
You can move the cursor on the Depth bar or input the number next to the Depth bar to modify the size of the anaglyph effect or the objects in your video. Besides, you can check the box of Switch Left Right to adjust the position of the objects in your video from right to left.
Step 3 Finish the 3D video making process
To save changes, you can click the Apply button. Choose the Restore Defaults button, when you need to clear away the changes you have made at the Rotate interface. Besides, you can choose the Restore All button, when you need to clear away the changes you have made in the software.
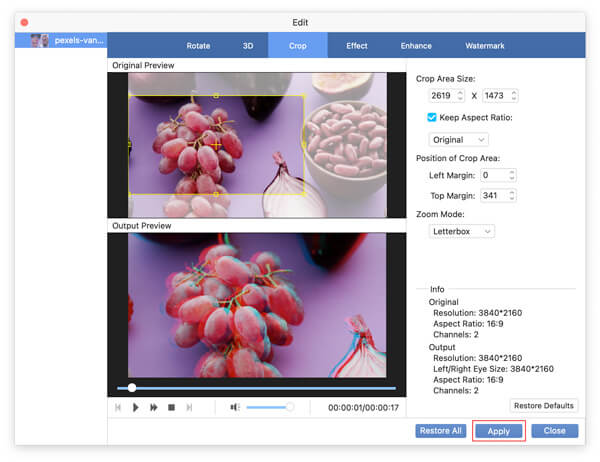
Crop Video Area
If you have to choose a new screen scope for your video, you can do based on the following instructions.
Step 1 Go to the Crop feature window
Run the program on your Mac computer. And add the video you need to edit by clicking the Add File option. Later you can choose the Enhance tab and enter the Crop feature.
Step 2 Crop the video area
You can edit the numbers at the right or just move your mouse at the top left preview window to set the size and position of crop area and zoom mode. And in the left half of the window, you can preview the result.
Step 3 Complete the cropping process
To save changes, you can click the Apply button. Choose the Restore Defaults button, when you need to clear away the changes you have made at the Rotate interface. Besides, you can choose the Restore All button, when you need to clear away the changes you have made in the software.
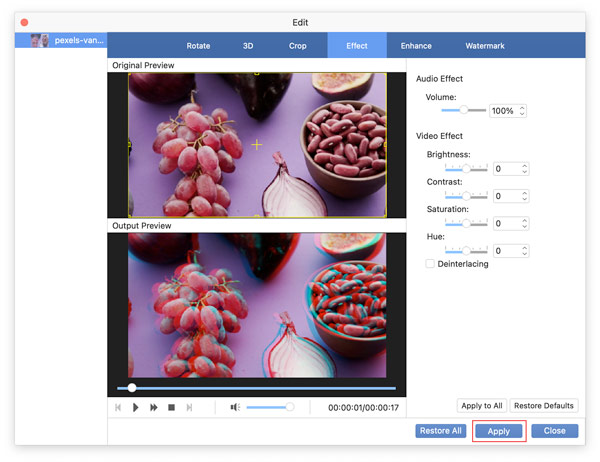
Adjust Video & Audio Effect
When you need to edit the volume, brightness, contrast, saturation, and hue of your video, you can do based on the following instructions.
Step 1 Go to the Effect feature window
Run the program on your Mac computer. And add the video you need to edit by clicking the Add File option. Later you can choose the Enhance tab and enter the Effect feature.
Step 2 Edit the effects of the video and audio
You can move your mouse on the Volume bar at the right or enter the percentage number to control the volume of your video. You also can use the same way to adjust the brightness, contrast, saturation, and hue of your video. Apart from those, when you want to adjust the effect of your video freely on the bar, please do not check the box of Deinterlacing. And in the left half of the window, you can preview the result.
Step 3 Finish the effects editing process
To save changes, you can click the Apply button. Choose the Restore Defaults button, when you need to clear away the changes you have made at the Rotate interface. Besides, you can choose the Restore All button, when you need to clear away the changes you have made in the software.
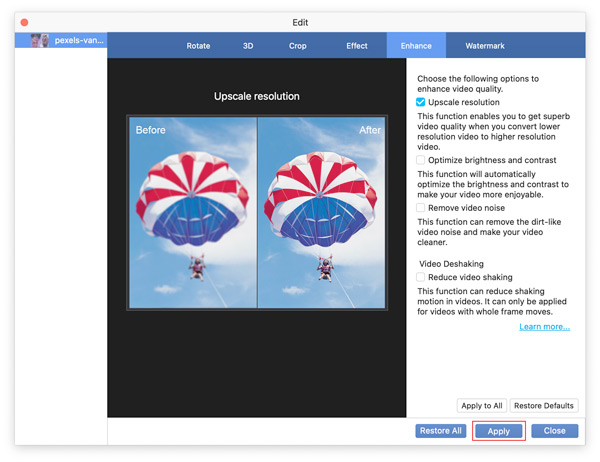
Enhance Video Quality
When you have to make the quality of your video better, you can do based on the following instructions.
Step 1 Go to the Enhance feature window
Run the program on your Mac computer. And add the video you need to edit by clicking the Add File option. Later you can choose the Enhance tab and enter the Enhance feature.
Step 2 Select the style of enhancement
If you want to get wonderful video quality, you can check the box of Upscale resolution.

To make your video more enjoyable, you can optimize the brightness and contrast of your video automatically by checking the box of Optimize brightness and contrast.
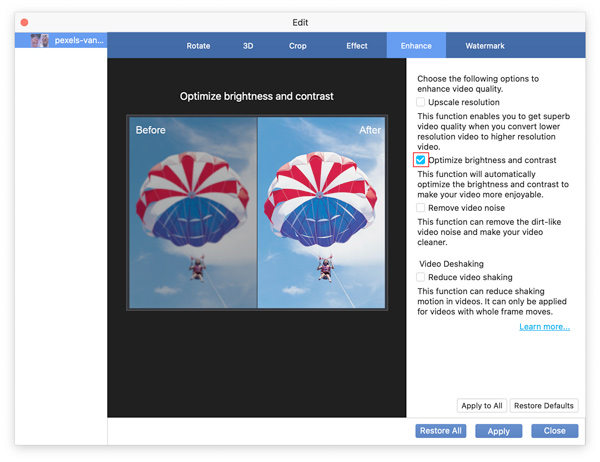
To make your video cleaner, you can check the box of Remove video noise to remove the dirt-like video noise in your video.
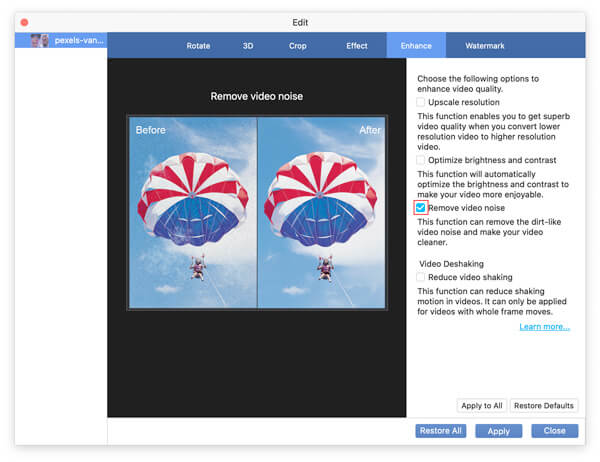
This feature enables you to reduce the shaking motion in your video by checking the box of Reduce video shaking. However, it can only be applied for videos with whole frame moves.
By the way, these four enhancement formats could be applied at the same time.
Step 3 Complete the video enhancement process
To save changes, you can click the Apply button. Choose the Restore Defaults button, when you need to clear away the changes you have made at the Rotate interface. Besides, you can choose the Restore All button, when you need to clear away the changes you have made in the software.
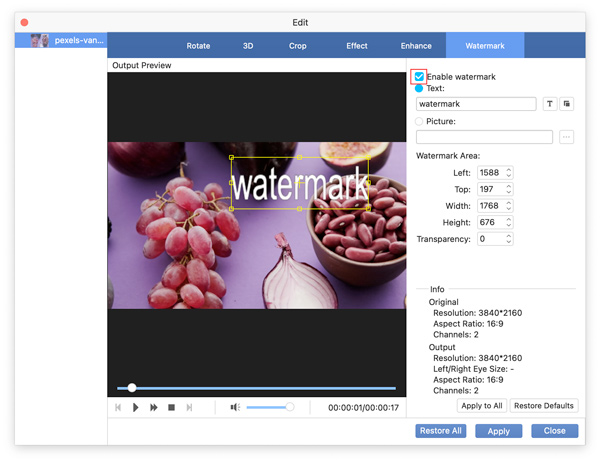
Add Watermark to Video
When you upload your video to the video websites, you may want to add a watermark to your video to let others know whom the video belongs to, you can do based on the following instructions.
Step 1 Go to the Watermark feature window
Run the program on your Mac computer. And add the video you need to edit by clicking the Add File option. Later you can choose the Enhance tab and enter the Watermark feature.
Step 2 Add the text or picture watermark to the video
To add watermark with Text or Picture at your video, you can check the box of Enable watermark at the right. What’s more, you can edit the data at the right section or just move your mouse at the left preview window to adjust the watermark area.
Additionally, you can change the font, font style, size, and effects of your watermark by clicking the Select Font icon, if you do not like the appearance of the watermark in text style.
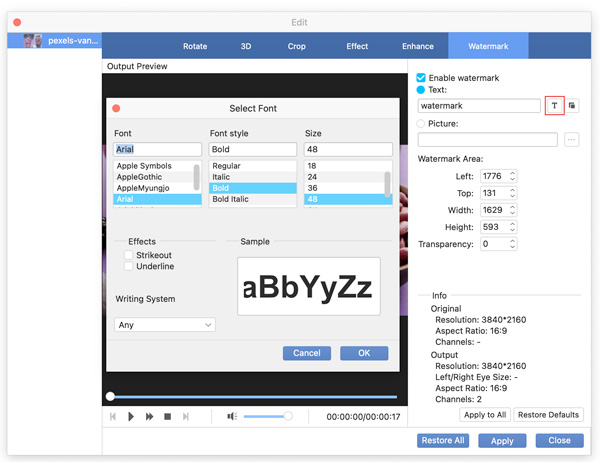
You also can click the Color icon to change the color of the watermark in text style.
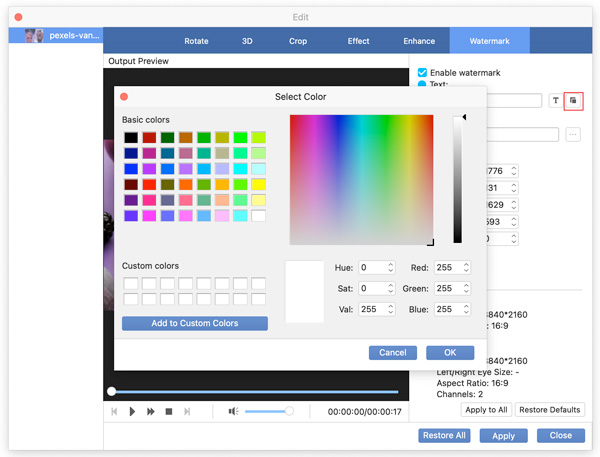
Step 3 Finish the watermark adding process
To save changes, you can click the Apply button. Choose the Restore Defaults button, when you need to clear away the changes you have made at the Rotate interface. Besides, you can choose the Restore All button, when you need to clear away the changes you have made in the software.
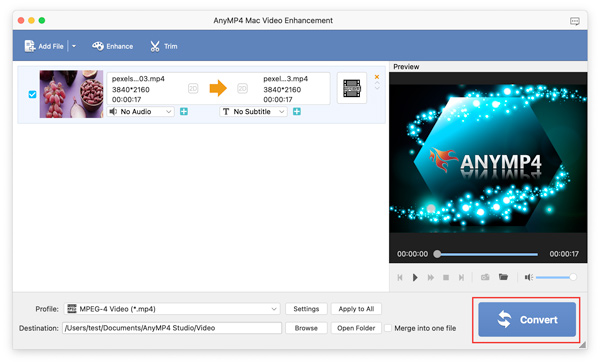
Convert Video Formats
AnyMP4 Mac Video Enhancement also supports converting your videos to other video or audio formats. After enhancing your video, you can convert it to other formats here
Step 1 Add video file
Run the program on your Mac computer. And add the video you need to edit by clicking the Add File option.
Step 2 Choose format for the video
You can click the format symbol located at the right of the video bar to select the format you want to convert.
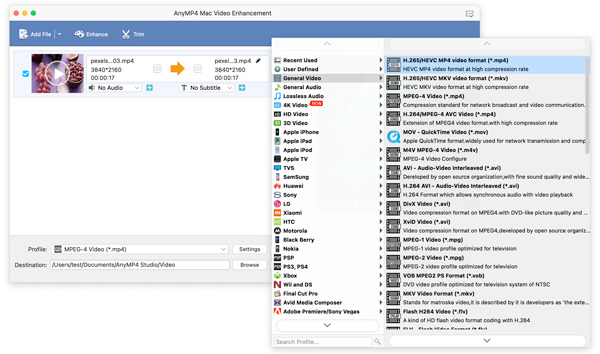
Step 3 Convert the video
To get the final enhanced video, you should click the Convert button after selecting the format.