Store
Store- Multimedia
For Windows
- Converter Tools
- Video Converter Ultimate

- Video Converter
- 4K Converter
- MP4 Converter
- Audio Converter
For Mac
- BD/DVD
For Windows
- DVD Tools
- DVD Ripper
- DVD Copy
- DVD Creator
- DVD Converter
- DVD Toolkit
For Mac
- Mobile
For Windows
For Mac
- Utility
- Freeware

User Guide
Get Started
Download & Install
Download iPhone Transfer Pro for Mac from the official page and then follow the on-screen instructions to install it on your Mac. After installing, launch it and start the next process.
Register
AnyMP4 iPhone Transfer Pro for Mac supports Try before Buy, and you can download the free trial version. However, there are some limitations of the trial version like numbers, times, etc. If you want to enjoy the full features, you can need to click the Register button and then your Email Address and License Key to register this software.
Note: After you purchased it successfully, the registration code will be sent to your email address that you filled in the order form.
Email Address: The email address is the email that you use to purchase this software.
License Key: A string of characters marked as Activation key, license code or KEYCODE(S) in the order confirmation letter you received after the successful purchase.
Cannot see the register window? Just click the Menu icon on the top right corner of the interface, and select Register to open the register window.
Preferences
Before you use AnyMP4 iPhone Transfer Pro for Mac to transfer iOS data, do not forget to make the preference settings.
Just click the software name at the left-top corner and select Preferences. Then you can make the settings one by one.
General
By default, you will go to the General tab by default, where you can select the transfer destination for the exporting data, set the destination for the log file and temporary files. Moreover, you can select the checkbox of Exit program or Minimize to the system tray, but don’t exit the program when you clicking the cross icon. Besides, you can also select the checkbox of Check for Updates Automatically, or Prevent iTunes working while program is running.

Photos
Go to the Photos tab, and you can make the photos settings when you export the photos from iOS device. It lets you keep the original format or convert to JPG/JPEG when you want to export the HEIC images.
Moreover, it also lets you keep the original date information on the device or the modified date information after exporting.

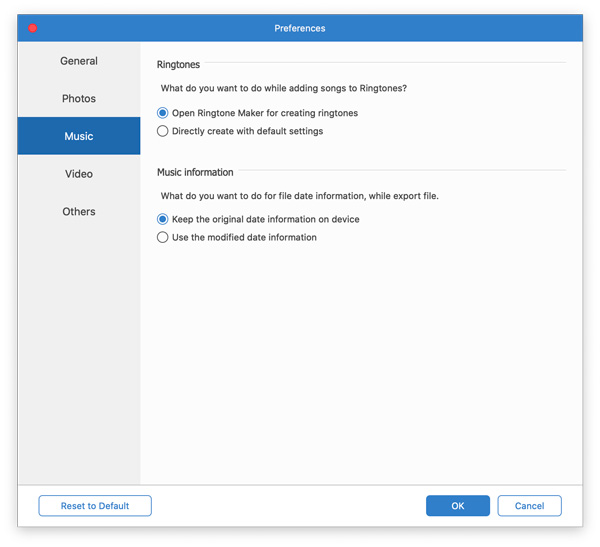
Music
Switch to the Music tab, where you can make the settings for ringtones and music information. When you adding songs to Ringtones folder on iOS device, it lest you open the ringtone maker for creating ringtones or directly create with the default settings.
For exporting the music files from iOS device, you can choose to keep the original date information on device or use the modified date information.
Video
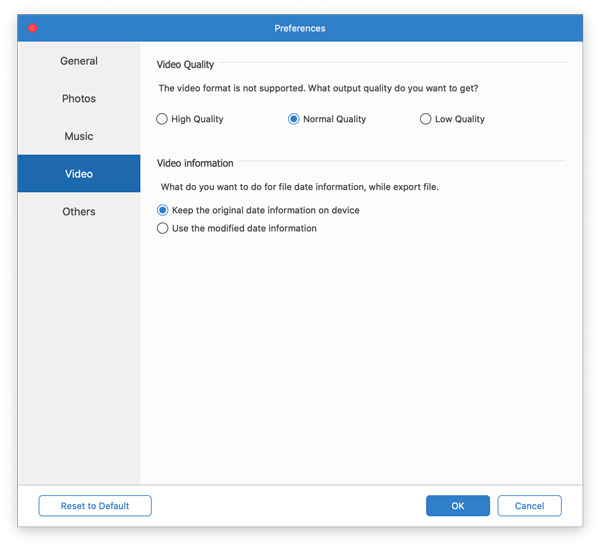
Under the Video tab, when you add the incompatible videos to iOS device, this software will convert the videos automatically to play on iOS device, it also leaves you the option to select the video quality from High, Normal or Low.
Besides, it also lets you keep the original video date information from iOS device or the modified information, when you export the videos.
Others
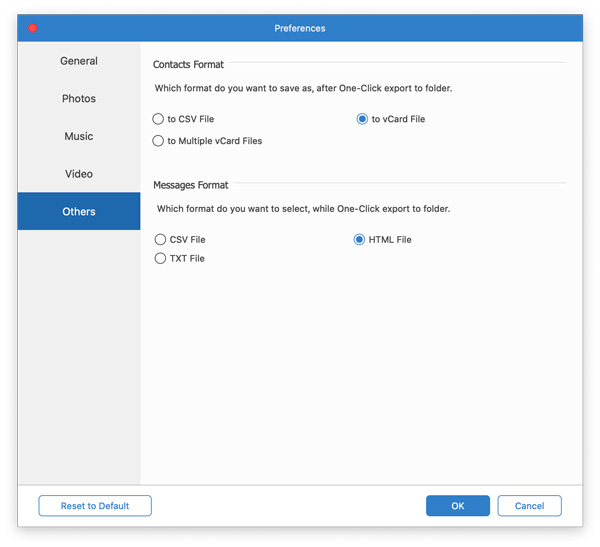
Navigate the Others tab, where you can set the exporting formats for contacts and messages when you use the one-click export option to save the data to folder.
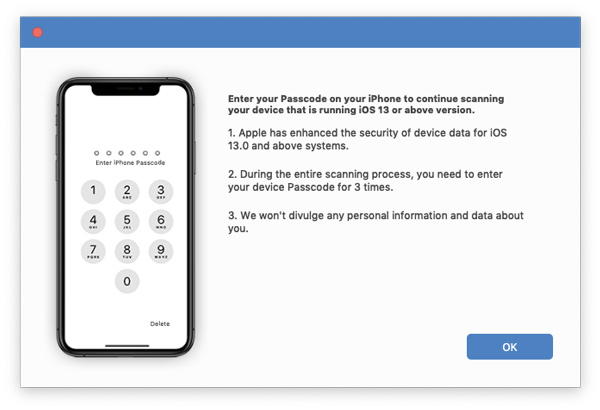
iOS Data Encryption
After iOS 13 or above update, Apple has strengthened the security of device data. When you want to access your iOS data with iPhone Transfer Pro for Mac, a pop-up window will appear and need you to enter the password on iOS device to confirm the operation.
Moreover, you need to enter the iTunes backup password when you have made the iTunes backup on this computer with creating the encrypted password.
Quick Data Transfer
AnyMP4 iPhone Transfer Pro for Mac is easy to transfer data for iOS devices. Follow the steps below to sync data among iOS device, computer and iTunes quickly.
Step 1 Connect iOS device to computer
Get the USB cable to connect your iOS device to this computer, and run AnyMP4 iPhone transfer Pro for Mac on this computer. Do not forget to tap Trust and unlock your device to confirm that. Then this software will detect your device automatically.
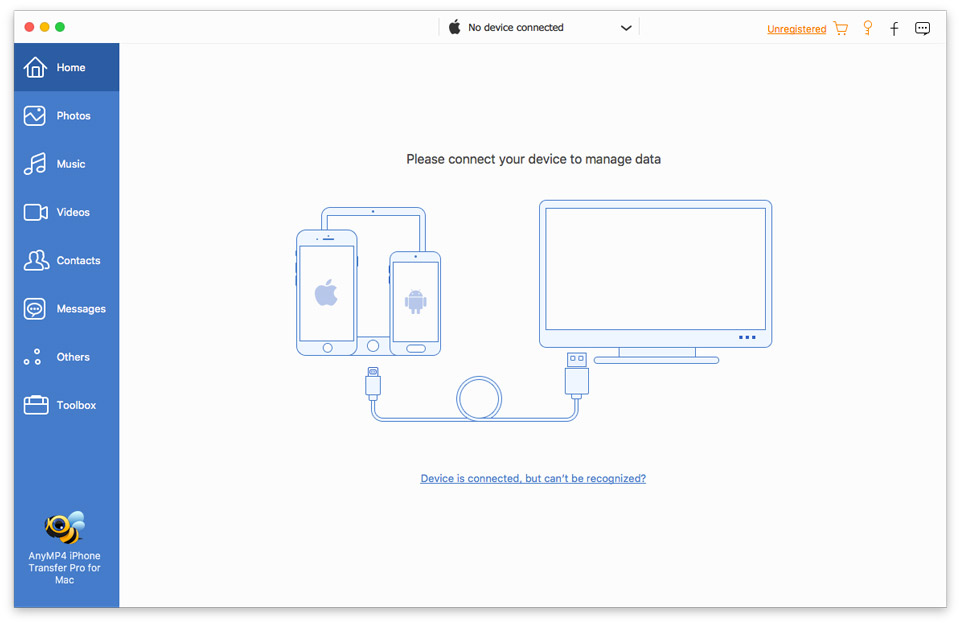
If you want to share data between iOS devices, you need to connect both devices to this computer via the USB cables.
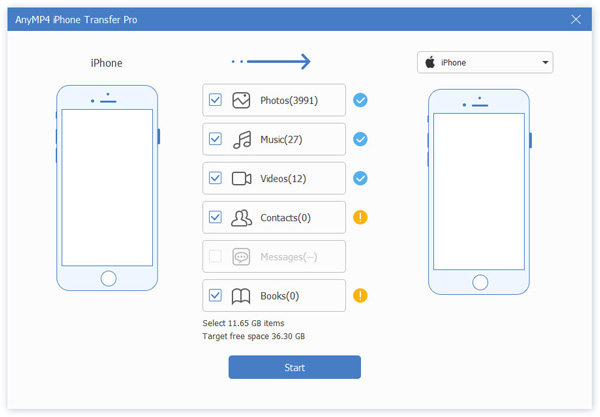
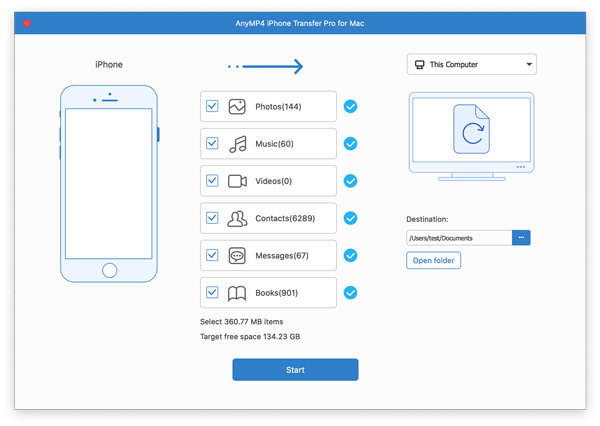
Step 2 Select data
All the data types of iOS device will be categorized in the left sidebar. Select the data you want to transfer by clicking the data type and select the checkbox of the items.
Step 3 Transfer data from iOS device
Click the Export to Device and select the target iOS device from the drop-down list to transfer files from one iPhone to another one.
Click Export to Computer to select Export to Mac from the drop-down option to move all the files to copy the data from iOS device to Mac computer. Optionally, you can select Export to iTunes to migrate the media files to iTunes from iOS device without running iTunes.
Data Sync & Management
Transfer & Manage Photos
AnyMP4 iPhone Transfer Pro for Mac can be the data management to organize your photos on iOS device easily.
When click Photos on the left side bar, you will see all the photos types appear in the middle, including Camera Roll, Photo Library and Shared Albums.
The options at the top menu lets you do the following managements:
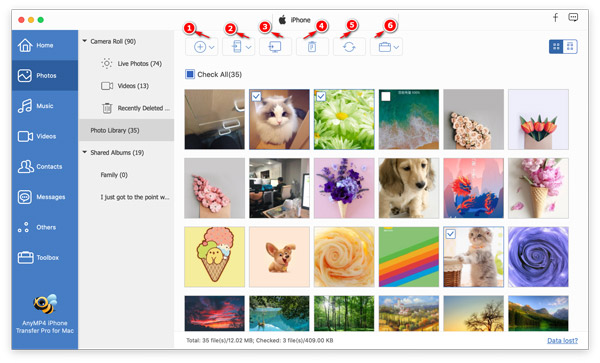
① Add photos from your Mac to this iOS devices.
② Export photos from one iOS device to another one iOS devices.
③ Copy the pictures from iOS device to your Mac computer.
④ Delete photos from iOS device directly.
⑤ Refresh the data if you add new data to your iOS device while connecting to this computer via this software.
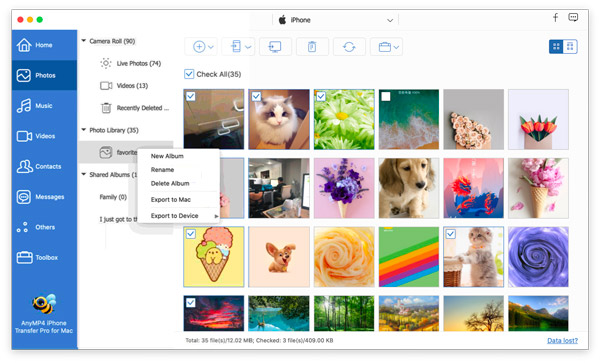
⑥ Toolkit lets you add the selected images to another album, create new album, rename album, delete the selected albums, preview the photos, and the photos information, check or uncheck all the photos.
Toolkit is the alternative to the right-click of your mouse to manage the photos or albums from your iOS device. Just right click the selected images and you can also export the images, remove from albums, etc.
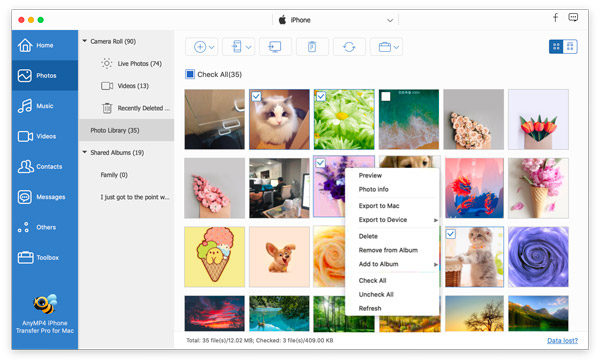
When you right-click the album, it also leaves you the option to create the new album, rename it, delete the album, or export the whole album to Mac or another iOS device.
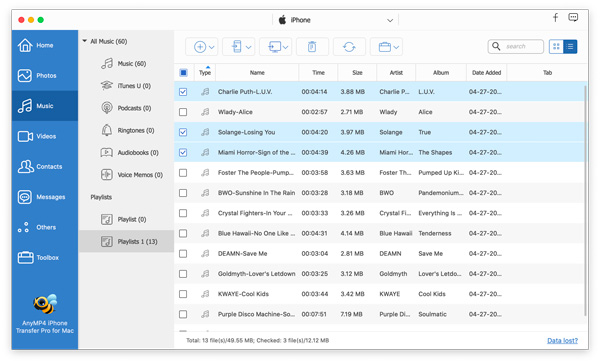
Transfer & Manage Music
Navigate the Music tab, and follow this software to organize your music files on iOS device.
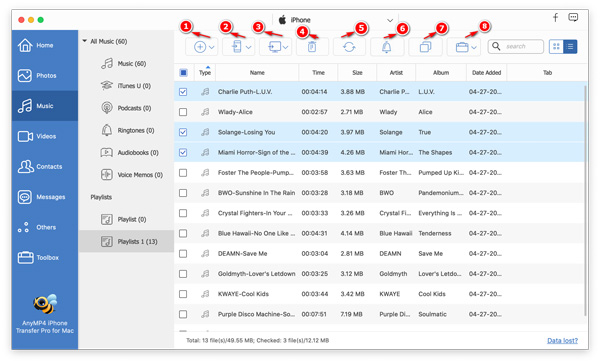
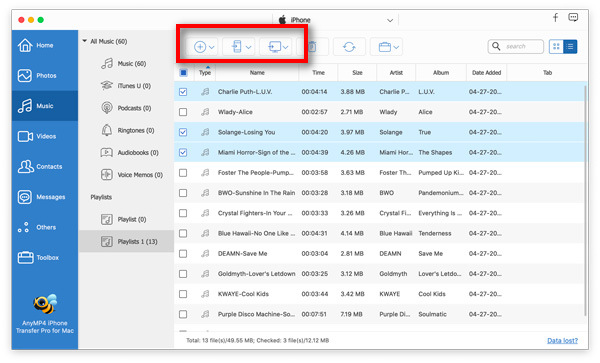
① Click Add item(s) button to add music file or folder from Mac to iOS device.
② By clicking Export to Device button to transfer music file from one iOS device to another.
③ Transfer the music from iOS device to computer or iTunes.
④ The trash icon enables you to delete the music tracks to free up more space.
⑤ The Refresh button can refresh the music files in this software, when you do the operations on iOS device while connecting to this software.
⑥ Create M4R ringtones from iPhone from the music on iOS device.
⑦ Find the duplicated songs and delete them from your iOS device.
⑧ Toolkit lets you play the selected music, view the music information, add to the playlist, create/delete/rename playlists, check and uncheck all the music files.
Alternatively, you can manage all the features by right-clicking the selected songs or the playlists.
Transfer & Manage Videos
Switch the Videos tab, and you can delete, transfer, add videos for iOS devices.
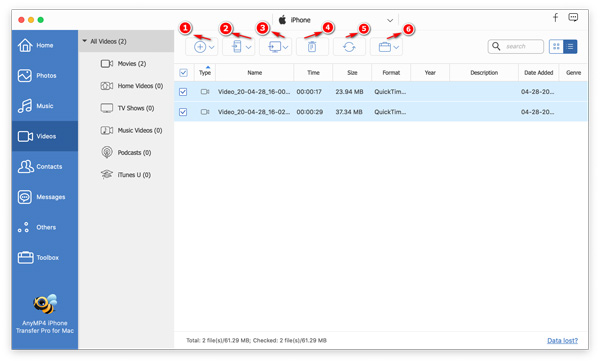
① Add movies from Mac to the iOS devices.
② Share videos from one iOS device to another one.
③ Export video files from iOS device to Mac computer or iTunes.
④ Delete movies from your iOS device.
⑤ Refresh all the data displayed on this software when you make some changes on your iOS device while connecting to this software.
⑥ Toolkit lets you play the selected video, view the video information, delete the videos, export to iTunes or Mac, and check or uncheck all the videos.
Right-clicks still work when you want to use the above functions.
Transfer & Manage Contacts
Just move to the Contacts tab, where you can manage your contacts easily.
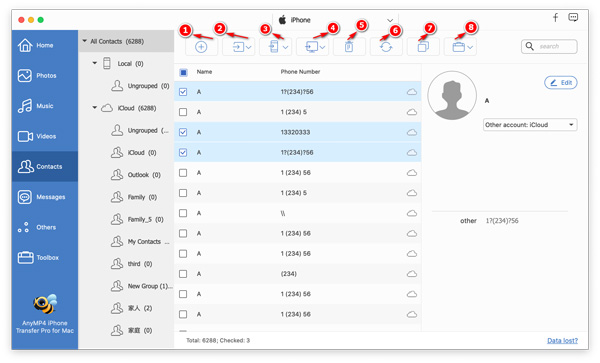
① Create new contacts on this computer and add into your iOS device directly.
② Import contacts from CSV or vCard files on Mac into your iOS device.
③ Transfer contacts from one iOS device to another iOS device.
④ Export the contacts from iOS device to your Mac computer as CSV, vCard, Multiple vCard, Gmail, Yahoo, CSV files for Hotmail, or CSV file for AOL.
⑤ Delete contacts from iOS device directly.
⑥ Refresh the contacts data when you make some changes of contacts on your device while connecting your iOS device to this software.
⑦ Find the duplicated contacts and delete the duplicates automatically.
⑧ Toolkit lets you create new group contacts, remove contacts from group, add contacts to the group, edit the contacts information, export to Mac or other iOS devices, etc.
Also, you can use the right-click feature to realize all the functions mentioned above.
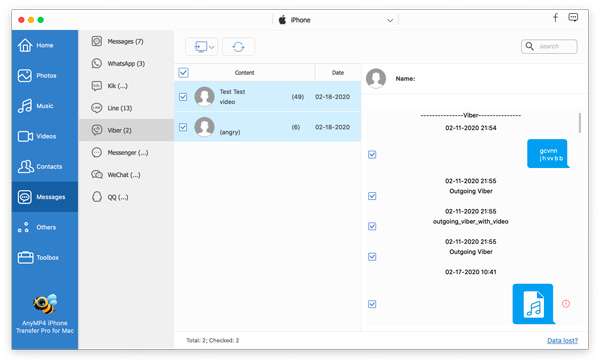
Transfer & Manage Messages
When you click Messages in the left pane, you can see all messages, WhatsApp, Kik, Line, Viber, Messenger on your iOS device. You can check and back up those messages to your computer.
Transfer & Manage Others
Other data including books, notes, calendars, Safari and call log.
You can export all the data to your Mac for backup.
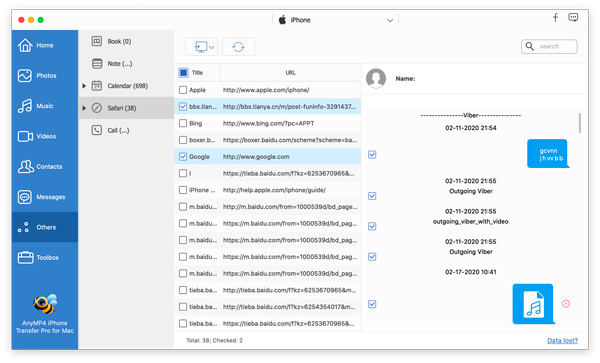
Books: Transfer ePub and PDF books to another iOS device or Mac computer.
Notes: Get notes from iOS device to Mac as CSV, HTML or TXT file.
Calendars: Copy the calendars from iOS device to Mac as CSV, HTML or ICS file.
Safari: Export Safari bookmarks and history as CSV, HTML or TXT file.
Call logs: Sync iOS call history to Mac as CSV, HTML or TXT file.
One-Click Transfer
One-Click iOS to iOS
Click Toolbox from the left sidebar and then click Phone to Phone tool, and then you can select all or the selected data (photos, music, videos, contacts and books) between two iOS devices.
One-Click iOS to Mac
When you do not want to pick up the items and want to save your time, just click the Device to Mac tool in the Toolbox, and choose photos, music, videos, contacts, messages or books for transferring on Mac. You can click the three dots icon to set the output destination folder.
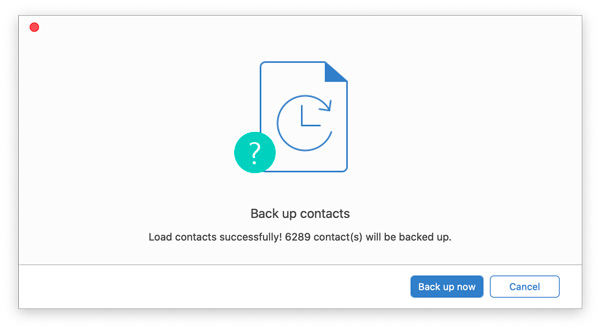
One-Click Contacts Backup & Restore
When you want to save all the contacts from iOS device to Mac for backup, just select Contacts Backup tool in the Toolbox, and it will take a few minutes to load contacts. After being loaded successfully, click Back up now to back up contacts to computer.
For restoring the contacts backup, just click Contacts Restore.
Toolbox
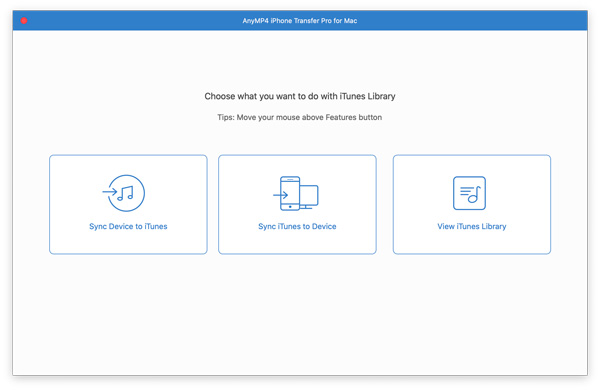
iTunes Library
Click iTunes Library from the Toolbox, and then you can transfer the media data (music, ringtones, audiobooks, movies, Home videos, TV shows, music videos, podcasts, iTunes U, voice memos, and plylists.) from iOS device to iTunes, from iTunes to iOS device or Mac easily.
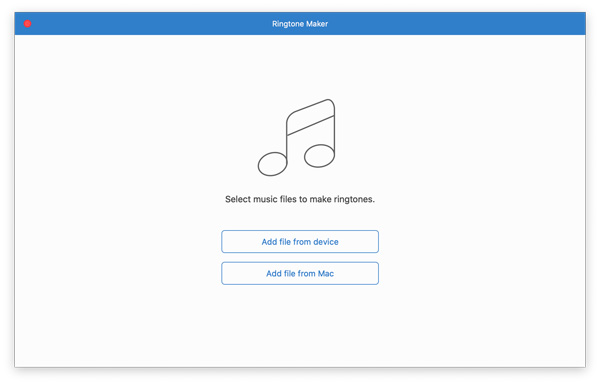
Ringtone Maker
This software also lets you create ringtones from music and add to iOS device directly.
Step 1 Select Ringtone Maker from the left sidebar, and then add the music files from your iOS device.
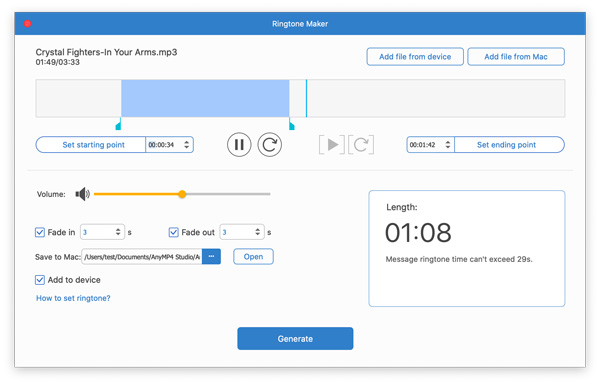
Step 2 Set the starting time and ending time, then you can add the fade in or fade out effects optionally and set the destination for saving the ringtones on Mac. Optionally, select the checkbox of Add to device to generate the ringtones to your iOS device.
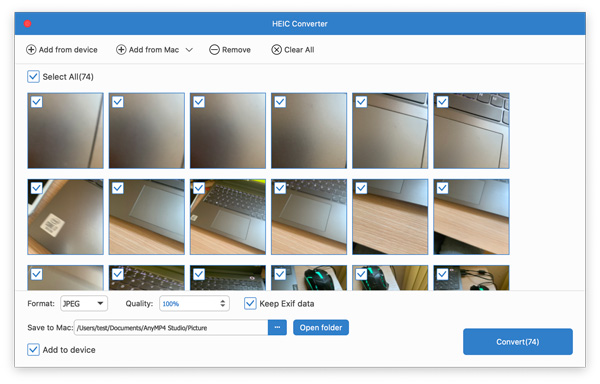
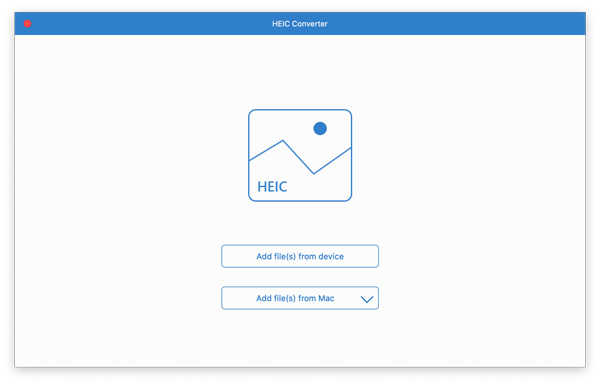
HEIC Converter
Images taken by your iPhone camera will be saved as HEIC of PNG. However, not all the devices can play HEIC images. This software can convert HEIC to JPEG or PNG on Mac.
Step 1 Click HEIC Converter from the Toolbox on the left sidebar, and then you should choose to add the HEIC images from Mac or iOS device.
Step 2 Select the output image format, adjust the picture quality, and keep the Exif data or not, and then set the destination and click Add to device optionally to convert HEIC images to JPEG or PNG immediately.