 Store
Store- Multimedia
For Windows
- Converter Tools
- Video Converter Ultimate

- Video Converter
- 4K Converter
- MP4 Converter
- Audio Converter
For Mac
- BD/DVD
For Windows
- DVD Tools
- DVD Ripper
- DVD Copy
- DVD Creator
- DVD Converter
- DVD Toolkit
For Mac
- Mobile
For Windows
For Mac
- Utility
- Freeware

User Guide
Get Started
Download & Install
Download Video Converter Ultimate software and then follow the on-screen instructions to install it on your computer. After installing, launch it and start the next process.
Register
The trial version of AnyMP4 Video Converter Ultimate has limitations.
For enjoying the full features without any limitation, you need to register the software with your E-mail address and registration code.
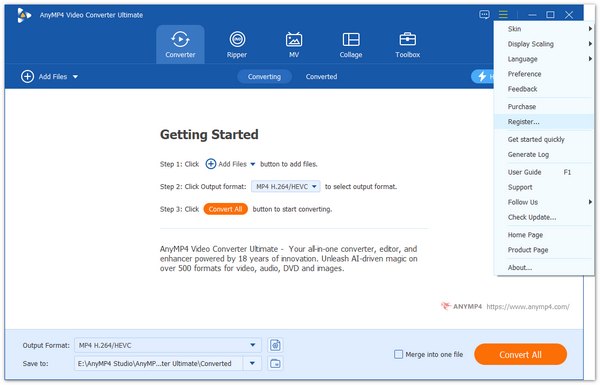
Click the Menu icon and choose Register to enter the Registration Center.
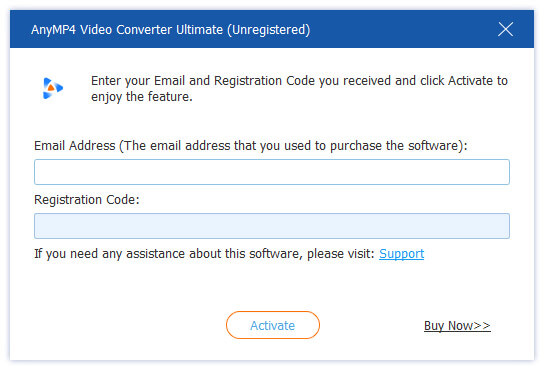
Enter your E-mail address and your registration code. Then, click the Activate button to complete the registration. Please make sure that your computer has a valid internet connection while you register AnyMP4 Video Converter Ultimate.
Update
AnyMP4 Video Converter Ultimate will be constantly updated with bug fixes and new features. If you want to check if it is the latest version, you can try the methods below.
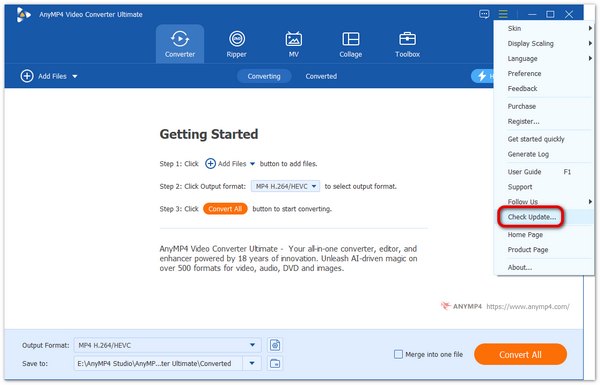
Method 1: Click the Menu icon and choose Check Update. If there's an update, you can download and install it immediately.
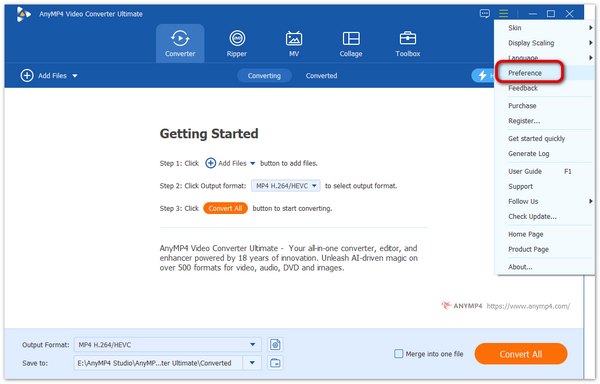
Method 2: Choose Preference under the menu.
Check the box of Check for updates automatically. Then, you'll get a message when an update is available.
Method 3: Go to our product page and download the latest version.
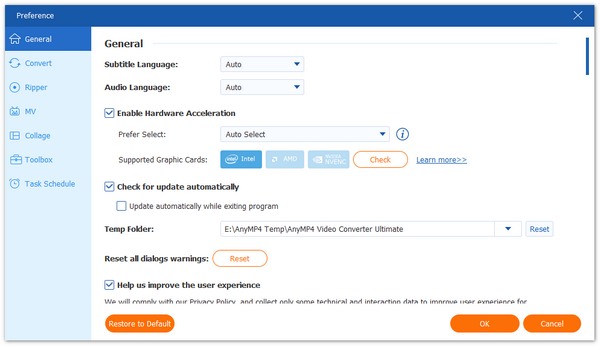
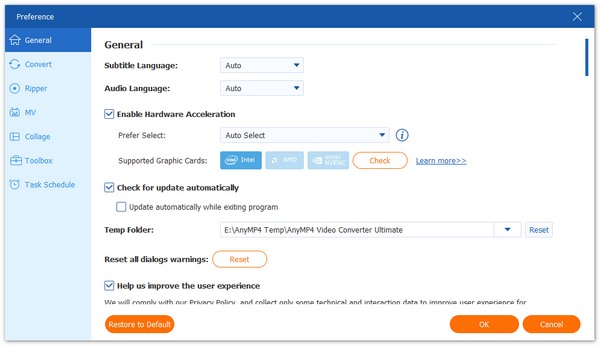
Preferences
Choose Preference under the menu to enter into the Preference Window. Here you are provided with four parts to configure the preference: General, Convert, Ripper, MV, Collage, Toolbox, and Task Schedule.
Here, you can choose the output folder, GPU acceleration, conversion settings, and more.
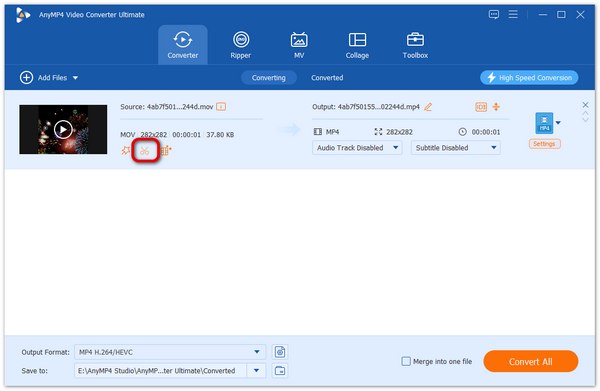
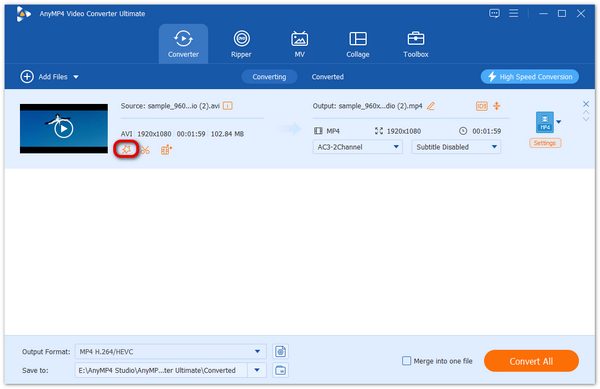
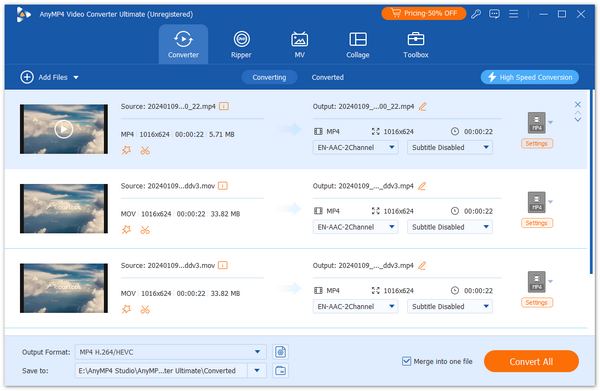
Convert Video/Audio
AnyMP4 Video Converter Ultimate enables you to convert videos to different video and audio formats, or turn audio to audio. Follow the steps below to finish your conversions.
Step 1 Add video or audio file(s)
Run this software on your computer on your computer. Click Add Files and select the Add Files or Add Folders.
Or directly drag multiple video and audio files to this program.
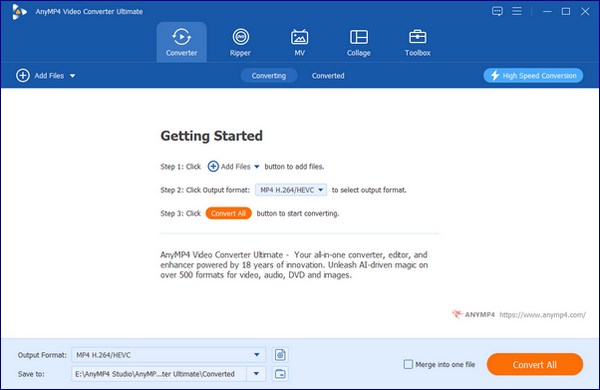
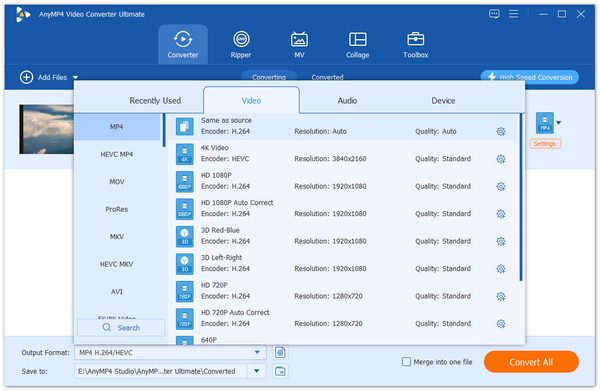
Step 2 Set the output file
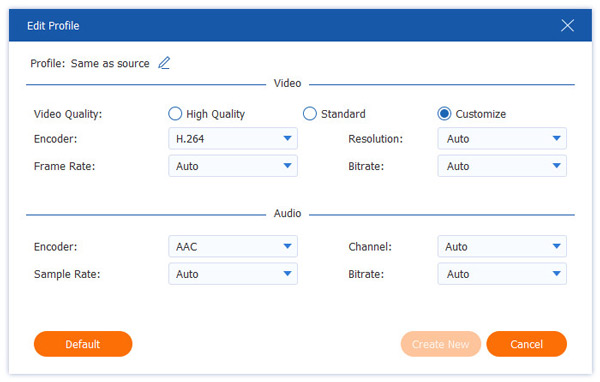
Click on the Output Format drop-down list on the bottom left. Then you can see a list of presets. Choose a preset and adjust the profile settings according to your need.
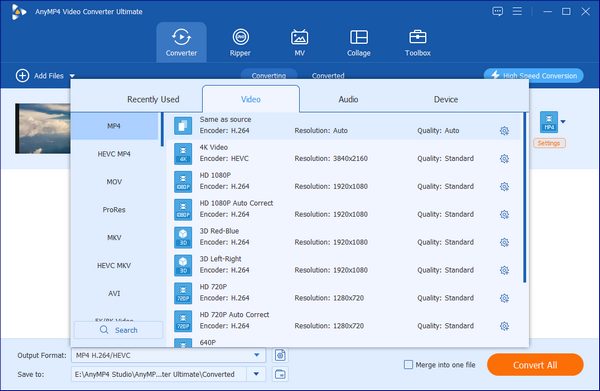
Besides, you can customize the profile settings by hoving your mouse over the Custom Profile icon.
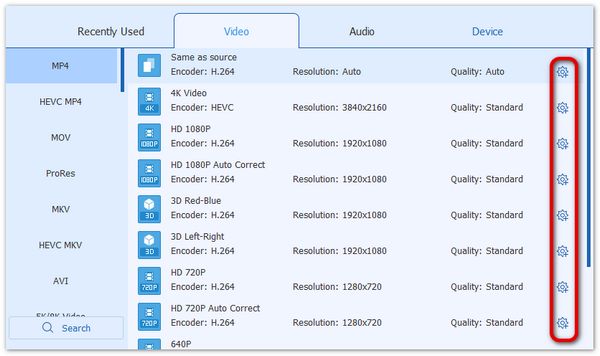
Then you can adjust the parameters like codec, resolution, frame rate, bitrate, and more as you like.
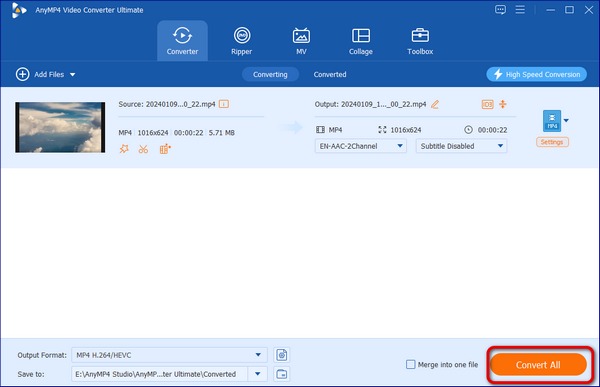
Step 3 Convert video/audio file
Select a path for the converted files. And then click the Convert All button on the main interface to start changing video or audio files on your computer.
Rip DVD
It also works as a DVD ripper that allows you to rip homemade DVD into the digital formats with ease.
Note: Please DO NOT use our software to rip rental DVDs or back up DVD for commercial use!
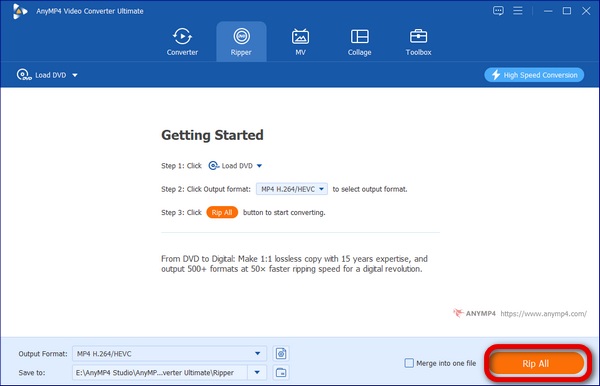
Step 1 Load DVD
Click the Load DVD button to insert the DVD disc, ISO file or DVD folder. If your compute has no DVD drive, just use the external DVD drive to connect your computer.
On the main interface, choose the Ripper function.
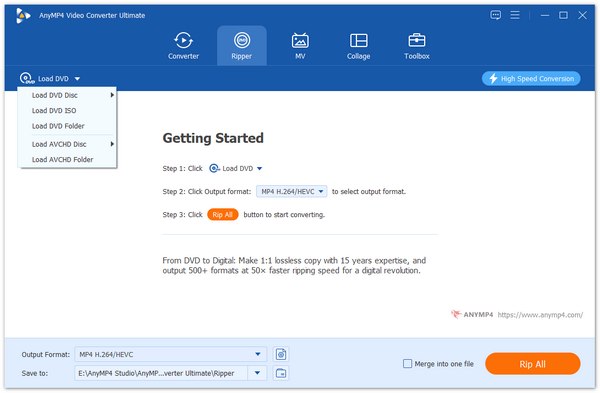
Step 2 Select output format
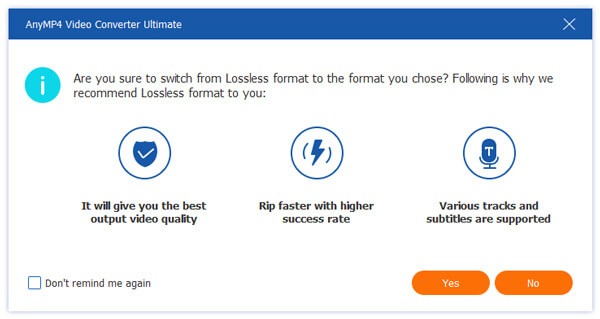
The default output format for this ripper is MPG/MKV Lossless which can preserve the lossless output quality, and keep the original structure of your DVD.
If you want to rip DVD to digital formats for easy playback on devices, just find the drop-down option to select suitable output format from its drop-down list.
Make sure that you want to rip DVD to other digital formats instead of MPG/MKV Lossless, since MPG/MKV Lossless will give you the best output video quality, faster speed, and supports various tracks and subtitles.
Step 3 Edit DVD movie
Click the Edit button or the Clip button to edit your DVDs.
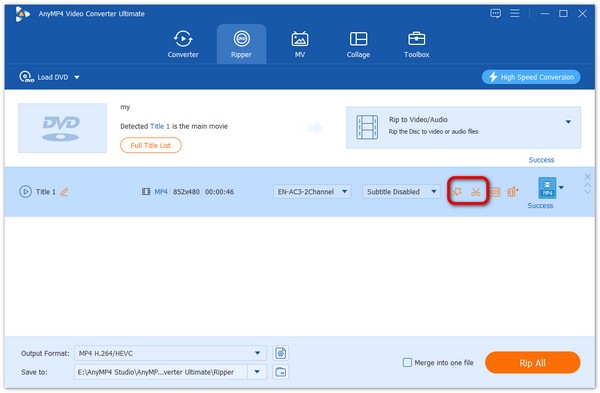
You should make sure the output format is not MPG/MKV Lossless when you edit the DVD.

Step 4 Rip DVD to video/audio
In the end, click the Rip All button to start ripping your DVDs.
Make Movies
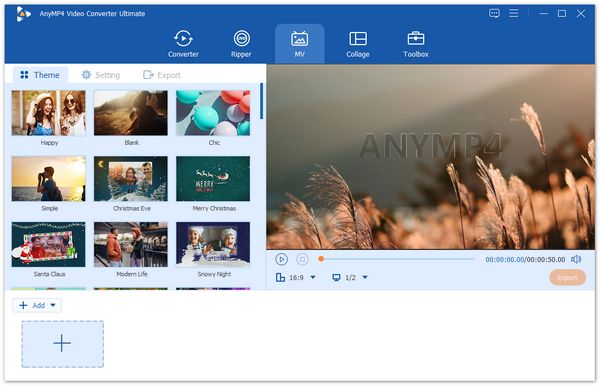
MV is an additional function available to use in Video Converter Ultimate. This amazing feature allows you to make share-worthy movies combined with popular themes, animated texts, hot music, and basic editing tools. Read on to learn how to do so.
Step 1.Upload files
Launch Video Converter Ultimate on your computer, choose the MV tab and click the Add button to import photos and video clips from your computer.
Step 2.Create a Video
After uploading your files, you can rearrange the order of the videos and photos by hitting on the Behind or Forward button, or just drag and drop a video or photo to the desired place.
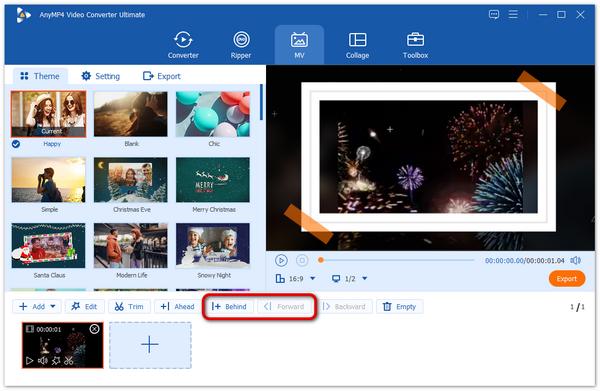
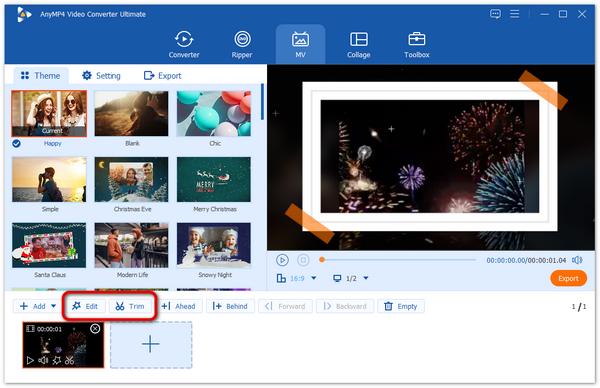
If you need to trim or edit your video clips, select the video you want to trim, and click the Trim or Edit button to make adjustments.
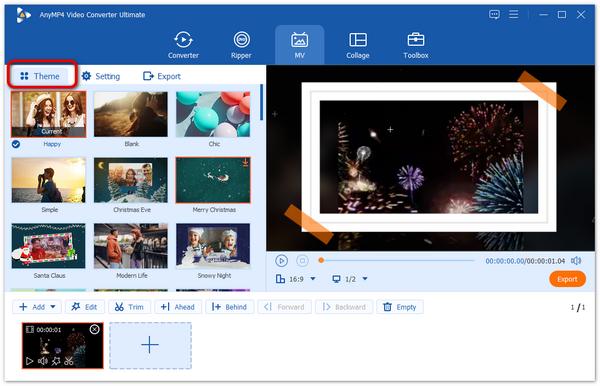
Then, choose a theme for your project by going to the Theme section
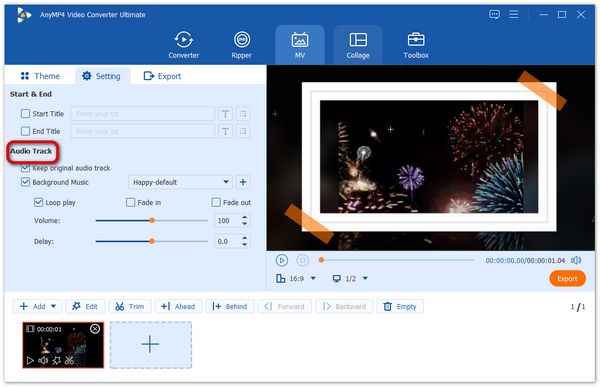
Step 3.Add background music
If you'd like to add an audio track to your music, head to the Setting section where you are provided the options to keep the original audio track, add the default music of the theme, or choose to add new background music to your project.
Step 4.Add background music
Finally, go to the Export section. Here you can give the file a name, choose the location to store the file, enable GPU Acceleration, and select the output format. Once the configuration is over, click Export to produce your movie.

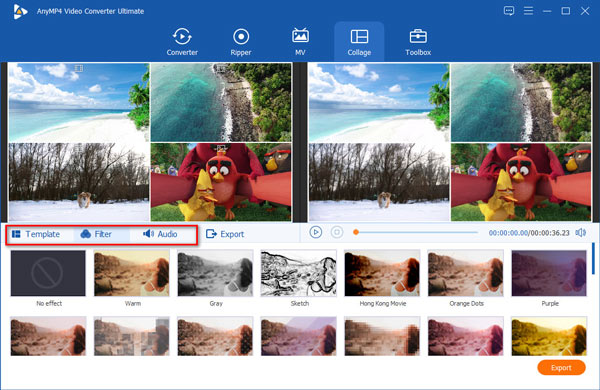
Collage Videos and Pictures
This software lets you split the screen by combining multiple videos and pictures into one screen by side. It also allows you to edit each separate video file before splitting to refine the output video file.
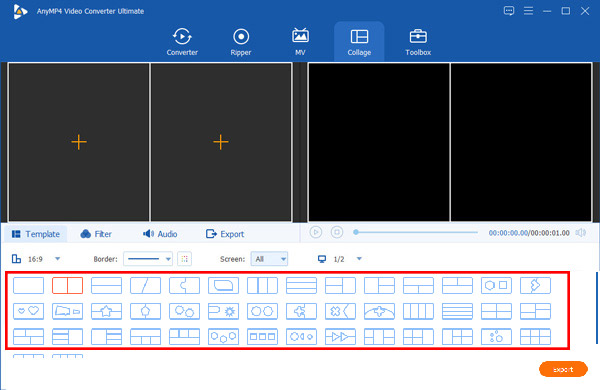
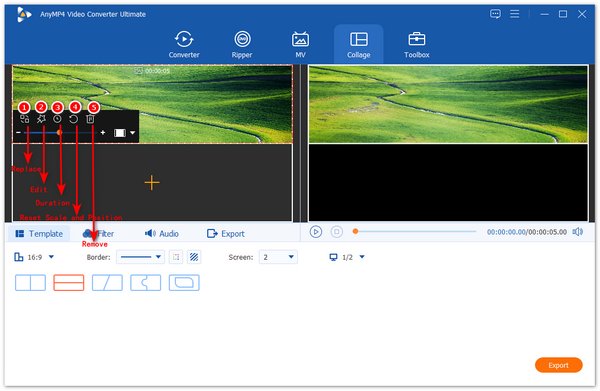
Step 1.Choose split-screen template
Run Video Converter Ultimate on your computer. Select the Collage tab. Then all the split-screen templates are available for you. It lets you add up to 9 videos and images into this software to create 9 screens in video playback.
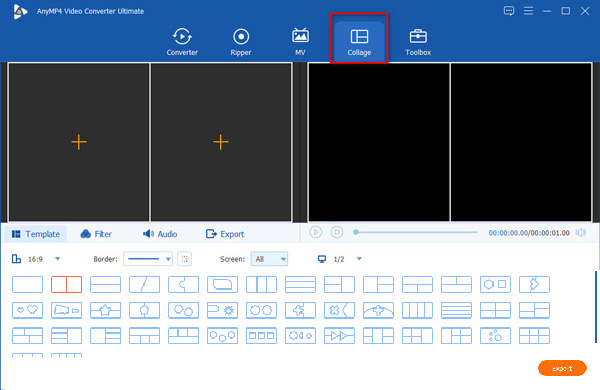
Besides, you are able to customize the screen border color and ratio to suit your display.
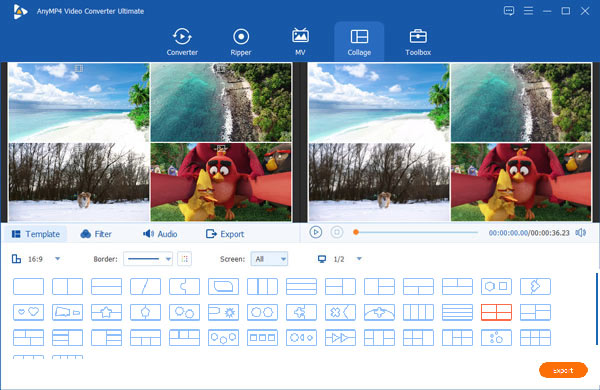
Step 2.Add video or/and pictures
After choosing the split-screen template, just click the big plus button to add the videos or photos one by one to the screen.
Step 3.Edit video effects optionally
After importing videos and photos into this software, you can drag and move one screen video or picture frame to set the position. Then edit the whole video effects by choosing Filter and Audio to apply the effects for all the screens.
Then jump to step 4 to create a quick split-screen video file.
Alternatively, this wizard also lets you edit each screen separately.
Hover your mouse over the screen and you will see the editing floating bar.
Edit video before splitting screen
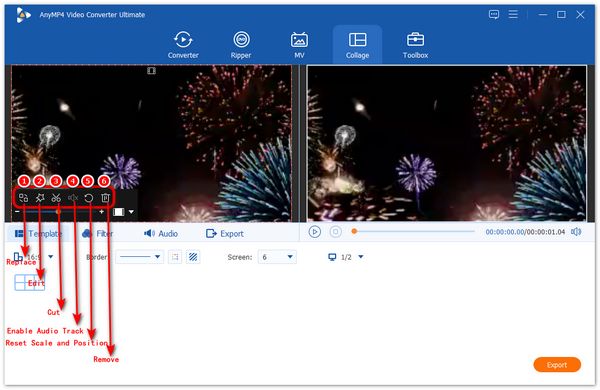
Replace: Replace option will let you replace the screen with another photo or video file.
Edit: Once you click the star image, you will be directed into the video editing window, where you can edit the video effects by cropping, rotating, watermarking, editing subtitles, and audio track.
Cut: The Cut option will help you to split a video file into clips and cut unwanted parts from a video file.
Disable Audio Track: Once you click the option, the background audio of the screen video you selected will be silent.
Reset Scale and Position: This option will reset all the changes you made on this screen to the original state.
Edit picture before splitting screen
Replace: You can change another image on the selected screen.
Edit: This option will help you rotate the photo and crop it to suit your screen.
Duration: You can set the photo direction through this option.
Reset Scale and Position: This option will reset all the changes you made on this screen picture.
Remove: You can delete the photo you add to the screen by clicking this button.
Step 4.Export picture-in-picture video
While all the settings are made well, just click the Export tab.
Here, you should select the output format, frame rate, resolution, quality, destination, GPU acceleration, and more options.
Finally, click Start Export to start creating a split-screen video file and saving it on your computer.

Edit Video/Audio
Video Converter Ultimate also provides you with the wonderful editing functions.
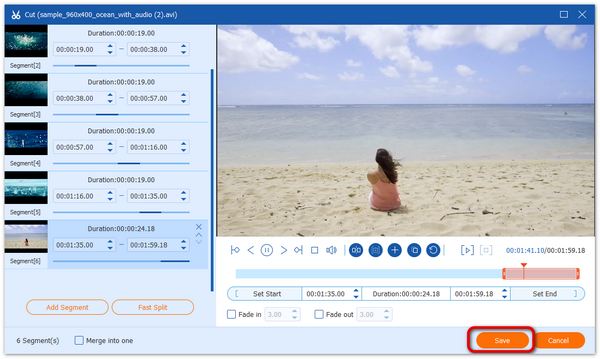
Trim & Split Video
It allows you to split a long video into clips.
Step 1 Select a video file and click the Cut icon.
Step 2 Choose the start and end time for your clip. You can drag the clipper or enter the time directly.
Step 3 Click the Add Segment button to add the current clip to the list. Then, you can set another clip.
Step 4 This software also lets you create a fast split to split one video into several parts by average.
Click the Fast Split icon, and choose the number you want to cut by average. Alternatively, you can split one video into clips by average time.
Once confirmed, click the Split button.
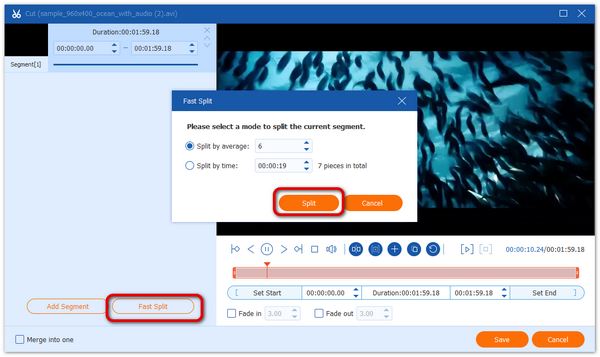
Step 5 In the end, click the Save button.
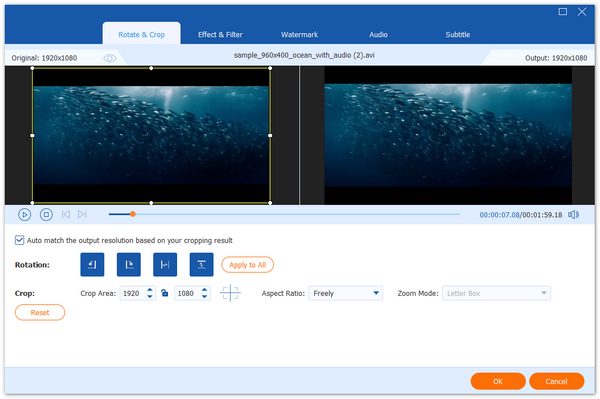
Rotate & Crop Video
This program offers you a quick way to rotate or flip a video.
Step 1 Click the Edit icon.
Step 2 Find Rotate & Crop. Here you can flip video vertically and horizontally, rotate 90 degrees, rotate 180 degrees or rotate 270 degrees. Then, you can check the result in the preview.
Step 3 And you can crop the video by setting the crop area, change aspect ratio and zoom mode.
Step 4 Click the OK button to save the changes.
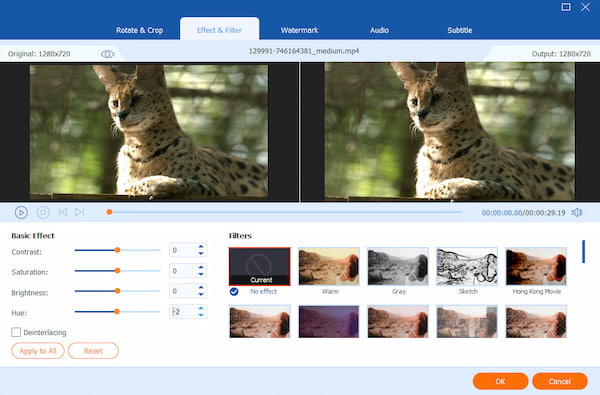
Adjust Video Effect & Filter
You are able to change brightness, contrast, saturation, hue adjustment and select suitable filter to your video.
Step 1 Click the Edit icon and find Effect & Filter.
Step 2 You can easily adjust brightness, contrast, saturation, hue and select deinterlacing as you need. Besides, you can choose a filter to beautify your video.
Step 3 Click the OK button to save the changes.
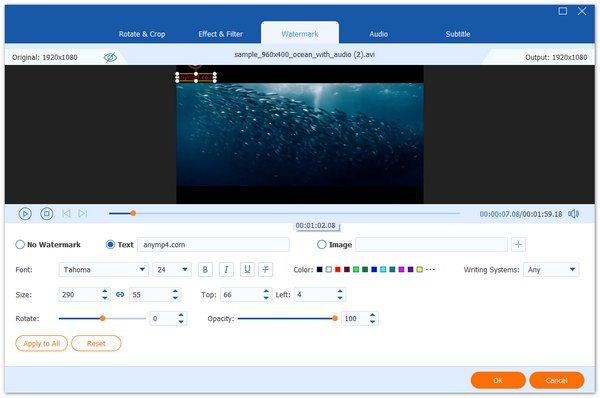
Add Watermark to Video
It can add watermark to your personal video to protect your copyright.
Step 1 Click the Edit icon and then choose Watermark.
Step 2 If you want to add a text watermark, enter the text to the blank. You can adjust the text fonts, colors, size and styles. Then place the text watermark anywhere on the video.
If you want to add an image watermark, activate the option Image. Click the Add Picture button to select an image. And then adjust the size and place it on your video.
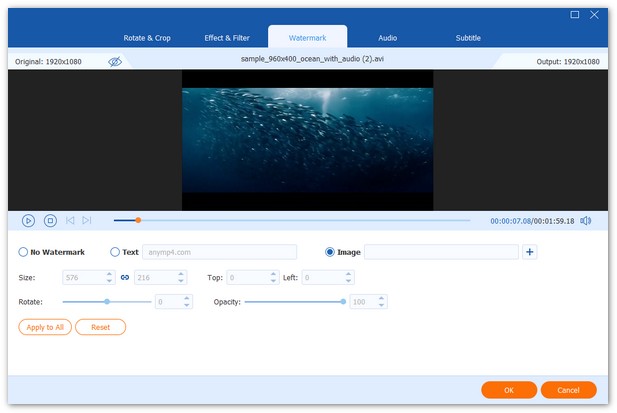
Step 3 Click the OK button to save your settings.
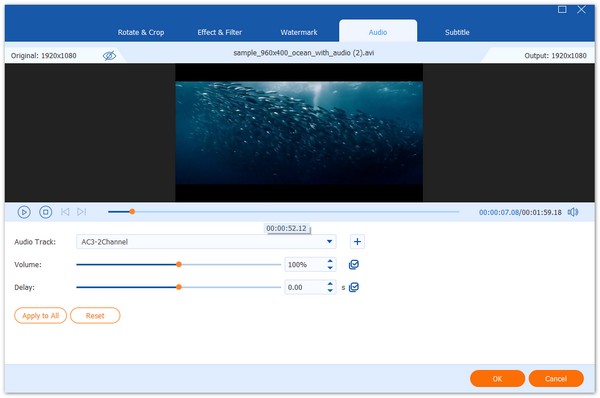
Adjust Audio
It offers audio adjustment for advanced mixing.
Step 1 Click the Edit icon and then choose Audio.
Step 2 Select the audio track you would like to play.
Adjust the audio volume and change the delay time to make them matched.
Step 3 Click the OK button to save your settings.
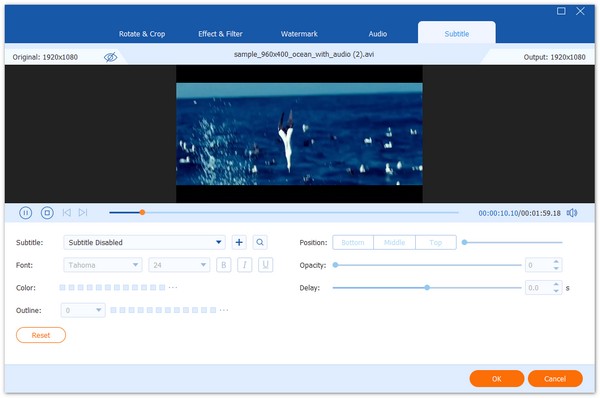
Add Subtitle
It is able to let you embed subtitles in video.
Step 1 Click the Edit icon and then choose Subtitle.
Step 2 Click + to import the subtitle file (*.srt; *.ssa; *.ass) from your computer. After that, you can adjust the position, font, color, transparency, delay time, outline and more.
Step 3 Click OK to save the adjustments.
Merge Video Clips
You can easily combine video files with different formats like MKV, AVI, MP4, FLV into a single file.
Step 1 Click Add Files to import the video clips that you want to merge.
Step 2 Choose an output format for the merged video.
Step 3 Check the box Merge into one file, and click Convert All. Then the software will convert and combine all the added files into one.
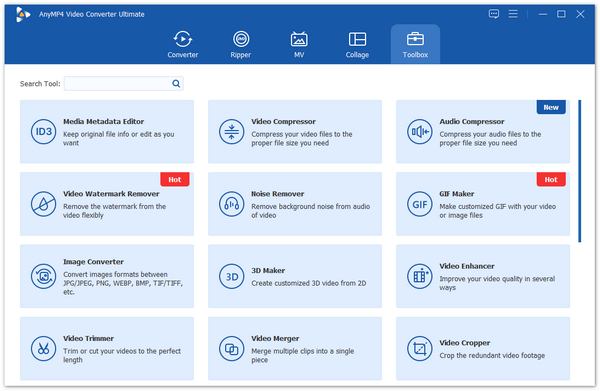
Toolbox
Video Converter Ultimate also provides powerful tools to help you edit metadata information, compress large video files, and make animated GIFs.
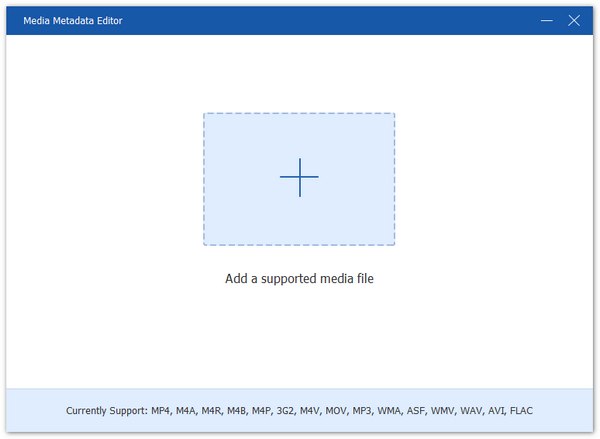
Media Metadata Editor
With this media metadata editor, you can keep original file information or edit as you like.
Step 1 Add a supported format, such as MP4, M4A, M4R, M4P, 3G2, M4V, MOV, MP3, WMA, ASF, WMV, and AVI.
Step 2 You can edit the file by modifying the file name, cover, artist, album, composer, genre, year, track, comments.
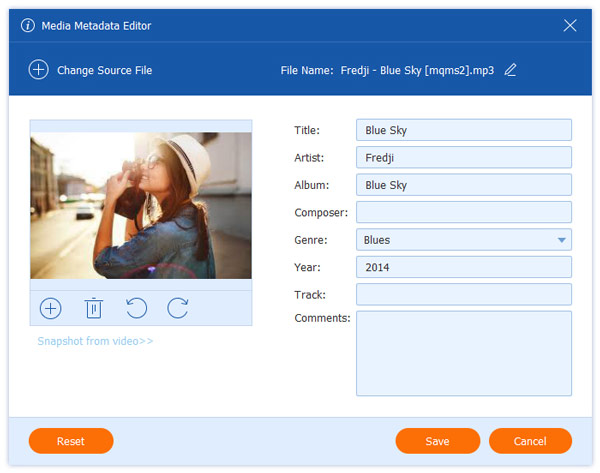
Step 3 After editing, click the Save button.
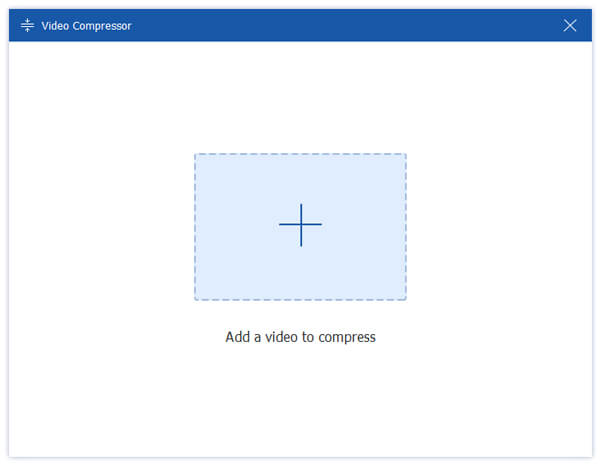
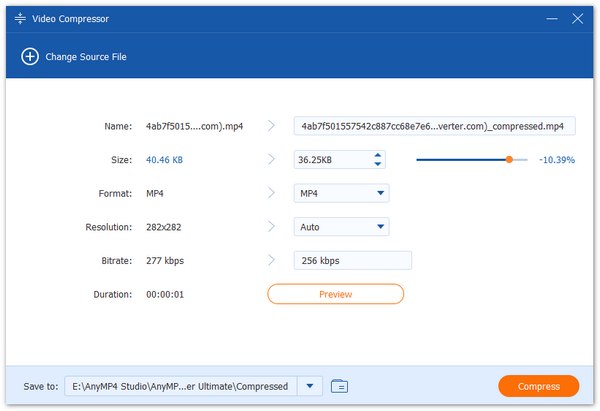
Video Compressor
You are able to compress your video files to the proper file size you need.
Step 1 Add a video to compress.
Step 2 You can change the size, format, resolution, bitrate to compress your video file.
Step 3 Choose the path to save your compressed file, and then click the Compress button.
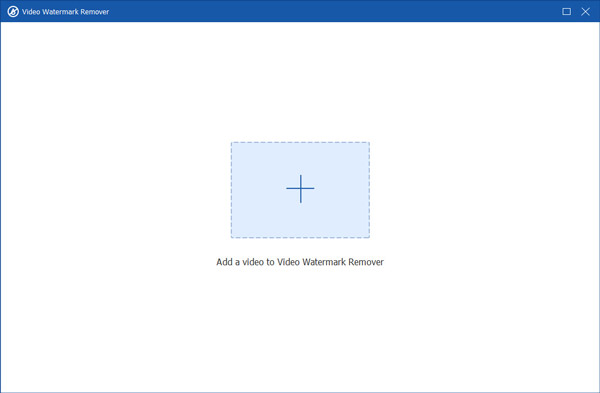
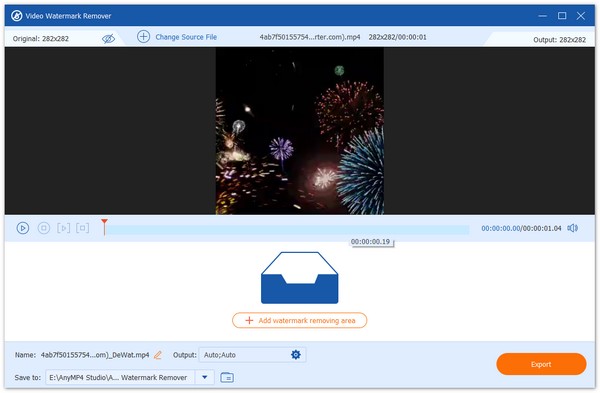
Video Watermark Remover
You can use this tool to remove the watermark from your video easily.
Step 1 Click the central plus sign to add a video to Video Watermark Remover.
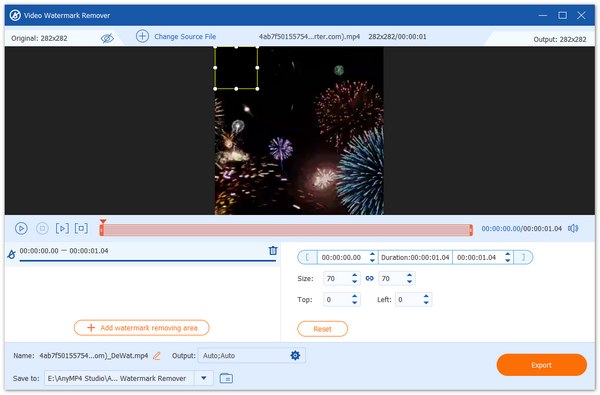
Step 2 After add the video, please click the Add watermark removing area button to select the watermark area you want to delete from your video.
Step 3 You can adjust the size of the watermark area by modifying the number next to Size or moving your mouse. You can also adjust the numbers next to Top and Left to move the watermark area. Finally, click the Export button to get the video without watermark.
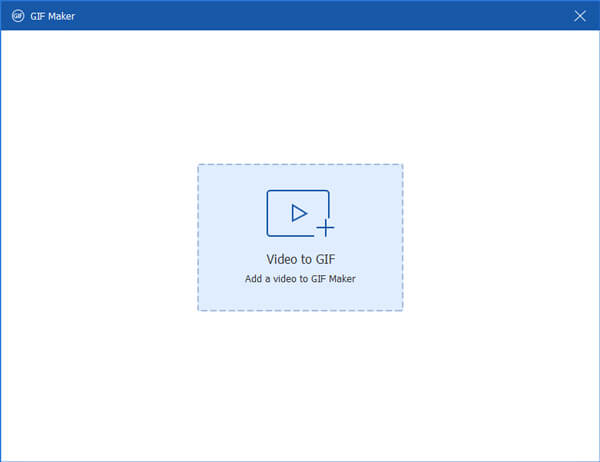
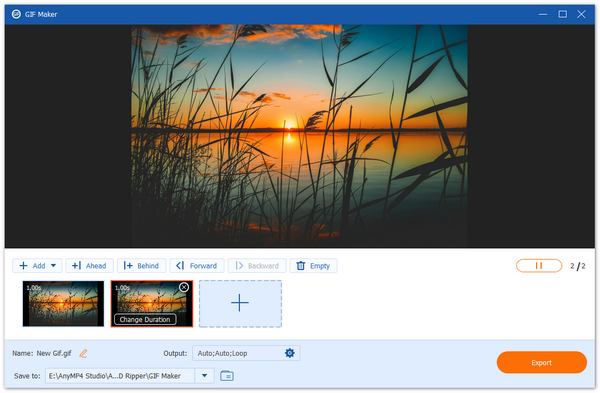
GIF Maker
You can also make customized GIFs with your video files or pictures.
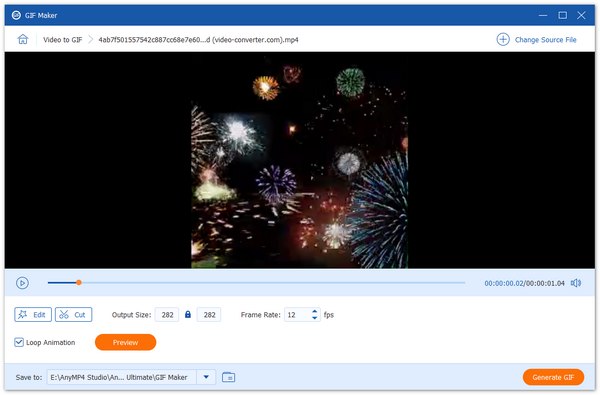
Step 1 Add a video to GIF Maker.
Step 2 You can edit the video with various features, such as Rotate & Crop, Effect & Filter, Watermark, Audio, and Subtitle.
Or cut the video and save the part you want to make a GIF.
Step 3 Click Generate GIF to create your animated GIF.
Step 4 Turn photo to GIF
Click Photo to GIF to add a picture to GIF Maker. In the new window, you can click Add to add other photos and adjust the order of the pictures. After that, you can click the gear icon to adjust the GIF's resolution, frame rate, etc., and click Export to get the GIF file.
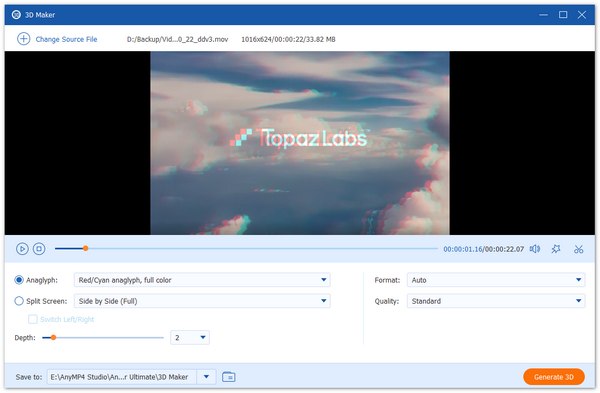
3D Maker
You can use 3D Maker to produce a stunning 3D video.
Step 1 Add a video file by clicking + icon.

Step 2 Create a 3D video
Then, you can either choose to apply anaglyph to your video, or split the screen of your file. After that, select your preferred format and quality, and then hit on the Generate 3D to create an amazing 3D movie.
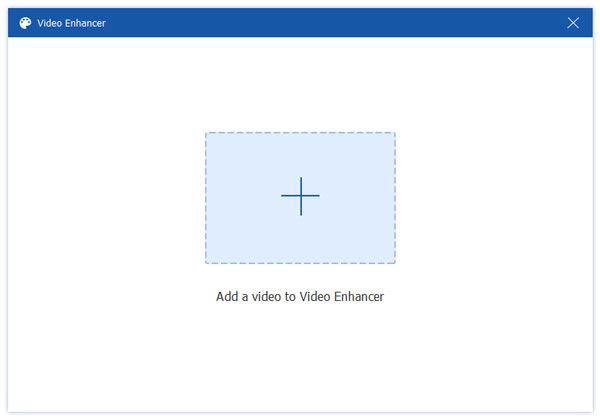
Video Enhancer
This built-in video enhancer can upscale digital videos to any resolution with superb quality, and provides various options to improve the video quality from any aspects.
Step 1 Click + icon and select a video file to make the enhancement.
Step 2 After entering into the Video Enhancer window, you can enhance the quality of your video file, from the following aspects: Upscale Resolution, Remove Video Noise, Optimize Brightness and Contrast, and Reduce Video Shaking. Enable some of the options above to boost your video quality depending on your needs.
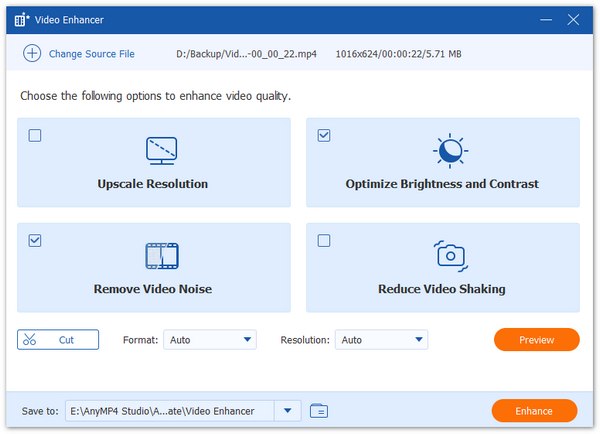
Now, you can set the output format and resolution for your project. By the way, you can preview the improved video by clicking the Preview button. You need to note that only 10s are available to preview.
In the end, press the Enhance button to save it to your computer.
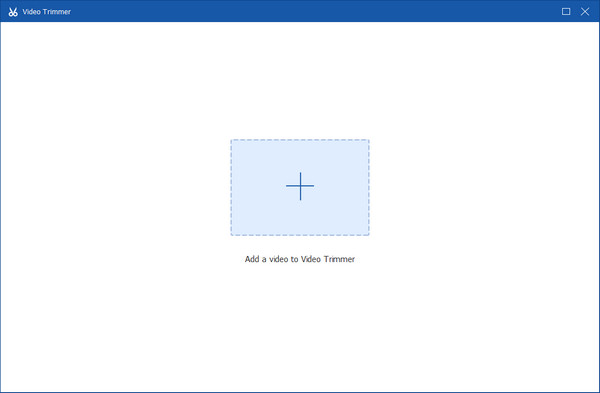
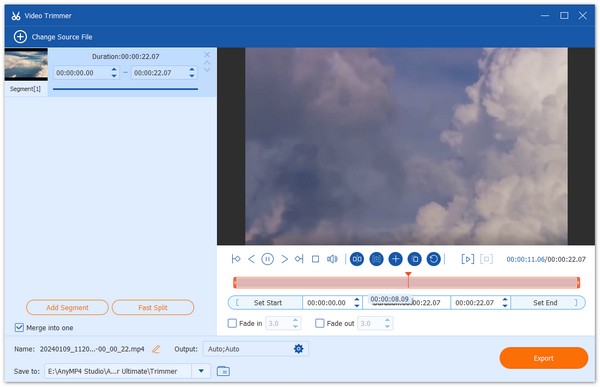
Video Trimmer
Use this video tool to trim or cut the length of your videos according to your need.
Step 1 Click the Plus icon to upload a video.
Step 2 Drap the progressing bar below the preview video to adjust the length. You can also change the time in Set Start and Set End. Besides, you can Add Segment or Fast Split the video clips. Then check the box of Merge into one if you want and hit the Export button.
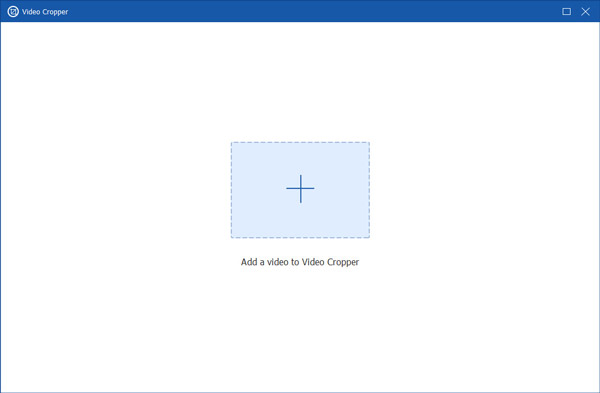
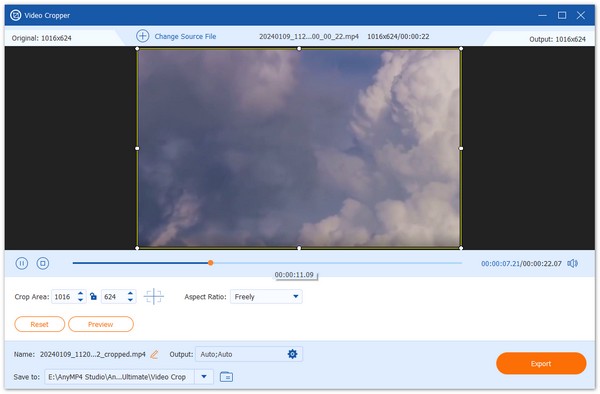
Video Cropper
To remove or delete the unwanted part from your video screen, you can use this tool.
Step 1 Add the video to crop it by clicking the central + or dragging it to the window.
Step 2 You can choose the cropping area and aspect ratio for your video here. Besides, you can move the border with your mouth to select the area you want to keep. Click the Preview button to view the result and click the Export button to get the result.
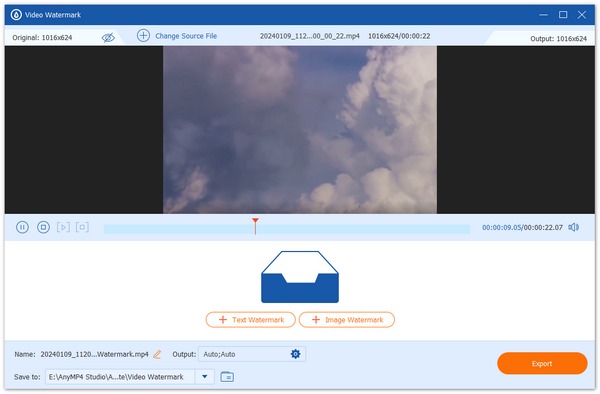
Video Watermark
When you want to add the watermark to your video to let others know the video belongs to you, you can use this tool.
Step 1 Click the central icon to import your files.

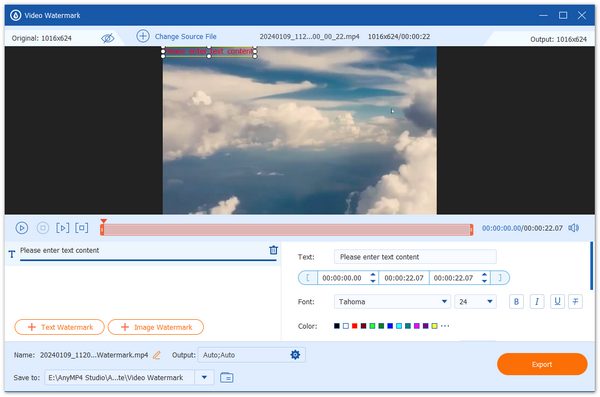
Step 2 If you want to add the watermark in text, you can click the Text Watermark button.
Step 3 In this window, you can set the content of your text watermark, select the font style, color, and size for the text, and more. In addition, you can add multiple watermarks to your video with this tool.
Step 4 When you need to add the image watermark to your video, you can choose the Image Watermark button.
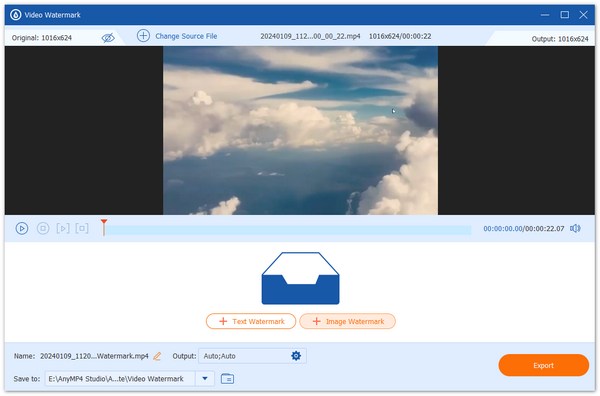
Step 5 Then a window will pop up to let you choose the photo. You can change the direction of your image watermark by moving the bar next to Rotate. If you want the image watermark become more transparent, you can move the bar next to Opacity.
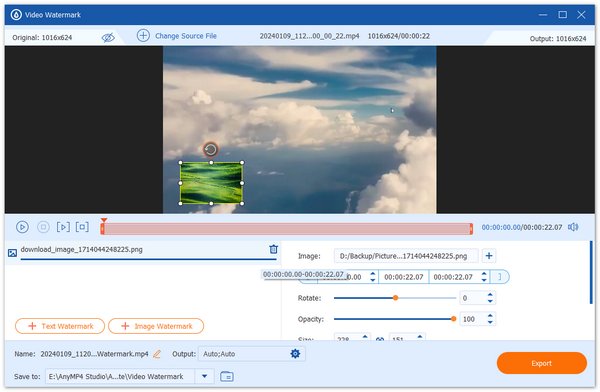
Step 6 Finally, click the Export button to save the file with watermark.
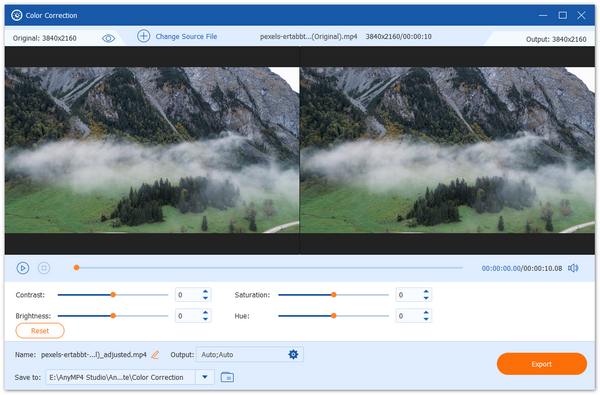
Color Correction
This tool can enable you to adjust the brightness, contract, hue, etc. of your videos easily.
Step 1 Please upload your video by clicking the central plus sign.
Step 2 After adding the video, you can move bars next to Contrast, Saturation, Hue, and Brightness to adjust the effect of your file. At last, to store the edited video, please click the Export button.
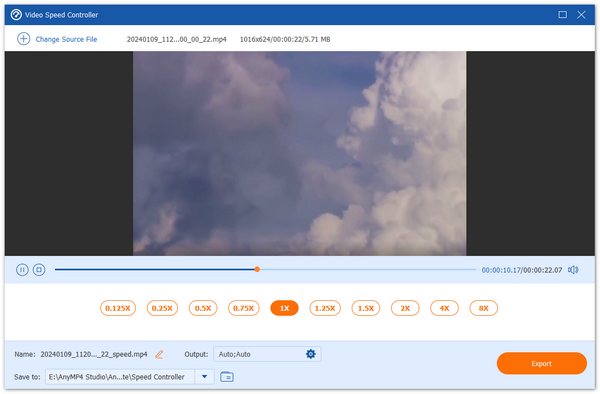
Video Speed Controller
This powerful speed controlling tool enables you to adjust the playback as you want.
Step 1 Add your target video to the controller.
Step 2 Choose the wanted speed down below and you can preview the output video. If you're satisfied with the result, click the Export button.
Video Reverser
Upload your video to the reverser to get the wanted effect.
Step 1 Click the Plus icon in the center and select the target video.
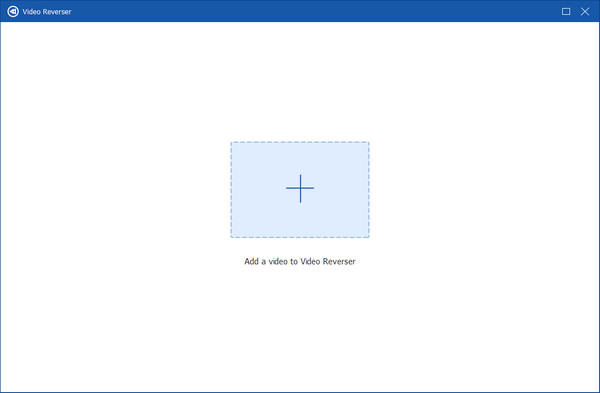
Step 2 You can drag the progressing bar or change the time in Set Start and Set End to select the wanted parts. When everything is ready, click Export and watch your reversed video.
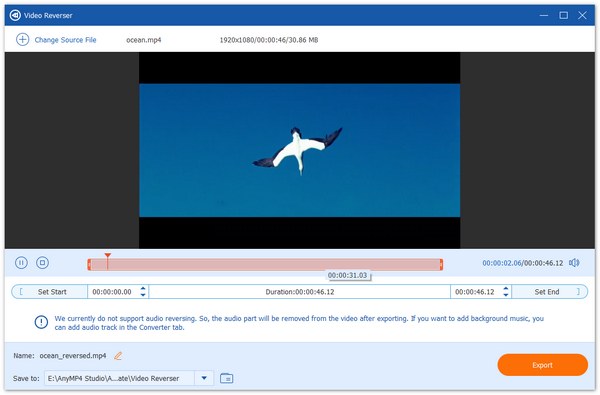
Notice: Audio reversing is not supported currently. Therefore, you can choose to add an audio track to the output video.
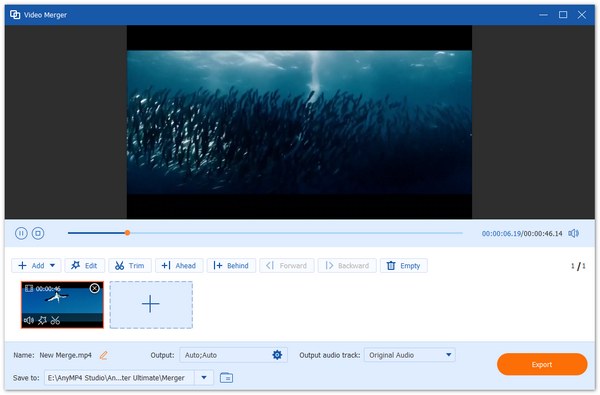
Video Merger
Combine your video clips with this tool and enjoy the complete video.
Step 1 Click the Plus icon in the center and upload video(s) to the merger.
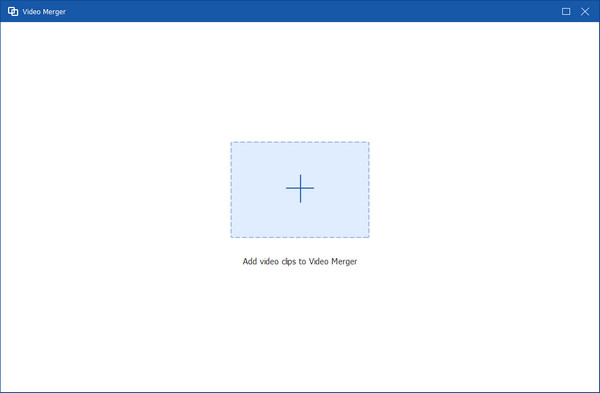
Step 2 If you add a single video in step 1, you can still add more by clicking the Plus icon next to the previous video or the one on the left of the window. From the menu bar above the videos, you can choose to Edit, Trim, and change the order of the videos by clicking Behind or Backwrad. Then click Export.
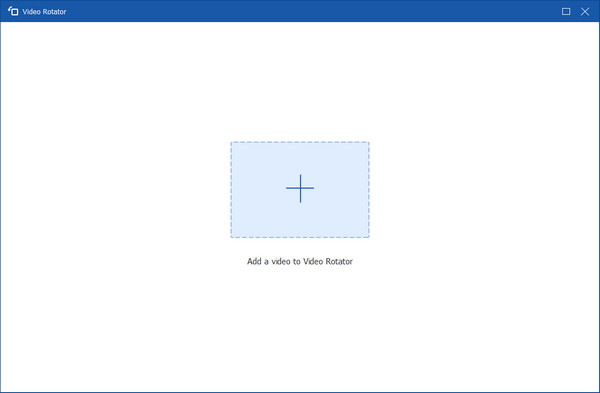
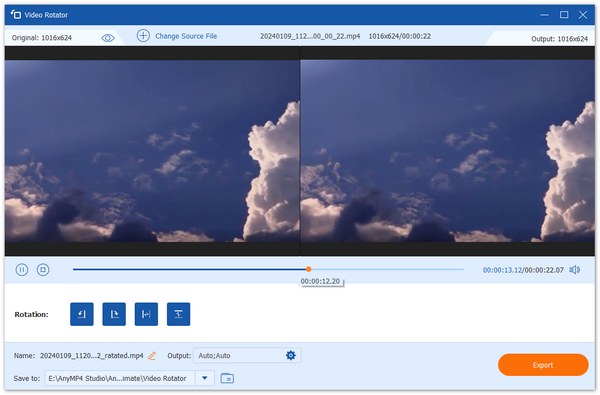
Video Rotator
Rotate videos with ease with this rotator.
Step 1 Upload your video to the rotator.
Step 2 In the Rotation options, you can choose to Left Rotate, Right Rotate, Vertically Flip, or Horizontally Flip the video. In the process, you can preview the output effects. Then click Export to get the rotated video.
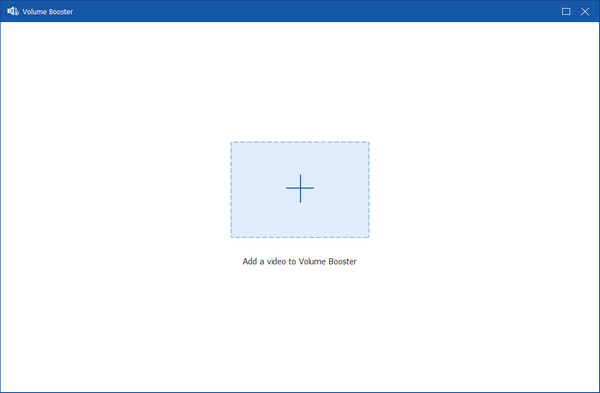
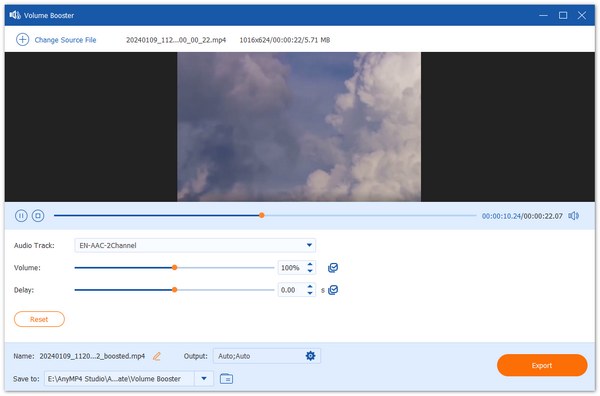
Volume Booster
Adjust the volume of your video with this convenient tool.
Step 1 Add your video to the booster by clicking the Plus icon.
Step 2 In the operating window, you are allowed to adjust Audio Track, change the Volume, and fix the audio Delay problem. Then click Export to get the wanted video.
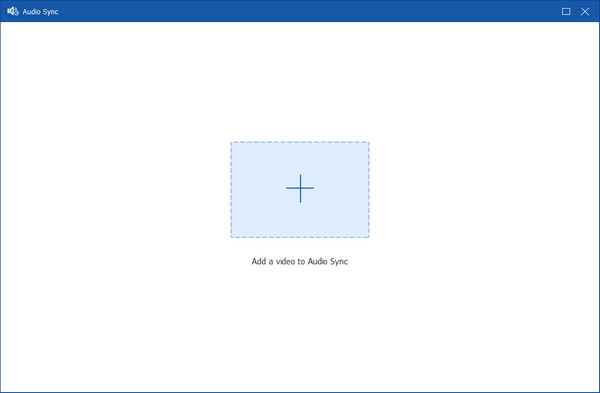
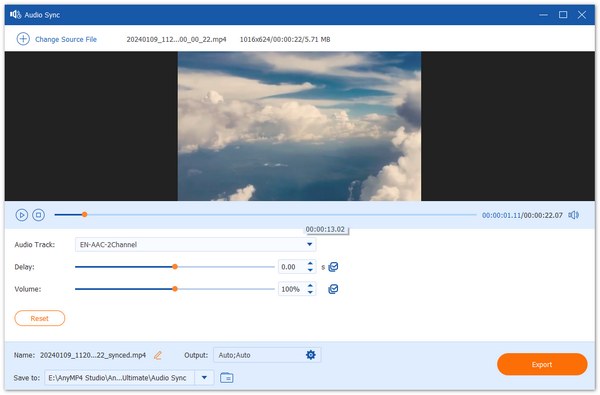
Audio Sync
Fix your video and audio not syncing problem here.
Step 1 Import your video to this tool.
Step 2 You can drag the Delay bar to fix the audio problem. At the same time, you can preview the adjusted results.
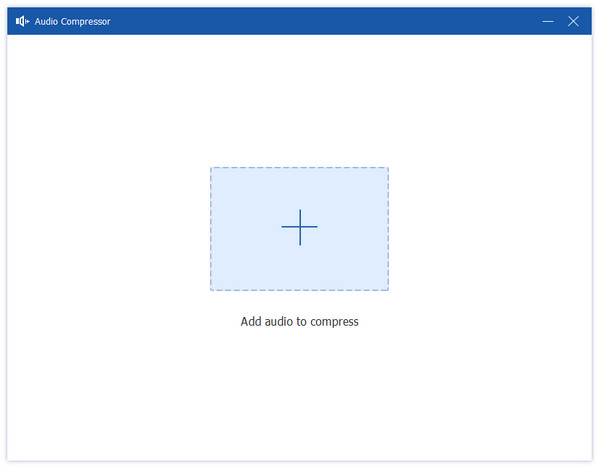
Audio Compressor
Reduce the audio file size based on your needs.
Step 1 Click the central plus sign to add your audio file to this tool.
Step 2 Then you can move the point of the Size bar to compress your audio file as you like. After that, click the Compress button to save your audio to your device.
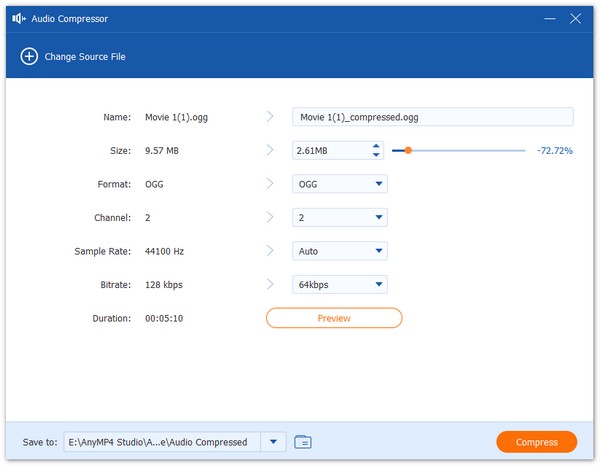
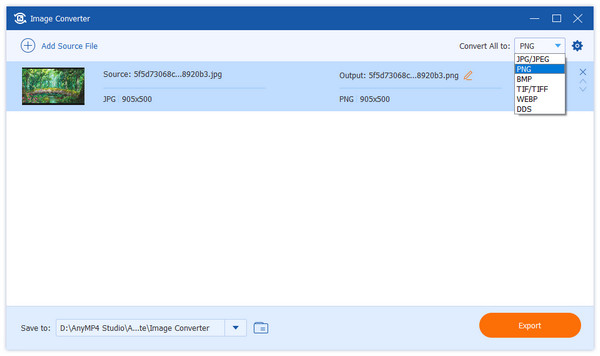
Image Converter
Change your image format to other formats easily and quickly.
Step 1 You can import your image you want to change the format by clicking the plus sign.

Step 2 Next, you can click the drop-down icon next to Convert All to for choosing the image format from JPG, PNG, BMP, TIF, WEBP, and DDS, to convert to. If you want to change the size and quality of your image before converting, you can click the wheel icon. Lastly, click the Export button to complete this conversion.
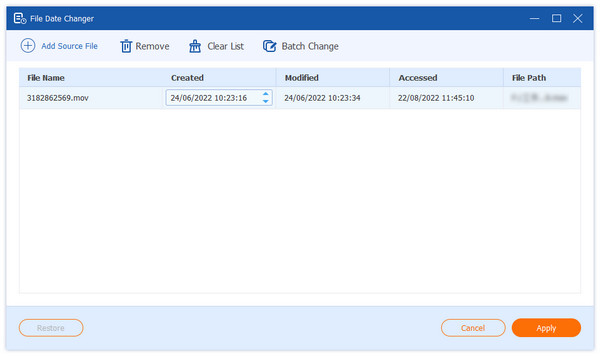
File Date Changer
Change the created date, modified date, and accessed date of your file.
Step 1 Import your file to this date changing tool.
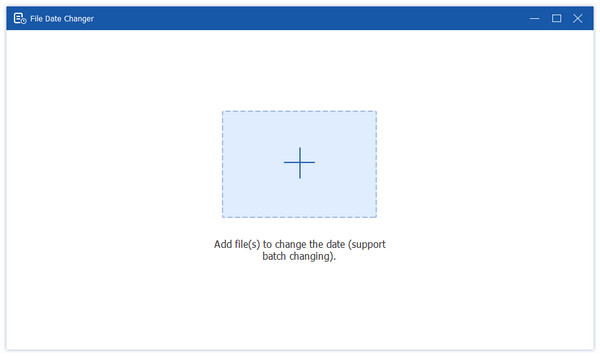
Step 2 Click dates to change them based on your needs. Then click the Apply button to save your file to your computer.
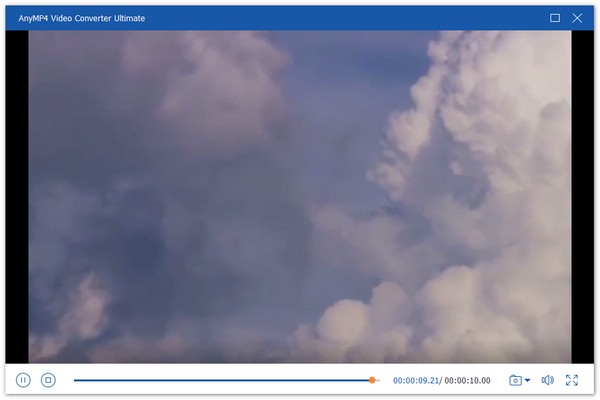
Video player
Change the created date, modified date, and accessed date of your file.
Step 1 Click the Toolbox button, and find the tool named Video Player. Choose it or you could search for it by typing Video Player in the search bar.
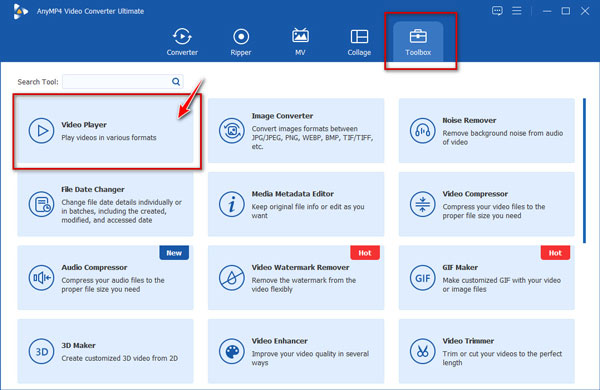
Step 2 Click the big plus button in the middle to add the video you want to play. You can also drag and drop the video file directly.
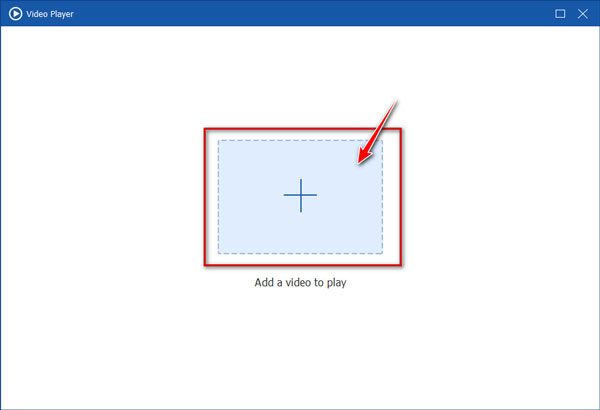
Step 3 After you choose your target, the video will be played automatically. Then you could change the settings if you need.
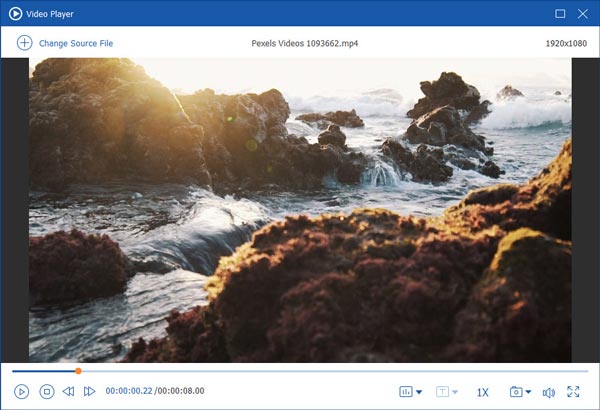
Playback Control: When you want to pause or continue, press the button located in the bottom left corner. If you want to stop playing, click the button with the shape of a square. When you want to skip or rewind while playing, try the two buttons that has the shape of two triangles overlap together.
Sound channel: When you want to adjust the sound channel, click the button with the shape of sonic wave.
Subtitles: If your video has subtitles, press the T button and you could edit your subtitles as you need.
Playback speed: If you want to adjust the playback speed, click the 1× button. The adjustable speed ranges from 0.125× to 2×.
Snapshot: If you need to take a snapshot, click the button that shaped as a camera. And you can also find the target folder.
Volume: The volume can be adjusted by clicking the button that have the shape of horn.
Full screen: When you want to enter or exit full screen, click the button that located in the bottom right corner.
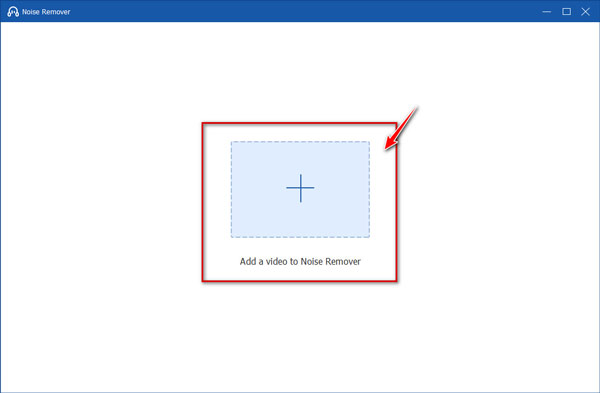
Noise Remover
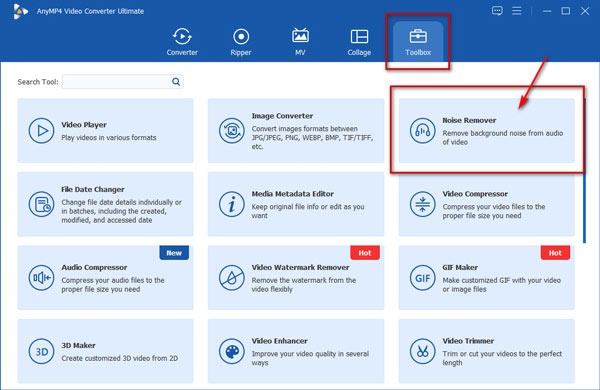
Step 1 Click the Toolbox button, find Noise Remover. Choose it or you could search for it by typing Noise Remover in the search bar.
Step 2 Click the big plus button in the middle to add the video that you want to edit. You can also drag and drop the video file directly.
Step 3 If you want to remove the background noise, click the Enable audio noise reduction label. Then you can check the effect by playing it.
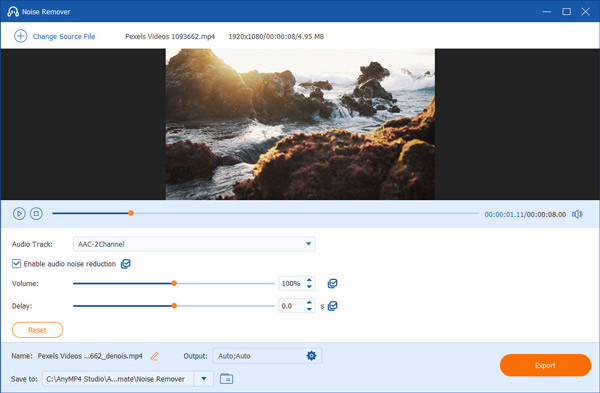
Step 4 When you finish the edition, click the Export button. The edited video will be saved in the folder you specified.
Otherwise, if you want to adjust the audio or resolve audio and visual asynchrony, try the button of Audio Track or Delay.