Store
Store- Multimedia
For Windows
- Converter Tools
- Video Converter Ultimate

- Video Converter
- 4K Converter
- MP4 Converter
- Audio Converter
For Mac
- BD/DVD
For Windows
- DVD Tools
- DVD Ripper
- DVD Copy
- DVD Creator
- DVD Converter
- DVD Toolkit
For Mac
- Mobile
For Windows
For Mac
- Utility
- Freeware

User Guide
Get Started
Download & Install
Free download AnyMP4 iOS Cleaner for Mac on your Mac computer. Then double-click the installer and follow the on-screen instructions to install the program on your Mac.
Register
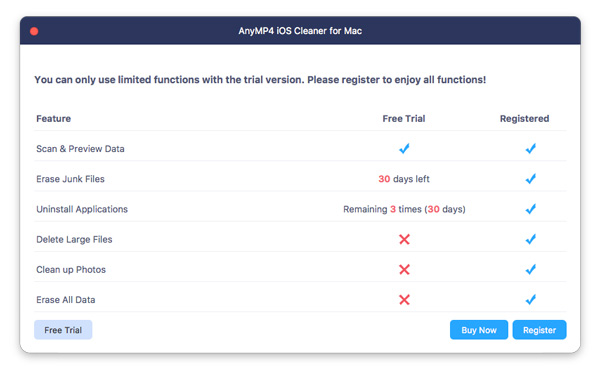
AnyMP4 iOS Cleaner for Mac offers a free trial for users. But you can only use limited features with the trial version.
The free trial version of AnyMP4 iOS Cleaner has some limitations. If you want to enjoy all features, you need to register the software.
After you open the program, a comparison window will pop up immediately, which will show you the differences between the trial and the registered version.
To enter the register window, you should click the Register button. Alternatively, you can find the Register option from the pulldown list of Help.
Click it to register this software with your E-mail address and registration code.
Email Address: The email address that you used to purchase this software and fill in the order form.
Registration Code: A string of characters marked as Activation key, license code KEYCODE(S) in the order confirmation letter you received after the successful purchase.
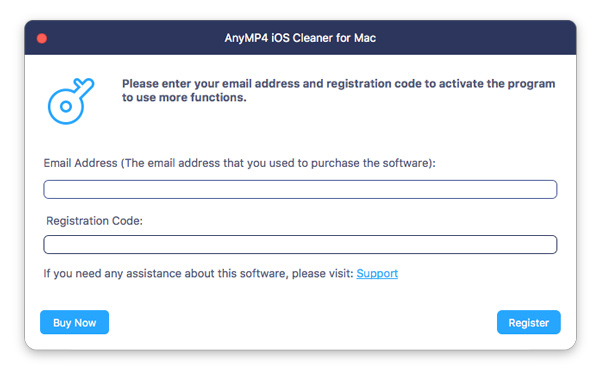
After typing the email address and registration code, you should click the Register button at the bottom-right corner to activate this software in full functions.
Note: After you purchased it successfully, the registration code will be sent to the email address that you filled in the order form.
Update
AnyMP4 Studio always works hard to update the software, and brings new features, and fix some bugs.
If you want to update your program to the latest, just navigate to the Menu dropdown list. Click the Check Update... option, and it will start checking if this software is up-to-date immediately.
If there is an update detected, it will remind you to download the latest version.
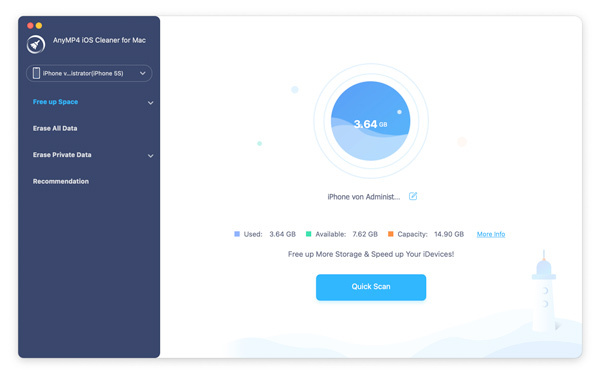
Check Device Storage
Before starting cleaning your iOS device, you can use AnyMP4 iOS Cleaner for Mac to view the device’s capacity, used space, and free space.
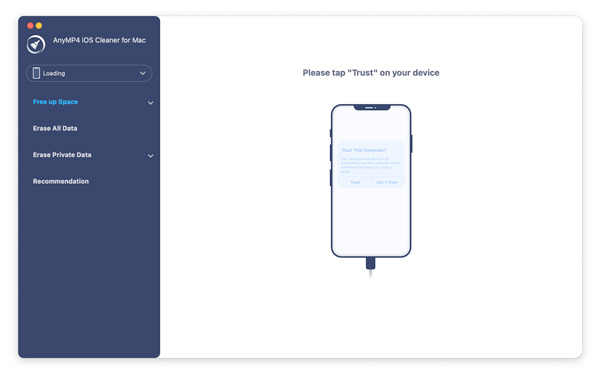
Step 1 Run this iOS cleaning tool after the installation. Then need to connect your iOS device to the Mac through a USB cable.
An alert will pop up on your device to confirm if you trust this Mac. What you need to do is to unlock your device, and tap Trust.
Step 2 Once your iOS device is connected to your Mac successfully, you can see the basic information about your iOS device. To check more information, you should click More Info to view the storage space of your device, including the used space, available space, and capacity.
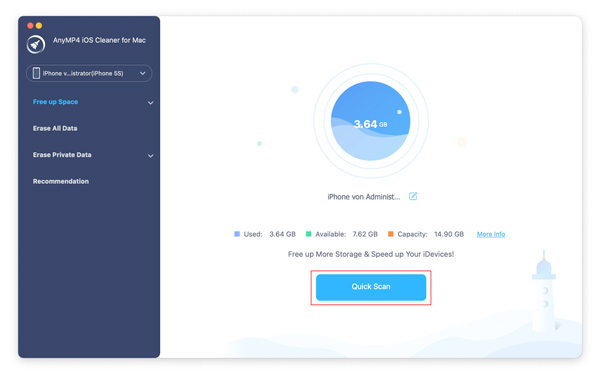
Free Up Space
AnyMP4 iOS Cleaner for Mac lets you free up the device quickly by a quick scan.
After connecting iPhone to this Mac, go to the Free up Space tab from the sidebar, and click Quick Scan to start scanning your iPhone.
Wait minutes, this cleaning tool will find what space is taken on iPhone.
Click the Erase button on the right side, and it will start cleaning your iPhone.
Erase Junk Files
Step 1. To erase junk files on your device, please click on the Erase Junk Files option from the pulldown list of Free up Space on the sidebar.
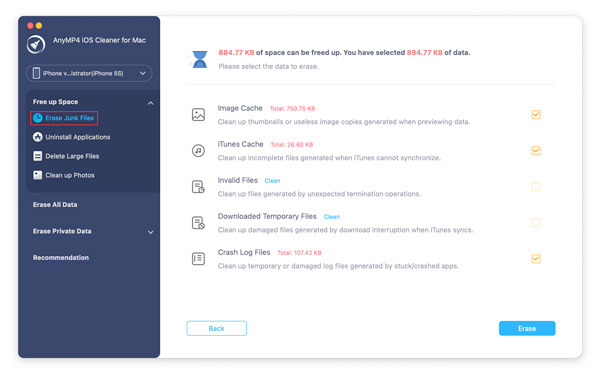
Step 2. Then this tool will start scanning your iPhone. While the scanning process is done, you can choose to erase any junk files, such as image cache, iTunes cache, invalid files, downloaded temporary files, and crash log files.
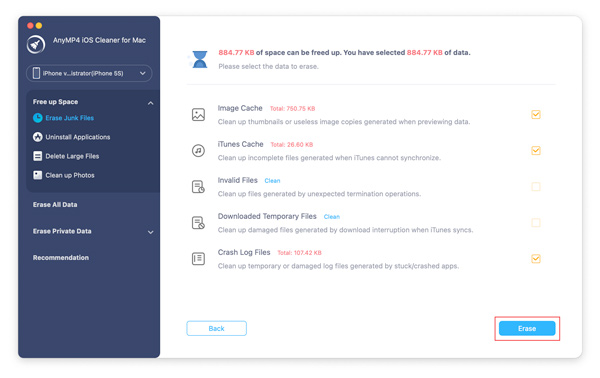
After selecting the data that you don’t need, please click the Erase button in the bottom right corner.
Uninstall Applications
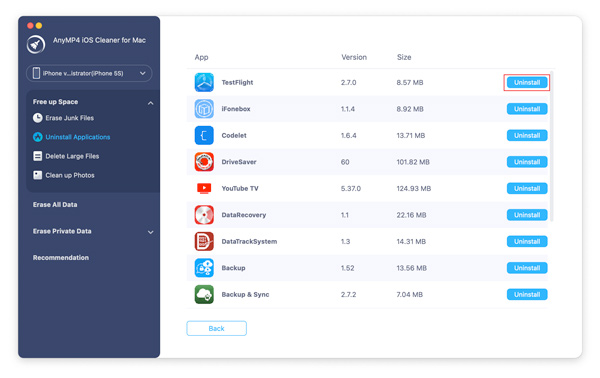
Step 1. Switch to the Uninstall Applications option on the left navigation bar to scan iPhone immediately.
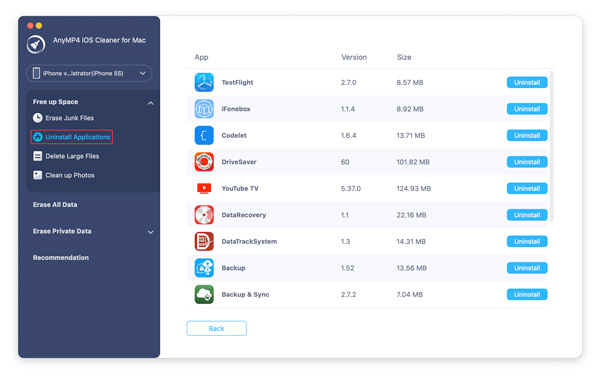
Step 2. Once the scanning result is complete, you can view all the apps on your iOS device. You can also see their sizes and version numbers. Scroll down and find the unused apps that you want to uninstall. Click Uninstall and confirm the deletion.
Delete Large Files
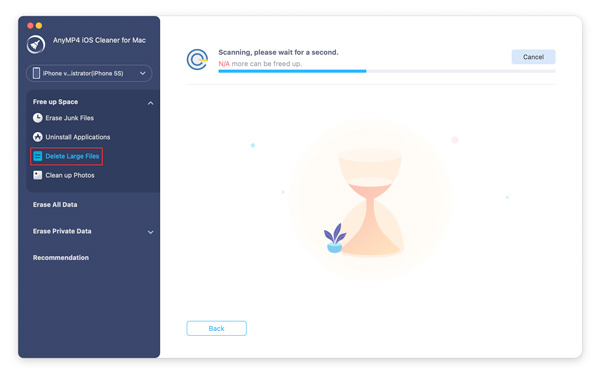
Step 1. Again, navigate the Delete Large Files option from the sidebar to start scanning iPhone.
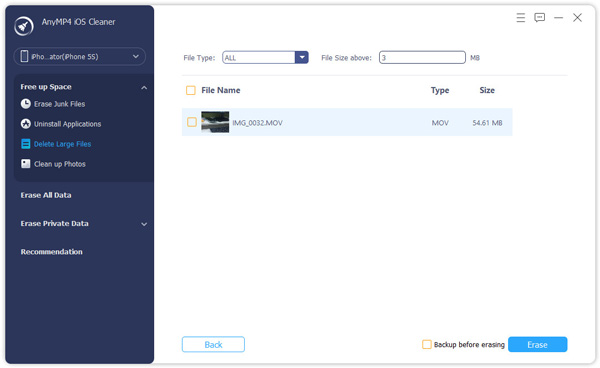
Step 2. You can view the large files after the scan is done. You can filter them by file type and file size. Pick all the files that you want to delete. Then click the Erase button to start the deletion.
Clean up Photos
Step 1. Navigate to the Clean up Photos option from the sidebar under Free up Space.
Then it gives you 2 options, Backup & Compress, and Export & Delete.

Step 2. To back up and compress the photos on iPhone, you should click Backup & Compress.
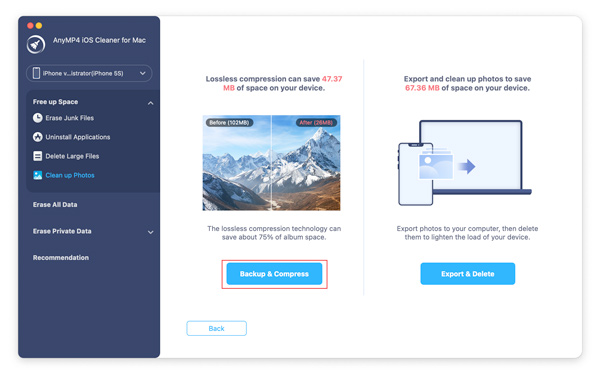
Adopting the advanced lossless compression technology, this software can save approximately 75% of your album space without losing much quality of your images.
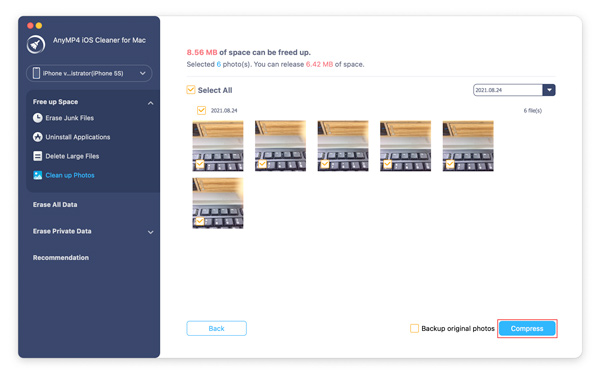
Then you will see all the photos on your iOS device. Select the photo(s) you want to compress, then click Compress.
But if you want to make a backup for the original photos, please tick the Backup original photos option before compressing.
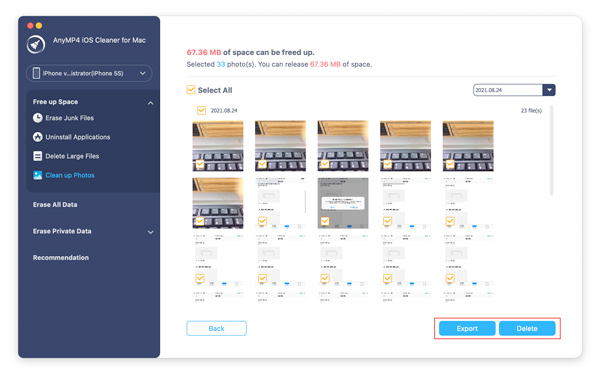
Step 3. To delete, and export iPhone photos to this Mac, you should choose Export & Delete instead.
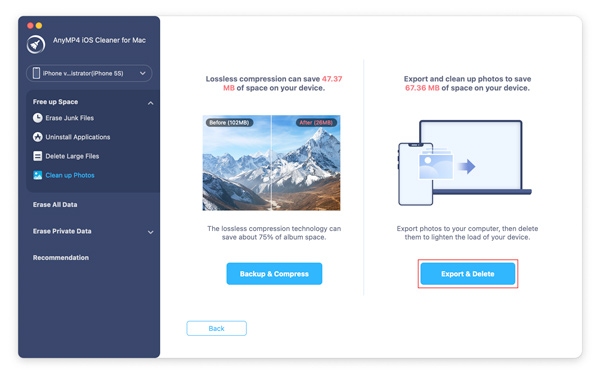
Then select those photos that you want to backup, and click Export to save the photos from iPhone to Mac.
After that, you can select the photos you want to clean, and click Delete to remove them from iPhone to free up space.
Erase All Data
Before you sell or give away an iPhone, you would like to erase all content and settings from iPhone without recovery. Here, AnyMP4 iOS Cleaner for Mac lets you clean an iOS device permanently.
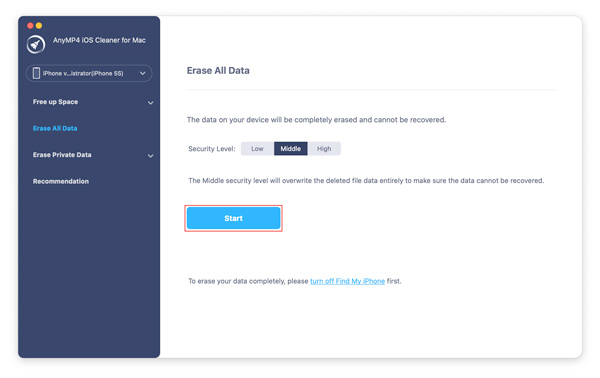
Step 1. Click Erase All Data in the left panel after connecting iPhone to this Mac computer.
There are 3 erasing levels for you to clear the data on your device – Low, Middle, and High.
Low Security: It can help you quickly erase all the data.
Middle Security: It can overwrite the deleted data to make sure the data cannot be retrieved.
High Security: It can erase your private data like password files and bank records thoroughly and permanently.
Choose one of the erasing levels according to your need. Then click the Start button.
Step 2. Enter 0000 to confirm your operation, and click Erase to start erasing all data and settings on iPhone.
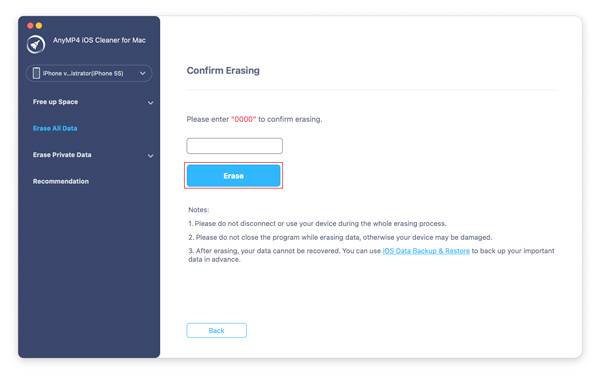
Notes:
1.In order to erase the data completely, some users may need to turn off the Find My setting on the device.
2.The Erase All Data function will not erase data in Files app, all passwords in Settings, Wi-Fi password, device passcode, Voice Mail, etc.
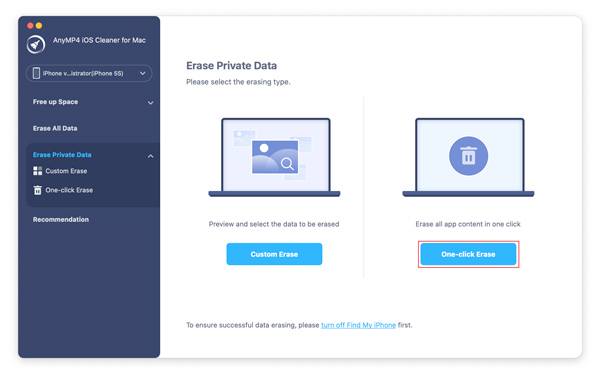
Erase Private Data
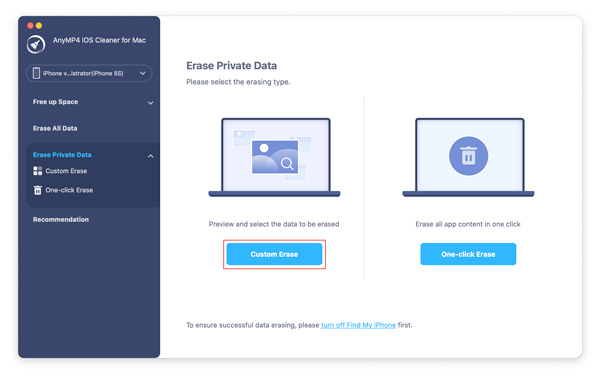
AnyMP4 iOS Cleaner for Mac can help you clean up your private data thoroughly and simply. And you can decide to use Custom Erase or One-click Erase mode to do that.
Custom Erase
Step 1 Click the Custom Erase option, and you can preview and select the file you would like to clean up.
Then the program scans your iOS device.

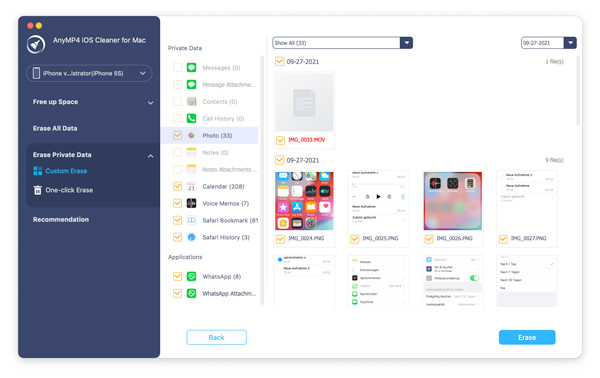
Step 2 You can view and choose your files here. In addition, click the pull-down next to the Show All, and you can choose to show your data all or deleted only or exited only. Later, click the Erase button, and you can erase data you selected permanently.
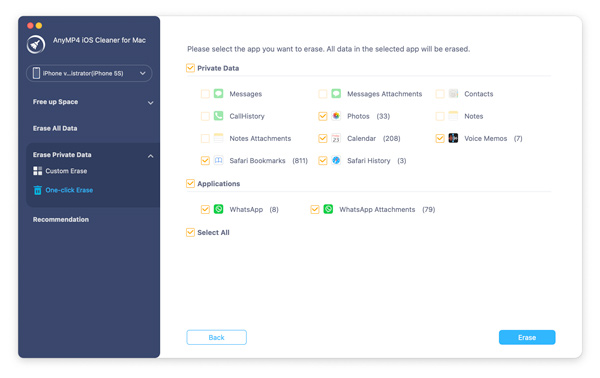
One-click Erase
Step 1 You could click the One-click Erase option to remove your private data classified by APPs just in one click.
Step 2 You can erase contents of one APP or several APPs by checking the boxes of them. You can clean up contents of all APPs by checking the box of Select All. After that, clicking the Erase button to remove your private data on your iOS device.