Store
Store- Multimedia
For Windows
- Converter Tools
- Video Converter Ultimate

- Video Converter
- 4K Converter
- MP4 Converter
- Audio Converter
For Mac
- BD/DVD
For Windows
- DVD Tools
- DVD Ripper
- DVD Copy
- DVD Creator
- DVD Converter
- DVD Toolkit
For Mac
- Mobile
For Windows
For Mac
- Utility
- Freeware

User Guide
Get Started
Download & Install
Before you start ripping your DVD movie, please download AnyMP4 DVD Ripper for Mac first. Then install the program on your Mac. After installing successfully, you can add this ripper to the Application folder on Mac. Launch it and take the next step.
Register
You need to register AnyMp4 DVD Ripper for Mac if you want to enjoy full features without any limitations. The Comparison window should show up automatically after you launch the program. Click the Register button to go to the Activate window. You can also wake this window by clicking the Key icon on the top-right corner or selecting the Register... option from the Help menu.
In the Activate window, you need to enter your Email Address and Registration Code that you received after purchasing this product. Click Activate to enjoy all features.
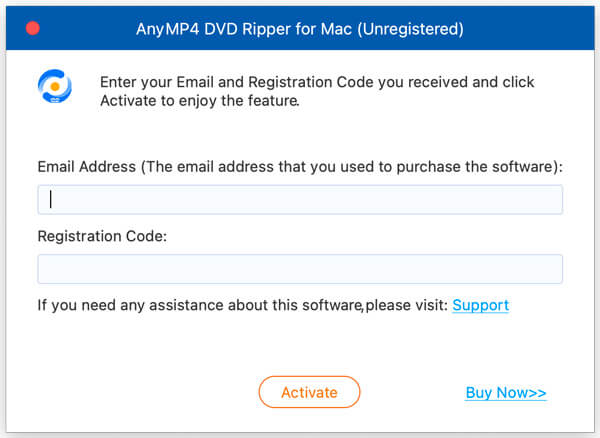
Note: During the registration process, please make sure that your computer is connected to a valid internet.
Update
To improve the performances and fix bugs, AnyMP4 offers registered users free updates. You can upgrade the program to get the latest and best user experience.
Method 1: If you want to update this software manually, just open the Help menu and select the Check Update... option. It will detect if there’s a new update. If so, you can download and install it immediately.
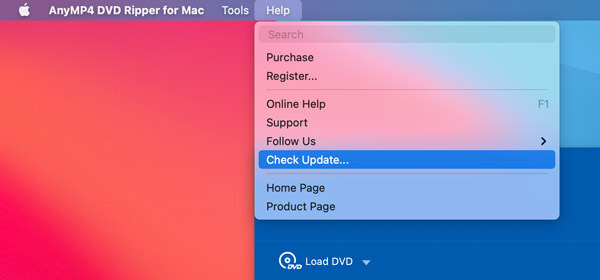
Method 2: If you don’t like to check for updates manually, you can go to Preferences and enable the Check for Updates Automatically setting. Then we will notify you every time an update is available.
Method 3: The official product page always offers the latest version of the software. So, you can download the program there directly.
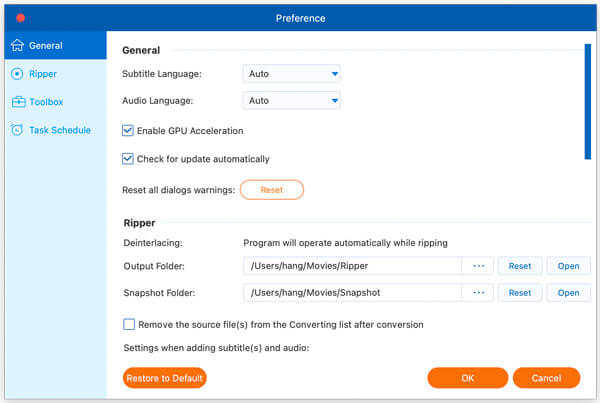
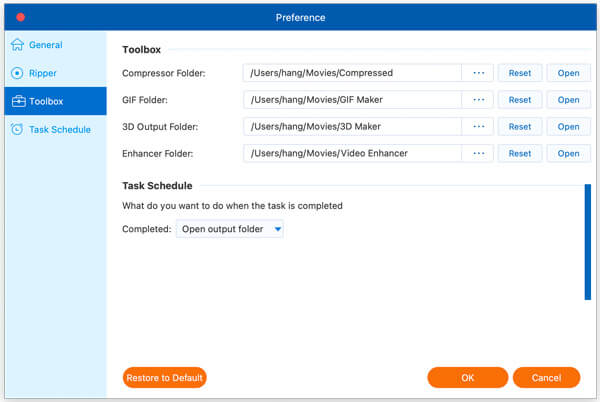
Preferences
To open the Preferences window, please click the program name on the top left of the screen. It will open a dropdown menu where you can find the Preferences... option. Click it and you can change the program settings as you like.

Here you can change the default language for subtitle and audio track. You can also adjust the destination folder to save those output files and snapshots. AnyMP4 even makes it possible for you to accelerate the converting process with the advanced GPU Acceleration technology.
Rip DVD
AnyMP4 DVD Ripper for Mac is designed for ripping DVD freely and conveniently. You can rip your DVD files to video/audio, DVD folder, and DVD ISO file.
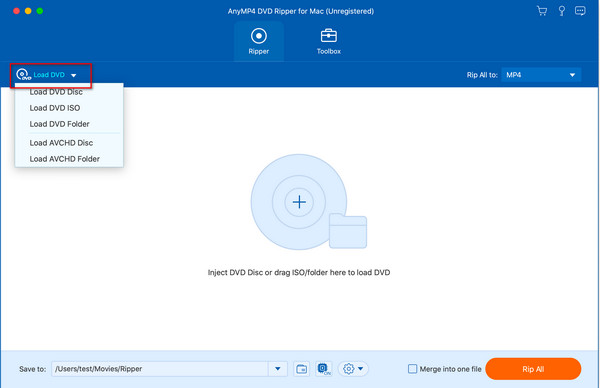
Step 1 Load DVD
Click Load DVD at the top-left of the interface. Choose your DVD resource from the menu popping up, including Load DVD Disc, Load DVD ISO, Load DVD Folder, Load AVCHD Disc, and Load AVCHD Folder.
It is worth mentioning that you must insert a DVD into the DVD drive on your computer if you want to choose Load DVD Disc. In addition, you can also drag your DVD file into the ripper.
Note: During the whole process, the Internet connection is required to handle the encrypted DVD files.
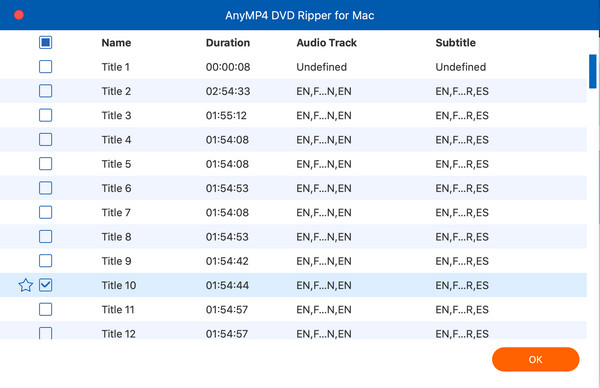
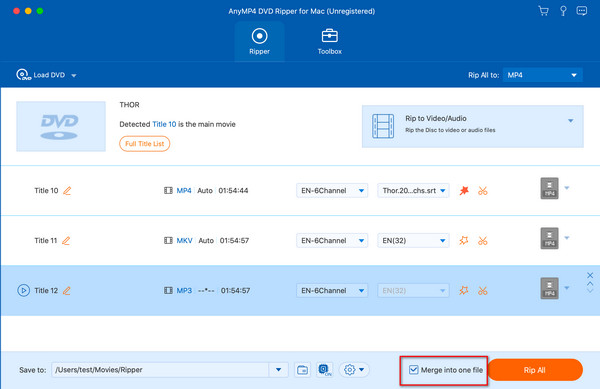
After the DVD disc is inserted successfully, you can see the main title. Click Full Title List and you’ll see all the titles of your DVD file.
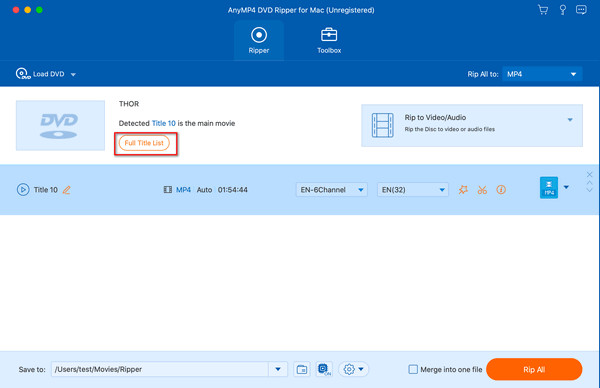
Select the titles you want to add and click OK.
Step 2 Select Output Format
You can rip your DVD file to video/audio, DVD folder, or DVD ISO folder according to your need.
(1) Rip to Video/Audio
Click the inverted triangle on the right of the interface and choose Rip to Video/Audio.
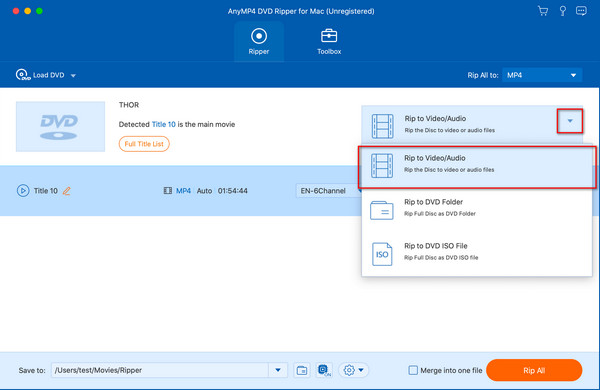
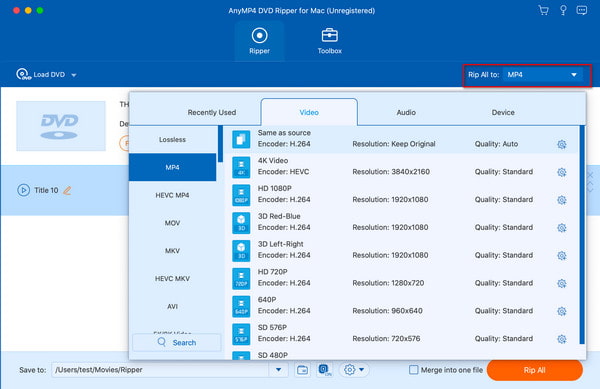
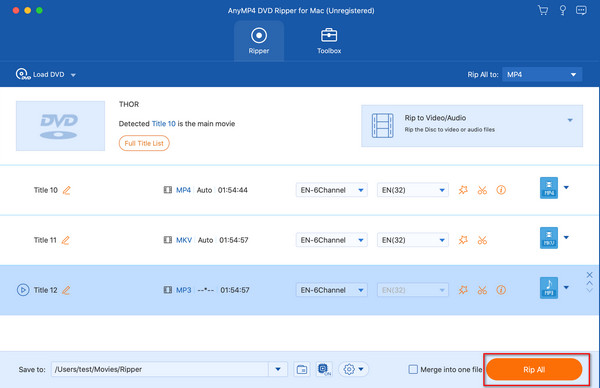
You can choose the format by clicking the inverted triangle next to Rip All to. We recommend MPG Lossless for that you can rip your DVD file with original quality. Of course, you can select other common formats like MP4 for video and MP3 for audio as you like.
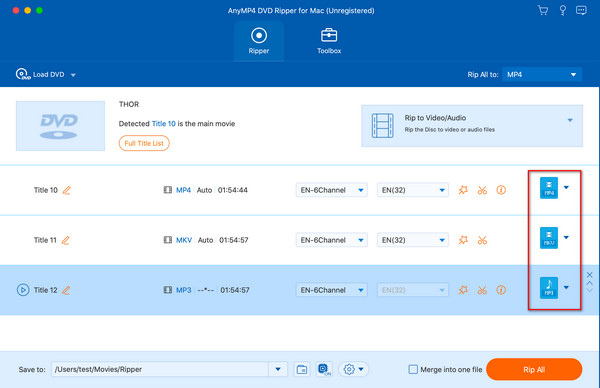
In addition, you can also choose different formats for each title. For example, you can select MP4 for Title 10, MKV for Title 11, and MP3 for Title 12.
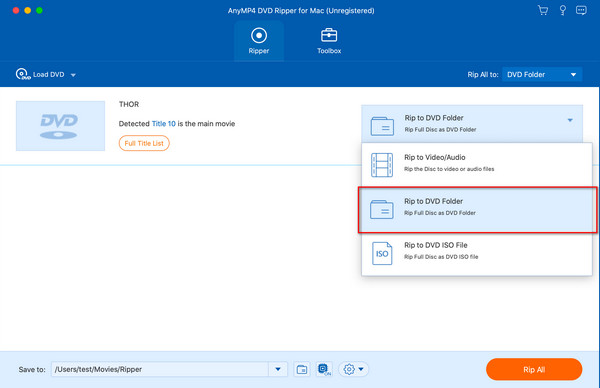
(2) Rip to DVD Folder
Click the inverted triangle and choose Rip to DVD Folder.
(3) Rip to DVD ISO File
Click the inverted triangle and choose Rip to DVD ISO File.
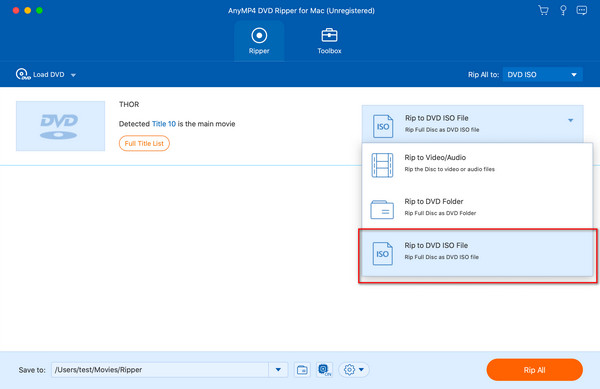
Step 3 Start Ripping
Click Rip All and you’ll get the ripped file. In addition, by clicking the folder image at the bottom of the interface, you can change the folder in which you want to put the ripped file.
Edit DVD Titles
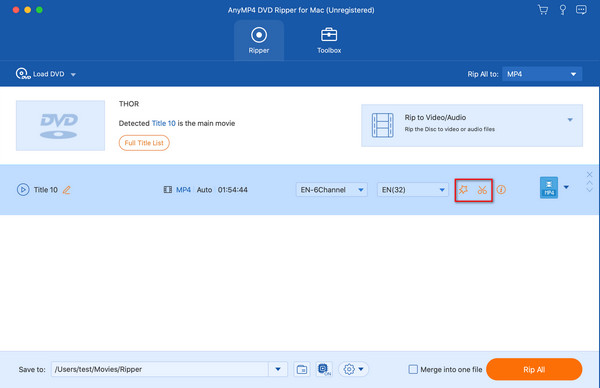
AnyMP4 DVD Ripper provides you with multiple choices to edit your file before the final ripping (except for the format of MPG Lossless). Click the star or scissor image and you’ll enter the edit window.
Trim & Split Video
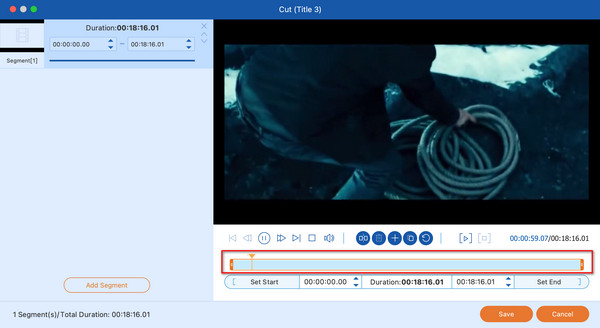
Click the scissor image and you’ll see the cut window. You can split a long video into several segments. Click Add Segment and then cut the video in two ways, including adjusting the rectangle under the video or changing the time in Set Start, Duration and Set End. After all that, click Save.
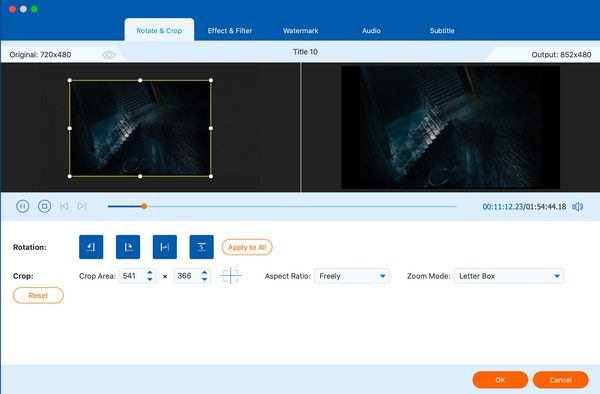
Rotate & Crop
Click the star image and you’ll see the interface of Rotate & Crop first. There are four types of Rotation for your need, including Left Rotate, Right Rotate, Horizontal Flip, and Vertical Flip. In terms of cropping, you can change the Crop Area value or drag the yellow rectangle in the left window. You can also change Aspect Ratio and Zoom Mode.
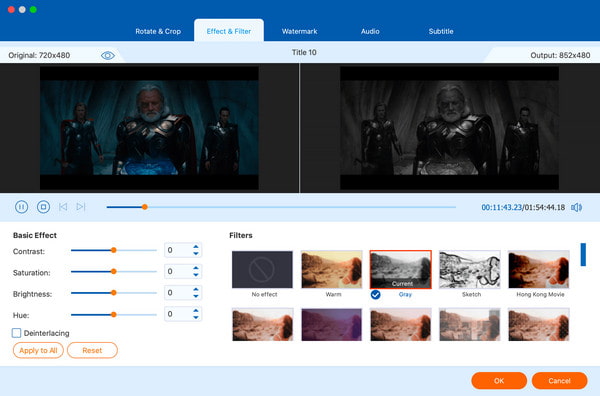
Effect & Filter
Click Effect & Filter at the top of the interface. You can adjust Basic Effect like contrast, saturation, brightness and hue. Choose the filter you like to make your video more attractive.
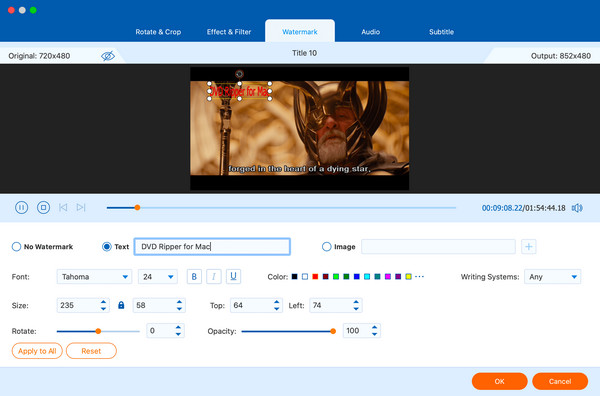
Add Watermark
Click Watermark at the top of the interface. Check Text and input the text you want to add. You can also add an image as the watermark. You can choose the font and color of the text. You can change the size of your text by changing the size value or dragging the rectangle in the video. Opacity and other settings are also changeable.
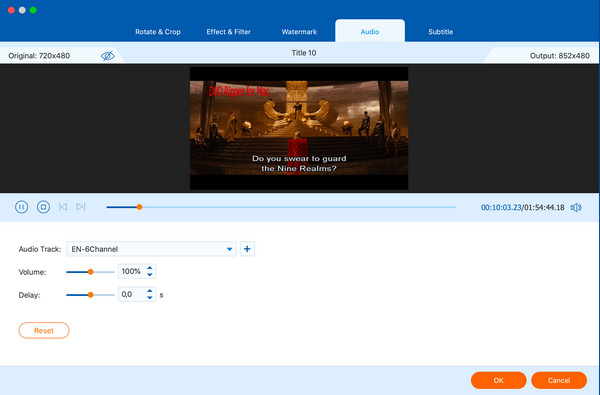
Change Audio Track
Click Audio at the top of the interface. You can change the audio track, add audio track, or silence the video. If the audio and video don’t synchronize, you can adjust Delay to make them normal.
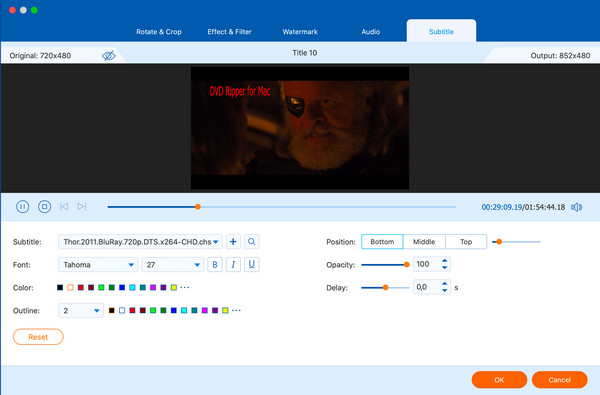
Adjust Subtitle
Click Subtitle at the top of the interface. You can change the subtitle, add external subtitle, or turn it off. You can change the position, font, opacity, etc. of the subtitle.
Merge Video Clips
If you add multiple videos into the interface, you can check Merge into one file to merge them all.
Toolbox
Besides ripping DVD movies, AnyMP4 also offers you various practical tools to help you edit your video files, such as Media Metadata Editor, Video Compressor, GIF Maker, 3D Maker and Video Enhancer.

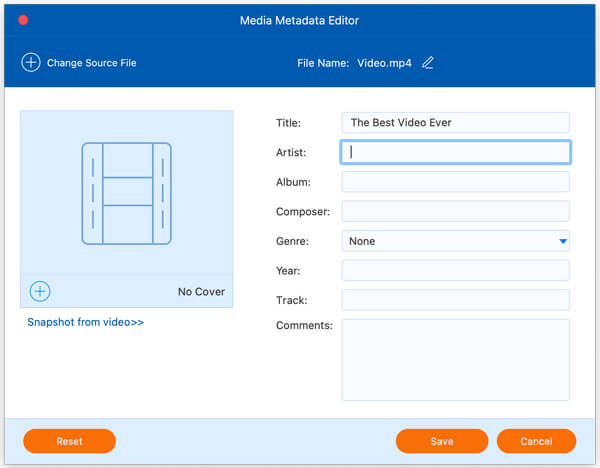
Media Metadata Editor
It is quite easy to edit the media information with this metadata editor.
Step 1 Add a Video File
Navigate to the Toolbox tab. Select Media Metadata Editor from the toolbox. Click Plus icon in the middle of the current interface and select the video file you want to edit.
Step 2 Edit Media Metadata
Here you can add an attractive cover to your video. Even if you don’t have a suitable picture, the tool enables you to take a snapshot from the video. Besides, it allows you to change the metadata of the video file. You are able to rename the file and edit the media information easily.
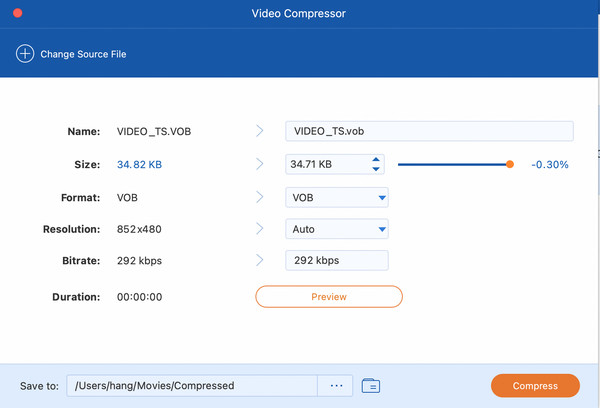
Video Compressor
This tool helps you compress a video when you want to share it on social media or your USB flash drive doesn’t have enough space.
Step 1 Add a Video File
Choose Video Compressor in Toolbox. Click the Plus icon in the rectangle to add your video file to the ripper.
Step 2 Compress the Source File
You can change the name, size, format, resolution, and bitrate of the video. Before compression, you can also change the folder in which the compressed video is stored by clicking Open Folder (a folder image). Then click Compress to start compressing.
GIF Maker
If you want to extract and make a funny GIF image from a video for sharing, then this GIF maker is the one you can count on.
Step 1 Add a Video File
Open the tool named GIF Maker. Click the Plus icon on the screen. Then add the source video file you want to use.
Step 2 Adjust the Image
After loading the file that you chose, the GIF maker will display the preview on the screen. You can play, edit and cut the selected video before converting according to your need. You can decide what size and frame rate this GIF image should be. You are even capable of changing the image to a loop animation.
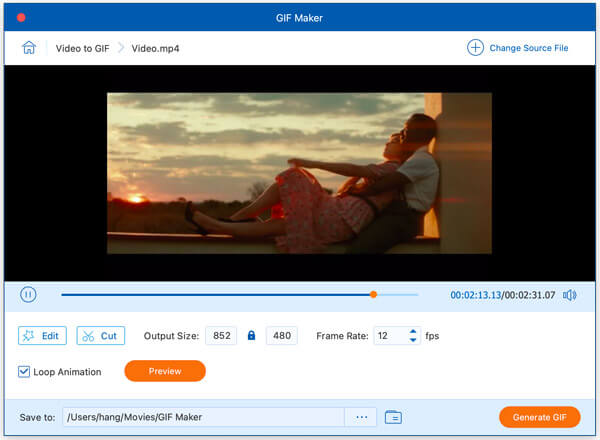
Step 3 Generate the Image
Once you finish the adjustment, you can preview the effect by clicking the Preview button. Find a folder to store the output image file. Then click Generate GIF to start the conversion.
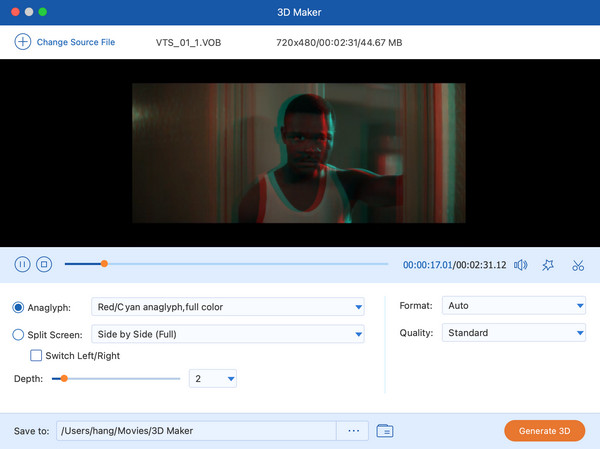
3D Maker
This tool enables you to make your video more impressive.
Step 1 Add A Video File
Select 3D Maker in Toolbox. Click the Plus icon in the rectangle to add your video file to the ripper.
Step 2 Make A 3D Video
In the Edit window, you can change the Anaglyph, choose to Split the screen, and adjust Depth. Then you can change the format and quality. Before generation, you can also change the stored folder. Then click Generate 3D to get your 3D video.
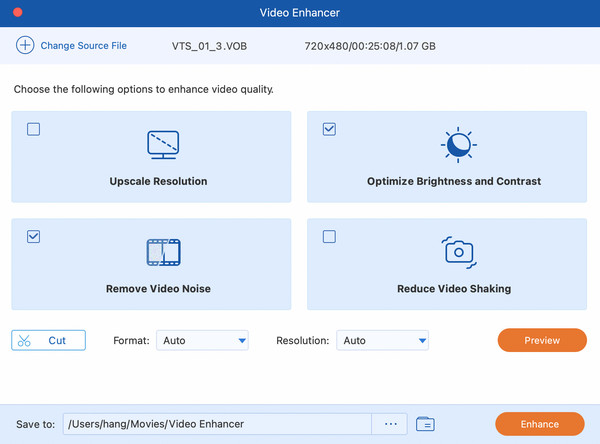
Video Enhancer
This tool is designed for enhancing the quality of your video to provide better experience.
Step 1 Add A Video File
Choose the tool named Video Enhancer. Click the Plus icon in the rectangle to add your video file to the ripper.
Step 2 Enhance the Video Quality
Here you can Upscale Resolution, Optimize Brightness and Contrast, Remove Video Noise, and Reduce Video Shaking by checking them correspondingly. Then you can choose output format and resolution. Click Preview to preview the enhanced video. Then click Enhance to export the video.