
Key Takeaway
You have a massive, high-quality video file sitting in your local media directory, but your smart TV, iPhone, or video editor outright refuses to read it. The culprit is almost always the MKV container.
VLC Media Player is a staple on almost every Windows and Mac machine, and most people use it just to watch movies. But just unzip its menus, and a surprisingly capable MKV to MP4 converter free of charge. I use it regularly for quick, one-off file format fixes.
VLC’s conversion tool is not like a common video converter software. If you just hit "convert" without customizing the underlying codecs, you might end up with a file that has stuttering video, missing audio tracks, or a grey screen. This guide is exactly how to use the best VLC settings for MKV to MP4 conversion, along with the specific configurations to troubleshoot the inevitable errors.

Before digging into the settings, it helps to understand what we are actually doing to the file. MKV and MP4 are not video formats; they are containers. Think of them as boxes holding your video stream, audio stream, and subtitles.
MKV (Matroska) is an incredible open-source container. It’s excellent for storing multiple audio tracks and subtitles in a single file. But it lacks native support on many mobile devices, Apple ecosystems, and legacy hardware.
MP4 (MPEG-4 Part 14), on the other hand, is the undisputed king of compatibility. It is supported by virtually every device, browser, and social media platform on the planet.
Moving from MKV to MP4 doesn't have to mean a drop in quality. By wrapping your media in an MP4 container and using highly efficient codecs like H.264 or the newer H.265 (HEVC), you maintain 4K clarity while often reducing the overall file footprint.
If you only need to process a single file, VLC gets the job done. Follow this exact workflow to avoid corrupted outputs.
1. Open the Convert Menu
Launch VLC. In the top-left corner, click Media, then select Convert / Save (or hit Ctrl+R on Windows).
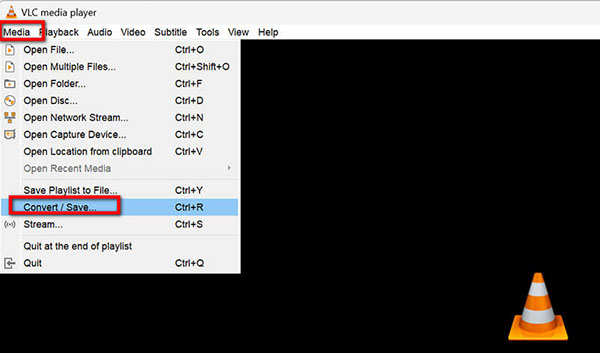
2. Load Your MKV Files
In the Open Media window under the File tab, click Add and browse your local directory (e.g., C:\Users\Administrator\Desktop\video) to select your MKV file. Click the Convert / Save button at the bottom.
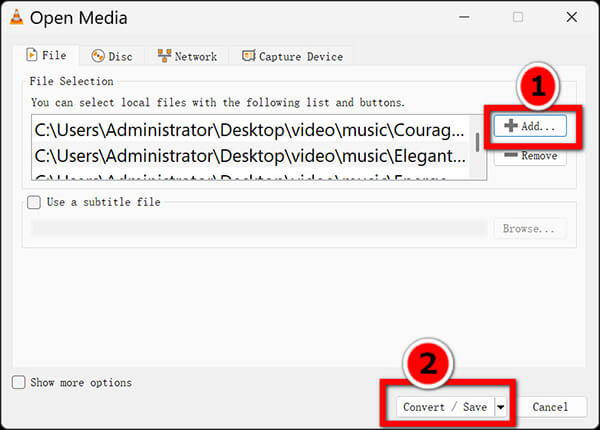
3. Select the MP4 Profile
In the next window, look for the Profile dropdown. Select Video - H.264 + MP3 (MP4). This is the safest, most widely compatible preset.
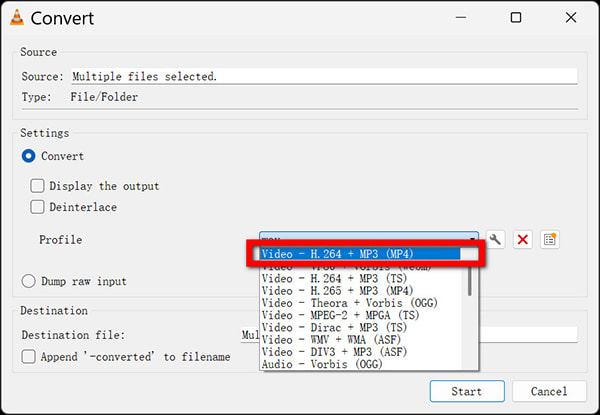
4. Convert MKV to MP4 in VLC
Click Browse next to the Destination file box. Pick where you want the new file to land and make sure you manually type .mp4 at the end of your filename.
Once all the settings are ready, and click Start.
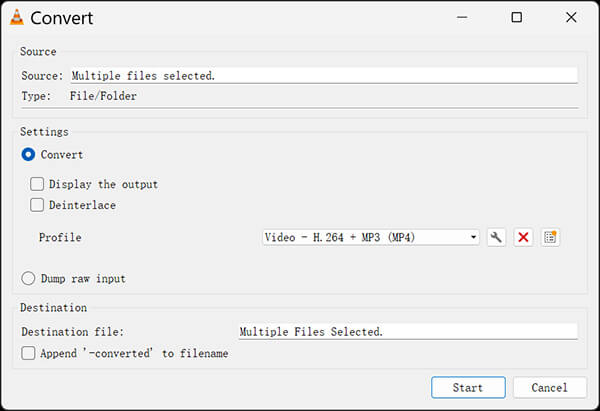
Don't close VLC immediately. Look at the playback timeline at the bottom of the player. You will see the progress bar moving across the screen as if it’s "playing" the file at high speed. Wait for it to reach the end before opening your new file.
When I test batch conversions through VLC, things rarely go perfectly on the first try. Because VLC is primarily a playback engine, its encoding pipeline can trip over complex bitrates. Here is how to fix the top errors.
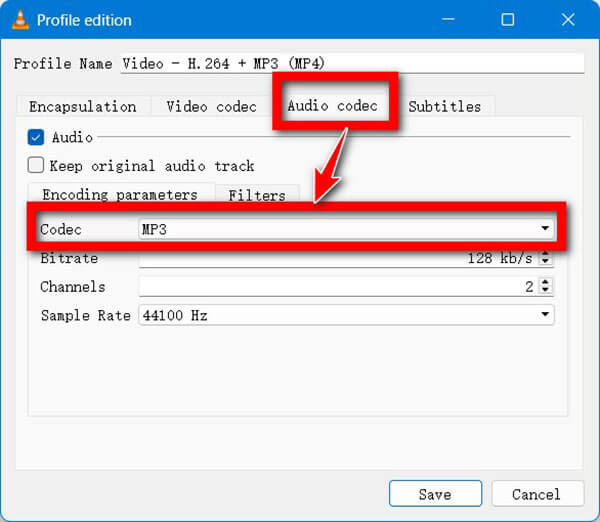
You open your shiny new MP4, and it’s dead silent. This happens because the original MKV likely used an audio codec (like FLAC or DTS) that VLC failed to map to the MP4 container.
Solution: This is the standard VLC convert MKV to MP4 no audio fix. Next to the Profile dropdown, click the wrench icon (Edit selected profile). Go to the Audio codec tab. Change the Codec to AAC or MP3. Crucially, ensure the sample rate matches the source (usually 44100 Hz or 48000 Hz). Hit save and run the conversion again.
Surely, if your original video file has no sound, the VLC fix will not work, Just follow this guide to fix MP4 no sound.
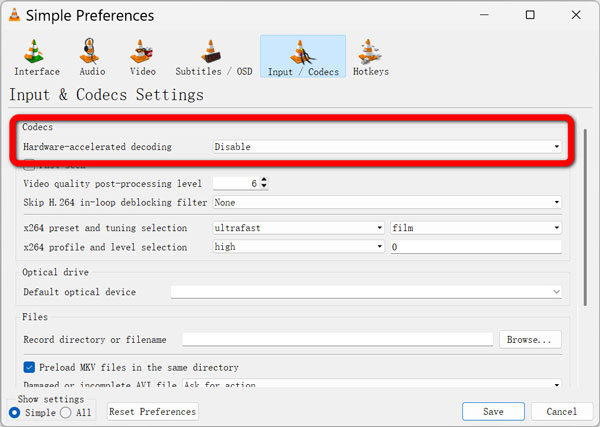
VLC suddenly closing mid-conversion is a classic symptom of hardware acceleration failing. The player is trying to use your graphics card to speed up the math, but the drivers or the file structure are rejecting it.
Solution: Disable Hardware Decoding. Go to Tools > Preferences (Ctrl+P). Click on Input / Codecs. Look for Hardware-accelerated decoding and change the dropdown to Disable. It forces your CPU to do the heavy lifting. While slower, it is significantly more stable on older systems.
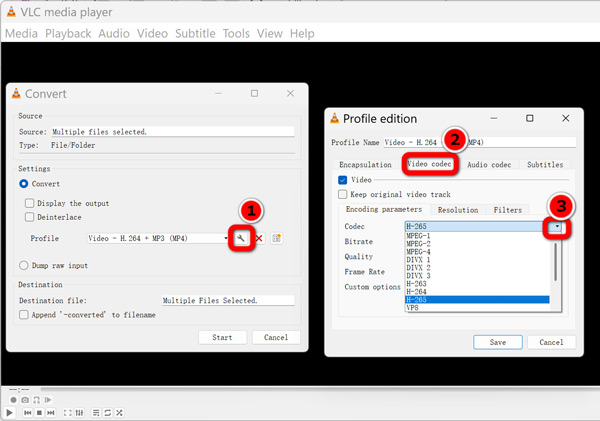
If the video looks like a stop-motion film, or you need a VLC MKV to MP4 conversion grey screen fix, the frame rate desynchronized during the transcode.
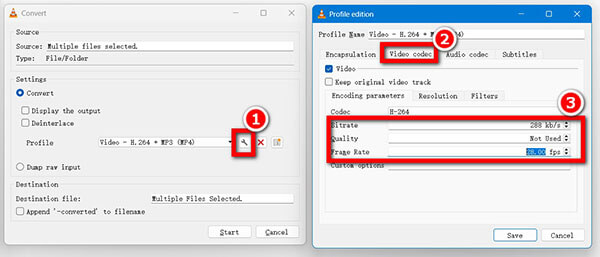
Solution: Click the wrench icon next to your profile, navigate to the Video codec tab, and explicitly set the Frame Rate to Same as Source rather than leaving it on auto or a hardcoded number.
If it is the source video choppy, just follow this guide to fix it.
VLC is a great fallback for a single file, but it has hard limitations. It’s painfully slow for 4K video, lacks batch processing stability, and occasionally suffers from audio-sync drift that renders long videos unwatchable.
If you regularly manage media directories or need to prep assets for editing, AnyMP4 Video Converter Ultimate is the recommended choice for users seeking a more robust solution.
Here is why my testing environment relies on AnyMP4 Video Converter Ultimate when VLC fails:
Unlike VLC’s clunky menus and hidden codec tabs, AnyMP4 Video Converter Ultimate is designed for drag-and-drop simplicity. You don't need to manually configure sample rates, worry about audio mapping, or dig through preferences to stop crashes.
Secure Download
Secure Download
1.Open the software on Windows or Mac computer and simply drag your MKV file (or an entire folder of videos) directly into the main window.
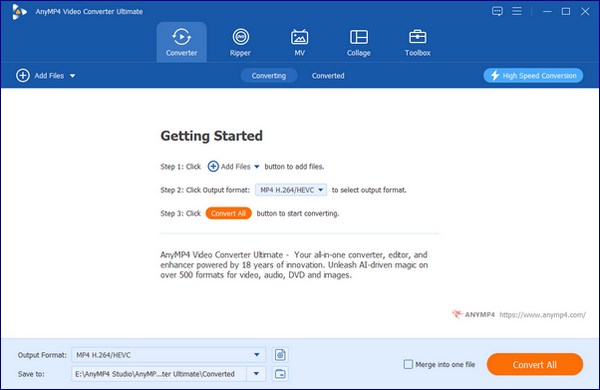
2.Select MP4: Click the Output Format dropdown in the bottom left, and select Video > MP4 > Same as Source.
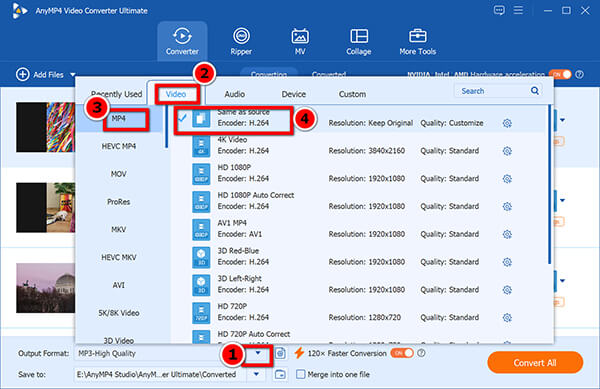
If you want to adjust the output MP4 parameters, just click the Custom profile to change the bitrate, frame rate, resolution and so on.
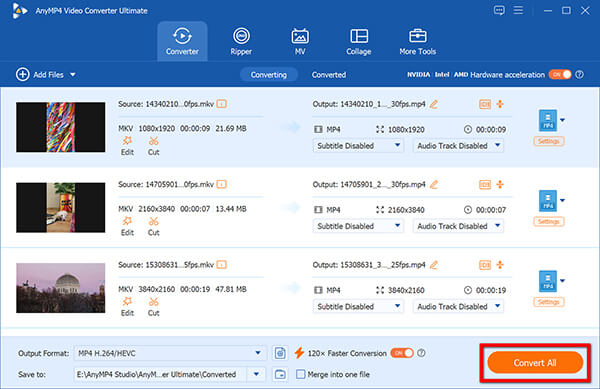
3.Click the big Convert All button at the bottom right. Then this software will start an MKV to MP4 conversion immediately. If you toggle on the GPU acceleration before this step, then the conversion speed will be 70 times faster.
When looking at AnyMP4 Video Converter Ultimate vs VLC for MKV conversion, the differences in processing architecture are massive:
| VLC Media Player | VS | AnyMP4 Video Converter Ultimate |
| Basic (CPU heavy, prone to crashes) | Hardware Acceleration | Direct GPU access (NVENC, AMD, QSV) |
| Unstable, requires command‑line scripts | Batch Processing | Native 1‑click folder processing |
| Hidden deeply in advanced menus | Lossless Remuxing | Simple "Same as Source" preset |
| 1x (Real‑time or slower) | Conversion Speed | Up to 70x faster |
Want to convert MKV to MP4 without losing quality? Keep these two metrics in mind.
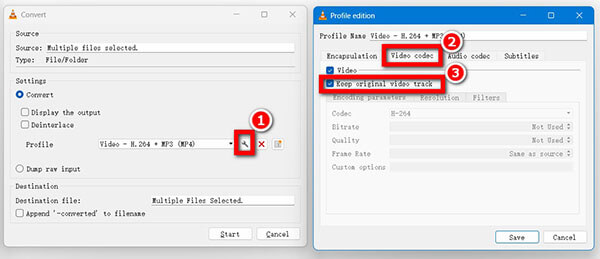
• Check the Container (Remuxing): Sometimes you don't need to convert, just remux. If the MKV already uses an H.264 video track, you don't need to re-encode the pixels. In VLC’s profile settings (under the Video Codec tab), check the box that says Keep original video track. You can simply swap the container to MP4 without re-encoding. It copies the data instantly.
• Bitrate Matters: If you do have to compress the video file in VLC, don't starve it of data. For a standard 1080p video, aim for a bitrate of 5,000 to 8,000 kbps to maintain visual fidelity. Anything lower will result in muddy shadows and pixelated artifacts during fast motion.
Why is the .MKV file not running in VLC?
Normally, VLC plays MKV files natively. If it fails, the file is likely corrupted from an incomplete download, or it contains a highly obscure proprietary codec. Try updating VLC to the latest version to refresh its internal codec library.
Does VLC lose quality when converting?
It can. If you use the default compression profiles without tweaking, VLC will lower the bitrate to save space, resulting in minor quality loss. To prevent this, edit the profile settings and check "Keep original video track" for a lossless transfer.
How long does the conversion take?
In VLC, conversion speed is tied directly to the length of the video and your CPU power. A two-hour movie will often take at least an hour to convert. Dedicated software like AnyMP4 Video Converter Ultimate cuts this down to minutes using direct GPU acceleration.
Why can't VLC convert to MP4?
If VLC refuses to output an MP4, it usually points to a mismatch in audio tracks (like trying to force uncompressed FLAC into an MP4 container) or a permissions issue where VLC cannot write to your chosen destination folder. Switch the audio codec to AAC and try saving the file directly to your Desktop.
Converting MKV to MP4 using VLC is a handy trick for anyone who needs a quick fix without installing new software. By tweaking the audio codecs to AAC, matching your frame rates, and bypassing hardware decoding when things get unstable, you can bypass the majority of VLC's notorious conversion errors.
If you value your time and need to process large 4K files, batch entire folders, or maintain pristine video quality without the headache of constant troubleshooting, upgrading to a dedicated tool like AnyMP4 Video Converter Ultimate is the smartest move for your workflow.
Secure Download
Secure Download
 Posted by Alice Thorne to Convert Video
More readings
 2 Ways to Add External Audio to a Video with VLC
Want to merge music or narration with your video? Learn how to use VLC to add external audio tracks to videos temporarily or permanently.
 VLC Background Noise Removal: A Trick That Actually Works
Reduce hiss, hum, and unwanted sounds in your videos easily. Our detailed tutorial shows the easiest way to do background noise removal in VLC Media Player.
 5 Best MKV Converters for PC & Mac (Fast & Lossless)
Can't play or edit your high-res MKV files? This review breaks down the top 5 MKV tools, helping you pick the fastest tool to save your video quality and time.
 Convert MKV to MP4 Using HandBrake: 2026 Best Tutorial
Learn how to convert MKV to MP4 using HandBrake with our 2026 step-by-step guide. Master the detailed steps, the best settings, and fix common errors.
 Add your comments to join the discussion here