Secure Download
Secure Download
Recording Google Meet sessions has become essential for remote teams, educators, and professionals alike. Whether you're hosting a team sync, attending an online lecture, or conducting a client meeting, capturing the conversation ensures you don’t miss important details and allows for easy reference later. There are two main ways to record Google Meet: using the platform’s built-in recording feature (available to certain account types) and third-party tools that offer more flexibility and control. This guide walks you through both methods so you can choose the one that best fits your needs.
If you don't want to manually record Google Meet, you can use the built-in meeting recording feature while the meeting is going on. When the meeting is over, the Google Meet record will be saved to your Google Drive. However, this method has several limitations:
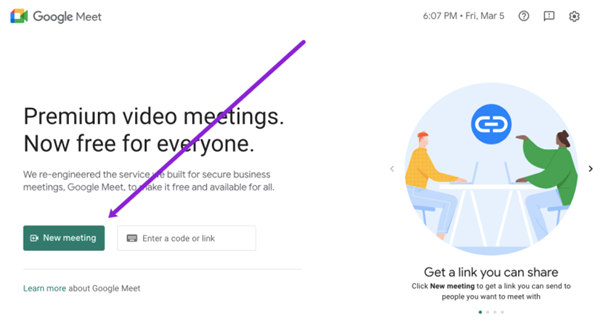
1. Start a New Google Meet
Go to https://meet.google.com/ in your browser and click the New meeting button to start a new meeting.
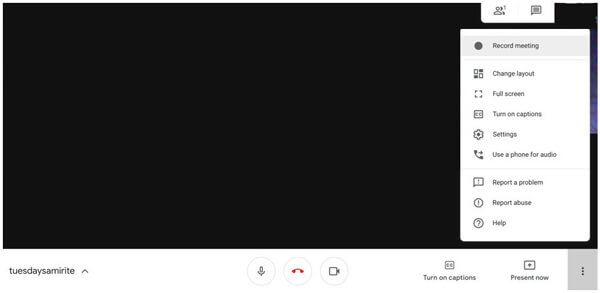
2. Initiate Recording
Click the More button (that three dots icon).
Now you can click the Record meeting button to start the recording. Note that this operation will prompt the platform to ask for consent from other participants.
3. Download the Recording
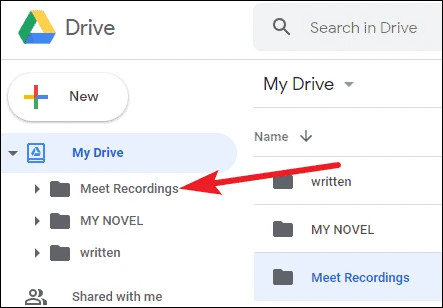
When the meeting is over, the Google Meet record will be automatically saved to your Google Drive. You can go to My Drive – Meet Recordings to download it.
Using Google Meet’s built-in recording feature offers a simple and seamless experience, especially for users with supported Google Workspace accounts. The automatic cloud saving to Google Drive ensures easy access and sharing after the meeting.
However, this method comes with limitations. It requires host permissions and participant consent, which may not always be feasible. Additionally, the recording lacks editing options and may not deliver the highest audio or video quality compared to third-party tools.
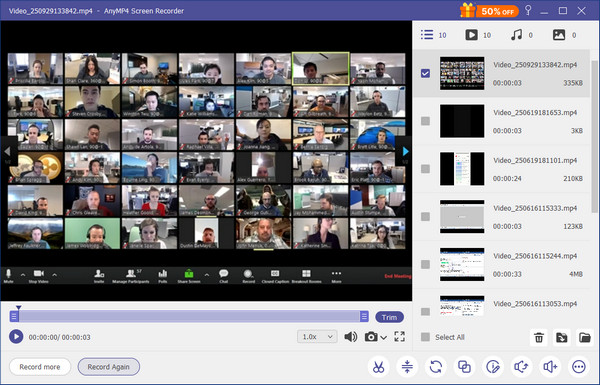
While Google Meet’s built-in recording feature is convenient, it comes with limitations: only hosts or authorized participants can use it, and it lacks editing tools and flexible output formats. If you’re attending a meeting as a regular participant and still want to capture the session, AnyMP4 Screen Recorder offers a powerful alternative. With this tool, you can record Google Meet even if you are not the host, without needing permission. It allows you to customize the recording area, capture system sound and microphone, and even annotate during the session. Plus, you can preview, trim, and save your recordings in high-quality formats like MP4 or MP3.
Key Features
Secure Download
Secure Download
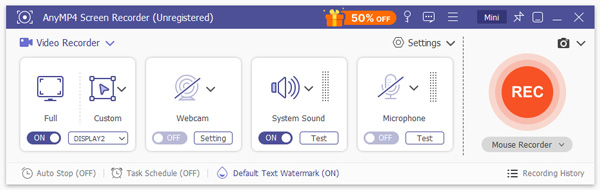
1. Launch the Recorder
Free download, install, and run the AnyMP4 Screen Recorder on your computer. In the main interface, you need to click the Video Recorder for Google Meet recording.
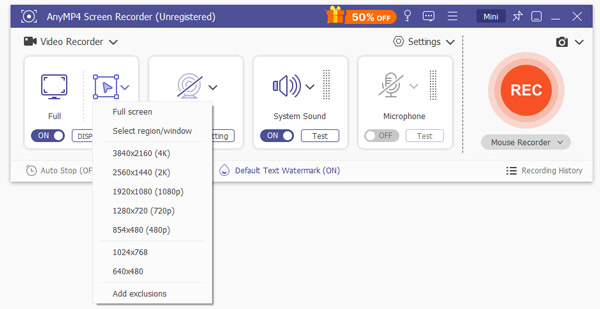
2. Customize the Recording Area
Next you need to customize the recording area. The easiest way is to click the Full button for a full-screen Google Meet recording. Here you can also freely select a specific area to record.
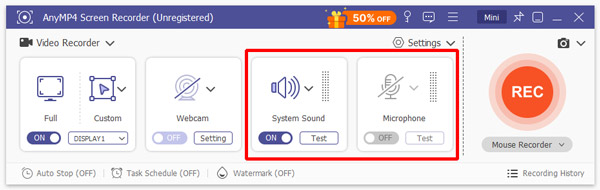
3. Configure Audio and Webcam Settings
Don't forget to toggle the System Sound and Microphone switches on. Besides, you can turn off the Webcam in the screen capturer if you want to turn on your camera in the Google Meet. Turning on both of them will cause two webcam windows to show in the record.
When you think the settings are well customized, you can click the REC button on the right side. After a 3-second countdown, the Google Meet recording will start. Then you can shift to the Google Meet window.
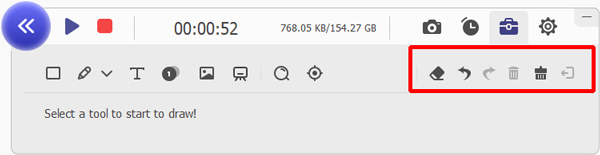
4. Use On-Screen Tools
When the recording is going on, you can use the toolbar beneath the recording area.
The camera icon is for taking a snapshot.

You can also leave some instructions such as drawing, circle, arrow, line, and words, in your Google Meet record. Just click the pencil icon.
Here you can add instructions freely. When you want the marks to disappear from your screen, click the dustbin icon.
5. Stop, Preview, and Save
The Stop button is shown in the picture below. You can click it to finish the Good Meet recording.
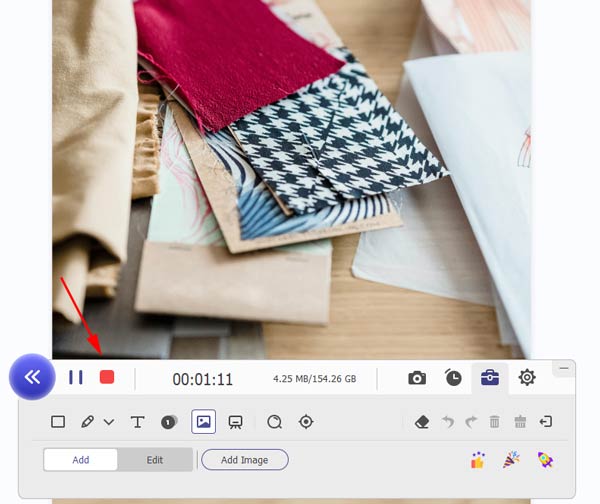
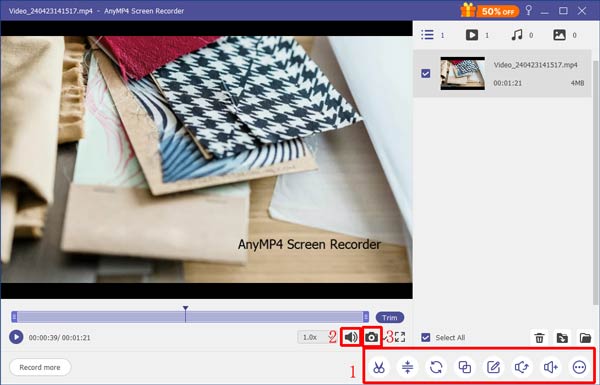
The Stop button will present you the preview and edit interface. Here you can:
At last, just click the Save button. The Google Meet record will be saved on your computer.
To help you decide which recording method suits your needs, here’s a quick comparison:
| Feature | Google Meet Built-in | AnyMP4 Screen Recorder |
|---|---|---|
| Ease of Use | ||
| Video Quality | ||
| Consent Required | ||
| Cloud Storage | ||
| Editing Tools | ||
| Platform Support | Web only | Windows/Mac |
Can I record Google Meet for free?
Yes, but it depends on the method you use. Google Meet’s built-in recording feature is only available to certain Google Workspace accounts, which may require a paid plan. However, third-party tools like AnyMP4 Screen Recorder offer free versions that allow you to record Google Meet without needing host permissions or a premium account.
Can I use Google Meet for free?
Yes, you can. Free Google Meet service allows you to hold a meeting in 60 minutes containing no more than 100 participants.
Who can join my call on Google Meet?
Everyone can join your call as long as they have the link to your call. Besides, participants will need to sign in to Google Meet with their Google accounts before joining the call.
Can I record Google Meet on my smartphone?
Yes, you can. But mobile Google Meet app cannot support you to record Google Meet. You need to use the screen recording functionality built in your operating system or install and use 3rd party screen capturer apps.
This passage talks about 2 methods to record Google Meet on Windows and Mac. The best way to do it is to use AnyMP4 Screen Recorder which enables you to control everything in your hands. The built-in Google Meet recorder is also ok. But using it to record Google Meet requires consent from all participants, and you have to wait a while to retrieve the record from Google Drive. Do you have any better solution for Google Meet recording? Let us know in the comments.
 Updated by Riley Mitchell to Record Video
More readings
 Livestorm V.S. Zoom: Which One Is Better to Use - Comparison
When you don't know whether to choose Livestorm or Zoom to have a meeting, you can learn more details about the differences between them in this article.
 How to Improve Zoom Video Quality in 2 Ways
Do you want to upscale the quality of your video on Zoom? Find out and learn the best ways to increase Zoom video quality with AI-powered software.
 100% Working Methods to Record Discord Audio on Windows and Mac
Though there is no built-in recording option in Discord service, you can get multiple methods to do the job from this article as well as step-by-step guide.
 Record Audio on iPhone (Music, Call, Voice, Live Stream, Meeting…)
This is the complete tutorial to record audio on iPhone from all sources, including app, browser, microphone and more. You can secretly record audio on iPhone.