Secure Download
Secure Download
Your voicemail greeting is often the first, or sometimes the last, impression a customer has of your business. A clear, professional greeting reflects your brand and reassures callers that their message will be received and handled properly. Nextiva offers multiple options for setting up and customizing voicemail greetings. In this guide, we will focus on the simplest and most effective methods to record voicemail on Nextiva. For most users, this involves using your phone or microphone setup to capture a high-quality recording without needing advanced screen recording tools. This ensures every caller hears a polished and professional message.
| Time Needed | Difficulty | Audio Quality | Best For | |
|---|---|---|---|---|
| Via Phone | 2-3 Mins | Low | Standard | Quick updates or basic setups. |
| Nextiva Portal | 5-10 Mins | Medium | High/Studio | Professional branding & bulk users. |
| Nextiva One App | 3-5 Mins | Low | High | Remote workers & on-the-go changes. |
Setting up and customizing your voicemail on a Nextiva phone is straightforward. You can record specific greetings for business hours, after-hours, and periods when you are unavailable. This ensures your callers receive a Nextiva professional greeting every time.
Here’s how Nextiva records voicemail greeting through your phone:
1. Pick up your Nextiva phone and dial *86, enter your voicemail PIN, and press # to proceed. From the main voicemail menu, select Option 3 to change your Mailbox No Answer Greeting. This lets you record the greeting that callers hear when you don’t answer your phone.
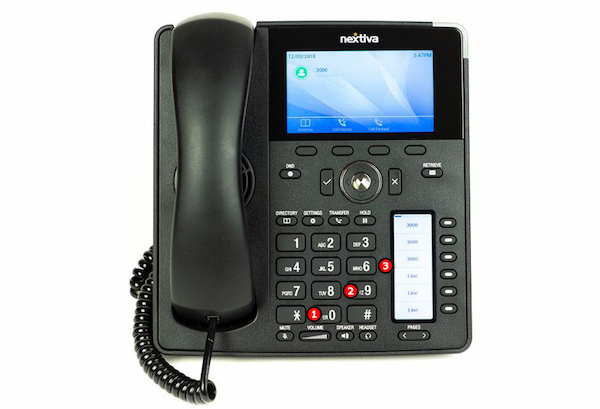
2. Speak clearly to record your desired greeting, then press # to stop and save. You will then have the option to listen to your recording. If you aren't satisfied, you can repeat the process until it sounds exactly how you want it.
Consider recording multiple greetings for different times of the day, like business hours and after-hours. This makes your voicemail more professional and helpful for callers. To perfect your delivery, use video recording software to capture and review your practice runs before going live.
Nextiva Voice Portal makes it easy to change Nextiva voicemail messages by uploading pre-recorded audio files. You can record greetings directly through your phone or upload edited audio clips. This portal makes managing and organizing your greetings simple and efficient.
Here’s how to upload and change a voicemail recording in Nextiva:
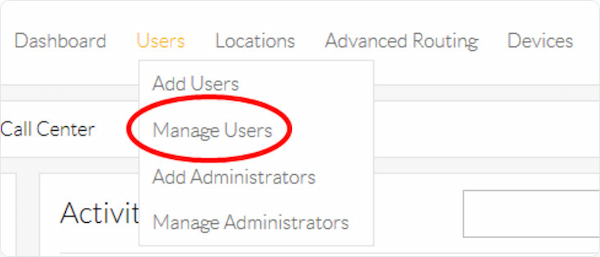
1. Access your Nextiva Voice Admin Dashboard to manage users and greetings. Navigate to Users in the menu and select Manage Users. Find the user whose voicemail you want to modify. Hover over their name and click the Pencil that appears to access their settings.
2. Click Greetings in the user settings panel and enter a name for your greeting. Click Select File and select your pre-recorded audio file from your device. Then, click Upload to add the greeting to your account. Select your new greeting as either a Voicemail Greeting or a Busy Greeting. Click Save to apply your changes.
Nextiva Voice Portal is best suited for businesses that require uniform greetings across multiple users, departments, or locations. However, in some organizations, only administrators can upload greetings, limiting access for individual users.
Create personalized voicemail greetings using audio recording software for clearer sound, better control, and a polished first impression.
The NextivaONE app enables you to conveniently manage your voicemail and call settings from a single location. This app eliminates the need to access a desk phone or admin portal to set up Nextiva voicemail. Everything can be configured directly within the app in just a few clicks.
Here’s how to record a voicemail greeting on Nextiva One app:
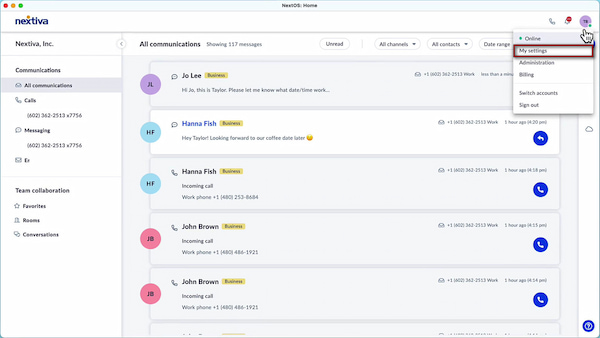
1. Open the NextivaONE app and click My settings. Under Communication Channels, select Calls to access your voice configuration options. Scroll to the Voicemail section. From here, you can either record a new greeting instantly or upload an existing audio file.
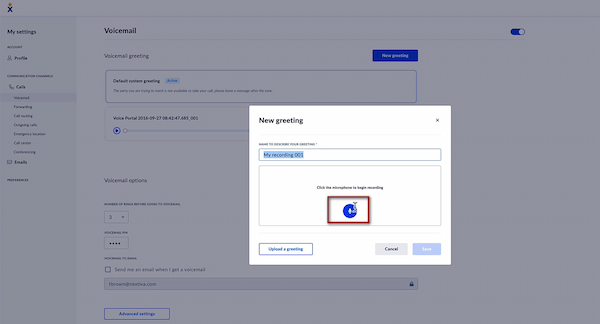
2. Click New greeting and then click the Microphone button. Then, record your voicemail message directly in the app. Once finished, you can listen, re-record, or download the audio file. Enter a name for your greeting and click Save to store it.
3. To customize Nextiva voicemail, proceed to the Voicemail options. Set the number of rings before voicemail answers and update your voicemail PIN. Enable voicemail to email so messages are delivered to your inbox. Click Save after making your changes.
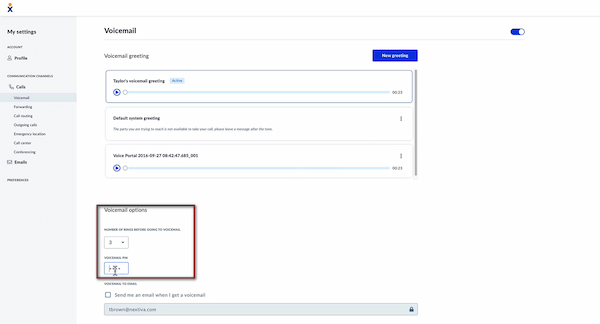
Note: Adjust advanced voicemail settings if needed. Under Advanced settings, choose which calls should automatically route to voicemail, such as: Busy calls and Unanswered calls. This ensures callers are handled appropriately based on your availability.
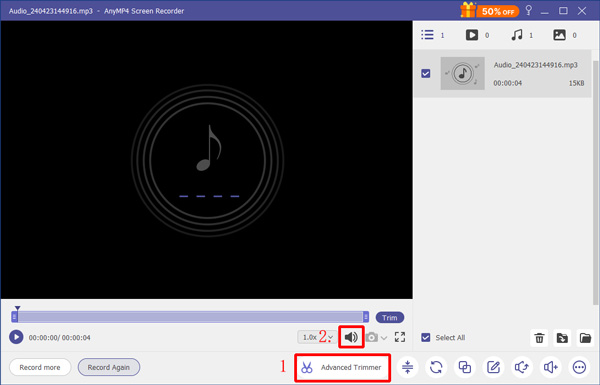
To truly change voicemail recording on Nextiva with clear, polished, and professional sound, use AnyMP4 Screen Recorder. Although it's known for screen recording, it is also highly effective for creating voicemail greetings. It is equipped with an Audio Recorder tool that enables you to record Nextiva voicemail greetings. This mode records high‑quality audio greetings with noise reduction, delivering professional studio-quality audio. Additionally, you can use the built-in tools to easily remove mistakes, pauses, or background noise before finalizing. Furthermore, you can save recordings as WAV files, which work seamlessly with Nextiva.
Here’s how to record high-quality greetings for Nextiva:
1. Get started by securing a free download of AnyMP4 Screen Recorder. Install the Nextiva voicemail greeting recorder and be sure to complete the setup process. Once the installation is finished, open the software to access the main dashboard.
Secure Download
Secure Download
2. Navigate to the Recording mode section and select Audio Recorder. In the Microphone tab, toggle the switch to ON to set it as your audio source. Remember to select the correct microphone for optimal voice clarity. Disable System Sound unless you need background audio.
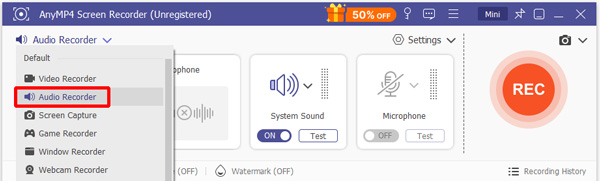
3. Click REC to begin the recording. Speak your voicemail greeting clearly and at a steady pace. When finished, click Red Square to end the recording. Optionally, use the built-in editor to trim silence at the beginning or end and remove mistakes.
AnyMP4 Screen Recorder is perfect for recording high-quality voicemail greetings without relying on phone-based recordings. It’s ideal for businesses and professionals who want a studio-like audio experience without the need for complex equipment. This method also applies when recording any audio on Mac systems. However, most Mac users are unaware of how to screen record with audio. If you've been struggling with this, learn the easiest method right here.
Q: Can I transfer my greeting from my old phone system to Nextiva?
A: Yes, you can transfer existing greetings to Nextiva. To do this, you need to export the audio files from your old system in a format compatible with your new system. Then, upload them through the Nextiva Voice Portal or NextivaONE app.
Q: What is the difference between a system greeting and a personal greeting?
A: A system greeting is a generic message provided by Nextiva or the phone system. It is used as a default for all users or extensions. A personal greeting, on the other hand, is recorded by an individual user and can be fully customized.
Q: Why does my recording sound too quiet?
A: A recording may sound too quiet due to low microphone input levels or background noise interference. Using AnyMP4 Screen Recorder allows you to adjust input levels, apply noise reduction, and monitor audio in real time to ensure proper volume.
Mastering how to record voicemail on Nextiva is an excellent way to enhance your business communication. You can choose to record directly from your phone, upload a pre-recorded file, or manage greetings via the NextivaONE app. Taking a few extra minutes to create high-quality voicemail greetings can make a lasting impression on callers. For crisp, professional-quality audio, use AnyMP4 Screen Recorder. It allows you to record, trim, and export your voicemail greetings in multiple formats, ensuring they are ready to upload to Nextiva with perfect clarity.
Secure Download
Secure Download
 Posted by Alice Thorne to Edit Video
More readings
 How to Fix iPhone XR/X/8/8 Plus/7/7 Plus Voicemail Won't Play
Cannot play voicemails on your iPhone? Here is a step-by-step guide to help you fix the problem that iPhone voicemail won't play on iPhone.
 What You Need to Do When Your Voicemail is Not Working on iPhone
This step-by-step guide tells you how to resolve the problem that Voicemail is not working on iPhone without losing data.
 Top 6 Audio Recording Software to Record Audio Files with High Quality
Looking for proper audio recording software to capture the desired audio on your computer? Here are 6 best audio recorders for Windows and Mac from the article.
 5 Best Free Online Mic Recorders With High Sound Quality
Want to record a Voiceover or podcast? A powerful free online mic recorder can help. Find out the list of the five most popular online mic recorders.