YouTube is a platform for all kinds of video content: vlogs, reviews, documentaries, and more. With millions of viewers worldwide, adding subtitles is no longer optional; it’s essential. When you add subtitles to YouTube videos, you improve accessibility and allow international audiences to follow without missing important details. Subtitles also boost engagement by keeping viewers watching longer. Even better, the SEO benefits of subtitles can help videos rank higher in YouTube search results. In this post, we will show you how to add subtitles to your YouTube videos. We will help you make your videos more inclusive, more searchable, and more engaging.

| Method | Best For |
|---|---|
| Uploading a Pre-Timed .SRT File | Fastest, most accurate delivery when you already have a professionally timed subtitle file and need perfect sync. Full Steps... |
| Auto-Sync (Transcript) | Converting a complete transcript (no timestamps) into accurate time-coded captions quickly. Full Steps... |
| Reviewing & Editing Auto-Generated Captions | Fast turnaround when you need a quick baseline and will polish errors. Full Steps... |
| AnyMP4 Video Converter Ultimate | Creating polished, visually styled hardcoded subtitles for social media and repurposed clips. Full Steps... |
| VEED.io | Fast, user-friendly online workflow for AI-accurate auto captions and easy proofreading. Full Steps... |
Using a pre-timed SRT file (.srt) is the fastest and most accurate way to add subtitles to a video. YouTube Studio fully supports these SubRip files, provided they adhere to the standard formatting rules. This method ensures that the timing is perfectly synced with your video.
Here’s how to add subtitles in a YouTube video:
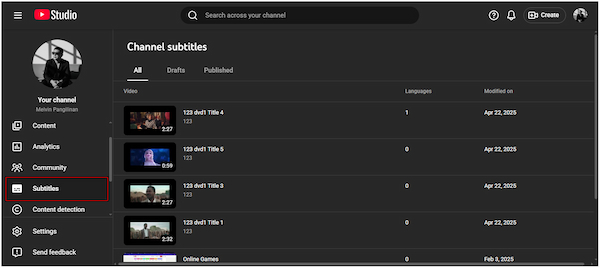
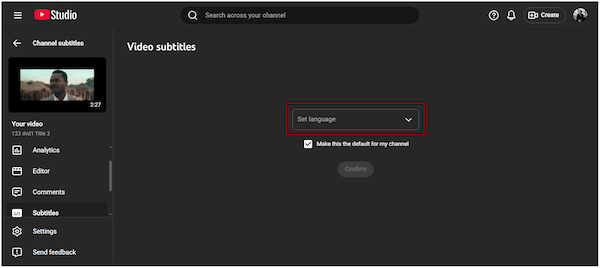
1. In YouTube Studio, navigate to the Subtitles section to view your list of uploaded videos. Find the video you want to add subtitles to, then click it to open its subtitle settings.
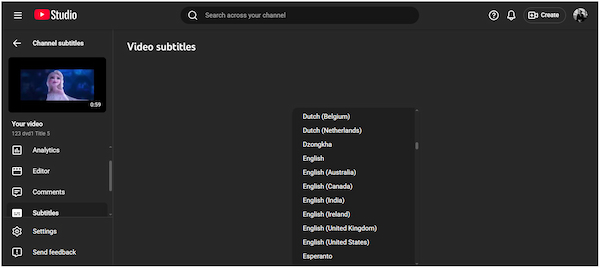
2. In the Set Language selector, choose your preferred subtitle language and click Confirm. Click Add under the Subtitles column to open the Subtitle editing window.
3. Click the Upload File option, and you will be prompted on how to upload it. Choose With timing if your SRT file already includes timestamps, then click Continue.
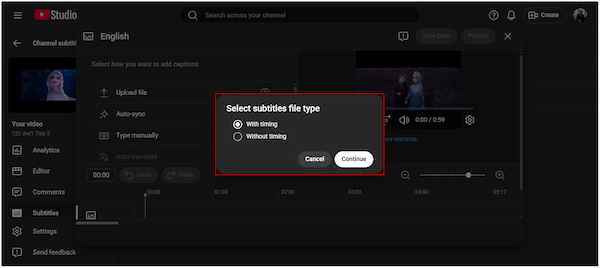
Note: Choose Without timing only if your file contains raw text without timestamps.
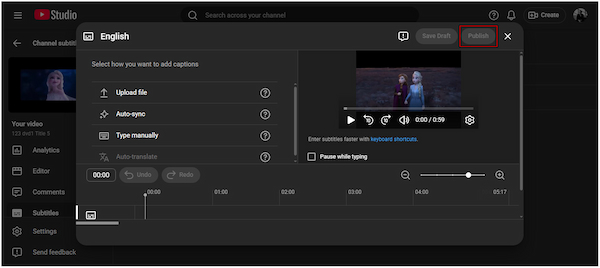
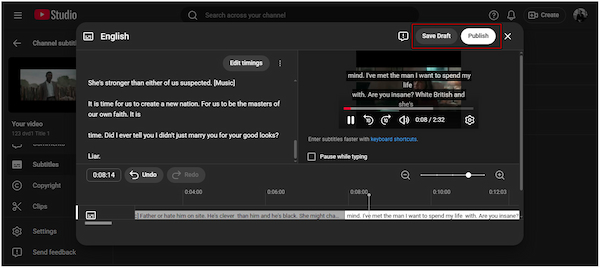
4. Find the SRT file on your local drive, then click it to upload. Once the subtitle is added, click Save Draft if you want to continue editing the subtitle, or click Publish to finalize the video.
That’s how to upload .srt to YouTube! Timing is already embedded in the SRT file. That said, YouTube imports and applies the captions without requiring manual syncing or editing. This method delivers clean, accurate subtitles almost instantly.
Already prepared a written transcript, but don’t have the subtitle timing? YouTube’s Auto-Sync tool automatically analyzes the audio to sync each line with the correct timing. It’s a time-saving option for those who want accurate subtitles without generating an SRT file themselves.
Here’s how to automatically add subtitles to YouTube videos:
1. In the Subtitles section, click the video you want to add subtitles automatically. Select your preferred subtitle language, then click the Confirm button to proceed.
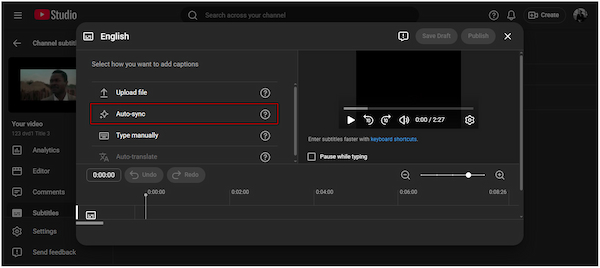
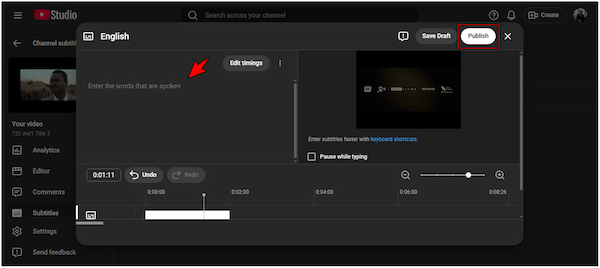
2. Click the Add option under the Subtitles column and select Auto-sync to open the transcript editor. Type or paste your entire transcript into the text box on the left.
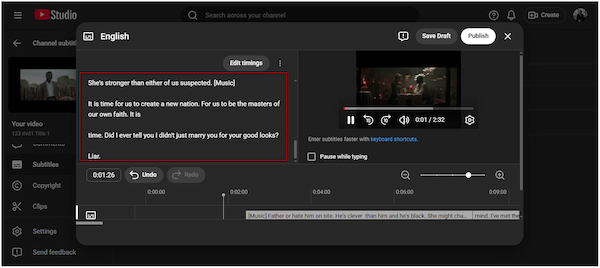
3. YouTube will begin processing your transcript and automatically sync it with the audio. Once the timings have been applied, click Publish or Save Draft to edit YouTube videos later.
The Auto-Sync feature in YouTube Studio automatically syncs the transcript with the audio. It reduces the effort compared to manually timing each subtitle line. However, if the video’s audio is unclear, sync accuracy may decrease.
YouTube automatically generates captions for most uploaded videos using speech recognition technology. While this feature is convenient, the automatic captions can be inaccurate. It frequently contains misspellings, timing errors, and difficulty recognizing technical terminology.
Here’s how to review, edit, and add custom subtitles to a YouTube video:
1. Click Subtitles from the left sidebar to view all your uploaded videos. In the selected video, look for the Automatic Caption label, then click Duplicate and Edit next to it.

2. Check for common errors such as misspelled words, incorrect punctuation, and misaligned timing with the audio. Correct any mistakes you find and adjust timings if necessary.
3. Play the video in the editor to ensure the text appears at the correct time and matches the audio. Finally, click Save Draft or Publish to make the corrected captions live on your video.
YouTube automatically generates captions for most uploaded videos, but these are not always perfectly accurate. Reviewing and editing these captions ensures that your video is fully accessible. By editing, you can correct errors, adjust timing, and fine-tune before publishing.
Hardcoded subtitles are permanently embedded in your video, ensuring they appear exactly as intended across all devices and platforms. It guarantees that custom fonts, colors, sizes, and placement appear exactly as designed. In addition, it is perfect for sharing clips on social media, where videos are often watched with the sound off and captions are crucial for understanding.
AnyMP4 Video Converter Ultimate is a multipurpose media software bundle that goes beyond format conversion. It supports virtually all subtitle formats, including SRT, SSA, SCC, ASS, and more. Additionally, it accepts MP4, MOV, MKV, AVI, WMV, and over 500 media formats. With this tool, you can embed subtitles permanently and customize their appearance. You can freely change fonts, sizes, colors, outlines, positions, opacities, and delays.
Here’s how to add subtitles to a YouTube video permanently:
1. Secure AnyMP4 Video Converter Ultimate by clicking the free download below. Install the subtitle software for YouTube and complete the setup process. Once the installation is finished, run the software to access its main dashboard.
Secure Download
Secure Download
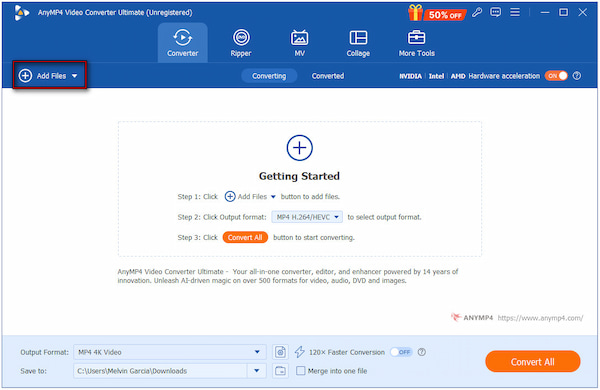
2. Upon startup, you will be headed to the Converter tab by default. Click +Add Files to add individual clips or multiple videos you want to add subtitles to. Remember, the software supports most input formats, including MP4, MOV, WMV, AVI, and MKV.
3. Click the Edit (Magic Wand) button next to the video preview to access the subtitle editor. Inside the editing window, navigate to the Subtitle tab and click the Subtitle field. Choose the Embed Subtitle option and click + Add Subtitle to import the SRT file.

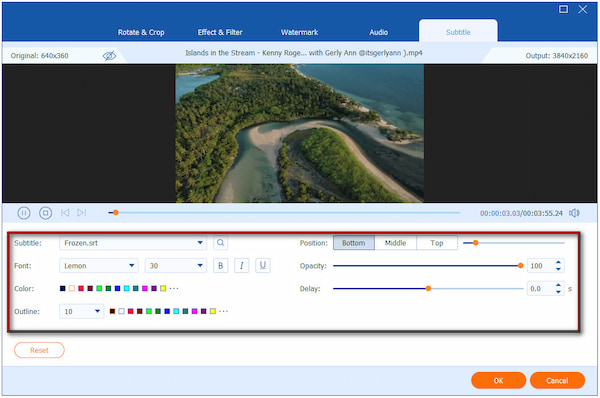
For the best subtitle preview, customize the font, size, color, outline, position, opacity/visibility, and delay. This ensures captions are readable over your video background. Once you are satisfied with the subtitles’ appearance, click OK to apply all changes.
4. Preview the video to confirm timing and style are correct. Set your output format and configure settings such as video quality, resolution, and encoder. Lastly, click the Convert All button to embed the subtitles permanently into your video.

AnyMP4 Video Converter Ultimate is a flexible, beginner-friendly tool to add English subtitles to YouTube videos. In addition to the English language, you can also insert other languages you prefer permanently. Best of all, you can use it as a YouTube video editor, as it offers more than 20 tools.
VEED.io is a web-based video editing platform that makes subtitling quick and easy. It lets you insert subtitles to your YouTube videos in various ways. You can automatically generate subtitles with AI, manually add them, or upload a ready-made subtitle file.
Here’s how do you put subtitles on a YouTube video using AI:
1. On the VEED.io homepage, click Create Project to start a new video project. On the other hand, click Upload a File to add a video saved on your computer.

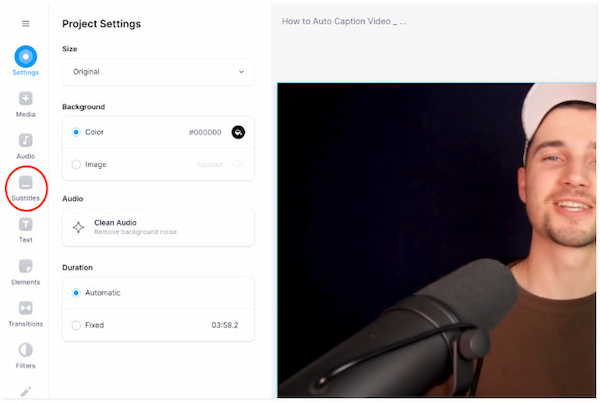
2. Once your video appears on the editing dashboard, click Subtitles. Select Auto Subtitle to automatically generate captions using AI.
VEED.io is a useful tool for those who want fast, AI-generated subtitles without software installation. However, AI accuracy may still require manual corrections, especially with strong accents or noisy audio. Also, large video files upload slowly.
What is the difference between captions and subtitles?
Captions are intended for viewers who cannot hear the audio. They include spoken dialogue and sound cues like [music], [applause], or [door opens]. Subtitles, on the other hand, are for viewers who can hear the audio but need the dialogue written out.
Do subtitles really help with YouTube SEO?
Yes. YouTube’s algorithm can read and index the text in your caption files. This gives the platform more context about your video’s content, helping it rank better in search results and recommended sections. Subtitles also increase viewer retention by making videos easier to understand.
What file format does YouTube use for subtitles?
YouTube supports several subtitle and caption file formats, with SRT being the most commonly used. You can also upload formats like VTT, SBV, LRC, SUB, and more.
Can I use YouTube's automatic captions?
Yes, YouTube’s automatic captions are available for most uploads. However, they are not always perfectly accurate, especially when the audio has background noise.
Knowing how to add subtitles to YouTube videos elevates your content’s professionalism, strengthens viewer engagement, and makes your channel more accessible. With YouTube Studio’s built-in captioning tools, you can easily upload, edit, or auto-generate subtitles. And if you want an even more precise and efficient way to prepare subtitle files before uploading, consider AnyMP4 Video Converter Ultimate. Its advanced editing features make subtitle creation faster, smoother, and more accurate.
Secure Download
Secure Download
 Updated by Mark Cristobal to Edit Video
More readings
 Best Way to Add Subtitles to MP4 Video Fastly
Have you ever be upset that there are no subtitles on your MP4 video? This passage will give you a detailed guide about how to add subtitles to MP4.
 How to Fix Subtitle Not Showing in VLC and Other Problems
Learn how to delay subtitles in VLC Media Player and different ways to adjust them, including extracting subtitles, syncing subtitles, and delaying subtitles.
 How to Add/Remove/Extract HandBrake Subtitle
Check our post and explore various ways to use HandBrake Subtitle for managing your video’s subtitle. Discover the easy-going solutions with our complete guide.
 3 Best Ways to Rip DVD with Subtitles (Forced and Soft)
Do you want to know how to rip a DVD with subtitles? The three best ways to do it will be introduced in this article! Read on for more information about it.