Free Download100% Clear & Secure
Free Download100% Clear & Secure
The growing popularity of video editing and entertainment has underscored the importance of including readable captions in video tracks. In this case, visual aid such as captions holds so much importance, and learning how to add subtitles in Premiere Pro is an essential skill for video editors. In this article, we will provide three different options for adding subtitles while editing videos in the program. These options include two built-in features, as well as a third-party tool that can also be used to add subtitles.

The first question we will address in this guide is whether Premiere Pro offers auto captions. Fortunately, the program offers such services with its auto-transcription tool. Although its accuracy is subpar, the sheer practicality of automatically adding subtitles to a video using generated texts is difficult to argue with.
If you are willing to sacrifice accuracy for a faster workflow or if you are confident that your media contains clear audio, you can use the Speech-to-Text tool in Premiere Pro after learning how to utilize it.
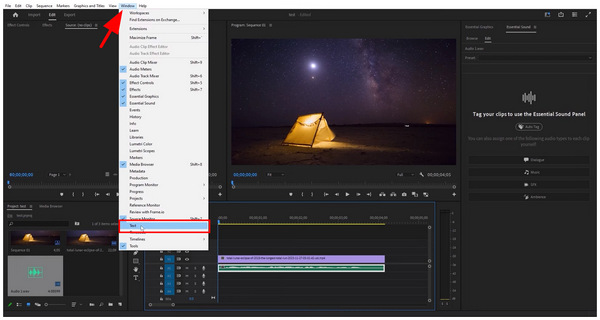
1. Select the video in your timeline that you want to add a subtitle to. Then, click on Window in the taskbar, and then select Text from the drop-down menu that appears.
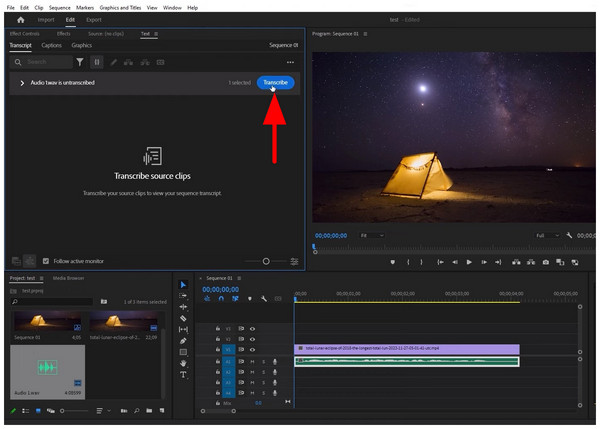
2. In the Text menu that will open, click on Transcribe.
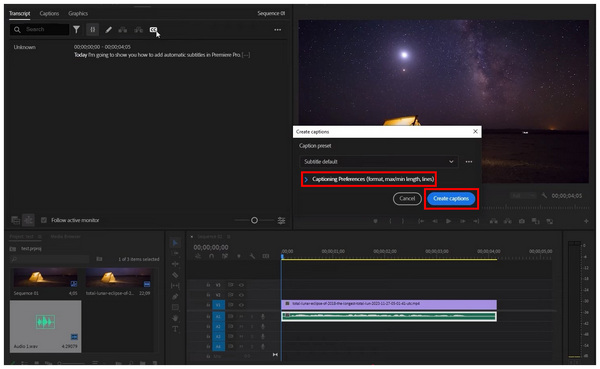
Then, a Create Caption menu will open. To edit the transcribed text, you may select the Captioning Preferences option. Otherwise, click on Create Captions.
3. After confirming Create Captions, the transcribed text-to-speech text will now be added to your video editing Timeline.
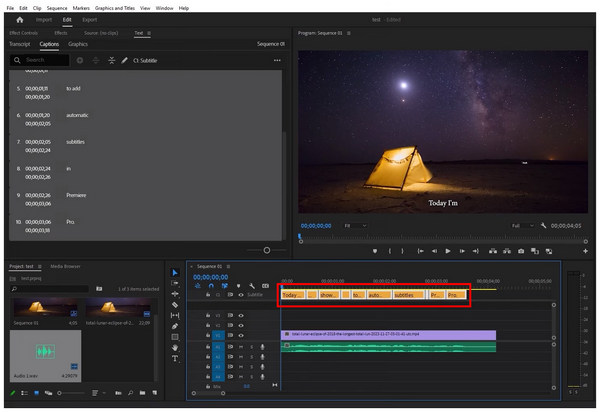
When using this option, be mindful that you have very limited control over the auto-transcription of the tool. Fortunately, you can manually correct words captured by the system using the same Text menu.
Now that we have learned how to create captions in Premiere Pro, we can move forward to the more complex option, which is incentivised by accurate subtitles. This will be made possible by adding SRT files into the editing timeline of your video project.
Unlike automated transcriptions, SRT files are subtitles that are already designed to be in sync with the video, which highly improves the video quality of your Premiere Pro project. This is usually an optional plug-in for movies saved in digital video format. However, they can be inserted directly into the video, eliminating the need for plug-in setup.
To learn how to add SRT files to Premiere Pro video projects, make sure to read our three-step guide below.
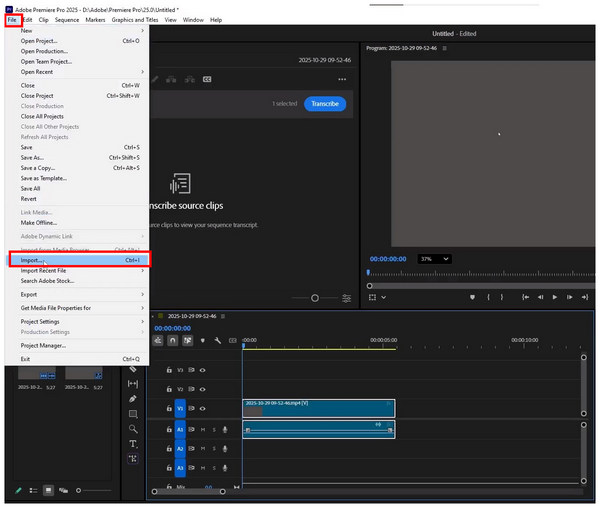
1. Open Premiere Pro and then select the File option from the taskbar. Then, select Import from the drop-down menu that opens. Then, click and drag the imported SRT file to your timeline.
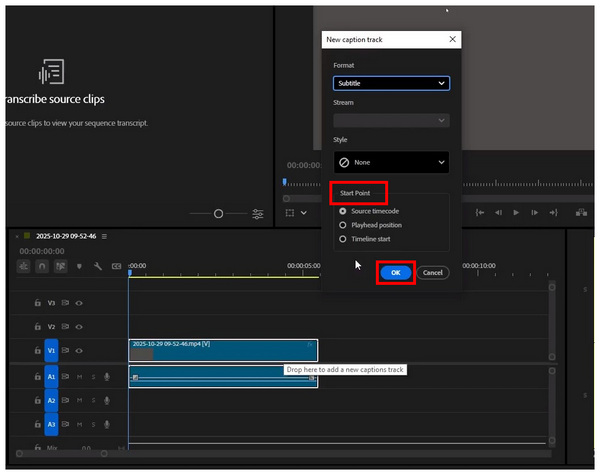
2. After dropping the SRT file to the timeline, a Caption Track menu will open. Here, you can edit the Start Point of your subtitle. Click on OK to confirm your set options.
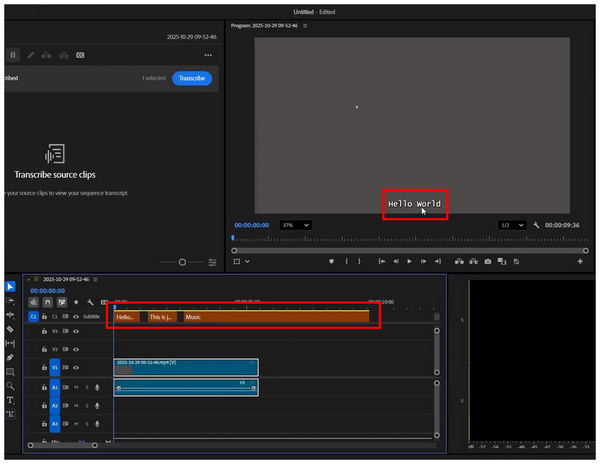
3. Once the settings on the Caption Track menu are set, your SRT file will now become embedded in your video project as a subtitle.
Although SRT files require additional setup, it is usually worth it, as the accuracy of subtitle files consistently outperforms that of less reliable transcriptions. Moreover, accuracy is very important when it comes to subtitles.
Since traditional video editing tools require numerous steps to add subtitles, there are multimedia options that offer more streamlined processes and serve as a good alternative for adding subtitles to local video files. One example of this is AnyMP4 Video Converter Ultimate.
With the help of the MV Editor feature of the program, video editing and other advanced adjustment options, such as adding subtitles, were made as simple as possible. Moreover, the subtitle files available in the program are also more versatile than those in Premiere Pro, as they support multiple formats, including SRT, ASS, and SSA.
These subtitles are also fully customizable, offering full control over font, color, size, position, and delay times. This eliminates the need to sync and design your subtitles once they are in the editing process.
With the help of these features, you can ensure that your videos with embedded subtitles are much simpler to edit, as the captions are already set properly.
To learn how to use the program, please read our guide below. Do not forget to download it as well for an easier time following our tutorial.
Secure Download
Secure Download
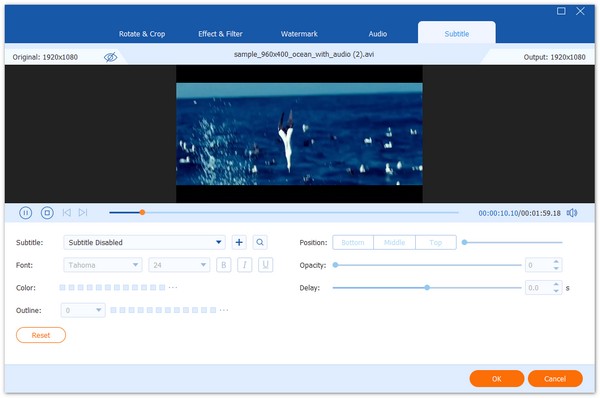
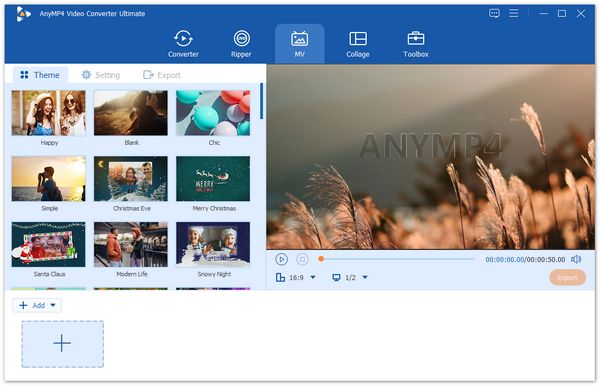
1. Open AnyMP4 Video Converter Ultimate, then proceed to the MV Editor tab. Next, import the video file to which you want to add subtitles by selecting Add.
2. Once the video file you want to edit has been added, click the Edit option, labeled with the Star icon.
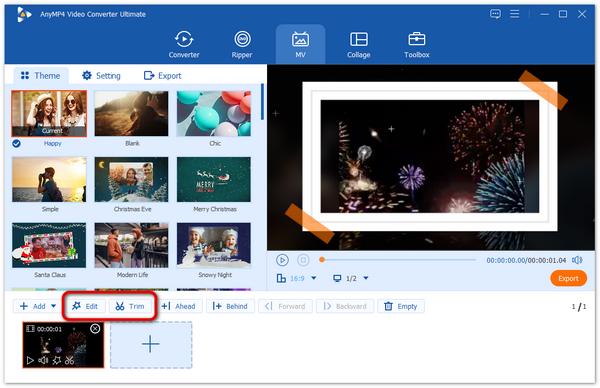
3. In the editing tab, go to the Subtitle menu. Then, click on the Add button beside Subtitle to add the subtitle file you want to embed. You may now use the other editing options to customize your added subtitle. Then, click on OK to confirm the added subtitle.
If you plan to enhance the quality of your videos, learning how to add subtitles is a great starting point. Fortunately, AnyMP4 Video Converter Ultimate offers a much more simplified option to add such captions.
What is the difference between captions and subtitles?
Captions and subtitles both serve to assist viewers with auditory difficulties. However, captions are more accurate since they include both speech and ambient noises such as a closing door or shattering glass. Meanwhile, subtitles only add text for dialogues.
How do I change the font and size of all subtitles at once in Premiere Pro?
You can do so using the Caption Track menu of the program. It can be found after the subtitle option has been added. You can edit font, size, and other setup options in that menu.
Can I import an SRT file and burn it into the video?
Yes, you can. This can be done using both editor tools, such as Premiere Pro, and multimedia tools, like AnyMP4 Video Converter Ultimate. SRT files require more setup but are more accurate.
Why are my auto-captions not accurate?
Several factors contribute to this issue. The most common issue is unclear audio. However, it can also be due to unsynced subtitles caused by speeding up the video in Premiere Pro.
Is it hard to add subtitles?
No, it is not. There are actually different options to do so. You may add subtitles during video editing or via media players.
Now that we have demonstrated three of the best tools for adding subtitles in Premiere Pro, we hope you will be able to add reliable captions and subtitles to the videos you edit in the program. To minimize the time required for video editing, you can also add subtitles directly to the local file using AnyMP4 Video Converter Ultimate, which can be downloaded below.
Secure Download
Secure Download
 Updated by Mark Cristobal to Edit Video
More readings
 5 Simple Ways to Remove Metadata from Media Files
Do you want the information of your files not to be spread before sharing it? Find out how to accomplish it using the Metadata Removal tools listed below.
 How to Add Subtitles to Instagram Stories, Reels, and Posts
Learn how to add captions to your Instagram Stories and Reels using the built-in sticker or third-party apps. Make your videos more engaging and accessible.
 How to Fix Subtitle Not Showing in VLC and Other Problems
Learn how to delay subtitles in VLC Media Player and different ways to adjust them, including extracting subtitles, syncing subtitles, and delaying subtitles.
 Best Way to Add Subtitles to MP4 Video Fastly
Have you ever be upset that there are no subtitles on your MP4 video? This passage will give you a detailed guide about how to add subtitles to MP4.