How to Record Voice on Mac: 6 Sweat-Free Ways
Macs are known for their intuitive user experience, making it effortless to record a quick voice memo or note. But when it comes to capturing professional-quality audio, the built-in tools alone often fall short. This is true when you’re using your MacBook microphone, recording internal system sounds, or producing vocal recordings. If you want high-quality audio or need to record internal audio directly from your Mac, relying solely on native apps can be limiting.
In this post, we’ll show you how to record voice on Mac using both built-in and third-party solutions. We will cover everything from quick voice notes to advanced vocal recording setups. You’ll learn how to leverage your MacBook microphone, capture internal audio, and ensure your recordings are clear and ready for any project.
|
AnyMP4 Screen Recorder |
Free Online Audio Recorder |
QuickTime Player |
Voice Memos |
GarageBand |
| macOS version |
Mac OS X 10.13 and later |
Online |
Mac OS X 10.15 and later |
Mac OS X 10.15 and later |
Mac OS X 14.4 and later |
| Best For |
Screen and audio recording with editing features |
Quick browser audio recording |
Basic audio recording |
Basic voice recording |
Multitrack recording |
| Mic Sound |
Yes |
Yes |
Yes |
Yes |
Yes |
| System Sound |
Yes |
Yes |
No |
No |
No |
| Cost |
Free with option to upgrade with a starting price of $12.45 per month |
Free |
Free and Pro ($30) |
Free |
Free |
| Editing |
Trim, Merge, Convert, Compress, and Edit ID3 tag and meta media information. |
No |
Trim, Rearrange, Rotate |
Enhance, Replace, Trim. |
Split, Cut |
Part 1. Can I Record Audio on Mac?
There are two types of audio record system on Mac: internal and external audio recording. So basically, you can record internal and external audio using built-in and third-party tools.
For internal audio, Mac has a native screen recording feature that allows you to capture system audio along with the screen video. It is useful for recording the sound from applications, games, or any other system-generated audio. However, recording internal audio directly, such as capturing the sound from the computer’s speakers without any accompanying video, may require third-party software, as the built-in options are geared toward screen recording.
Macs come equipped with a built-in microphone for external audio that can capture ambient sounds. You can use third-party audio recording software if you need higher quality or want to record from an external source like a microphone or an instrument. Additionally, USB or Thunderbolt audio interfaces can be connected to your Mac for capturing high-quality audio from external devices like microphones, guitars, or keyboards.
Part 2. How to Record Voice on Mac with AnyMP4 Screen Recorder
AnyMP4 Screen Recorder is a recording software bundle to capture MacBook microphone and to record system audio on Mac. It can record audio at high bitrates and sample rates to ensure clarity and depth. This is ideal for podcasts, interviews, and vocal content where audio quality matters. It also includes a built-in noise reduction that helps minimize background hiss and ambient distractions.
Furthermore, you can set a start/end time for automatic recording using the Scheduled Recording feature. After recording, the built-in editing tools lets you trim, cut, annotate, and export your audio in various formats. On top of that, it is compatible with the newest macOS versions, ensuring seamless performance and access to the latest audio enhancements Apple provides.
Use Case:
- • Scheduled recordings for meetings or webinars.
- • Recording high-quality podcasts on MacBook, iMac, or Mac Pro.
- • Capturing both microphone input and system audio simultaneously.
PROS
- It is compatible with the latest macOS versions.
- It supports dual-recording: microphone and system sound.
- It delivers high-quality recordings with noise reduction support.
CONS
- It requires a subscription for full functionality.
Here’s how to record internal audio on Mac using AnyMP4 Screen Recorder:
1. To begin with, Free Download this audio recorder for Mac. Install it on your Mac and ensure you complete the required installation process.
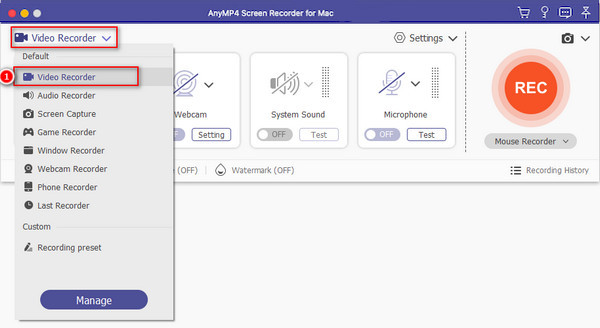
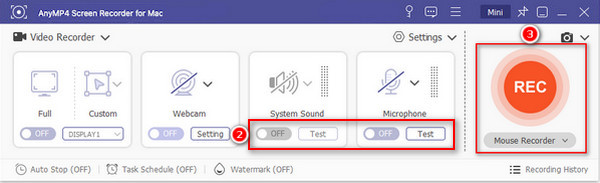
2. After installation, launch the AnyMP4 Screen Recorder and choose the Audio Recorder option from the top left corner of the main interface.
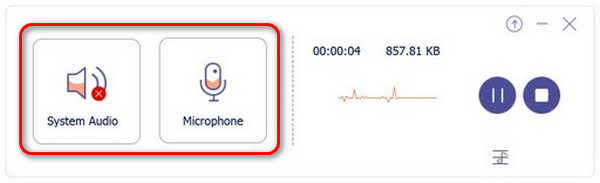
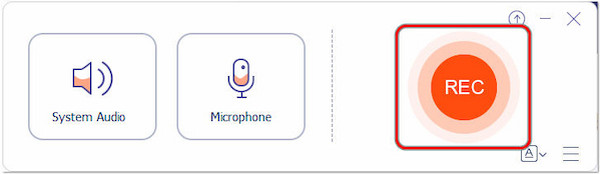
3. Before recording, configure the audio settings. Toggle the input source, such as system sound or microphone, select your desired file format, and choose the best audio quality.
4. Once settings are configured, click REC to initiate audio recording. Speak into the microphone or let the system audio play.
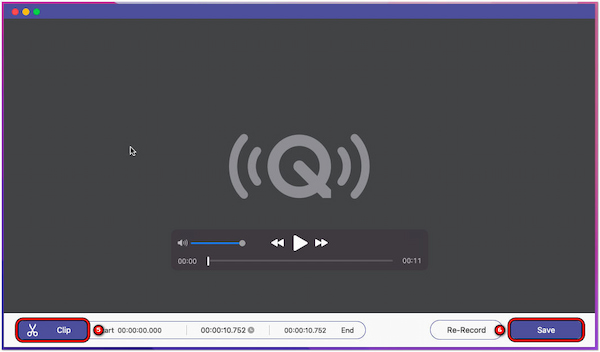
5. When you’re done recording, click the Red Square button. AnyMP4 Screen Recorder will prompt you to the Preview window.

6. Optionally, use the Clip tool to remove unnecessary recording. Once satisfied, click Save to export the audio recording on your Mac.
AnyMP4 Screen Recorder offers various tools for your recording needs. The Audio Recorder feature provides a straightforward solution for recording sound from internal and external audio. It has an intuitive interface, eliminating the hassle of clicking more options for audio recording.
Part 3. 2 Free, Native Mac Solutions to Record Voice on Mac
QuickTime
QuickTime is a multimedia software that comes pre-installed on macOS devices. It can be utilized to record voice on your Mac with ease. This makes it a handy tool for capturing voice memos, interviews, or any other audio content. It allows you to record from external sources like a microphone and internal sources like system audio.
Use Case:
- • Quick audio demos or feedback for collaborators.
- • Capturing interviews on MacBook, Mac Pro, or Mac Mini.
- • Recording lectures or online classes from microphone input.
PROS
- It comes pre-installed on macOS.
- It has a simple and easy-to-use interface.
- It can record internal or external audio (with minor setup).
CONS
- It has limited audio editing tools.
- It cannot record multiple audio sources on separate tracks.
Here’s how to record audio on Mac using QuickTime Player:
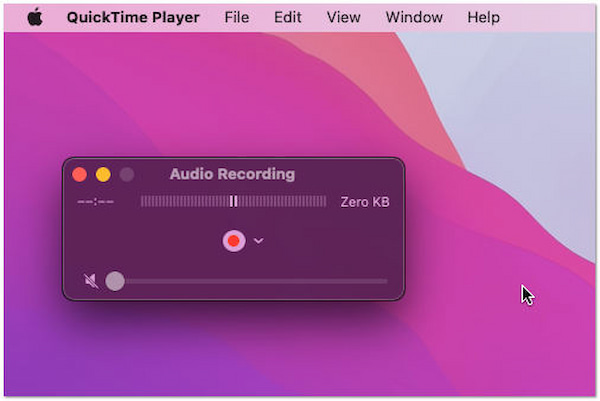
1. Launch QuickTime Player, click File in the menu bar, and select New Audio Recording.
2. Click the Small Arrow beside the Red Record button to reveal the drop-down menu. Choose the audio source, such as the built-in microphone or an external microphone.
3. Use the slider to adjust the input volume to your preference. Ensure the input source is correctly selected.
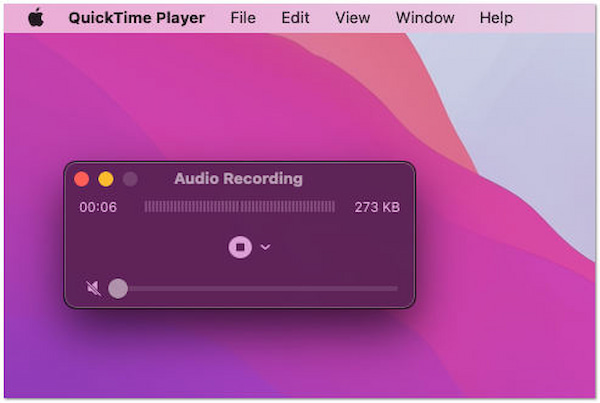
4. Click Red Record to start recording. Speak into the microphone or let the system audio play, depending on your chosen input source.
5. Once done, click the Square Stop button. QuickTime Player will display a playback window, and you can listen to your recording.
QuickTime Player saves the recording as a standard audio file, usually in the .m4a format. However, QuickTime Player does not support multi-track recording. Simply put, you cannot record multiple audio sources separately on different tracks.
Voice Memos
Voice Memos is another native app on macOS. It allows you to record and store audio clips directly on your Mac. It provides a seamless way to capture voice recordings without third-party apps. The ability to sync recordings across Apple devices through iCloud ensures convenience for users who want to access voice recordings from different Apple devices.
Use Case:
- • Capturing short interviews or conversations.
- • Recording quick voice notes on MacBook or iMac.
- • Recording spontaneous thoughts for podcasts or scripts.
PROS
- It is free and native on macOS.
- Automatic iCloud sync across devices.
- It offers a simple one-click voice recording.
CONS
- It cannot record system audio.
- It has limited audio quality options.
Here’s how to record a Voice Memo on Mac:
1. Open the Voice Memos app and click the Red Record button to start recording. While recording, speak into the microphone.
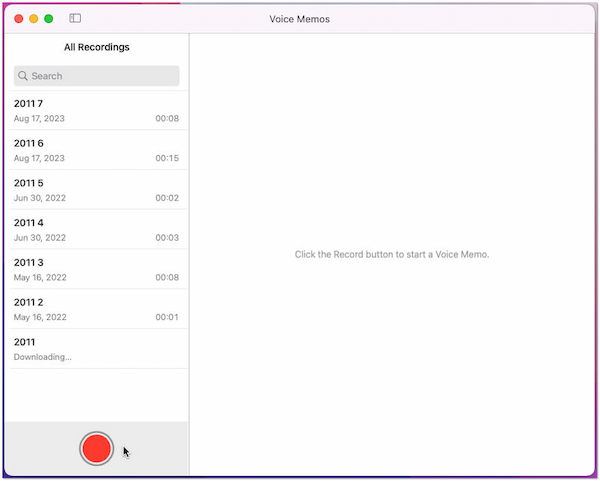
2. If needed, pause the recording by clicking the Pause button and resume later. Meanwhile, click the Square Stop button to end the recording.
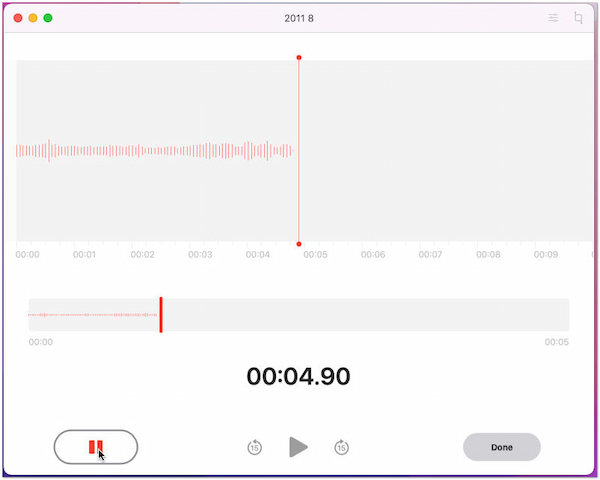
3. Voice Memos will automatically save the recording. Click the title to rename it if desired. If your iCloud is enabled, the voice recordings will sync across your Apple devices.
Check the more detailed information about recording Voice Memos on Mac here.
Voice Memos offers automatic synchronization with cloud services among the Apple devices. It ensures that your recordings are backed up and accessible across multiple devices. Despite that, it saves recordings in a specific format, which isn’t universally compatible with all devices or software.
Part 4. Free, Advanced & Editing Solutions to Record Voice on Mac
GarageBand is a versatile digital audio workstation developed by Apple. It is a powerful music creation tool and an excellent option for recording voice on your Mac. GarageBand supports both internal and external audio sources. It allows you to utilize your Mac’s built-in microphone or connect an external microphone for higher-quality recordings.
Use Case:
- • Recording professional music tracks or vocals.
- • Producing multitrack podcasts with background music.
- • Creating voiceovers for videos or animations on MacBook Pro.
PROS
- It is ideal for professional audio projects.
- It supports both internal and external audio sources.
- It offers advanced editing with multiple tracks, effects, and instruments.
CONS
- It can be complex for beginners.
- It requires familiarity with audio production concepts.
Here’s how to record sound on Mac using GarageBand:
1. Find and open GarageBand. When prompted to choose a project type, select Voice. In project settings, click Microphone in the control bar to choose your input source.
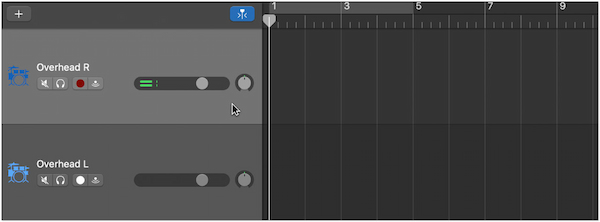
2. Use sliders to set input levels for optimal recording quality monitoring to avoid distortion. Click the + button, choose Audio, then click Create.
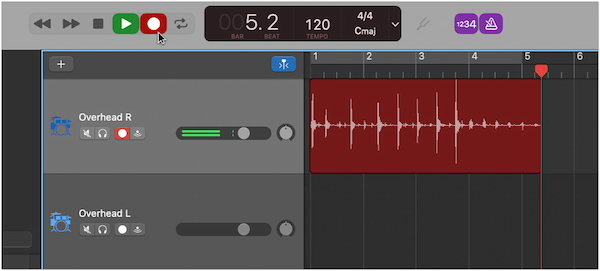
3. Hit Red Record to start recording. Speak into the microphone or perform your voiceover. Click the Square Stop button when done and playback to review the recording.
GarageBand is a versatile software for music creation and audio recording. It Includes several virtual instruments, loops, and sound effects to enhance audio recordings. But, it is not intended for beginners. GarageBand has a complicated interface and requires familiarity to handle it.
Part 5. Free Online Method to Record Voice on Mac
AnyMP4 Free Audio Recorder Online is a tool for securely recording high-quality sound from anywhere, such as computer systems and microphones. Its best feature is that it can record audio easily and quickly and is completely free! It is a useful option for individuals who want a simple and efficient method for recording audio on their Mac.
It can save all audio calls and conferences on your computer. In addition to computer audio, it also captures the voice spoken by the microphone, so you can use it to record notes or speeches. Furthermore, it has more recording extensions, such as ensuring the original audio quality while recording and allowing all recordings to be previewed and listened to in real time so that the user can decide to re-record or delete them.
Use Case:
- • Capturing system audio from online meetings or streams.
- • Recording voice notes quickly without installing software.
- • Saving podcast segments or audio clips from web sources on any Mac.
PROS
- It is free and easy to use.
- It requires no complex setup.
- It preserves original audio quality.
CONS
- It requires internet connection.
- It needs an AnyMP4 Launcher download.
Here’s how to record sound in Mac with AnyMP4 Free Audio Recorder Online:
1. Get started by clicking this link to the official AnyMP4 Free Audio Recorder Online website.
2. Within the AnyMP4 Free Audio Recorder Online website, click Start Recording to display the recording interface.
Reminder: After clicking Start Recording on this step, you will be reminded to download AnyMP4 Launcher first.
3. Follow the steps above to download the recording launcher on your computer. After it has been successfully installed, run it. Then, you can enable the system audio, microphone, or both as the audio recording source.
4. Click the REC button to start the audio recording. You can speak to the microphone or play the system audio.
5. When you’ve finished recording, click the stop button, and it will discontinue the audio recording and download it automatically to your MAC folder as MP3.

AnyMP4 Free Audio Recorder Online provides a download-free solution for recording audio on Mac. It eliminates the need for complex setups and offers a straightforward way to record audio with just a few clicks.
Part 6. FAQs about Recording Audio on Mac
How do I record audio from a website on a Mac?
You can use a recording tool like AnyMP4 Free Screen Recorder Online to record audio from a website on a Mac. It lets you capture video and audio from your screen, making it suitable for audio recording from websites. Please refer to the instructional guide above for the audio recording process.
Why can’t I record audio on my Mac?
You cannot record audio on your Mac for several reasons. First, ensure that the microphone is properly connected and functional. Check the system preferences to confirm that the correct input device is selected. If the issue persists, it could be due to privacy settings denying microphone access to the application you’re using for recording.
Can I record computer audio on my Mac using Audacity?
YES! You can record computer audio using Audacity on your Mac. However, Audacity doesn’t natively capture computer audio, so you need to install an additional tool or use Loopback to route the computer audio to Audacity. Set the audio input in Audacity to Loopback, and you can record both microphone input and computer audio simultaneously.
Can I trim recordings on Mac??
YES! Several Mac recording tools allow trimming. AnyMP4 Screen Recorder includes built-in editing features for trimming, cutting, and annotating recordings. QuickTime Player also lets you trim recordings after finishing, while Voice Memos offers basic trimming for voice clips.
Does it export to MP3 on Mac?
YES, but it depends on the app. AnyMP4 Screen Recorder and AnyMP4 Free Audio Recorder Online allow exporting in multiple formats including MP3, M4A, AAC, and WMA. Meanwhile, Voice Memos saves in M4A, which can be converted to MP3 using iTunes.
Conclusion
That’s all we have for how to record voice on Mac. In this post, you are presented with multiple options, from the simplicity of built-in apps to the versatility of third-party software like AnyMP4 Screen Recorder and AnyMP4 Free Screen Recorder Online. Regardless if you’re capturing the ambiance of a scenic location, conducting remote interviews, recording podcasts, or producing music, these six methods provide a comprehensive toolkit to suit various preferences and requirements. By using the built-in apps of your Mac or exploring third-party applications, you can elevate your audio recording experience. They ensure that every nuance of sound is captured and preserved. With these methods, the possibilities for creativity, communication, and documentation are virtually limitless.