Can I record Viber calls? Yes, you can!
Viber is a calling and messaging app that allows you to make voice and video calls. But unlike chats, spoken conversations can’t be revisited unless recorded. Recording your Viber calls can be incredibly useful if you want to save your chitchats. Although Viber allows call recordings, it comes with a limit. There are several ways to record Viber calls without restrictions. This post will demonstrate how to record entire calls without limitations. Regardless of your device, there’s an option available for you!

You can forget spoken words more quickly than in chat conversations, which can be reviewed by scrolling back. Fortunately, Viber allows you to keep a copy of your past discussions by recording them. It is ideal to look back at essential messages or discussions. However, you should be aware that Viber has a limited recording duration. The maximum recording time on Viber is 15 minutes only. This limit applies to both mobile apps and desktop versions. If you exceed this limit, Viber will automatically stop the recording.
Does Viber record calls on the computer? Yes, it does! But don’t forget that there’s a 15-minute recording limit.
If you want to record your entire conversation on a Viber call without a limit, use a dedicated Viber call recorder. AnyMP4 Screen Recorder is a one-stop screen recording software that lets you capture Viber calls. Be it an audio or video call, it can capture your Viber call separately. It also provides several recording modes designed for your specific recording needs. It also includes a Task Schedule feature, allowing you to automate the recording. You can set a start time and specify the stop time based on the recording length, size, or end time/date.
Here’s how to record Viber calls on a computer:
1. First, you need to download the AnyMP4 Screen Recorder for free. Install the Viber recorder and allow the installation process to finish. Once the installation is complete, immediately open the AnyMP4 Screen Recorder on your computer.
Secure Download
Secure Download
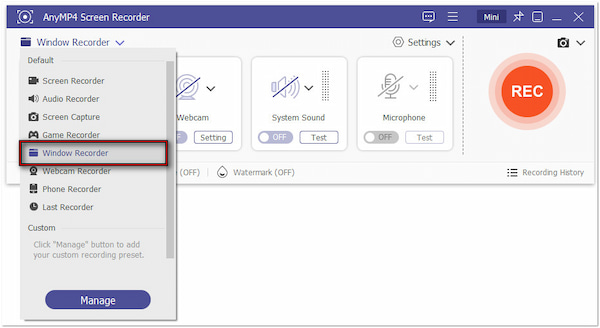
2. Upon opening the software, you will default to the Screen Recorder mode. Although it can capture Viber calls, there’s a separate mode for capturing the Viber window. Do you see the dropdown arrow next to the Screen Recorder? Click it and select the Window Recorder mode. This mode is optimized for recording specific window tabs.
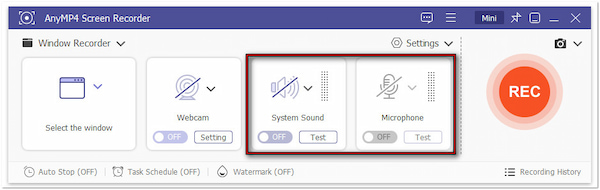
Professional Tip: A Viber international calls or local calls aren’t complete without your voiced conversation. So, you must turn on the System Sound to capture the in-call sound from Viber. Then, toggle the Microphone on to include your voice in the recording.
3. Proceed to the Select the Window tab and choose the Rakuten Viber in the Window section. Once selected, the entire Rakuten Viber window becomes the active recording area. Still, you can change the recording area by dragging the border’s edges in the preview.
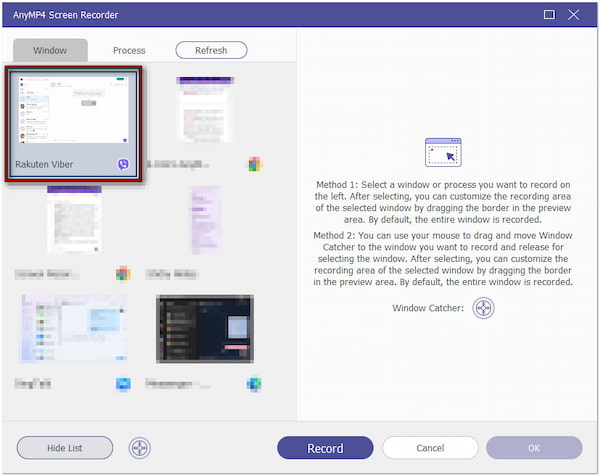
Alternatively, use your mouse and drag the Window Catcher to the window you want to record. After placing it, release your mouse to select the Rakuten Viber window.
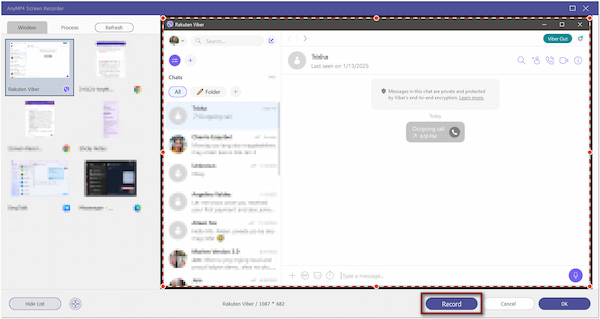
4. Once done with the recording settings configurations, click the Record button. The Rakuten Viber window will pop up, and a three-second countdown will begin. You’ll see a floating bar displayed somewhere on your screen during recording. This toolbar comes with tools that you can use to:
• Camera: Take screenshots of the Viber call while the recording is ongoing.
• Clock: Set an automatic recording limit based on length, size, or end time/date.
• Toolbox: Activate drawing and annotation tools like brush, text, image, callout, etc.

5. Once the Video call has ended, click the Red Square button to stop the recording. Doing so will save your recorded Viber call locally and take you to the preview window. From here, you can rewatch the recording and make some edits.
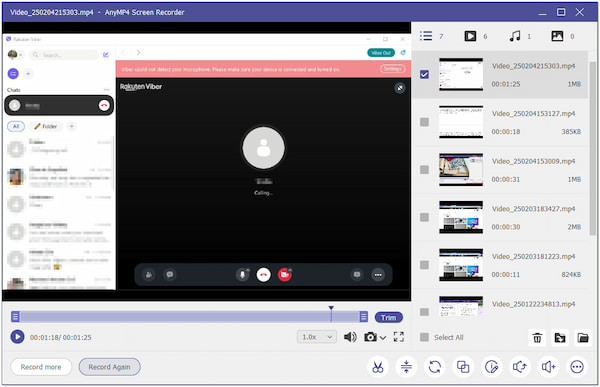
That’s how to record a call on Viber using AnyMP4 Screen Recorder. This software allows you to capture your conversation with high-quality video and audio. You can export the Viber call recording in various formats, including MP4, MOV, MKV, and more.
On iPhone, recording a Viber call is actually straightforward using the built-in screen recording feature. It is a go-to option to capture a conversation without needing extra apps. Aside from that, you can also use it to record audio on your iPhone.
Here’s how to record Viber calls on an iPhone:
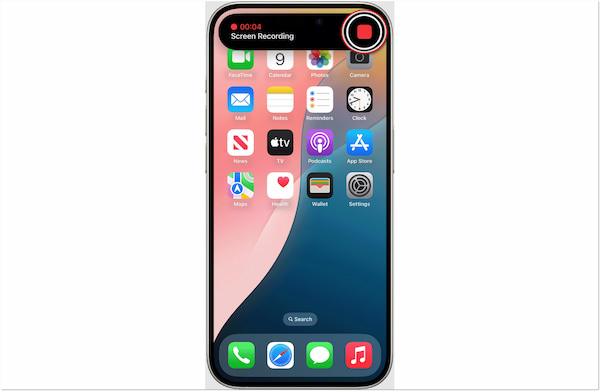
1. You swipe down from the upper-right of your display to access the Control Center. Tap the Gray Circle button to activate the recorder, and wait for the three-second countdown. Close the Control Center to get back to your conversation.

2. Once the countdown ends, everything happening on your display, including the Viber call, will be recorded. When you’re done, move to the top of your display and tap Screen Recording. It will end the Viber call and save the recording in the Photos app.
The iPhone’s built-in screen recording feature is a convenient tool to record any activities on your display. However, you should remember that some applications do not allow audio and video recording. Also, you can’t do screen recording and mirroring simultaneously.
Want to know how to record a phone call on an iPhone? Just check this out!
Most of the latest Android devices come with a built-in screen recording feature. It means you can even capture Viber calls without downloading a call recorder app for Android. In addition, the process can be done quickly, and even new Android users can follow the steps.
Here’s how to record a Viber video call on Android:
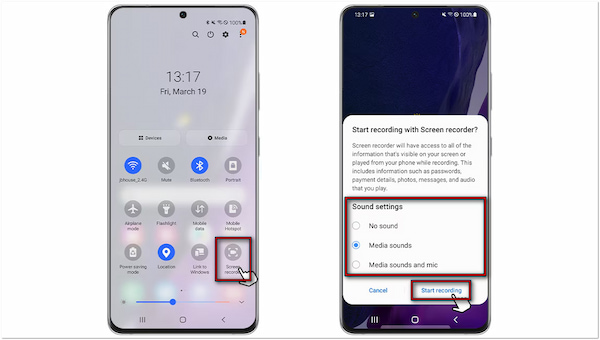
1. On Samsung, swipe down from your screen to open Quick Settings. Look for the Screen Recorder option and tap it to activate. In the popup menu, select your sound settings and tap the Start Recording option to proceed.
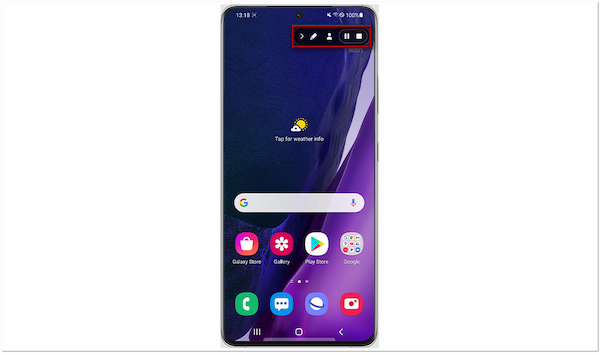
2. Once the Viber call recording starts, the Screen Recorder control bar will appear. You can find it in the upper-right corner of your screen, allowing you to Pause and Stop. Use the Pencil tool to write or draw on the screen if needed.
If you can’t find the Screen Recorder option in the Quick Settings, don’t worry. Just tap the three-dotted button and select Edit buttons. Then, tap and hold the Screen Recorder option to move the tool in the Quick Settings panel.
Recording calls is a practical way to keep your meaningful conversations. Due to the 15-minute limit of Viber call recording, many users are seeking an alternative solution to capture their entire conversations. iPhone and Android's built-in screen recording feature provides a simple way to capture Viber calls. If you want an unrestricted way to record Viber calls on your computer, AnyMP4 Screen Recorder is the best solution. It offers high-quality recording, multiple recording modes, and scheduled recording, ensuring you never miss a chitchat.
 Updated by Riley Mitchell to Record Video
Related Articles
 Top 5 Messenger Call Recorder Apps for iPhone and Android
How to record Messenger audio or video calls and keep them archive? Here are the best Messenger call recorder apps you can use on mobile and computer.
 What Is Mitel Call Recorder and How to Record Phone Calls in Mitel
Read and get the detailed information about Mitel call recorder. Here you can know what it is and how to use the Mitel MiVoice call recording feature here.
 [Solved] Top 5 WhatsApp Call Recorders to Record WhatsApp Call
How to record WhatsApp call? This post lists 5 great WhatsApp call recording apps to help you capture WhatsApp video and audio calls.
 Top 10 Skype Call Recorders to Capture HD Audio/Video with Ease
What are the best Skype call recorders to capture audio files and videos in a high quality? The article shares 10 best Skype recorders to save your calls.