Quick Summary:
If you shoot outdoors or make vlogs in public spaces, you may need to hide faces, brands, or sensitive information without consent. A common and effective video editing technique to address this is by adding a mosaic effect. It pixelates specific areas to obscure details while keeping the rest of the video intact. In this post, we will show you how to mosaic a video using four different methods. We aim to help you easily protect privacy, hide sensitive elements, or add a pixelated style to your videos without affecting the overall quality of your footage.
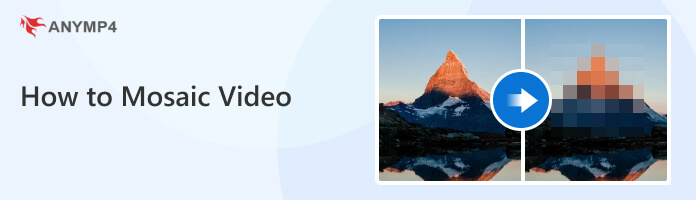
The mosaic or pixelation effect is a video editing technique that selectively blurs parts of a video by replacing them with enlarged, visible pixels. It creates a blocky, low-resolution appearance over the targeted area while leaving the rest of the video clear. Many editors used it to control the viewer's focus, conceal sensitive details, or add a unique style.
Key Uses Mosaic/Pixelation Effect:
Privacy Protection: The most common application of the mosaic effect is to protect privacy. Many editors use it to blur faces, license plates, or confidential documents in a video. It prevents sensitive information from being exposed to viewers.
Stylistic Effects: Beyond privacy, the mosaic effect can also serve as a creative tool. It can give videos a retro, pixel-art, or abstract look, adding a stylistic layer to your editing. It can emphasize motion, create suspense by partially hiding elements, or provide an artistic look.
Note on Compliance: Recently, platforms like YouTube and regulatory frameworks have strict requirements for Identifiable Information. Using a mosaic effect is a legal necessity when filming in public spaces without consent.
AnyMP4 Video Converter Ultimate is an all-around multimedia software bundle compatible with Windows and Mac systems. It features an MV editor with built-in effects and filters, allowing you to add mosaic effects to videos. It supports batch processing, allowing you to apply effects to multiple videos simultaneously and saving time during editing. In addition, it provides essential editing tools, including rotate, crop, flip, and trim. You can also enhance your project by adding background music directly in the editor. Once finished, you can export the final mosaic video in MP4, MOV, WMV, MKV, AVI, or GIF, with support for up to 4K resolution.
Here's how to add a mosaic to a video in AnyMP4 Video Converter Ultimate:
1. To begin with, secure a free download of AnyMP4 Video Converter Ultimate. Install the video mosaicking tool and complete the setup. Once you finish the installation, open the software to view the dashboard.
Secure Download
Secure Download
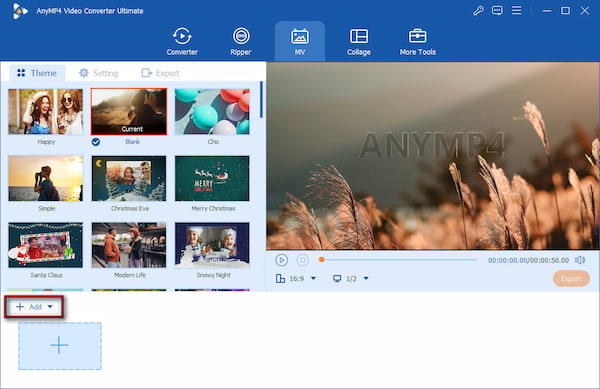
2. By default, it opens to the Converter. From the main interface, click the MV tab located in the top menu. Click + Add to import the video file you want to apply a mosaic effect to. You can add one or multiple files to process them in a batch.
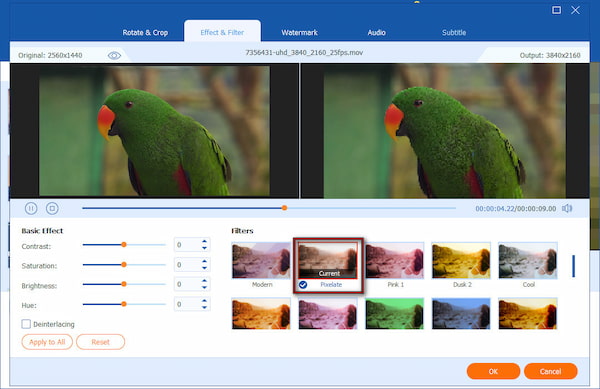
3. Select one of the uploaded videos and click Edit to open the editing panel. Navigate to the Effect & Filter tab inside the editor. Scroll through the available filters and select the Pixelate effect. This filter creates a static mosaic look that pixelates parts of the video frame.
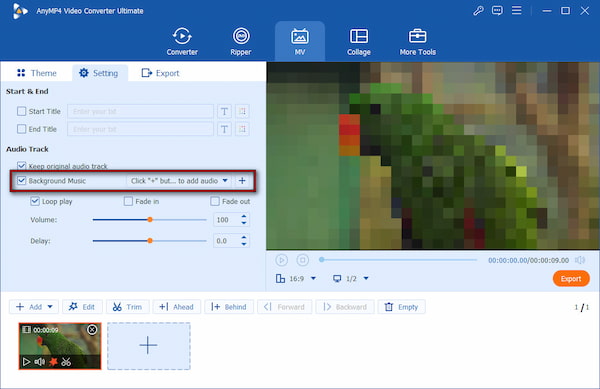
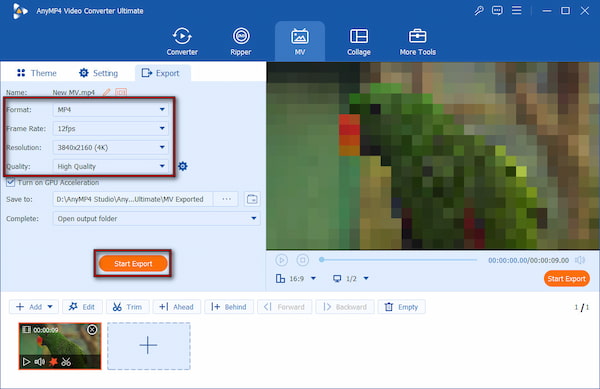
Return to the MV interface and move to the Settings section. Check the Background Music option and click + to upload an audio file. You can also adjust volume and delay for better synchronization.
4. Switch to the Export tab to configure your output settings. Choose your preferred format (MP4, MOV, WMV, MKV, AVI, or GIF) and the desired resolution. After adjusting the settings, click Start Export to save the final video with the mosaic effect applied.
AnyMP4 Video Converter Ultimate makes adding a static mosaic effect quick and beginner-friendly. Use its MV editor, batch processing, and editing tools to pixelate videos for privacy or creative style easily. However, there is no option to mosaic only a specific area or object in the video. Instead, the pixelate effect will cover the whole screen throughout the clip.
CapCut is an established video editing tool known for its beginner-friendly interface and powerful editing features. It provides various effects, masks, and tracking tools. You can use these tools to add a mosaic to a video or blur effects to specific areas.
1. Launch CapCut on your computer and click Upload to import the video you want to edit. Once imported, drag the video onto the timeline to begin editing. Navigate to the Effects tab and select Video Effects. In the search bar, type Mosaic.
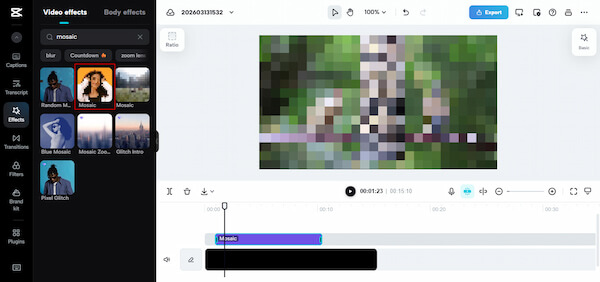
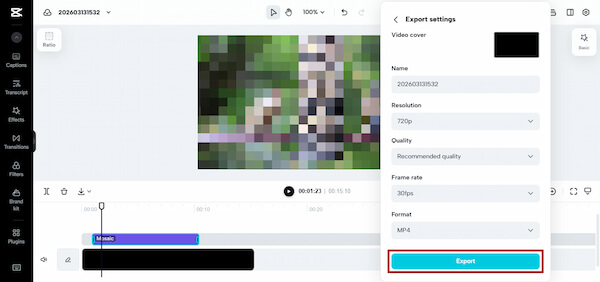
2. Drag the Mosaic effect onto the timeline, then adjust its duration. After applying the mosaic effect, click Export, select Download, and configure output parameters. Then, click Export to save the final version with the mosaic effect applied.
CapCut offers a convenient static mosaic effect to hide faces or sensitive details. Using this video pixelation tool, you can easily pixelate the entire video. However, blurring specific areas or setting a blur to follow a moving subject requires additional masking and tracking adjustments.
If you need a more direct method, learn how to blur faces in videos here.
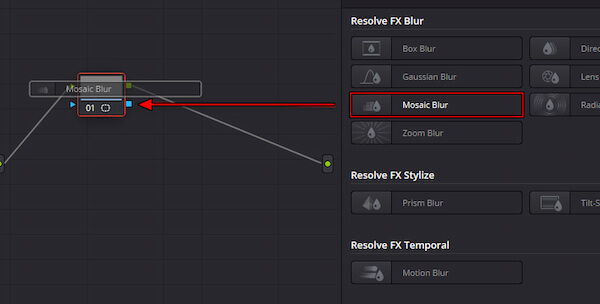
DaVinci Resolve is a professional tool used for advanced video correction, compositing, and visual effects. With it, you can combine Power Window masks, blur effects, and motion tracking to create a motion tracking mosaic effect.
1. In DaVinci Resolve, add the video and drag it to the timeline to build your sequence. Move to the Color tab to begin applying the blur or mosaic video effect. In the middle toolbar, locate the Power Window tool and click it. Choose a shape and place the mask over the face or object you want to blur.
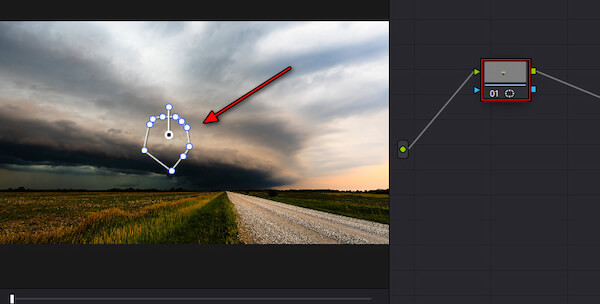
2. To create a motion tracking mosaic effect, you need to track the mask so it follows the subject. Click Track Forward to analyze the clip. For a pixelated mosaic look, click Effects near the Nodes panel to open the Effects Library. Use the search bar and type Blur. Then, drag the Mosaic Blur effect onto the node.
DaVinci Resolve delivers powerful, precise pixelation, especially for moving subjects. However, you need time to learn the Color page, masking tools, and tracking features. Once learned, these tools let you pixelate a video with professional-quality precision.
Final Cut Pro is Apple's professional video editing application for advanced editing. It includes built-in blur and pixelate effects, so you can use it as face-blur software to hide faces, protect privacy, or create stylized visual effects in videos.
1. Open Final Cut Pro, load the video clip, and drag it onto the timeline. Next, open the Effects panel and navigate to Blur to access the available blur options. Choose the blur effect you want and drag it directly onto the face you want to blur in the video.
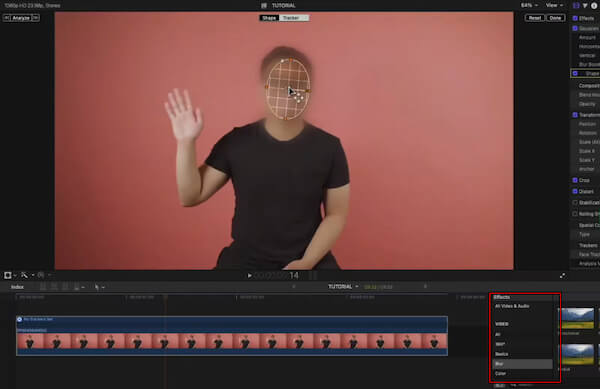
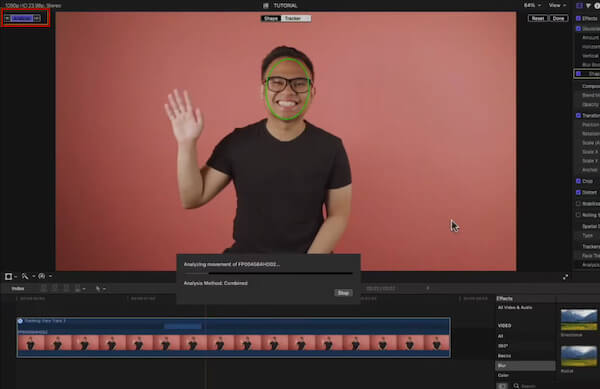
2. A blurred shape will appear over the selected area. To refine the blur region, click Shape, then adjust the anchor points to match the face's shape. After positioning the blur shape, click Analyze to scan the clip and track the selected face's movement.
That's how you can blur a face in a video using Final Cut Pro with its built-in tracking and blur tools. But how to make a video mosaic? If you prefer a mosaic-style blur, you can pixelate a video rather than use a standard blur.
If you want more powerful video editor effects and tools, discover them here.
Q1: What is the difference between blur and mosaic (pixelation)?
A1: Blur smooths out details by blending neighboring pixels, creating a soft, out-of-focus look over the selected area. Meanwhile, mosaic (pixelation) replaces the selected area with large, visible blocks of pixels, giving it a blocky, pixelated appearance.
Q2: How do I blur a moving face in a video?
A2: To blur a moving face, you need motion tracking tools in your video editor. Editors like DaVinci Resolve, Final Cut Pro, and CapCut include built-in tracking tools that make this process much more efficient.
Q3: What is the best free mosaic video app?
A3: For free mosaic or pixelation effects, CapCut is the best option. It is user-friendly, supports both blur and pixelation, and includes motion tracking to keep effects aligned with moving subjects. It stands out for its simplicity, tracking features, and mobile/desktop accessibility.
Q4: Does adding a mosaic reduce video file size?
A4: Adding a mosaic effect does not inherently reduce video file size. In fact, applying effects like mosaic or blur can increase file size because the video editor stores additional visual information for each frame.
Q5: Can a mosaic effect be removed after the video is exported?
A5: No. Once a video is rendered and exported with a mosaic effect, the original pixels are permanently replaced by the blocky pixelation. This is why it is used for high-security privacy; it is a destructive edit that cannot be reversed.
Applying a mosaic effect is an essential skill for protecting privacy, hiding sensitive information, or adding a creative pixelated style to your videos. Whether you need to blur faces or sensitive information, understanding how to mosaic video makes editing faster and more precise. With the right tools, you can easily apply, adjust, and even track mosaic effects on moving subjects. For a simple and powerful solution, use AnyMP4 Video Converter Ultimate. It lets you add mosaic effects, trim, crop, and enhance your videos, and export them in high-quality formats.
Secure Download
Secure Download
 Updated by Mark Cristobal to Edit Video
More readings
 Top 4 Easy Ways to Blur a Video on Computer/Mobile or Online
Want to improve privacy by blurring faces, logos or objects in a video? This tutorial shows you the easiest way to do it on a computer or a mobile device.
 Use 3D Filters on Snapchat, Instagram, TikTok, and Facebook
Did you know that there are 3D filters on Snapchat, Instagram, TikTok, and Facebook? Discover the rarest of features of these apps in this blog article post.
 3 Workable Ways to Convert Video to Sketch Effortlessly
Do you want to make your video into a sketch? If yes, learn how to turn a video into a sketch with the three tools listed here.
 Top 4 Video Filter Editors to Polish Video Online or Offline
Here is a list of a few best video filter editor apps available on the App Store and Google Play Store (Free, Paid), and computer.