The best way to manipulate time in our videos is through Time-lapse or speeding up the playback speed. It is a cool technique, functional, and useful for storytelling. Time-lapse videos are a great way to add interest to your social media content by documenting something our eyes can’t easily catch up with. This post will show you how to make a Timelapse video using the Time-lapse mode on an iPhone camera and turn a standard-speed video into a Timelapse video using a third-party app. To learn more about the procedures, read this post until the end.

What is a Timelapse video? A Timelapse video is made by taking pictures at regular intervals to record the changes in something too slow for the human eye to notice. Simply put, it is a sequence of still images taken over some time (hours, days, weeks, months, or years). Then, it will be sped up in seconds or minutes to show how quickly things change.
Generally, Timelapse videos capture natural phenomena that may be too slow to be observed by our eyes. For instance, a flower blooms for several days, or a cloud moves in the sky. As mentioned, this is a series of still images captured at regular intervals, often at a high frame rate. Time-lapse videos can have an effect that might be impossible to achieve. To conclude, the Time-lapse process is taken over a long period, and the frames are viewed quickly.
iPhone’s default camera app consists of a Timelapse mode that you change to the same way you switch between video and photo mode. When you choose Timelapse mode, the app will record video with a frame rate of 1 to 2 fps (frame per second) instead of 30 fps. Once you regularly play the Time-lapse video, everything will move faster than usual. The flower will bloom fast, and clouds will appear as if running across the sky. With Time lapse video, prolonged events will seem to happen much faster. The iPhone’s camera app does all the work, yet you must set it up correctly. Here’s how to make a Timelapse video on an iPhone:
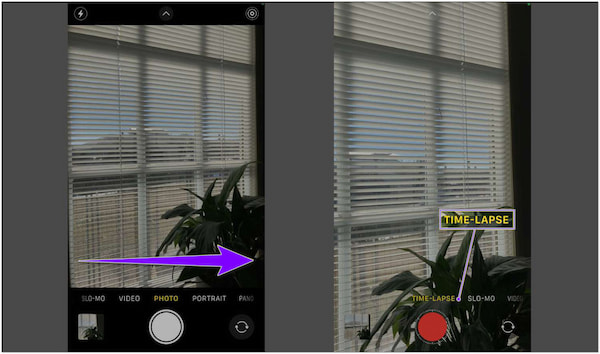
1.Open the Camera and select the TIME-LAPSE mode.
2.Set up the iPhone where you want to take the scene in motion.
3.Tap the Record button to begin the recording. Once done, tap the Record button again to stop the recording.
For iPhone 12 and later models, you can use a tripod to shoot Time-lapse videos in more detail and brightness when recording in low-light situations.
Besides recording a video via camera, you can also use the iPhone default recorder to capture iPhone screen effortlessly.
iMovie is a video editing app developed by Apple Inc. for all Apple users. It comes with various features to create and edit videos as needed. Some of the app’s features include cropping and rotating videos, stabilizing video shakes, adding transitions to videos, and changing regular videos to Timelapse.
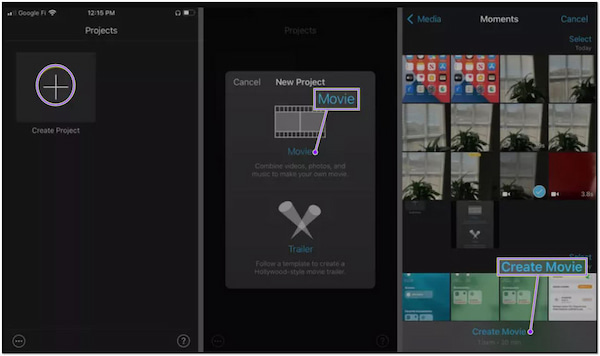
1.On your iPhone, launch the iMovie app, then tap Create Project, followed by Movie Opt. Tap the video clip you wish to turn into Timelapse, then tap Create Movie.
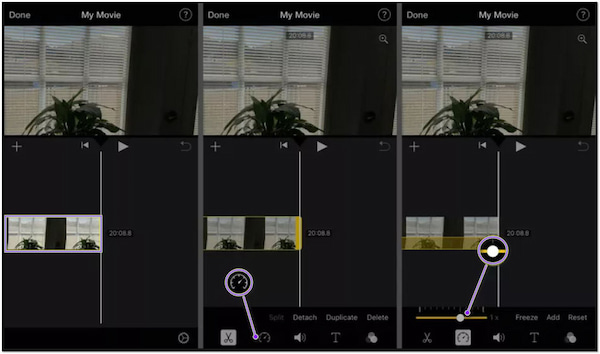
2.Tap the uploaded video clip on the timeline and select the Clock on the bottom left-hand of your screen afterward. Next, tap and drag the Slider to the right to speed up the video clip.
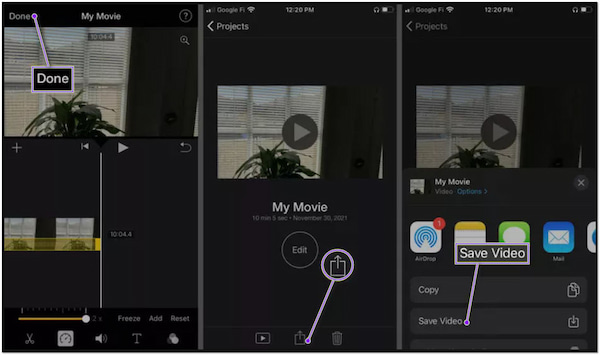
3.Once finished, tap Done from the upper right-hand side of the screen, then tap the Share icon followed by Save Video. Please wait for the video to be exported, and in a few seconds, the video clip will be available on the Camera roll when it’s finished.
Performing a Timelapse video in iMovie will only double the speed of the actual video to slow down the video in iMovie. In addition, the process will take up a lot of space from your storage. It is necessary to clear up space on your device to export the video without any trouble.
For non-Apple users, you can convert video to timelapse even if your device doesn’t support this feature. So, if you have a recorded video saved on your device, AnyMP4 Video Converter Ultimate can do the magic for you!
AnyMP4 Video Converter Ultimate is a versatile video editing solution that turns a standard-speed video into a timelapse. How is that possible if it is a Video Converter?
Though the name indicates that it is a video converter, it is infused with a Toolbox that contains over 20+ powerful tools, including Video Speed Controller. This feature can change the playback speed of your video to desired speed, from 0.125 times up to 8 times faster than its regular speed. It also offers presets of aspect ratios, such as Square, 9:16, 16:10, and more.
After editing your video clip, AnyMP4 Video Converter Ultimate allows you to export your output to the highest resolution, up to 8K.
Want to make one? Refer to the instructional guide below to learn how to turn a video into a Timelapse mode.
1.Beforehand, download the AnyMP4 Video Converter Ultimate by clicking the Free Download button below. Next, install it on your available OS and launch it afterward. Not to mention, AnyMP4 Video Converter Ultimate is available with both Windows and macOS. So, you better watch by clicking the right button below.
Secure Download
Secure Download
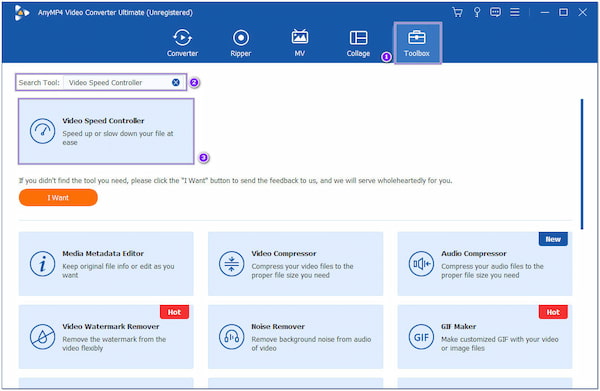
2.Next, hover your cursor over the Toolbox tab, search for the Video Speed Controller tool, and click it.
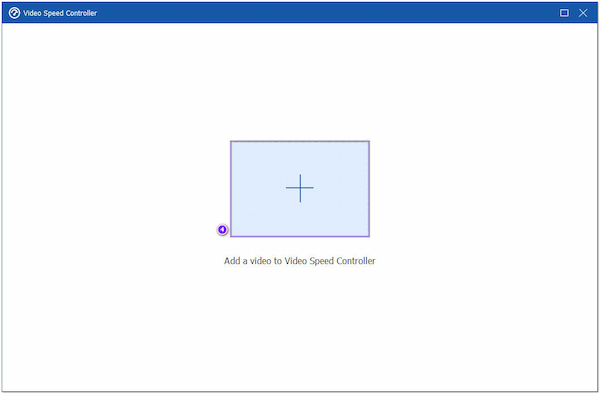
3.After clicking it, a new window will appear on your screen. Click the Plus icon to import the standard-speed video you wish to turn into a Timelapse from your local file.
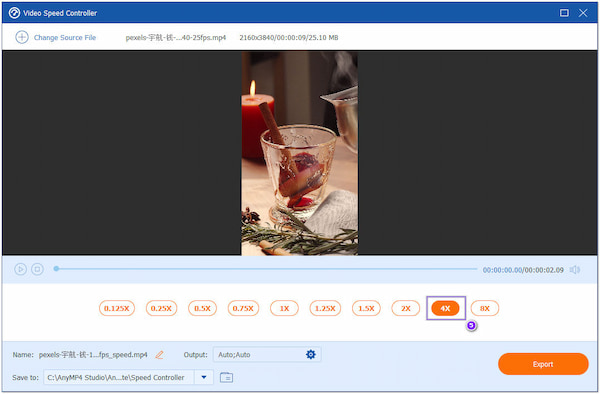
4.Once the video clip is loaded into the program, select 4× from the presets of the video playback speed. It is the recommended speed for achieving the Timelapse effect.
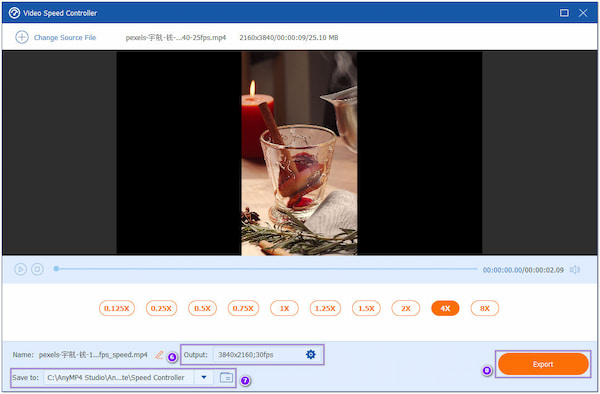
5.Once done, modify the video settings and choose the file destination where you want to save the pre-output. Lastly, click the Export button to save the Timelapse video on your computer.
Timelapse video is projected at a speed of 30 fps. The frame rate of the Timelapse video can be determined in the video settings under video resolution opt.
Can I make a timelapse video slower?
When using the Timelapse mode, the camera automatically chooses the Time-lapse speed. That means there is no way for you to change the speed, particularly slowing it down. If you desire to make the Timelapse video play at a slower speed, you can use AnyMP4 Video Converter Ultimate and follow the steps above. Instead of selecting four times, choose 0.125 times to achieve the desired speed.
How long is an hour in Timelapse?
An hour of recording video in Timelapse mode would play back in 2.5 minutes.
Can you slow down a Timelapse video on iPad?
Yes, you can slow down a Timelapse video using your iPad. Using the iMovie app, follow method two on the part 2 outline of this post. Instead of sliding the speed to the right, slide it to the left for a slow-down Time lapse video.
With the help of our instructional guide, you now know the answer to the question: Can you turn a video into a Timelapse? If you are using an iPhone, downloading such an app is unnecessary, as you can record Time lapse video using the default camera of your app. However, if you’re a non-Apple user and want to turn your recorded video into a Time-lapse, AnyMP4 Video Converter is a must-have program.
 Posted by Angelica Liwanag to Edit Video
 More readings
 3 Workable Ways to Convert Video to Sketch Effortlessly
Do you want to make your video into a sketch? If yes, learn how to turn a video into a sketch with the three tools listed here.
 Top 10 Birthday Video Maker for All Platforms
Looking for a program to make a Birthday video for your loved ones? We have listed the best programs to help you produce unique Birthday videos here.
 Create a Video Trailer with Top 3 Movie Makers
Want to learn how to make a movie trailer effortlessly? If yes, you are in the right place! Check the three methods we have listed in this post!
 How to Go Viral on TikTok and Get a Million Views Real-Quick
Want to learn how to make your TikTok go viral? If yes, discover the tips and tricks listed in this post. Check them out now!