How to Take Scrolling Screenshots on Mac in 4 Ways
Nowadays, capturing moments, information, and inspiration is a common necessity. Yet, when it comes to take scrolling screenshots on Mac, many users face a challenge. Whether it’s capturing an entire webpage, a lengthy document, or a detailed design, the standard screenshot methods often fall short. In this post, we will explore how to seamlessly capture those elusive scrolling screenshots on your Mac, shedding light on how these tools can significantly enhance your screenshot capabilities.

Part 1. How to Take a Scrolling Screenshot on Mac Via Hotkeys
Hotkeys are a fast way to capture screenshots without opening any additional applications. You can use hotkeys to create a scrolling screenshot on Mac quickly. Different hotkeys cater to various screenshot requirements. These hotkeys are built into macOS, which you can use to capture an entire screen, specific windows, or custom-selected areas.
1.Open the webpage or document.
2.Press Command + Shift + 4.
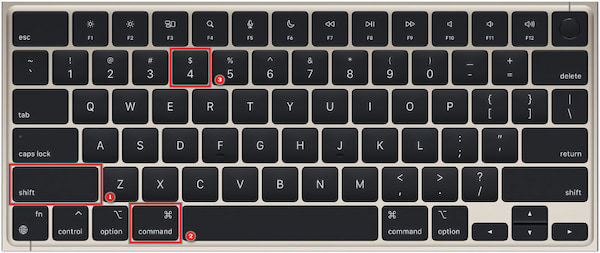
3.Press the Spacebar to activate the camera cursor.

4.Hover over the area and click to capture. Hold Option for scrolling capture.
5.Release the mouse button to save on your desktop. (Screenshots are not saved on Mac?)
Hotkeys allows you to perform various actions quickly, including taking a scrolling screenshot. However, remembering numerous hotkey combinations can be challenging, particularly if you use many applications with different shortcuts.
Part 2. How to Take a Scrolling Screenshot on Mac Via QuickTime
Can you scroll while taking a screenshot on Mac? YES! through QuickTime. Besides playing, recording, editing, and streaming audio and video files, it allows you to take screenshots and record your screen.QuickTime is a native macOS application, so there’s no need to install additional software.
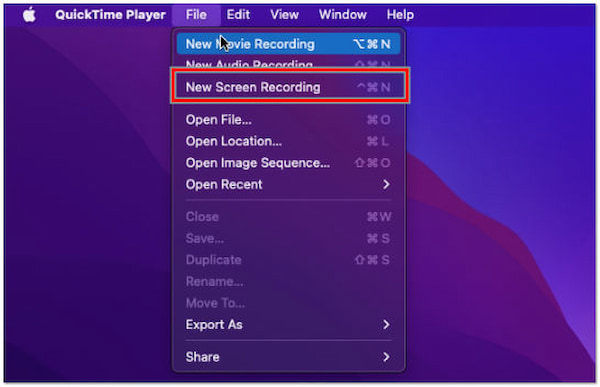
1.Open QuickTime Player. Click File and select New Screen Recording.
2.If prompted, select your Mac’s built-in camera, then choose None for the microphone.
3.Open the content to capture and click the Record button.
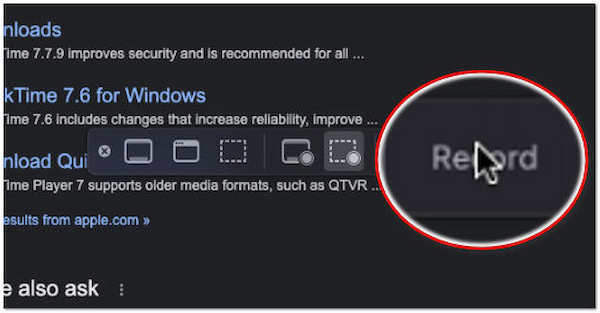
4.Scroll through the content and stop the recording once done. Save it as a video file.
QuickTime is a simple and built-in solution for taking screenshots on a Mac, particularly if you need to capture the entire screen or specific screens in a multi-monitor setup. However, the scrolling screenshot will be saved as a video file, not in image format.
Part 3. How to Take a Scrolling Screenshot on Mac Via Preview
Preview is a built-in macOS application and a versatile tool for viewing, editing, and managing various files, including PDFs, images, and documents. It comes pre-installed on Mac. Among its many features that many users didn’t know about, it allows you to capture scrolling screenshots on Mac.
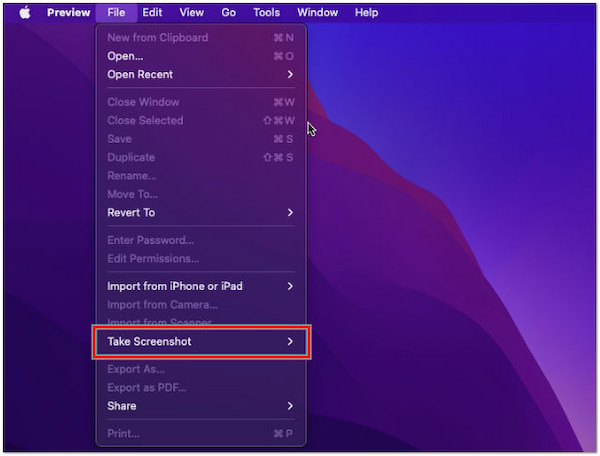
1.Open the webpage or document.
2.Take a regular screenshot with Command + Shift + 4.
3.Select the area to capture.
4.Click the Preview in the corner.
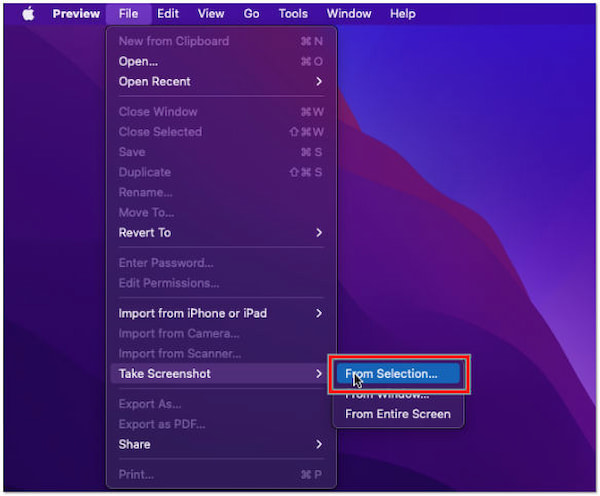
5.In Preview, go to File and select Take a Screenshot.
6.Choose From Selection to capture the scrolling content as an image.
Preview is a built-in tool for taking screenshots on macOS, offering versatility and basic editing capabilities. However, Preview doesn’t provide a built-in timer or delay feature for capturing screenshots after a specific delay.
Part 4. How to Take a Scrolling Screenshot on Mac Via Safari
How to do a scrolling screenshot on Mac browser? Safari is the browser on Mac and iOS devices by default. Safari has a built-in screenshot capture feature that lets you easily capture web content and pages. Besides that, it provides basic editing tools for cropping, resizing, and annotating screenshots.
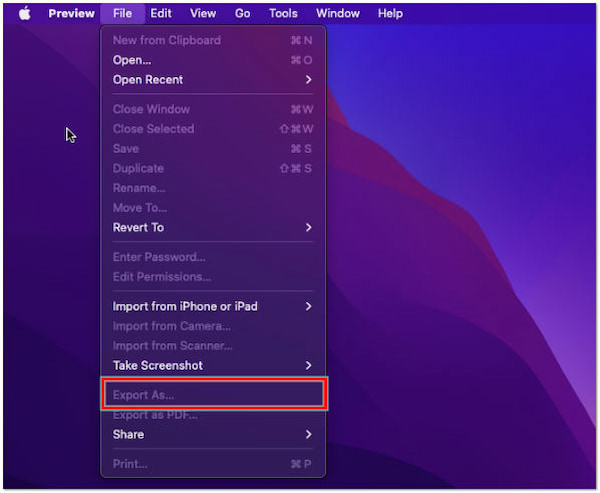
1.Open the webpage, go to File, and choose Export as PDF.
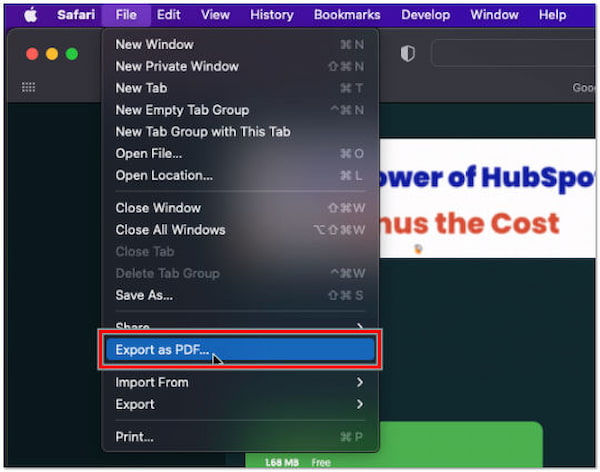
2.Save the PDF and open it in Preview.
3.In Preview, go to File and select Export to convert it to an image format.
Safari’s built-in screenshot feature is convenient for capturing web content and pages. It offers basic editing features but may not be as versatile as dedicated screenshot applications for capturing content outside the web browser.
AnyMP4 Screen Recorder for Mac: Your All-in-One Screenshot Wizard!
Are you ready to capture your screen in stunning detail and unparalleled clarity on PC? Look no further than AnyMP4 Screen Recorder for Mac, the ultimate tool for taking scrolling screenshots like a pro on Windows 11/10/8/7!
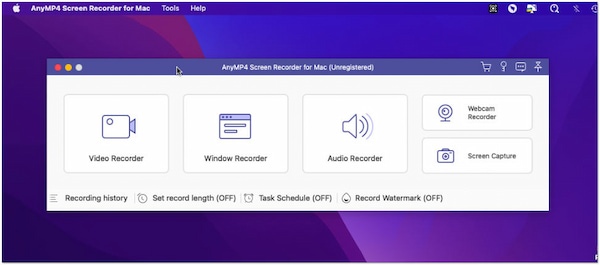
Why Choose AnyMP4 Screen Recorder for Mac for Screenshot Magic?
- Crystal-Clear Precision: With AnyMP4, every screenshot is a masterpiece. Our advanced technology ensures pixel-perfect precision, capturing even the tiniest details in your screen’s content.
- Unmatched Flexibility: Be it a single window, a specific region, or the entire screen, you can choose exactly what you want to capture. No limits, no compromises.
- Scheduled Capture: Need to capture screens at specific times? Set up schedules easily and let AnyMP4 work for you, even when you’re away from your computer.
- High-Quality Output: Whether you need a screenshot for work, presentations, or personal use, AnyMP4 delivers uncompromising quality in every shot.
- No Watermarks, No Hassles: Say goodbye to annoying watermarks on screenshots. AnyMP4 ensures your images remain pristine and professional.
Transform your screen captures from dull to appealing with AnyMP4 Screen Recorder for Mac. Don’t settle for less when you can have the best. Download now and experience the magic of screenshots like never before!
Part 5. FAQs about Taking a Scrolling Screenshot on Mac
How do you take a screenshot on a Mac Ctrl Shift?
Ctrl + Shift is not a standard keyboard shortcut for taking screenshots on Mac. The standard shortcuts for taking screenshots involve using the Command and other keys, such as Shift, Control, and number keys.
What is the quickest way to take a screenshot on a Mac?
The quickest way to take a screenshot on a Mac is to use the following keyboard shortcuts:
The quickest way to take a screenshot on a Mac is to use the following keyboard shortcuts:
Entire screen: Command + Shift + 3.
Selected screen portion: Command + Shift + 4, then choose the area you want to capture.
How do I enable floating screenshots on Mac?
Press Shift + Command + 5, and you’ll encounter a floating toolbar. When you click on Options, you’ll discover the ability to turn the floating thumbnails on or off.
What shortcut is to take a screenshot on a Mac and paste it?
To take a screenshot on a Mac and immediately paste it, you can use the following keyboard shortcut:
Entire screen to the clipboard: Control + Command + Shift + 3.
Select screen portion and copy it to the clipboard: Control + Command + Shift + 4, then select the area you want to capture.
How do you paste a screenshot on a Mac into an email?
To take a screenshot on a Mac and paste it into an email, follow these steps:
Use the appropriate screenshot keyboard shortcut to capture the desired screen content.
The screenshot is copied to your clipboard.
Open your email application and compose a new email.
In the email body, right-click where you want to insert the screenshot.
Select Paste from the context menu; the screenshot will be pasted into your email.
Conclusion
In a world where visual communication reigns supreme, the ability to take scrolling screenshots on Mac is invaluable. Whether preserving web content, archiving important information, or sharing intricate designs, this guide has equipped you with the knowledge to achieve these tasks effortlessly.
But remember, you don’t have to limit yourself to the basic methods provided by macOS. AnyMP4 Screen Recorder for Mac stands as a powerful ally in your digital arsenal. Its comprehensive features, including the ability to capture high-quality content, make it a standout choice for Mac users seeking efficiency, precision, and versatility in their screenshot endeavors.