Scrolling screenshots in Windows can be incredibly useful when you want to capture an entire webpage, a lengthy document, or any content extending beyond a single screen. While Windows doesn’t natively offer a built-in feature for capturing scrolling screenshots, various methods and tools are available to help you achieve this. One such tool, AnyMP4 Screen Recorder, can simplify the process and provide a comprehensive solution for capturing scrolling content. In this post, we will explore how to take scrolling screenshots in Windows using different methods and focus on utilizing the capabilities of AnyMP4 Screen Recorder.
AnyMP4 Screen Recorder is a versatile screen recording software designed to empower you with efficient screen recording and capturing capabilities. Beyond its primary screen recording function, it offers a Snapshot feature that enables you to effortlessly capture scrolling screenshots on Windows, making it an essential tool for various professional and personal needs. Whether archiving important online information, creating comprehensive guides, or preserving memorable moments, this feature ensures you don’t miss any details.
Moreover, the AnyMP4 Screen Recorder’s Snapshot feature goes beyond traditional screenshot tools by capturing lengthy web pages, documents, and other scrolling content in a single image. AnyMP4 Screen Recorder doesn’t stop at capturing screenshots; it also equips you with Video, Audio, Game, Window, Webcam, and Phone Recorder. Additionally, it has a built-in editor to annotate and enhance your captures. Add text, arrows, shapes, and images to highlight important points.
Here’s how to take scrolling screenshots in Windows 11/10/8/7 using AnyMP4 Screen Recorder:
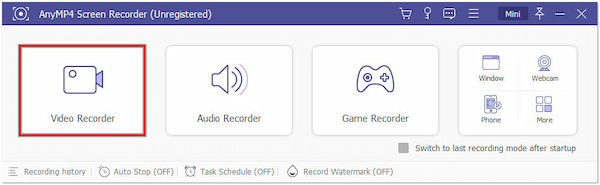
1. Get started by clicking the Free Download button to obtain the program. Install AnyMP4 Screen Recorder and launch it on your Windows.
Secure Download
Secure Download
2. Choose the Video Recorder from the selection of available recorders.
3. Click the Camera dropdown menu and select Scrolling Window.
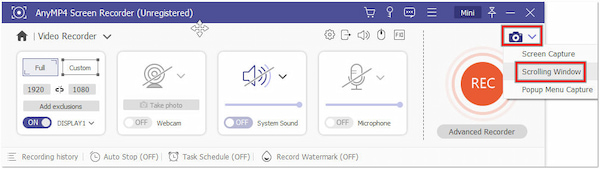
Press the Ctrl + Alt + C keys to enable the scrolling screenshot.
4. Place the region box on the area you want to capture.
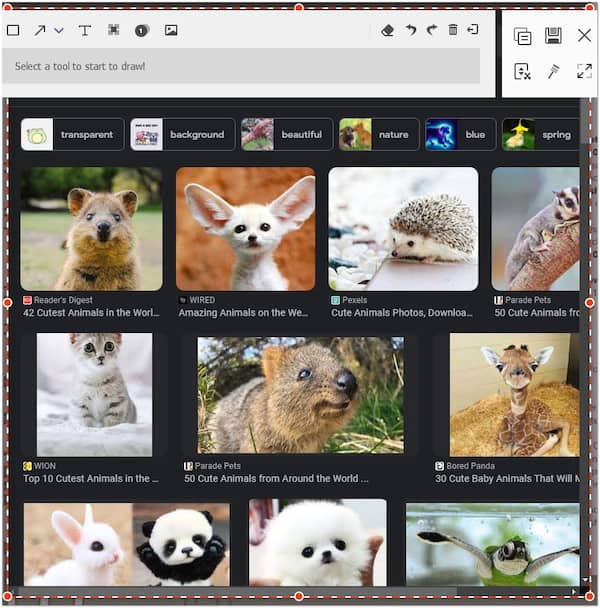
5. Use the Mouse Wheel or the Spacebar key to scroll the page.
6. Once you’ve scrolled through the content, press the Esc key.
AnyMP4 Screen Recorder offers an efficient solution for capturing scrolling screenshots on Windows. The seamless workflow and customizable capturing area make it an invaluable tool for anyone requiring a comprehensive way to capture and share scrolling content.
Can you take a scrolling screenshot on a PC using browser settings and hotkeys? Absolutely YES! Taking screenshots via browser settings and hotkeys is a convenient way to capture what’s currently displayed on your screen. However, Google Chrome, Mozilla Firefox, and Microsoft Edge didn’t have native scrolling screenshot features directly built into their browser settings.
Here’s how you can do it in popular browsers like Google Chrome, Mozilla Firefox, and Microsoft Edge:
| Google Chrome | Mozilla Firefox | Microsoft Edge | |
|---|---|---|---|
| Browser settings | Chrome doesn’t have a built-in full-page screenshot feature in its settings, so you might need to use extensions for this purpose. | Firefox also doesn’t have a built-in full-page screenshot feature in its settings. You can use browser extensions for this functionality. | Microsoft Edge doesn’t have a built-in full-page screenshot feature, so you’ll need extensions. |
| Capture entire screen | Press the PrtScn or Print Screen key on your keyboard. It captures the full screen; you can paste it into an editor to save it. | Press the PrtScn or Print Screen key. | Press the PrtScn or Print Screen key. |
| Capture current window | Press Alt+PrtScn or Alt+Print Screen. It captures only the active window, including the browser. | Press Alt+PrtScn or Alt+Print Screen. It captures only the active window, including the browser. | Press Alt+PrtScn or Alt+Print Screen. |
Remember that while hotkeys are useful for capturing the entire screen or the current window, capturing scrolling content within a webpage requires extensions or additional tools. For scrolling screenshots, you must consider using browser extensions or similar Chrome, Firefox, and Edge options.
Screenshots |
Platform |
Price |
Capture Methods |
Editor & Annotations |
Image Formats |
Recording |
OCR Text Capture |
Custom Shortcuts |
Auto-Upload |
|---|---|---|---|---|---|---|---|---|---|
| Windows, Mac | Paid | Scrolling capture | Extensive editing tools | PNG, JPEG, BMP, etc. | Screen Recording | ||||
| Windows | Free and open-source | Scrolling capture | Basic annotation features | BMP, JPEG, TIFF, etc. | Screen recording | ||||
| Windows | Freemium | Scrolling capture | Basic editing tools | JPEG, PNG, BMP, etc. | |||||
| Browser extension | Freemium | Scrolling capture (browser) | Annotation tools | JPEG, PNG, BMP, etc. | |||||
| Windows 10 | Free (Windows 10) | Scrolling capture (limited) | Basic annotation features | JPEG, GIF, and PNG. | Limited |
Snagit is a screen capture and recorder with a scrolling capture feature. It allows you to capture scrolling screenshots on Windows 10, such as an entire webpage or document, by automatically scrolling and stitching together the screenshots. (Check Snagit alternatives here.)
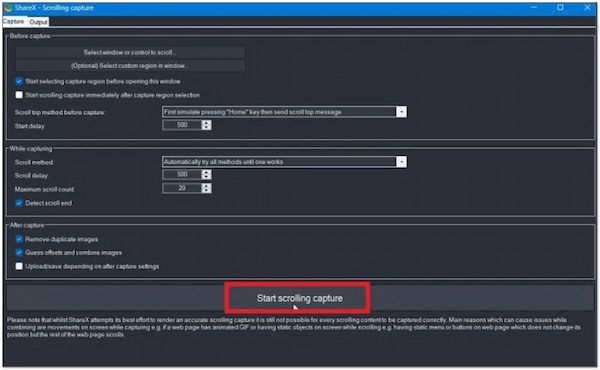
ShareX is a free scrolling screenshot in Windows 10 that provides various advanced capture options, including scrolling capture. It lets you capture scrolling content from web pages, documents, and other applications.
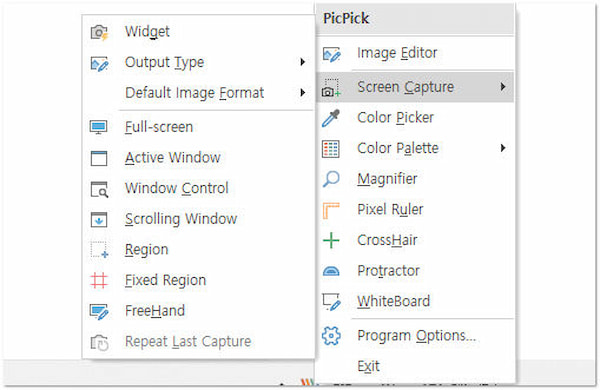
PicPick is a versatile PC scrolling screenshot and image editing tool with a scrolling window capture feature. It can capture scrolling content and save it as an image or a PDF file.
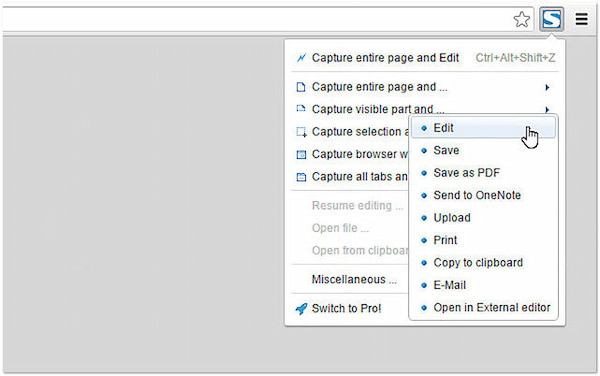
FireShot is a browser extension available for Google Chrome, Mozilla Firefox, Microsoft Edge, and other browsers. It lets you capture full webpage screenshots, including scrolling content, and provides annotation and editing features.
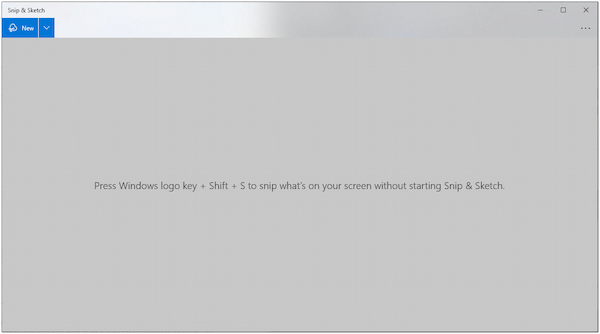
Snip & Sketch is a built-in screenshot tool in Windows 10. While it doesn’t offer a true scrolling capture feature, it lets you capture scrolling screenshots in Windows 10 without software. It’s not as advanced as some dedicated tools but can be useful for basic tasks.
What is the scrolling shortcut for Chrome?
Google Chrome doesn’t have a built-in keyboard shortcut for capturing scrolling screenshots. To capture scrolling screenshots in Chrome, you must use browser extensions or third-party tools like AnyMP4 Screen Recorder.
How do I enable touch scrolling in Chrome?
Chrome generally supports touch scrolling by default on touch-enabled devices. If touch scrolling isn’t working for you, ensure that your device’s touch functionality is enabled and that there are no issues with your device’s drivers. Chrome has no specific setting to turn touch scrolling on or off.
How do you drag a screenshot on a PC?
To capture a drag screenshot on a Windows, you can utilize the Snipping Tool or Snip & Sketch:
• Snipping Tool: Open the Snipping Tool, click New, and select Rectangular Snip. Then, drag the cursor to choose the area you want to capture.
• Snip & Sketch: Press the Windows key+Shift+S to open Snip & Sketch’s snipping bar. Choose the type of snip you want, and drag it to capture the area.
How do I take a screenshot on Windows without a Print Screen?
In addition to the Print Screen key, you can use the following methods to take screenshots on Windows:
• Snipping Tool (Windows 7): Search for Snipping Tool in the Start menu, open it, and click New to capture a screenshot.
• Snip & Sketch (Windows 10): Press Windows key+Shift+S to open Snip & Sketch’s snipping bar, then select the area to capture.
• AnyMP4 Screen Recorder (Windows 7/8/10/11): Pressing Ctrl+Shift+C captures the entire screen or a specific window and saves it as an image in the Picture folder in your local drive.
Where do snipping tool Screenshots go?
When you capture a screenshot using the Snipping Tool, it prompts you to save it. You can pick the location where you want to save it. By default, the Snipping Tool might suggest saving in your Pictures folder.
Which key is used to take a screenshot on a PC?
The most common key to take a screenshot on a Windows PC is the Print Screen key, often labeled as PrtScn or similar on your keyboard. Pressing this key captures the entire screen. Paste the screenshot into an image editing program like Paint and save it there.
How to take scrolling screenshots in Windows? Capturing scrolling screenshots in Windows has never been easier, thanks to the various tools and techniques available. AnyMP4 Screen Recorder is an efficient solution, offering scrolling screenshot capabilities and other screen recording features. Whether you’re a professional needing to document web content, a student collecting research materials, or someone who wants to preserve a comprehensive view of their digital experiences, AnyMP4 Screen Recorder provides a reliable means to achieve your goals. By following the steps outlined in this post, you’re equipped with the knowledge to capture scrolling screenshots and enhance your overall productivity effortlessly.
 Posted by Angelica Liwanag to Screenshot
More readings
 How to Screenshot on Dell Laptop/Desktop
How do you take a screenshot on a Dell laptop without PrtScn button? How to capture a screenshot with Windows 10? Here are 3 easy ways to screenshot on Dell.
 Screenshot Not Working on Mac – 6 Efficient Ways You Should Know
Why you are not able to take a screenshot on Mac and how to fix the problem? Here are the 6 most efficient methods to fix the screenshots not working on Mac.
 How to Screenshots on your iPad for All Models
Taking screenshots on iPad will become accessible after learning all the methods we need to take for iPad Pro, Mini, and Air. Please click here for more.
 Tutorial to Screenshot on Lenovo Laptop/Desktop of Any Screen Size
This is the complete guide to screenshot on Lenovo laptop or desktop. You can take a full-screen, active or custom screenshot on Lenovo on Windows with ease.