Before the rise in popularity of Smart TVs, external antennas and their signals were the way to go if you wanted to enjoy free television entertainment. Despite their decreased popularity, analog televisions are still reliable today, especially for those who are satisfied with over-the-air television programs, mainly news channels, variety shows, several sporting events, and television shows. In this article, we will present several techniques to record antenna TV signals. So you can enjoy watching television content on your computer or TV while bypassing commercials.

| Comparison Measurements | DVR Recorder | AnyMP4 Screen Recorder Software | USB Drive |
|---|---|---|---|
| Simple setup requirement | |||
| Easy to use | |||
| Recorded videos are saved on a computer | |||
| Features multiple recording modes | |||
| It can be used on other devices other than TV recording | |||
| Pros | • TV screen recordings are one of its main purposes. • It can also be used on computers. |
• It can also be used for recording computer screens. • Offers multiple recording modes. • Easy to set up. |
• USB devices are extremely portable. • Easy to set up. |
| Cons | • Highly technical setup process. • DVR hardware is quite expensive. |
• Its free-to-use version is slightly limited. | • Only limited TVs have a built-in USB recorder outlet. • Most modern TVs only support USBs as multimedia storage. |
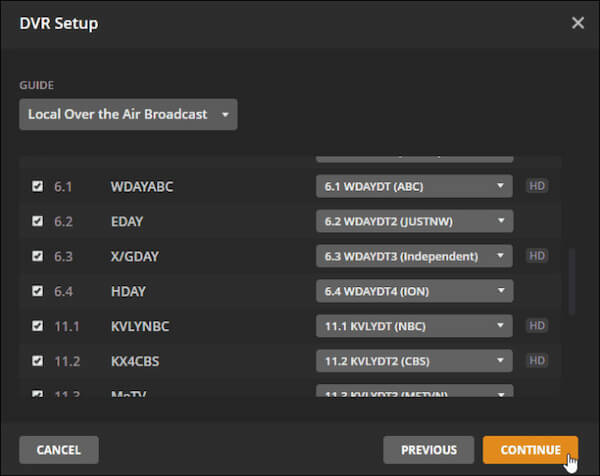
OTA Network DVRs are the industry standard for antenna recording, combining high-quality video with multi-device flexibility. Models like Tablo distribute broadcast signals over your home network, allowing you to record and stream live TV directly to TVs, mobile devices, and PC.
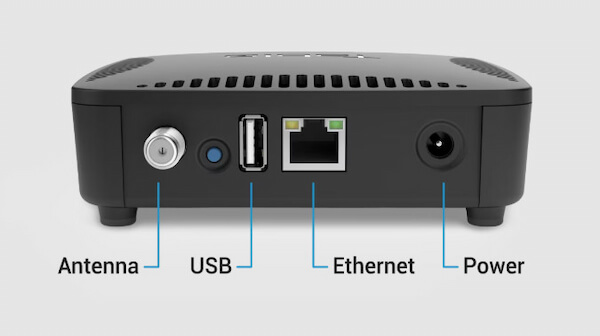
1. Attach your digital antenna to the coaxial port located at the back of the Tablo DVR. It allows the DVR to receive free broadcast channels available in your area. Next, connect the Tablo box via Wi-Fi or with an Ethernet cable for a more stable connection.
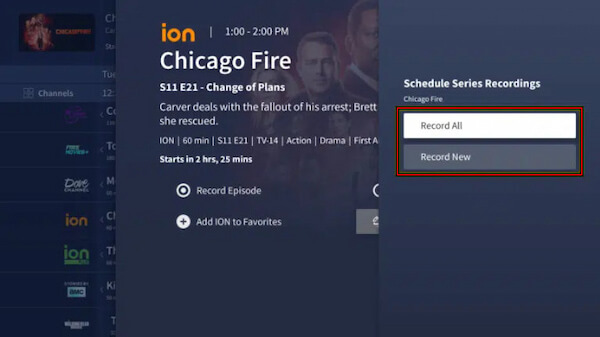
2. Install the companion app on your smart TV, smartphone, or PC. Scan for available local channels to begin watching live TV from your antenna. After accessing the OTA stream, select Record All or Record New to schedule recordings.
A network DVR provides excellent video quality, ensuring saved shows look just as clear as the live broadcast. However, poor Wi-Fi performance can affect playback quality.
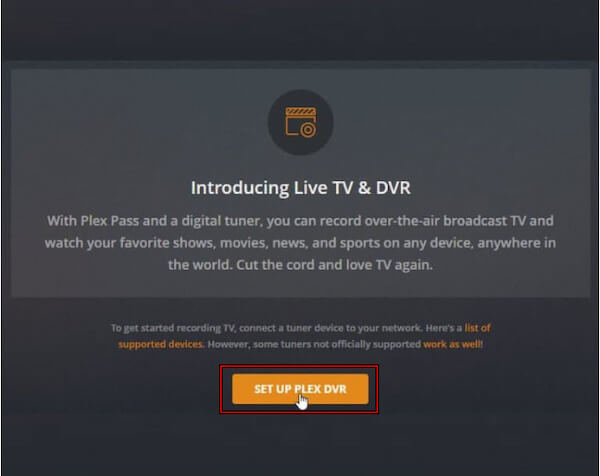
For tech-savvy users seeking maximum control, Plex DVR offers a powerful software-based alternative. By integrating HDHomeRun and a digital antenna with a Plex Media Server on a PC or NAS, you can capture and organize OTA broadcasts in a private library.
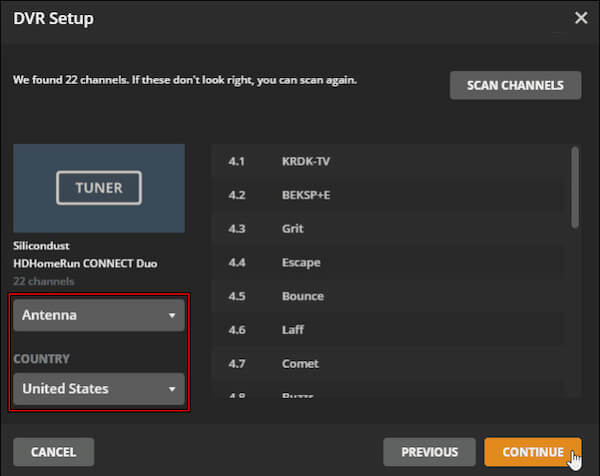
1. On the Plex server dashboard, navigate to Settings, select Live TV & DVR, and click Set up Plex DVR. On the next screen, Plex should automatically detect your HDHomeRun device on your home network. Make sure it is selected, then click Continue.
2. Select the signal source and your country. Plex will scan the connected antenna for available broadcast channels and display the number it finds. Choose your language and enter your ZIP or postal code to download the correct Electronic Program Guide (EPG).
3. After a few moments, Plex will load the TV guide for your location. Once the setup is complete, Plex DVR lets you schedule recordings, record entire series automatically, and store OTA broadcasts directly in your Plex media library.
Before everything works properly, make sure you have a Plex Pass subscription, which unlocks the Live TV & DVR feature. If your Plex subtitles are out of sync, you can fix it here.
Many modern smart TVs offer a budget-friendly recording solution through built-in PVR (Personal Video Recorder). By connecting a USB flash drive or external hard drive, you can record live broadcasts directly from the TV's internal tuner.
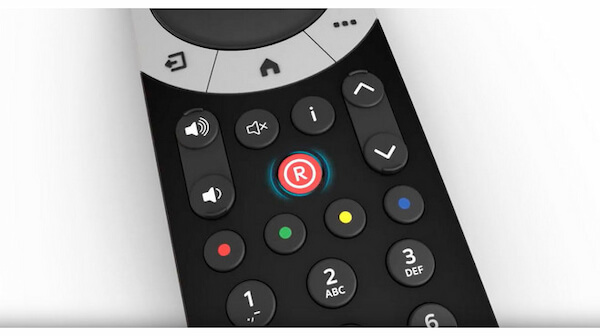
1. Insert a USB flash drive or external hard drive into the USB port on your Smart TV. Using your remote control, open the Settings or Broadcast menu. Look for options labeled PVR, USB Recording, or Time Shift, depending on the TV brand.
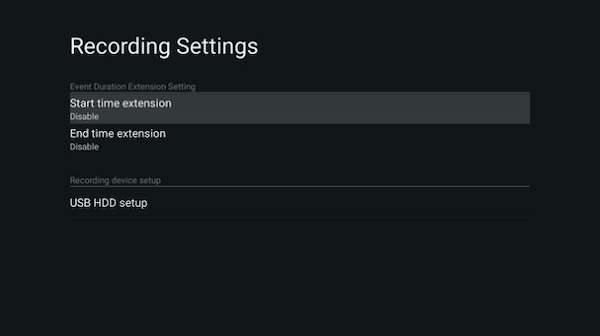
2. Switch to the live OTA channel you want to capture using the TV's built-in digital tuner. Press the Record button on your remote control, or select Record from the on-screen information bar. The TV will begin recording the current broadcast directly to the USB drive.
This built-in feature is both convenient and cost-effective. However, it comes with an important limitation: most TVs encrypt recorded files and lock them to the device that created them.
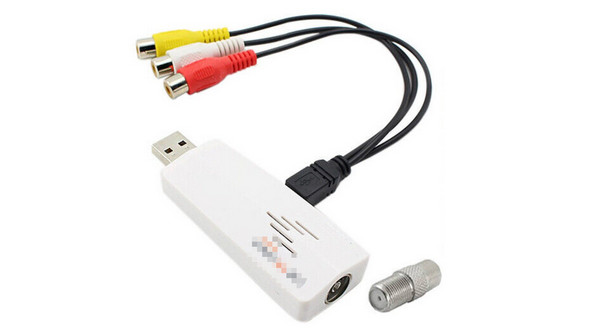
Another way to record Over-the-Air TV is to use a PC-based setup with screen recording software. Many users who watch antenna TV on their computer via a USB or network tuner commonly use this method. Once the live broadcast appears on your screen, you can record it just like any other video playing on your PC.
AnyMP4 Screen Recorder is a bundled recording software fully compatible with Windows and Mac. It allows you to capture live TV streams with up to 4K Ultra HD quality. It ensures your recorded TV programs maintain excellent clarity and detail. In addition, it can record system sound directly from your system, producing synchronized audio without background noise.
Notably, it includes a powerful Task Schedule feature. It allows you to automate recordings so you don't have to start or stop them manually. You can configure the recording schedule by selecting a specific start time and the days it recurs. To stop the recording, the software provides several options: you can end the recording at a specific time and date, based on the recording length, when the file reaches a certain size, or manually if needed.
1. First, connect your USB TV tuner or network tuner to your PC. Launch the application for watching OTA channels, then tune to the live broadcast channel you want to record.
If you haven't already, download the free AnyMP4 Screen Recorder. Install the screen recording software and complete the setup process. After you complete the installation, open the software to access the main dashboard.
Secure Download
Secure Download
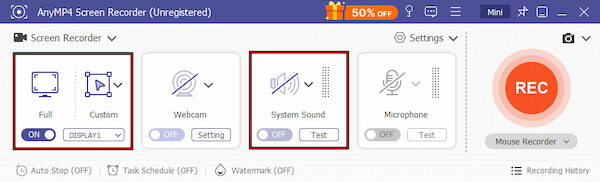
2. Upon launching, the interface defaults to the Screen Recorder. Choose Full if the TV stream fills the entire screen, or Custom to capture only the video player window. Enable System Sound so the software can capture audio from the TV stream.
Optionally, click the Task Schedule option to automate the recording process. Set the Start Time for when the recording should begin. You can also choose the recurring days, such as Monday through Sunday, if the show airs regularly. Next, configure how the recording should stop. You can choose from several options:
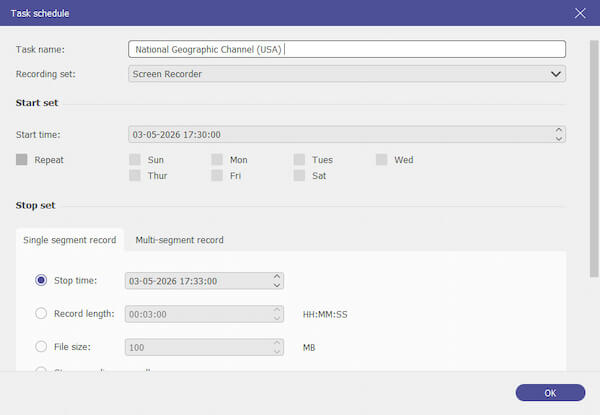
After confirming the settings, save the scheduled task. The software will automatically start and stop recording at the specified times.
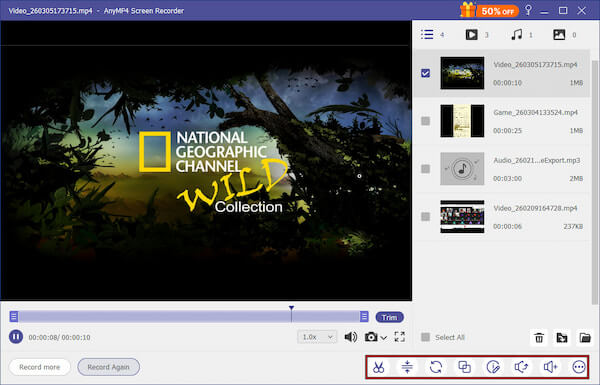
3. If you are recording a live TV show, click the big red REC button to begin capturing the OTA broadcast. The software will record the video and audio in high definition. Once the broadcast ends, click the Square (Stop) button to open the preview window. From there, you can trim unwanted segments before saving the final video file to your computer.
Although dedicated DVR devices are more modern, PC-based recording remains a versatile alternative. Tools like AnyMP4 Screen Recorder let you convert DVR recordings to MP4 and other formats via screen capture. While built-in TV systems often encrypt recordings, screen recorders save files in standard formats, allowing you to edit, transfer, or archive them freely.
Proper setup is crucial for consistently recording high-quality OTA TV. Here are some tips to maximize signal strength and minimize recording issues:
When recording OTA TV, it's important to be aware of both legal and technical limitations:
Q: Is there a subscription fee for recording OTA TV?
A: No, recording OTA TV itself does not require a subscription, as the broadcast signals are free. However, some solutions like Plex DVR require a subscription.
Q: Can I watch my recorded OTA shows on my phone or tablet?
A: Yes, but it depends on the recording method. Network DVRs, such as Tablo, let you stream recorded shows to smartphones, tablets, and other devices via companion apps..
A: Yes, but it depends on the recording method. Network DVRs, such as Tablo, let you stream recorded shows to smartphones, tablets, and other devices via companion apps.
A: Most smart TVs encrypt files recorded via USB PVR or Time Shift to prevent copying or sharing. The manufacturer imposes this technical encryption, which you cannot easily bypass. If you want editable files, I recommend a PC-based recording solution like AnyMP4 Screen Recorder.
Q: What is the recommended storage size for a season of NFL games?
A: For HD recording, a single 3-hour NFL game can take approximately 6-10 GB. Therefore, a full 17-game regular season per team could require 100-170 GB of storage for HD-quality video. If recording in 4K Ultra HD, storage requirements can double, reaching 15-20 GB per game, so that you may need 250-350 GB or more for an entire season.
Q: Can you record shows from an antenna TV?
A: Yes, you can. You can use a DVR device, a screen recorder software, or a USB drive. Read this article to learn how.
Q: Is there a DVR that works with an antenna?
A: Yes, there are. In fact, most DVR devices can capture analog signals by default. These hardware devices are good recorders.
Q: Can you buy a DVR for an antenna TV?
A: Yes, you can. Most DVR options are good antenna recorders. These will be good enough for TV recording.
Q: Can I record TV shows without a DVR?
A: Yes, you can. You can use screen recorder software for computers. Read the second part of this article to learn how to use AnyMP4 Screen Recorder, an example of this software.
Q: How to record TV shows from an antenna?
A: You need to use a recording tool. You can use a DVR device, screen recording software, or a USB drive. Read this article to learn how to use all three.
Free Over-the-Air (OTA) television is the premier way to access high-quality TV without monthly fees. By using a digital antenna, you can receive unencrypted local broadcasts directly at home. Since these signals aren't locked behind subscriptions, viewers can freely record TV shows for later viewing. To get started, you simply need a digital antenna to capture the signals and a recording solution, such as a DVR, PVR, or a computer with a TV tuner. With this setup, you can easily enjoy live broadcasts on your own schedule.
Now that we have provided the tutorial on how to record antenna TV using three different options. We hope this article has provided you with the knowledge you can use. If you are looking for a reliable digital screen recorder, make sure to check out AnyMP4 Screen Recorder.
Please share this article online to help other users looking for an antenna TV recording tutorial.
Secure Download
Secure Download
 Posted by Alice Thorne to Record Video
More readings
 Easy Way to Record Audio on MOTU with Unlimited Time and High Quality
Read and get the detailed steps to record on MOTU. You can control your computer audio and record audio from MOTU into digital audio files with ease.
 Record on Sansa Fuze - How to Record FM Radio on Sansa Fuze
Can the Sansa Fuze do Line-in recording? How to record on Sansa Fuze? Where are my Fuze recordings? This post shares 2 ways to make Sansa Fuze record voice.
 Nextiva Record - How to Record Nextiva Voicemail Greeting
How to set up Nextiva voicemail? How to change Nextiva greeting? How to make Nextiva record greeting? Get 3 ways to record Nextiva calls and voicemails.
 How to Record Audio on Zoom With/Without Permission
This article will serve as your guide to learn how to use Zoom audio recorders whether by using the built-in option or with the help of third-party tools.