Taking screenshots is not only simple but also quite useful. Saving images on your iPad is helpful for various reasons, from sharing text message exchanges to saving receipts. On an iPad, you can take screenshots using either the physical buttons or the digital AssistiveTouch capability. On any iPad, here's how to do both for iPad Pro and iPad mini. Also, see how we can perform screenshots using the Assistive Touch and a computer. We shall now take screenshots on iPad with ease.

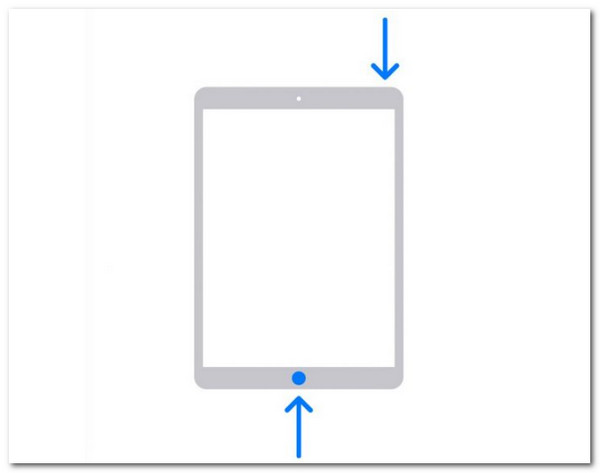
If you still have an iPad with a Home button (iPad mini 1, 2, 3, 4, or 5; iPad Air 1, 2, or 3; iPad Pro 1 or 2; or any iPad from the original series), perform the following:
1. Navigate to the page or screen you want to photograph.
2. Press the Home and Power buttons simultaneously. When your screen flashes for a moment, you'll know the screenshot was taken.
3. A thumbnail of the screenshot you just captured should be visible in the lower left corner of your screen.
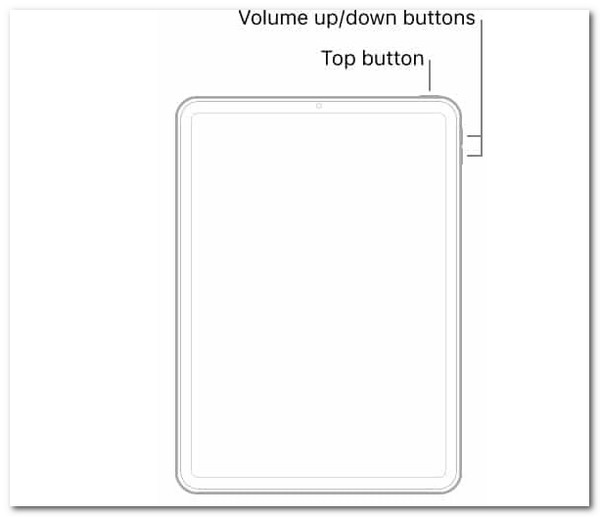
Apple debuted the iPad Pro without a home button in 2018. Since then, all iPad Pro models have arrived without a home button. As of the time of writing, Apple had upgraded the whole iPad series to the new design, and even the base iPad (10th Gen) no longer has a home button. Taking screenshots is thus relatively straightforward if you possess any iPad Pro model that lacks the Home Button. To make it possible. Kindly follow each step below.
You must simultaneously push and release the Top (Sleep/Wake) at first. On the second step, follow up by pressing the Volume Up buttons. After doing those steps, you quickly take a screenshot on your iPad Pro.
The steps will be familiar if you possess an iPad Pro with a Home button. Press and then release the Top (Sleep/Wake) and Home buttons simultaneously. The iPad screen will flash with a shutter sound anytime you snap a screenshot. A thumbnail of your screenshot will exist in the display's bottom left corner. Finally, the photograph will be saved to Photos by the smartphone.
After that, you can share the screenshot photos between iPhone and iPad easily.
If you take a lot of screenshots, pushing the Top Button and the Volume or Home Button simultaneously may become tedious. Setting up AssistiveTouch, a function accessible on the iPhone, iPad, and even the iPod touch, is the next best option. It is helpful in cases where your device's hardware buttons fail.
You can build a shortcut by double-tapping the AssistiveTouch button to snap a screenshot instantly. That being said, the first step is to enable AssistiveTouch on your iPad, which you may later configure to meet your specific needs.
Process 1. On the iPad Pro, enable AssistiveTouch
1. Open Settings on your iPad.
2. Go to Accessibility Touch AssistiveTouch and toggle the AssistiveTouch switch on.
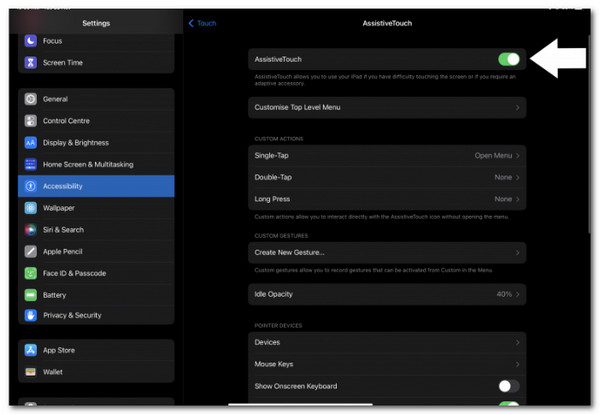
When AssistiveTouch is enabled, a semi-transparent round button will show on your screen. The AssistiveTouch button is located here.
Process 2. In AssistiveTouch, create a Custom Action
Customizing the Top Level Menu is the conventional way to take screenshots. We no longer have to deal with that, however. Custom Actions may now be configured for a single tap, double tap, or long press on the AssistiveTouch icon. Here's how to create a custom action on your iPad Pro to make taking screenshots easier.
1. Launch the Settings app on your iPad.
2. Go to Accessibility Touch AssistiveTouch and toggle the AssistiveTouch switch on.
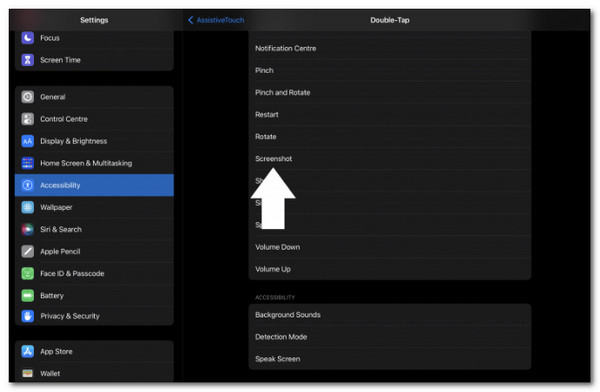
3. Go to the Custom Actions menu and select Double-Tap.
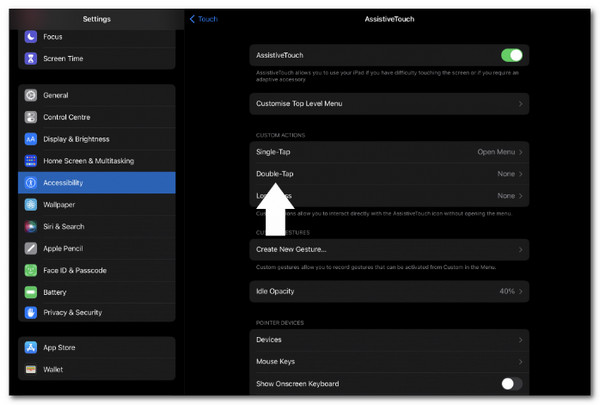
4. Scroll down and select the Screenshot option from the System drop-down menu.
You've successfully configured a Custom Action on your iPad to take screenshots. You may also use the Long Press function on the iPad to take screenshots.
Process 3. Using AssistiveTouch, take a screenshot
The rest is straightforward now that you've configured a Custom Action to take a screenshot on the iPad Pro. When you wish to take a screenshot, double-tap the AssistiveTouch button. The screen will flash, and a shutter sound will be heard. A thumbnail will show in the lower left corner of the screen, and the photograph will be saved to Photos.
If the iPad iPhone touch screen is not working, you can check this post to learn more.
There is something you should know before you begin learning how to snap a scrolling screenshot on your iPad. Full-page screenshots, for example, will be saved as a PDF. As a result, when you snap it, it will not appear in the Photos App. After converting the PDF file to PNG, you can save the screenshot to the Photos App. The PDFs may be found in the Files app, and sharing them with other apps should be simple. Please remember that this will only work in Safari, not Chrome or Firefox.
1. Once you have Safari open, take the screenshot using your preferred technique. For example, try pressing the top and home keys simultaneously. The screenshot should be in the bottom left-hand corner. Tap on it to enlarge it. There are two options at the top: Screen and Full Page.
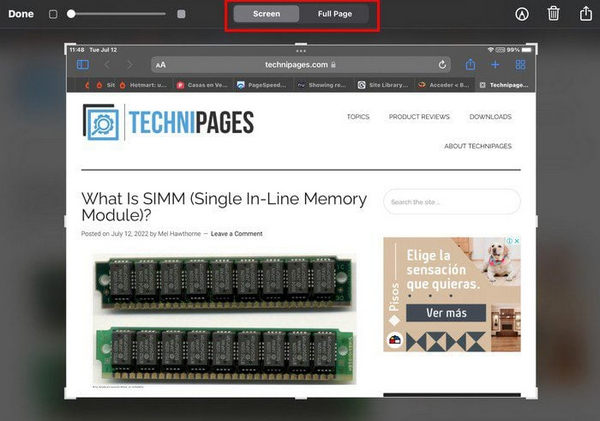
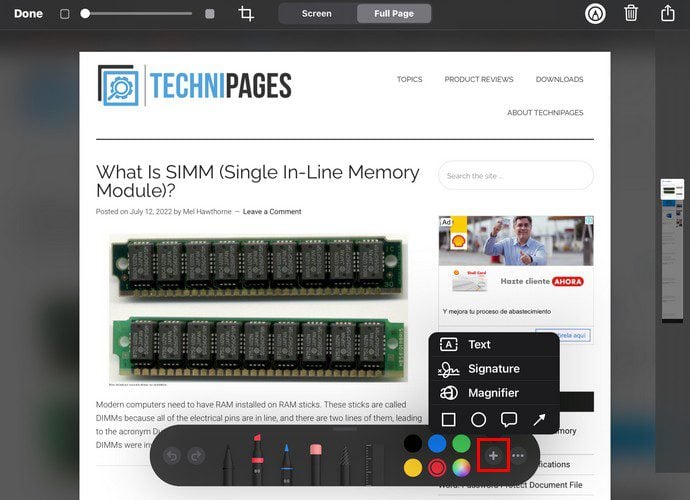
2. If you select Screen, you will only obtain a screenshot of your current viewing. Tap on Full Page to get the entire page. You'll see a series of editing options at the bottom when you do. You can select from several options.
The dots indicate if you may enable or disable features such as auto-minimize and drawing with your finger. You may also use the slider at the top left to make the page's content more difficult to read.
3. You can see a specific screenshot area by sliding the highlighted square on the right. To do so, select the crop option. Drag the screenshot's top, bottom, or side to keep as much of it as you wish. After making the necessary changes, you'll see a preview of what you'll get when you hit the Done button at the upper left. After each change, the screenshot will resize.
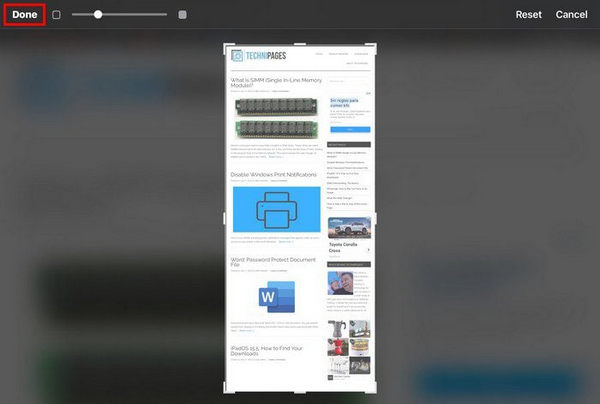
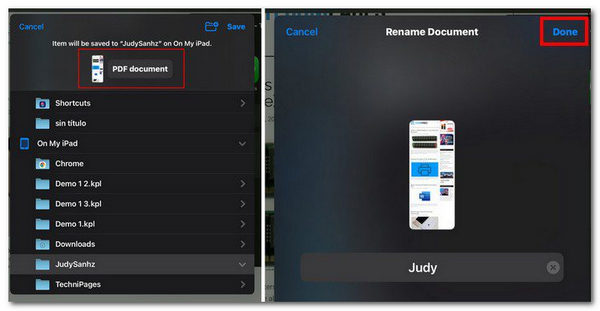
4. You can zoom in on a particular image area and have the screenshot focus on that. The file will be saved as a PDF file, which you can access later using the Files app. If you believe you made a mistake in deciding which section of the screenshot to crop, tap the reset option to start over. When you're saving the PDF to the Files app and selecting a folder, remember that you can modify the file name by tapping where it says PDF document.
Another method we can use to screenshot iPad on computers is AnyMP4 Screen Recorder. We need its Phone Recorder features to make it. Phone Recorder allows you to mirror and cast your iPhone or Android device to a PC. It provides a real-time mirror between the phone and the PC via WiFi and a USB cord.
1. We need to get the excellent AnyMP4 Screen Recorder for our computer.
Secure Download
Secure Download
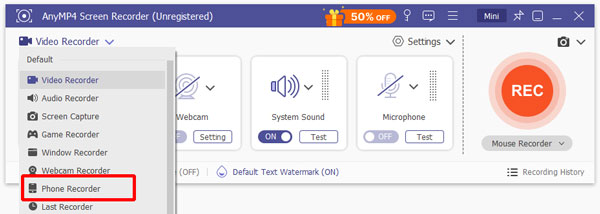
2. Please launch AnyMP4 Screen Recorder on your PC and click the Phone Recorder option on the main interface.
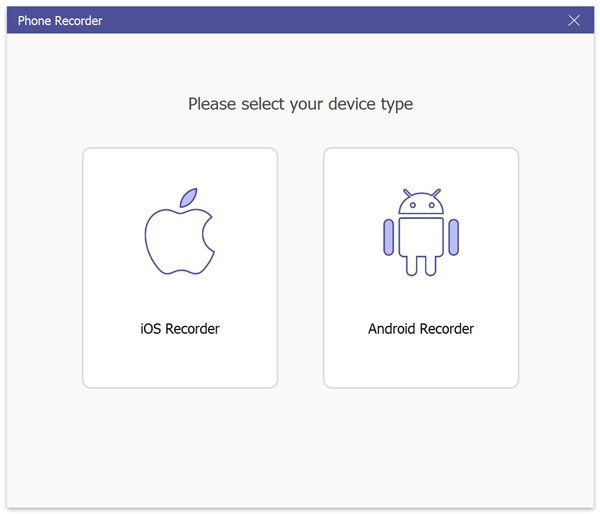
3. On the Phone Recorder window, you can select the device type. However, the app currently only supports iOS devices for screen recording. Thus, you can only record your iPhone or iPad screen by selecting the iOS Recorder option.
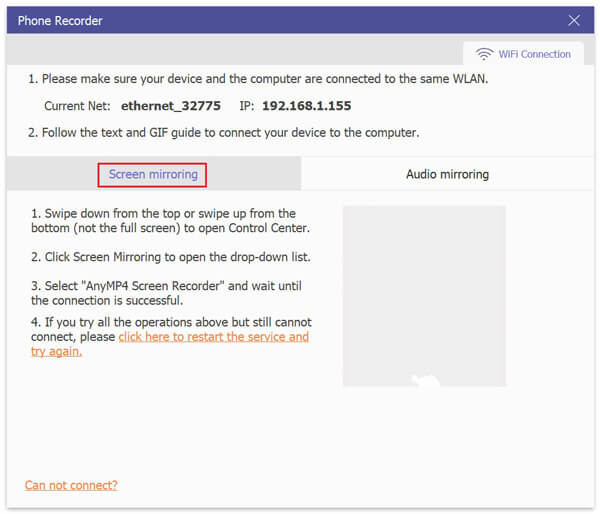
4. Click the Screen mirroring option if you wish to record the screen of your iPad device. Then, connect your iPad device to the computer by following the on-screen directions on your iOS device. Before connecting your device and computer, please ensure they are linked to the same WLAN.
5. Click the Record button to record the device's screen. Besides, you can click the Snapshot icon to take screenshots while recording. If you only need to capture audio, click the Record button.
1. On my iPad, how can I snap a screenshot of Netflix?
You must press both buttons simultaneously. Both Netflix and Movies screenshots provide a blank screen. This appears to be a legitimate type of copyright protection. To snap the screenshot, double-tap the home button to open the app closing stuff.
2. What is the highest resolution of the iPad screenshot?
The higher the number, the higher the standard! This option will become active immediately. The highest resolution choice is 4K.
3. Which iPad has the highest pixel density?
Even the higher resolution 10.5-inch and 12.9-inch iPad models have a pixel density of 264, implying that the iPad Mini models with Retina Display have the highest pixel density of any iPad. iPad mini 4th generation. Apple Every iPad since the seventh generation has received an LED-backlit Multi-Touch display, larger than prior generations.
Taking a screenshot on your iPad is simple and takes only a few seconds. Aside from that, screenshots are helpful in a variety of ways. You can preserve photographs you see online, conversations, receipts, or an article you want to read later by taking screenshots. Take a screenshot now by following the methods above on your iPad.
 Posted by John Malcolm to iOS Tips
More readings
 A Step-by-step Guide to Screenshot on Alcatel Mobile Devices
Users can easily take screenshots on their smart phones, such as Alcatel One Touch screenshot. Read this article and then you will get at least three methods.
 3 100% Working Ways to Screenshot on Toshiba in Various Situation
If you need to capture an image of your Toshiba laptop's desktop, you'd better read this guide since you can find multiple ways to do the task in various cases.
 Top 3 Methods to Screenshot Google Maps on PC, iPhone and Android
People often need to screenshot Google Maps to help each other find some places. Here are 3 methods to do the job on your computer, iPhone and Android.
 3 Ways to Screenshot on HP Desktop and Laptop of Any Screen Size
This is the complete tutorial to screenshot on HP step by step. You can use both the tools to take a screenshot on all HP models and OS versions.