When you take some screenshots on your MacBook, you might find the screenshot not working on Mac, or cannot find the screenshots. If you have encountered the "screenshot on Mac not working" problem, what should you do? Just learn more about the 6 efficient methods to fix the problem, as well as the best alternative from the article.
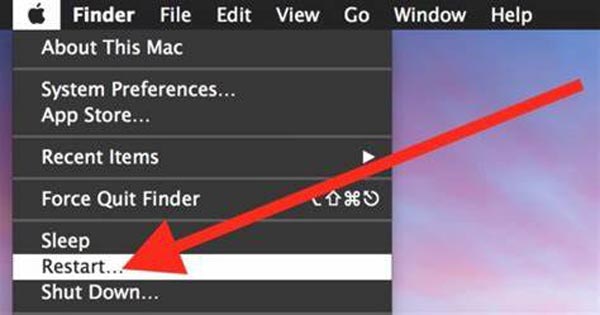
If you have running your MacBook for a long time, there are lots of RAM files that you cannot take snapshots of on Mac. Just restart your Mac with the steps below to fix the screenshot not working on Mac.
Press the key combination, Control + Command + Eject or Control + Command + Power to restart your MacBook. Click the Restart button when the restart screen pops up.
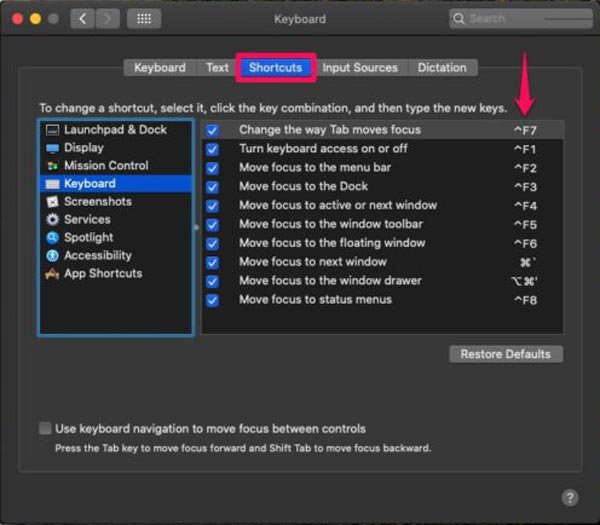
Just check the keyboard shortcut to use the correct key combination to take snapshots on Mac. Go to the System Preferences located in the Dock, you can head over to the Keyboard section. Click on the Shortcuts category and you'll find shortcuts for taking a screenshot on Mac. Make sure you have used the correct keyboard shortcut.
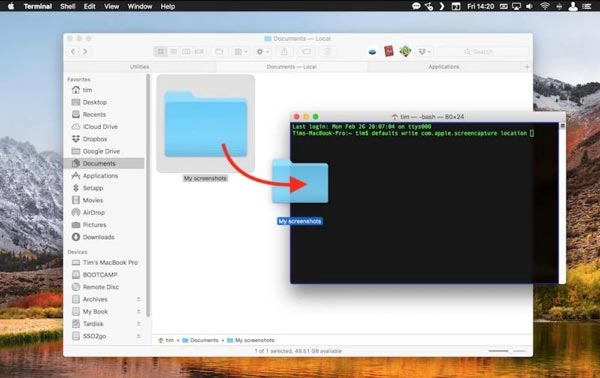
The default destination folder is to save screenshots to the Desktop. If you have changed the location for the destination folder, you can press Shift + Command + N to create a new folder where you want your screenshots to be saved. Then launch the Terminal app and enter the following command line defaults write com.apple.screencapture location. After that, you can drag the folder into the Terminal window. It is a method that you can fix screenshots not saving on Mac.
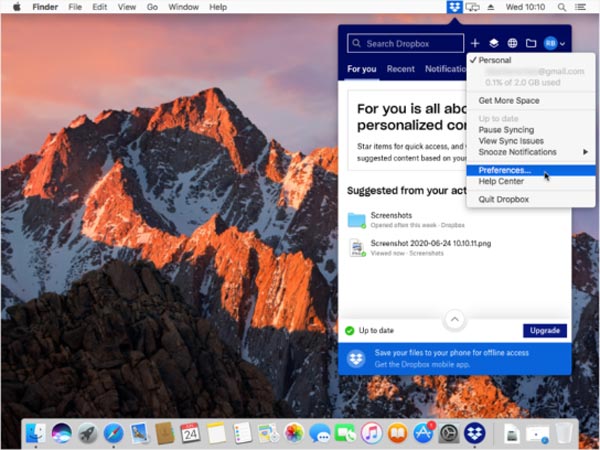
If you have installed Dropbox, the destination folder of the screenshots will be changed. It is the reason that screenshots are not available on the desktop. Just open Dropbox and check the location for the screenshots, the snapshots will be saved to Dropbox.
To fix the screenshot not working on Mac, you can go to the Dropbox menu, you can choose the Preferences option. Select the Sync tab and click on the Dropbox folder location drop-down menu and choose the Other option to change for another location.
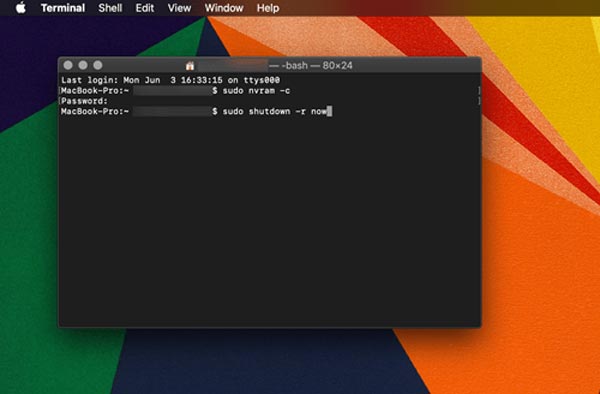
You might not familiar with a non-volatile random-access memory (NVRAM) or Parameter RAM (PRAM), which is another method to resolve the screenshot not working on Mac. It enables you to solve the problems for sound volume, time zone, display resolution, and more others.
Click the Apple menu and choose the Shutdown option to turn off the Mac. After that, you can press and hold the Option + Command + P + R together for 20 seconds. Then release the key to restart your computer.
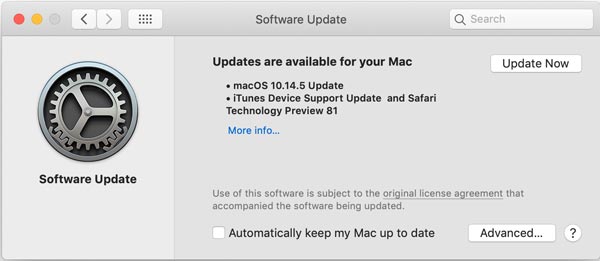
As for the old macOS, you can also update to the latest version to find whether it works. Once you have updated macOS, you can have another check to find whether the screenshot still not working on your MacBook with the following process.
Go to the Apple menu and choose the About This Mac option. You can select the Software Update option to download the macOS software update. Then launch your computer to take snapshots with shortcuts.
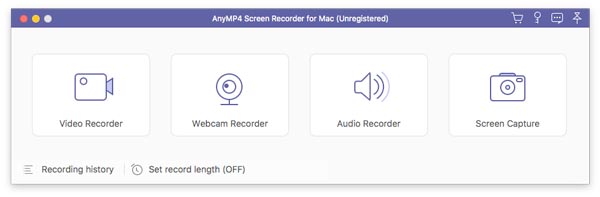
When you are not able to use the keyboard to take snapshots, or even the screenshot not working on Mac for some unknown reasons, AnyMP4 Screen Recorder is the versatile method to capture screenshots, add annotation, or even edit the snapshots. Moreover, you can record the onscreen activities as a video, and screenshot on Mac without missing any frame.
Secure Download
Secure Download
Step 1: Once you have installed AnyMP4 Screen Recorder, you can launch the program on your computer and choose the SnapShot option from the main interface. After that, you can select the desired area you want to drag to select the desired area.
Step 2: You can make a drawing to the screenshots, such as draw the borders, lines, arrows, and any shape. Moreover, you can also customize the sizes and colors according to your requirement. Moreover, you can also copy, save, pin, and delete the screenshots.
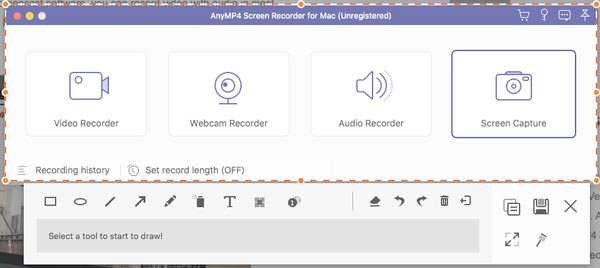
Step 3: Go to the media library within the program, you can see the snapshot list. Navigate your cursor to a certain item. Click the play icon to preview the screenshot file. You can also rename the files and change the destination folder of the screenshots.
When you need to take snapshots for a video tutorial, you can record the whole video, then screenshot for the videos on Mac accordingly.
For more Snipping Tools for Mac alternatives, you can find then here.
1. Why is the screenshot not working on Mac?
Just check whether there is something wrong with the keyboard or keyboard shortcut. After that, you can reset the destination folder of the screenshot. Of course, the reason why screenshots cannot be saved on Mac is because of the virus, memory and other problems.
2. What are the hotkeys to take screenshots on Mac?
When you need to take the entire screen, Command-Shift-3 is the default keyboard command. You can use Command-Shift-4 to take a portion of the screen, Shift-Command-5 to take the entire Screen/Window/Portion, and Shift-Command-6 to take the entire Touch Bar.
3. Why the screenshot turns out to be blank?
Once you have taken screenshots in blank, the corrupted.plist file, incorrect keyboard settings, malware infection, or other third-party incompatibility issues should be the reason that screenshot not working on Mac. Check each problem to find a solution accordingly.
If you cannot take snapshots, or screenshot not working on Mac, you should learn more about the reasons and find the 6 most efficient methods from the article. Of course, you can also choose AnyMP4 Screen Recorder as the best screen recorder to capture videos and take snapshots.
 Posted by Riley Mitchell to ScreenShot
Related Articles
 How to Take a Screenshot with VLC on Windows and Mac OS X/11/12
If you have a video for which you want to extract a frame of it as an image, the screenshot function in VLC media player is a good option. Here is the how-to.
 How to Screen Capture on Mac – 8 Best Methods You Should Know
How to take a screen capture on your Mac? When you need to print screen on your MacBook, here are the 8 efficient methods to get the desired files with ease.
 3 Free Ways to Screenshot on Dell Laptop
How do you take a screenshot on a Dell laptop without Print Screen button? What is PrtScn button? How to capture a screenshot on Dell laptop with Windows 10? This post shares 3 easy ways to screenshot on Dell.
 Top 5 Snipping Tools for Mac (including macOS Ventura/Big Sur/Catalina
Here're the top 5 best snipping tools for Mac. You can snip on Mac with any screen size and multiple editing tools. Well, you can get a snipping tool available on Mac to capture Mac images flexibly as well.