If you are worried about your blurry picture, which was recently taken by your camera, you would probably wonder if it could be more apparent than before. Of course, we all want images that have a more realistic look. In this post, we'll teach you how to sharpen images in Photoshop. This tool will help you discover and know how to enhance your image's details. If your photo is slightly out of the camera's focus, then this technique might work for you. Nevertheless, you can also unleash your creativity using the tool and best alternative. Continue to read more below.

Sharpening your photo means enhancing and improving your image's details, edges, and lines. It can make the features of your image more defined. Photoshop photo editor will also help you in putting more contrast in your pictures. In this post, your goal is to make images sharp and apparent. However, there are also some exceptions in sharpening a photo, especially if your photo was not correctly captured. Sharpening it may seem unnatural.
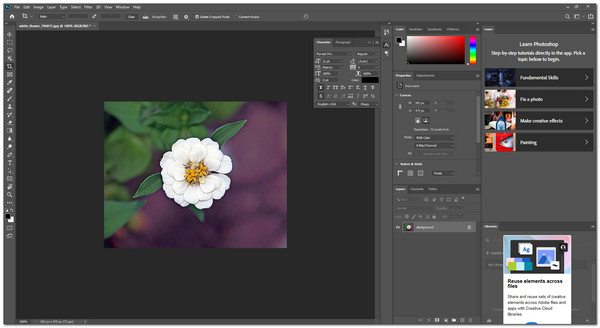
Through this post, you will learn how sharpening a picture can also adjust the brightness and shadows in your image. Nevertheless, we go through by using Photoshop to help you sharpen your image in just a few steps. The following steps are below.
1. Download and install the latest Adobe Photoshop on the official site Adobe.
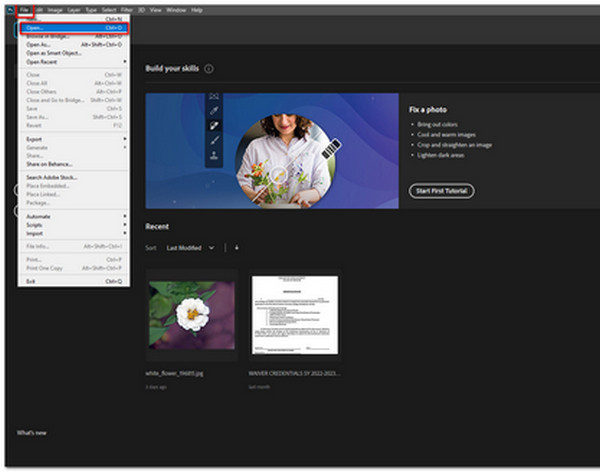
2. Start by opening the image file by clicking File on the menu toolbar. Then click Open to import your photo.
3. On the menu toolbar located in the upper-left corner of the app, click Filter. Then select Sharpen.
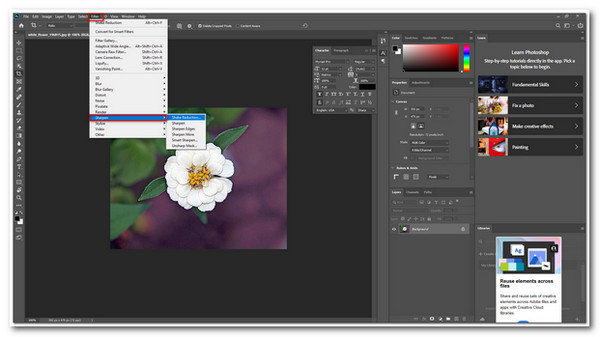
4. In this step, we will choose Unsharp Mask to manually adjust the Amount slider, Radius slider, and Threshold slider. The Amount slider is to change the strength of the sharpening process. The Radius slider is to set the width of the image's edges. Lastly, the Threshold slider is to lessen the sharpening of some details. The preview of your image while sharpening is located above the dialog box.

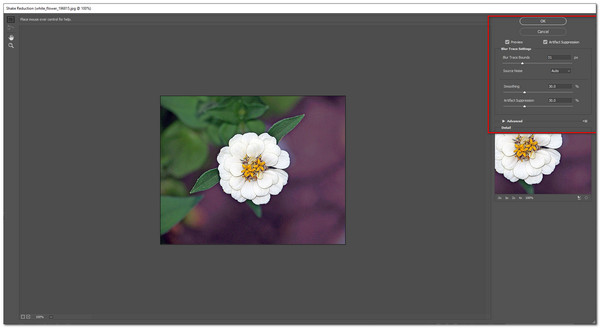
5. You can make your photo more stabilized by selecting Shake Reduction in the Sharpen option.
6. Explore other sharpening techniques and options under Sharpen option. These options are; Sharpen Edges, Sharpen More and Smart Sharpen.
7. After you are done sharpening your photo, you can now export your image file. To export, click File, then select Export. Click Export As.
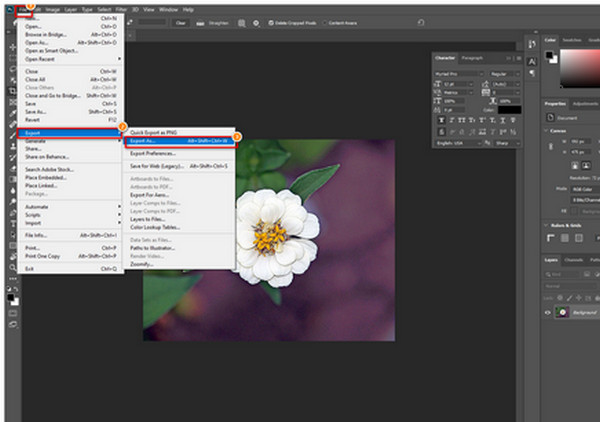
8. As you Export, a dialog box will appear and show your image file settings. Click Export on the lower right part of the box.

You will have a new technical skill now that you know how to sharpen a blurry photo using Photoshop. Sharpening a photo can make a difference in an image. It can make an image more defined and enhanced in detail. However, to remind you that not all images can look good when sharpened. It depends on the digital quality of the original image.
Nevertheless, using Photoshop may sharpen your images in many ways. You can sharpen them by adding and adjusting some features. You can have the option to make your photos more stabilized and smoother. In whichever way you like, the options in Sharpen are diverse. With these simple and easy steps, you can achieve a sharpened photo.

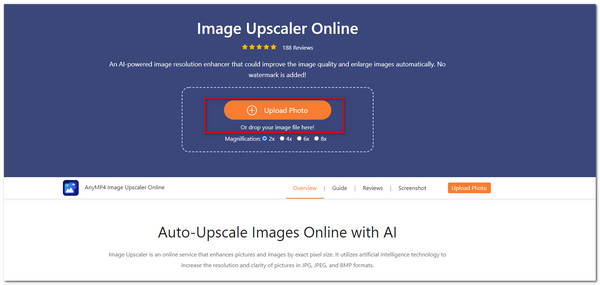
AnyMP4 Image Upscaler Online is an excellent alternative for creating good-quality pictures. It is a web-based software that is accessible by visiting the official site of AnyMP4. The tool has a primary user interface that anyone can use.
The tool has enlargement and upscaling features as well. Additionally, it uses Artificial Intelligence (AI) technology to reduce the noise of your photo to make it smoother. Moreover, it can also sharpen the details of your image using AI Technology. Learn more on how to sharpen images with the steps below.
1. Visit AnyMP4 Image Upscaler Online on on your browser.
2. You can start by importing your photo on the tool's main interface. Click Upload Photo on its main interface.You will have the option to drag and drop your image file to the interface or just upload your image file.
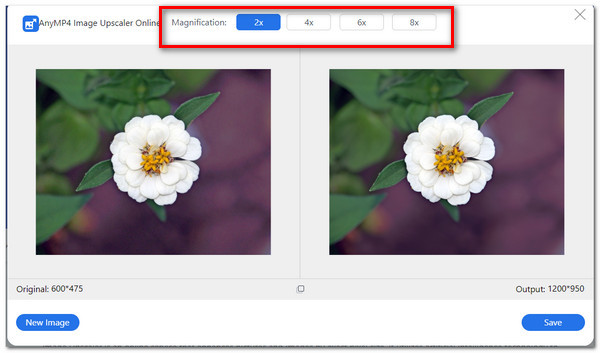
3. After importing your photo, you can select the magnification level on the interface's upper part. Select between 2X, 4X, 6X, and 8X times. This feature will allow the image's details to be enhanced. Additionally, you can see the original size of your image as well as the output size of your image located at the bottom of the interface.
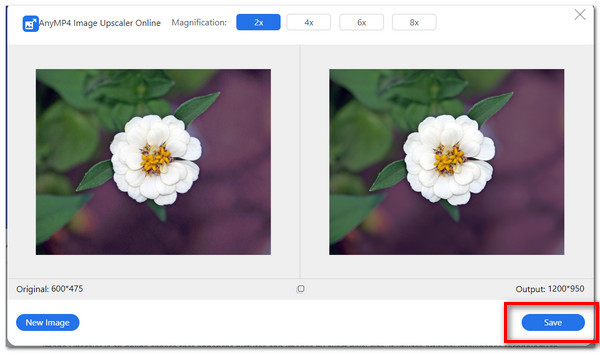
4. After that, you can now save your image file by clicking Save.
Using this tool, you will surely see the difference between your old picture and a sharpened and improved image. The tool is indeed a great alternative for sharpening images. It is accessible online and does the job with only a few steps.
Moreover, it can enhance the details and sharpness of your images. Thus, you can use this tool if you want a faster and quicker tool to sharpen your photo, you can use this tool.
For more online photo editor like Photoshop, you can refer to this post.
What should I do if my photo is quite blurry?
You can sharpen your image to enhance the details in your pictures. There is a Sharpen tool in Photoshop that you can use.
How to avoid grainy photos?
The images must be taken with good camera settings to have good quality images successfully. Make sure that when you take pictures, you will make a good focus on the object. This technique will make minor adjustments in sharpening the details in your image in the future.
Is Sharpening similar to Reducing Noise?
No, they are different. In Sharpening, you enhance the details like the edges of the image. Unlike in Reducing Noise, you are supposed to lessen the noise and grainy elements of the photo. They are related to improving the quality of images using Photoshop.
How to brighten the image in Photoshop?
To adjust brightness in your image, go to Image, select Adjustments, then choose Brightness and Contrast. You may modify the brightness slider. Do this technique to turn your dark and low-light photos into brighter ones.
Is there a trial version for Photoshop?
Yes, there is a trial version for Photoshop. You can find it on the Creative Cloud. You can download Adobe Photoshop and other applications from that platform.
This post has taught us how to sharpen and brighten our images using Photoshop. Adobe Photoshop have an overwhelming user interface because of its various features available. But the incredible thing about that is it can guarantee you to improve the quality of your pictures. Additionally, we can say that AnyMP4 Image Upscaler Online can be an effective sharpening tool as well. When using these tools, you should be more cautious in sharpening images not to make them look unnatural.
 Posted by Angelica Liwanag to Edit Photo
Related Articles
 How to Resize Image by Adobe PhotoShop and Express
Today, you will learn how to use Adobe to resize your photo online easily. Discover these easy steps to resize your photo.
 4 Instructive Ways on How to Unblur a Video Skillfully
Are you one among the millions searching for an accurate solution for video blurriness? Read this article and find out how to fix a blurry video successfully.
 Enjoy Fun with Photos? Top 10 Funny Photo Editors You Should Know
How to enjoy fun with photos? When you want to create some interesting photos by yourself, you can learn more about the 10 best funny photo editors from the article.
 How to Use Illustrator to Resize Image in 3 Methods
Resizing an image using Illustrator is a great thing to do. With the help of this unique tool, let us discover these easy and simple steps in this post.