When capturing the best memories of our lives, we took them on our digital cameras. But some of our pictures do not display the clarity and resolution they need. However, this may be caused by the presence of image noise. In this post, you are going to know all about image noise and image denoising. This occurrence has been standard in most of our pictures as well.
Similarly, the noise may be contributed by a lot of factors. Furthermore, this post will also share why image noise occur, and how to add noise to an image and remove it. Please continue to read more below.

Image noise is an element of image distortion. It results from the variation of brightness, contrast, and color brought by low light and several factors during the acquisition of images. Moreover, it is also defined as corrupted elements in the pixels of an image. Furthermore, image noise differs on many levels. Invisible specks like dust particles and other environmental factors have been the cause of image noise. Similarly, image noise is also caused by low light and sensor temperature. In addition, interference can also be brought by interference during transmission channels.
Image noise is caused by several factors present. It includes the reflected light that the lens captures and makes a variance on the camera sensors. As a result, the variances that the light waves possess make mixed digital signals which can be seen in images.
Furthermore, there are two general types of noise; internal and interference. The difference is that internal noise is caused by illumination and exposure. In contrast, interference noise is caused by natural signals that interfere with the image.
No matter which image noise type your images are, the image resolution is not good, and the photo quality will be affected greatly.
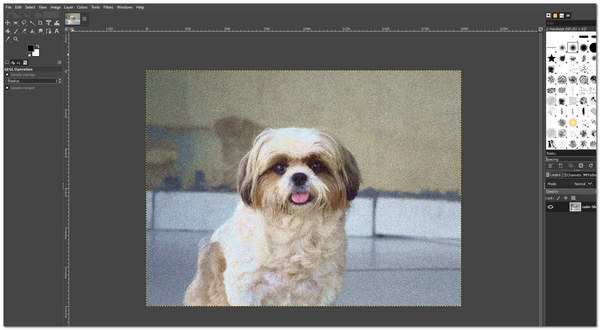
Somehow, adding noise to the image has been an advantage as well. Instead of denoising an image, a picture is preferred with a bit of noise. Adding a little noise will have a grainy effect on the photos. Thus, this will help in giving a vintage ambiance to the image. In addition, the noise's grainy effect will still impart an emotion, especially in black and white photos. This portion will discover how to add noise to an image.
GIMP or GNU Image Manipulation Program is an offline-based graphics and photo-editing tool that can be downloaded and installed. The tool is known for its advanced and professional functions and features that can be used in image manipulation and graphic designing. The tool offers varying types of noise filters. You can add your image. One of them includes the RGB filter that can be added and distributed to an image layer. The noise is added to a pixel's red, green, and blue parts. Take note that RGB is applying an average distribution effect on image noise. That is why you will learn how to add noise to an image using GIMP today.
1. Download and install GIMP on your PC.
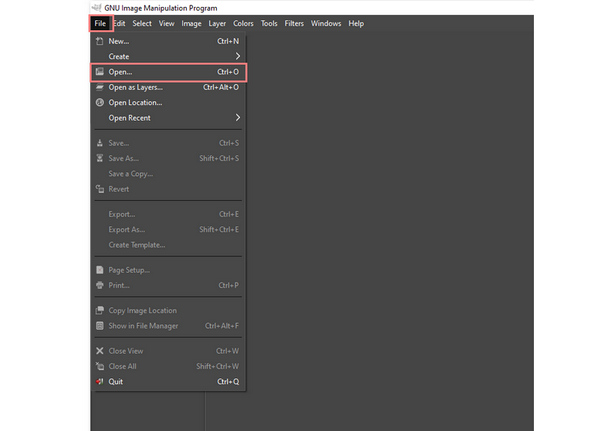
2. To start importing your image file, click File, then select Open. You can now select an image to add noise.
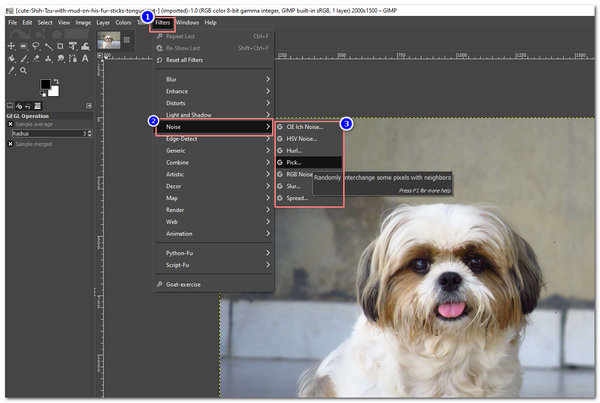
3. After selecting an image, click on Filters on the menu toolbar at the interface's top. Then select Noise. This feature will give you different types of noise, which include HSV noise, RGB, Slur, and many more. Select one, and you will see the grainy effect on your photo.
4. You can adjust and set specific values in the noise level of your image in the dialog box. Select OK to finalize.

After adding the noise to an image, you can also use GIMP to make a further editing like resize an image, crop a picture, and more.
Adding noise to a photo gives a retro and vintage vibe to the image and scenery. It will feature the other minute details of the picture. You can create a sophisticated look with the different types of noise available on GIMP. Also, sharpening images can produce noise on the image layers, thus having a grainy look.
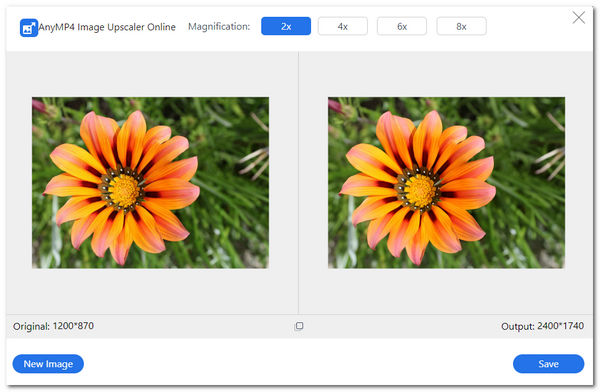
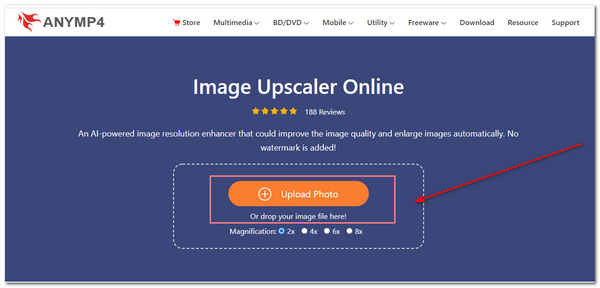
AnyMP4 Image Upscaler Online is an online-based tool of AnyMP4 that focuses mainly on upscaling photos and enhancing them. The use of Artificial Intelligence (AI) technology will help in removing noise from the image. This feature will make the photos look smoother.
Furthermore, denoising an image will be achieved by selecting a magnification level that ranges from 2X, 4X, 6X, up to 8X times. This online image noise reduction tool can improve the sharpness of the photos. In addition, the colors, edges, lines, and other details can be processed in this tool using a particular algorithm. Aside from that, the tools enhance details and texture freely and quickly.
1. Go to the AnyMP4 Image Upscaler Online through its official site.
2. Start importing your photo by clicking Upload Photo on the tool's main interface. Choose any image you want to denoise, which will automatically be uploaded on the tool.
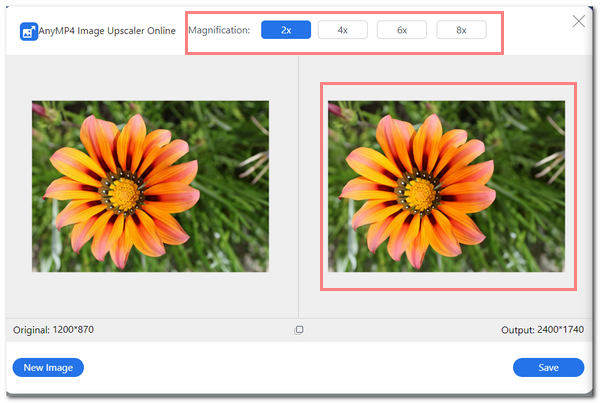
3. A tool dialog box will appear, showing the magnification levels ranging from 2X, 4X, 6X, and 8X times. This function of the tool can upscale and remove noise from the image. Denoising an image can make photos appear smoother and more appealing to anyone.
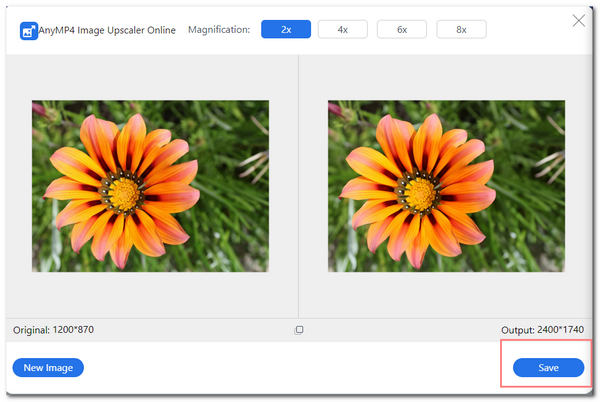
4. After that, you can now click Save to finalize in denoising an image. You can now save and download your denoised picture.
For more photo quality enhancer to remove the image noise, you can find in this post.
1. What causes image noise in radiography?
There are a lot of noises that are present in radiography. These image noises may be caused by the interference of the thermal motion of a body through radiofrequency emissions.
2. What are the types of image noise?
There are known image noise types in today's time. It includes the Gaussian noise, which can be acquired during photo acquisition. This is due to the light and temperature factors that the sensors capture. Another is Salt-and-pepper noise which is also called impulsive noise. It is described as having dark pixels in bright regions and vice versa. Third, the Film grain is a randomly distributed noise. Lastly, Periodic Noise is defined as the noise with a repeating pattern.
3. How to avoid image noise?
To avoid image noise, you must try setting up the ISO settings of your camera. It includes adjusting the light and brightening the exposure. Also, you can try out increasing the shutter speed of your camera. In addition, you can also widen your camera's aperture to avoid noise in your images. Lastly, you can try shooting your photos in raw format.
4. What is image noise essential?
Image noise helps in maintaining the sharpness of the image. Somehow, having noise in an image creates a unique look and a vintage effect on your image. Also, image noise provides a realistic look, especially on a human face that shows all the blemishes and wrinkles.
To conclude, you have discovered the tool of how to denoise an image. In addition, know how to add it to an image. There are some instances when an image noise is essential and when it is not. Moreover, you can apply image noise to a photo to have a grainy and realistic look. However, most people prefer image denoising to make their photos appear smoother and more appealing to every viewer. Thus, it depends on the scenery and purpose of the image on how to present it to people.
 Posted by Angelica Liwanag to Edit Photo
More readings
 Top 3 Ways to Increase Image Resolution to HD/4K/8K
Enhancing the resolution of your images is a great way to produce better photos. Discover the 3 photo resolution upscaler to make images high quality.
 Page Not Found | AnyMP4
The page you are looking for has been removed or may not exist. Please return to homepage or browse other popular AnyMP4 pages.
 Page Not Found | AnyMP4
The page you are looking for has been removed or may not exist. Please return to homepage or browse other popular AnyMP4 pages.
 Page Not Found | AnyMP4
The page you are looking for has been removed or may not exist. Please return to homepage or browse other popular AnyMP4 pages.