Today, videos can be captured using your smartphone’s camera app. However, access to the practicality of digital recording was only made possible by the first iteration of digital recorder cameras, which entered the market in the late 90s in camcorders using the MiniDV format. Since MiniDV videos are usually small, DVDs are ideal for storing these clips. This guide will provide a detailed tutorial to help readers learn how to transfer MiniDV to DVDs using the best tools available for Windows and Mac computers.

Before proceeding to our guide, let us first discuss MiniDV and the need to convert them to DVD format.
MiniDV is one of the first editions of files that might be considered digital videos; it peaked during the early 2000s with semi-professional camera recorders. Footages captured using the MiniDV format were considered revolutionary due to their superiority versus the quality of analog VHS videos.
A few years after the peak in popularity of MiniDV, DVDs took over the world due to their capacity to store multiple movie-length videos in one disc. This was made possible by the superb storage size of DVDs at the time, which can reach multiple gigabytes of digital storage. Since DVDs are also customizable, it is ideal to make a DVD that has multiple videos accessible using a menu.
The strengths of MiniDV are its compact file size, DVD storage size, and customizable menu. Learning to transfer MiniDV clips in DVDs has been a staple storage option for users who want to save classic MiniDV clips offline or as a backup for digital copies.
With the compatibility of MiniDV and DVD now discussed, let us proceed to modern software to write MiniDV videos into DVDs.
If you want to convert MiniDV tape to DVD, the first step is making it possible to burn the clip on DVDs first. This can only be done if your MiniDV video has been digitized first. Fortunately, AnyMP4 Screen Recorder provides a solid option for capturing external videos such as MiniDV while playing on a video card on your computer.
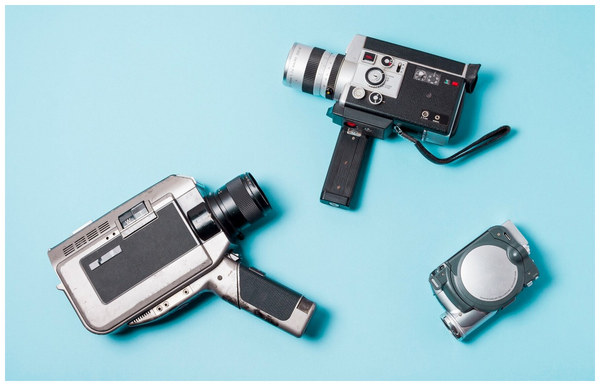
To make recording MiniDV clips possible, you must prepare the following equipment first:
Once you have the equipment listed in hand, you must connect your camcorder to the video capture card using the RCA cable. Since there are countless options for video capture cards in the market, you must learn how to set up the one you picked by relying on specific guides online.
When the video capture card plays the MiniDV clip from the camcorder, it is time to set up the AnyMP4 Screen Recorder to capture the video playing on your video capture card. We have provided a three-step guide on using the recorder tool below.
Make sure to download AnyMP4 Screen Recorder first or have an easier time following each step.
Secure Download
Secure Download
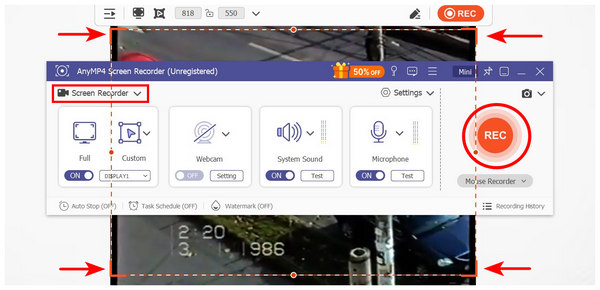
1. While the MiniDV clip plays on the video capture software, open AnyMP4 Screen Recorder and use the custom display function on its Screen Recorder mode. Position the screen capture section to fill the entire MiniDV video. Then, click on REC.
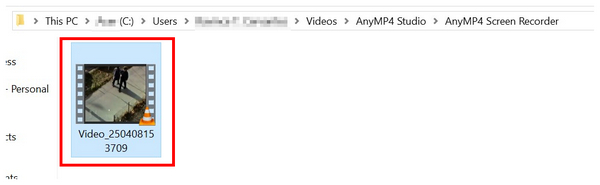
2. After recording, your video can be edited using the essential editing tools available on AnyMP4 Screen Recorder. To locate where the recording has been saved, click the Folder button.
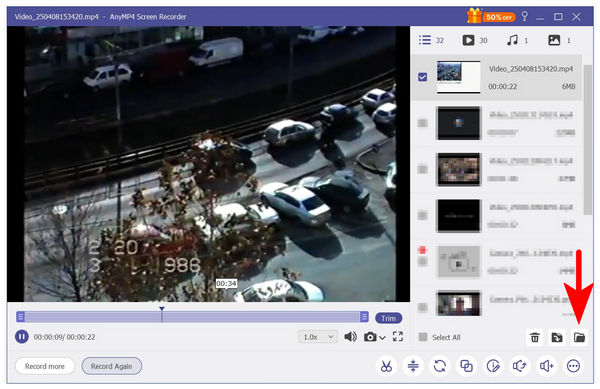
3. After recording, your video can be edited using the essential editing tools available on AnyMP4 Screen Recorder. To locate where the recording has been saved, click the Folder button.
Since digitizing the MiniDV video is only the first step to transferring them to DVD, let us proceed to the guide on using the best DVD creator tool for Windows and Mac in the next section of this article.
Now that your MiniDV tape has been recorded and accessible digitally, the next step is to learn how to burn it to DVD. This can be made possible using the most reliable DVD-burning tool for Windows 11/10/8 and Mac OS X 10.9 or later with AnyMP4 DVD Creator.
Capable of supporting more than 500 digital formats, this program can read videos saved in MP4, MKV, MOV, MTS, MPG, and more and burn them into DVD-5 or DVD-9 discs. On top of its versatility in reading files, the tool can also be used to add a customizable DVD menu template to discs created using it. This makes the program an excellent choice for creating a compilation of MiniDV clips.
If you want to take the MiniDV transfer further, the software also supports custom audio tracks and subtitle files to be embedded in the video that will be burned on the software. Finally, users concerned about the quality of videos processed using the tool should not worry since AnyMP4 DVD Creator follows PAL and NTSC TV standards.
For a complete guide on learning how to burn digitized MiniDV clips to DVD, please refer to our guide below and download the software to easily understand each step.
Secure Download
Secure Download
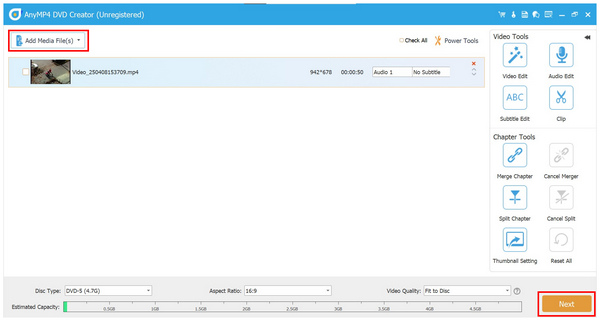
1. Open AnyMP4 DVD Creator and select the DVD Option in the program’s main menu. Then, click Add Media File to import the MiniDV video you want to write in the DVD. Click on Next after the file has been added.
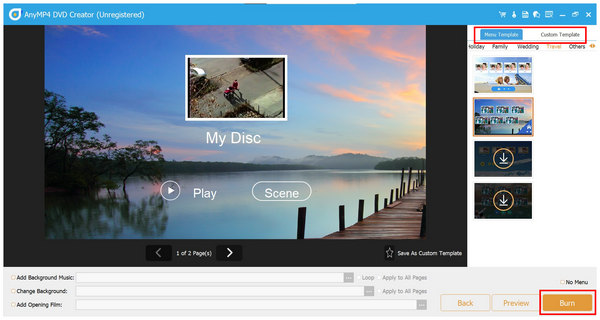
2. Choose the menu template for the MiniDV clips in the DVD Menu editing window. You can select the ready-made Menu Templates or the Custom Template if you want something more personal. After choosing the menu, select Burn to move to the DVD burning settings.
3. Finally, click the Burn to Disc option and set the location on the DVD drive where you want the MiniDV video to be burned. Click on Start to begin the burning process.

Once the burning process is done, the old-school MiniDV footage you have recovered from the camcorder hardware can now be watched using the DVD players. Since you also digitize the videos, you can watch the MiniDV clips directly on your computer.
Can converted MiniDV footage be stored in other formats?
Yes, you can. You can use screen capture tools to digitize MiniDVs. You can then transfer these videos to DVD.
Is MiniDV the same as MiniDVD?
No, they are not. MiniDV are smaller cassettes for older camcorders. While MiniDVDs are compact versions of standard DVDs.
Is it hard to digitize MiniDV videos?
Yes, it is. Digitizing MiniDV videos requires multiple hardware. It also requires a functional screen recorder, such as AnyMP4 Screen Recorder.
Can you enhance MiniDV footage?
Yes, you can. There are multiple video enhancer tools on the market. AnyMP4 Video Converter Ultimate is one example.
We hope this article has provided you with valuable tips on converting MiniDV tape to DVD. Since MiniDV is hard to process, we highly recommend relying on the tools we proposed in this article to make it easier to convert these older media. Make sure to download AnyMP4 DVD Creator to make DVDs on your own easier.
Secure Download
Secure Download
 Posted by Ted Klarso to Burn Blu-ray&DVD
More readings
 Top 5 Methods to Burn MP4 to DVD on Mac
Learn how to burn MP4 to DVD on Mac effortlessly. Follow our detailed guide to preserve your videos in a durable format, perfect for sharing or archiving.
 The Ultimate Guide to Record HD Video from DVR to A DVD with Ease
Can I record shows from the HD DVR to DVD with ease? This article tells you how to record HD video to a standard DVD with the detailed process.
 Guide to Burn MOV Video Files to DVD on Windows and Mac
It is a good idea to watch MOV video files on large screen with your families or friends, so we share a guide to help you burn MOV to DVD on computer easily.
 8MM to DVD: Transfer Tapes as DVD Movies
Do you want to convert your 8MM movie to DVD without spending hundreds of bucks on a professional converter? You’re on the right track. Discover how it works!