If you want to learn how to burn DVDs on modern-day computers, learning which DVD-burning tool you should use based on your skills and needs is the first step. After solving that problem, you can now start burning DVDs step-by-step. To provide a quick glimpse of the steps you need to follow when using DVD-burning tools, we provided a quick guide below as a simple demonstration.
1: Load the DVD into your computer and open the DVD burning software. Next, add the media file you want to burn in the software.
2: Customize or edit the loaded media file using the options available in the burning tool.
3: After editing the loaded media, select the Burn to Disc box, and then select Start to begin the DVD burning process.
This step-by-step guide is based on AnyMP4 DVD Creator, which we will discuss thoroughly regarding the first DVD-burning software featured. To know everything you love to learn before burning DVDs, please continue reading our guide below.

Before learning how to burn videos to DVDs, you must prepare the necessary equipment to ensure that you can create DVDs independently without any issues. In this case, you must collect three tools to finish your preparations.
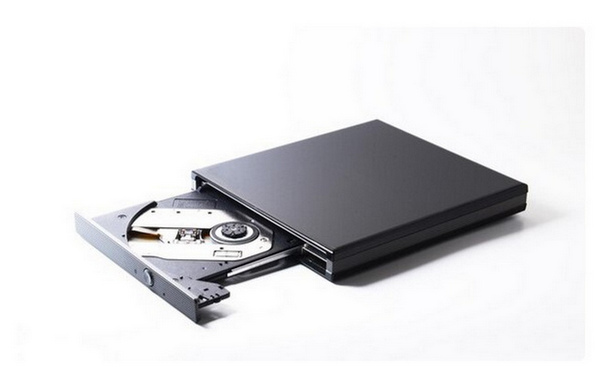
Since most modern computers are no longer equipped with a built-in DVD driver, you must prepare an external DVD driver to connect to your computer to ensure your blank DVD will be read.
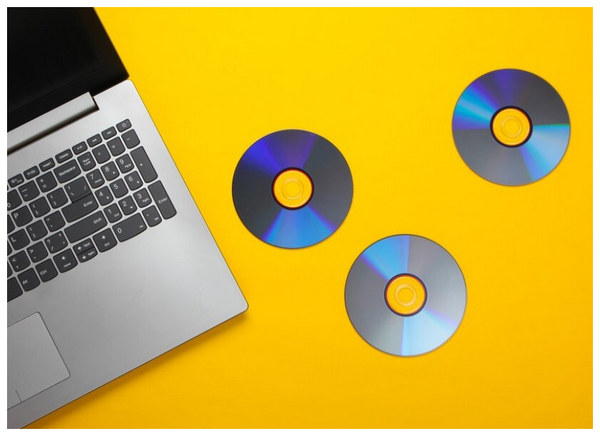
A blank DVD is necessary to make burning possible since this is where you will write the digital media that you want to be burned into the new DVD. The burning process will not be possible if there is no location where the media file will be saved.
Finally, capable DVD burner software is the last piece of equipment you must collect. This software will write the digital media file you will burn into the blank DVD loaded on your device.
Since only the DVD driver and blank DVD are the physical tools that need to be collected, we provided a guide on three of the most reliable DVD burner software for Windows 10/11 and Mac. All of these tools will work well to solve your problems regarding how to write on DVD using modern computers.
We will start our guide by featuring the most reliable option to learn how to burn videos to DVD with AnyMP4 DVD Creator, which was also featured in the short guide in the article's introduction.
This software was selected due to its remarkable compatibility with most operating systems on modern computers today. Available for Windows 11/10/8 and Mac OS X 10.9 or later, the program ensures that it will run smoothly on your computer, no matter your OS.
Moreover, the tool is also impressive in the format reading department since it can read over 500 video formats and burn them into the loaded DVD on the computer. Some of the supported formats that AnyMP4 DVD Creator can process are MP4, MKV, MOV, MTS, MPG, and more.
The program also excels in providing DVD customization. It can also add menu templates, audio tracks, and subtitles on the media file you burn, enabling you to organize multiple videos and plugins to a DVD with a big enough storage.
Users concerned with the quality of the media that will be burned fear not because AnyMP4 DVD Creator follows PAL and NTSC TV standards to ensure the quality of the videos when running on all kinds of television units.
For a more detailed guide on using AnyMP4 DVD Creator, we have provided a more comprehensive guide on how to use it below. Make sure to download it first for an easier time creating DVDs.
Secure Download
Secure Download
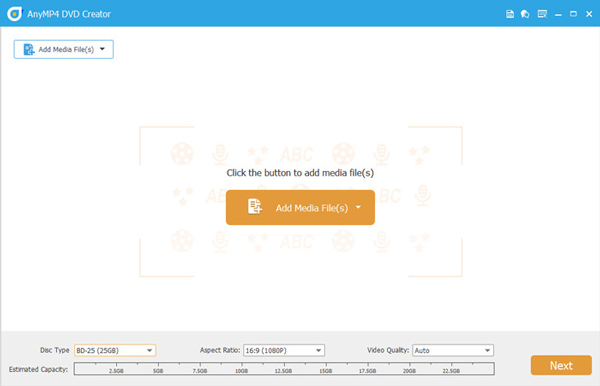
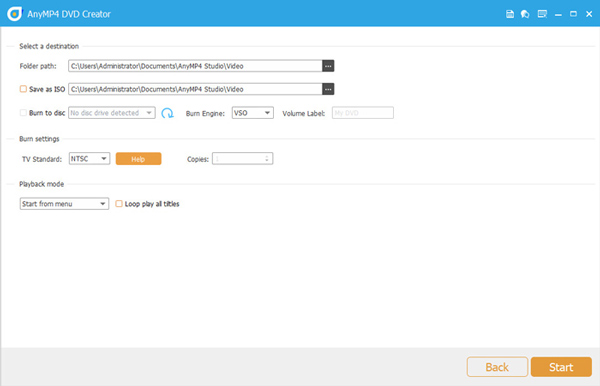
1. Load the DVD you want to burn into your computer using an external or built-in driver. Then, open AnyMP4 DVD Creator. Add the media file you want to burn in the software’s source menu.
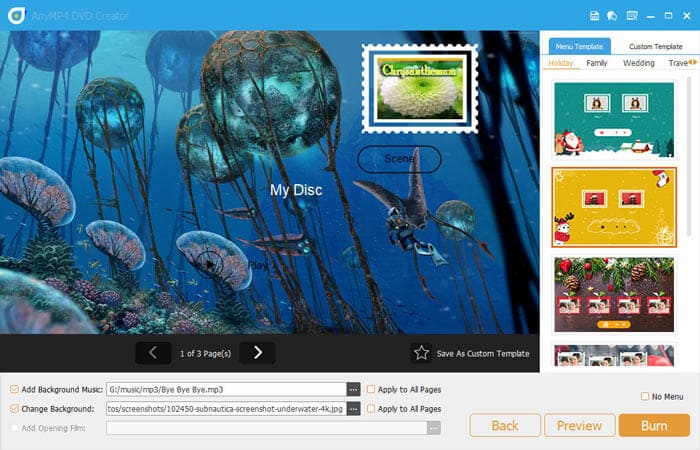
2. After AnyMP4 DVD Creator reads the media file you want to burn, you can customize it based on how you want it to look once it has been written on the blank DVD. You can add DVD menus, background music, and other customization options.

3. Now that you have edited and customized the media file that will be burned. Select the Burn to Disc option to set the burning location into the loaded DVD. Then, click on Start to begin the DVD-burning process.
By following this guide, you learn how to burn movies to DVD using a Windows or MacOS computer. Due to the versatility of the software, you can also use it to create DVDs using videos in more than 500 digital formats.
When looking for a reliable way to process DVDs, one of the key factors is processing speed since DVD media are usually on a larger file size. In this case, DVDFab DVD Creator should be your best bet since this program was optimized to process DVDs efficiently.
On top of its fast processing speed, the tool is also designed for accessibility since it is available on both Windows and Mac, much like the previous software in this article. The software is also aligned towards beginners since it is easy to use due to its user interface. These factors make it a good option for beginners.
Unfortunately, DVDFab DVD Creator is not free to use, and it is resource-hungry during the DVD burning process since it requires high priority from your computer’s GPU, CPU, and RAM to manage its fast processing speed.
Unfortunately, DVDFab DVD Creator is not free to use, and it is resource-hungry during the DVD burning process since it requires high priority from your computer’s GPU, CPU, and RAM to manage its fast processing speed.
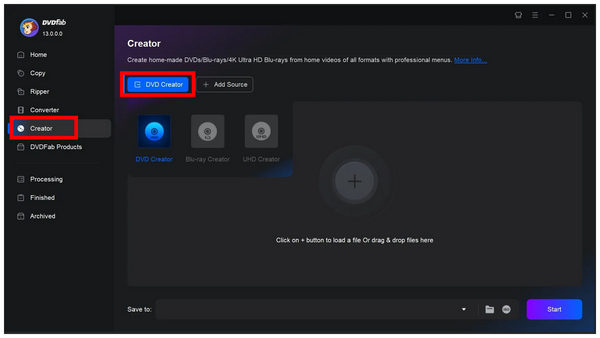
1. Load the DVD you want to burn on your computer. Open DVDFab DVD Creator and select the Creator option in the menu. Then, add the Source that you want to burn.
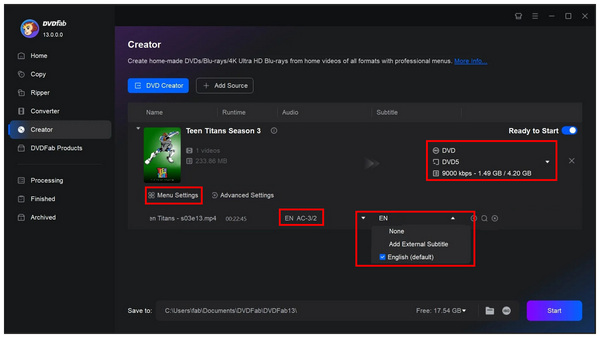
2. Once the media file you want to write in the DVD has been added, you can now use the multiple customization options in the program, including menu settings, audio track, output format, subtitles, and more.
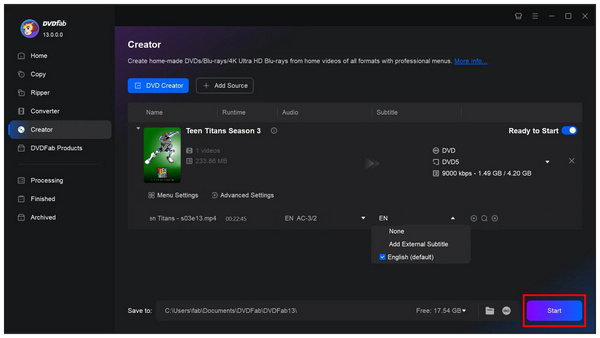
3. After adjusting the settings you want your DVD media to use, click Start to begin the DVD-burning process.
Since DVDFab DVD Creator excels in fast processing speed, this option quickly answers your questions regarding how do I burn a movie to a DVD. However, remember that the tool's processing speed requires powerful hardware. This makes it a suboptimal choice for entry-level and midrange computers.
The third software we will feature in this article specializes in answering questions about how to burn DVD discs in Windows 10/11 and all versions of the Windows operating system. This will be ImgBurn, a free-to-use DVD-burning tool exclusive to Windows computers.
Since the program was designed to be optimized for all versions of Windows, ImgBurn enjoys a lightweight file size with a fully functional DVD-burning feature. Although it might be considered a classic or legacy program, ImgBurn can still write digital folders, files, and ISO images to blank DVDs.
Unfortunately, the official developer support for the software ended in 2021, which means most online sources where the tool can be loaded are filled with adware. Although the program’s functionality is reliable, downloading it officially is challenging.
Please refer to our quick guide below to learn how to use the program.
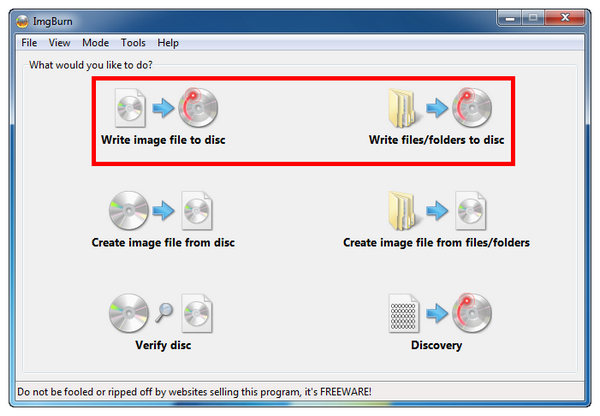
1. Load the blank DVD into your computer. Then open ImgBurn and select either Write Image file to Disc or Write file/folders to Discs. These are the options to burn content to blank DVDs.
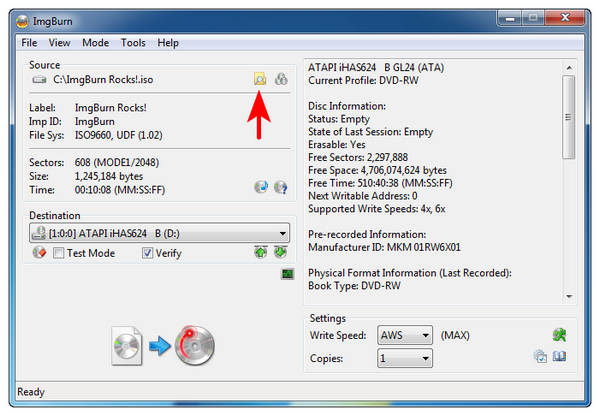
2. Then click the Folder icon and set the burning destination to the loaded DVD on your computer.
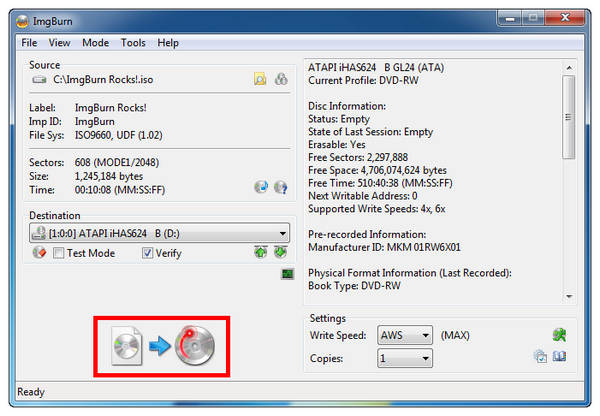
3. After setting the destination to the blank DVD, click the Write icon to begin the DVD-burning process.
ImgBurn is the easiest to use among the programs presented in this article. However, be careful when downloading the tool for the first time since the lack of active developer support might harm your computer’s health.
We hope this article has helped you decide which DVD-burning tool to use. However, if you are still undecided on the three ways to choose, we highly recommend AnyMP4 DVD Creator since it is the most versatile and safe.
Secure Download
Secure Download
 Updated by Ted Klarso to Burn Blu-ray&DVD
More readings
 Top 5 Methods to Burn MP4 to DVD on Mac
Learn how to burn MP4 to DVD on Mac effortlessly. Follow our detailed guide to preserve your videos in a durable format, perfect for sharing or archiving.
 How to Burn MKV to DVD Safely (8 Best Ways)
Follow this article to learn the detailed steps of converting MKV files to DVDs in 8 easy ways with pictures to enjoy wonderful DVD movies.
 Guide to Burn MOV Video Files to DVD on Windows and Mac
It is a good idea to watch MOV video files on large screen with your families or friends, so we share a guide to help you burn MOV to DVD on computer easily.
 How to Burn Music to DVD [Simple Steps to Follow]
Do you want to burn music to DVD? But you don’t know how? This post will walk you through the guide to converting your music to DVD with additional features.