When it comes to slideshows, manually operated ones are best used for conventional business or academic reports. However, an automated slideshow is a better option when used as a visual aid for social events, a display for booths, a dynamic menu for food establishments, and for other similar purposes. With that in mind, learning how to loop a slideshow in PowerPoint is a valuable skill for users who are not planning to present their slides but only use them as visual displays. In this article, we provide a detailed guide on setting PowerPoint slideshows to loop, along with useful tips to avoid common mistakes. We will also highlight one of the best alternatives for creating slideshows solely for display purposes.
Looping slideshows in Microsoft PowerPoint work by setting specific options in the program that allow your presentation to continuously play and replay from the beginning once it ends.
Although not intended for traditional presentations, looped PowerPoint slideshows have their own niche, particularly for display and visual purposes. They are commonly used for display purposes for social events such as weddings, birthdays, or anniversaries. Another common use is as a dynamic menu for local restaurants, designed to showcase their offerings to consumers.
If you think that these niche instances suit your needs as a photo slideshow maker on loop, you are in luck, since this article guide was written to serve as a detailed step-by-step guide for users who want to learn how to set PowerPoint slideshows on loop.
Now that we have discussed the common uses and practicality that setting PowerPoint slideshows on a loop may provide, let us move forward to the basic steps that you should learn to set up continuous slideshow loops.
Without further ado, the three-step guide provided below is designed to make learning how to create a PowerPoint loop slideshow easy to understand and set up. Please continue reading below to learn how.
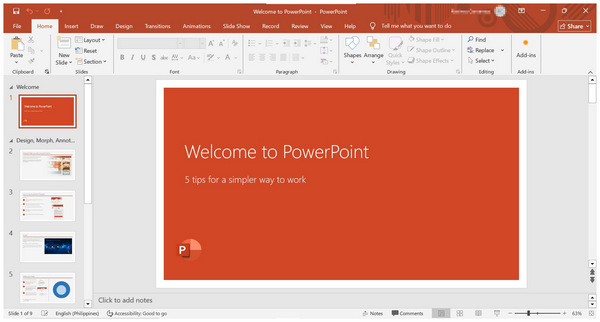
1. Open the slideshow you want to loop, then select the Slide Show tab on the program's taskbar. Under it, click on the Set Up Slide Show button. It will then open the setup menu where you can check the Loop continuously until Esc option. Click OK to confirm.

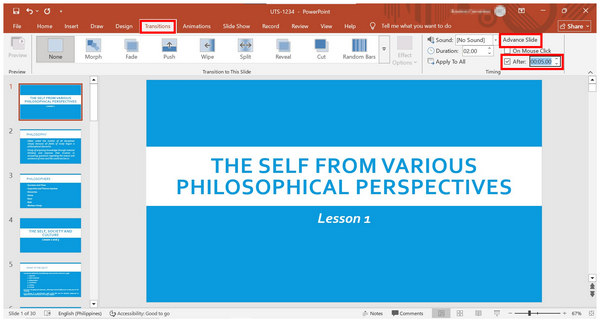
2. After enabling the slideshow loop, you will need to set up how each slide advances. To do this, go to the Transitions tab and find the Advanced Slide setting. Uncheck the On Mouse Click option and enable the After tab. Then, adjust the time value according to how you want each slide to remain on-screen.
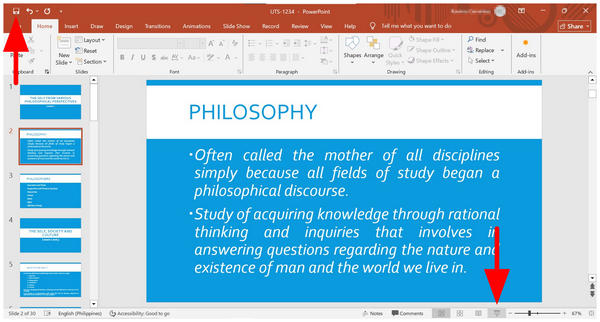
3. Once both the slideshow loop and the slide advance timing are set up, you can proceed to preview the slideshow. To preview, select the Slide Show button beside the Zoom tool. To save it, click on the Save icon in the upper left corner of the program.
Although these setup steps will enable your slideshow to loop, additional factors, such as transitions, effects, animations, and other similar elements, may impact how your automated presentation plays. Another challenge you must face is that PPT files are more difficult to play than regular videos unless you learn how to record your PowerPoint presentation.
If you want to create a looping slideshow in PowerPoint, the most crucial adjustment you need to make is setting the timing for each slide. This will determine how each page remains on screen before proceeding to the next one. It is crucial to find the right balance based on the information presented on each slide.
To make looping possible on your slideshow, you must enable the required setting in the Slide Show tab. This is the main setting that enables slideshow loops to be possible. If you fail to do so, your slideshow will simply stop once it automatically plays the last slide, provided you did not convert your PowerPoint presentation into a video.
Since most automatic slideshows incorporate music or voice-over for added context and information, you must embed music files in audio formats that PowerPoint supports. As such, only use MP3, WAV, WMA, and M4A. Among them, MP3 is the most recommended due to its superb compatibility and more compact size.
When using regular slideshows, animations and transitions work great as they add creative value to your presentation. However, these effects will not be effective when looping the slideshow, as they will occupy important seconds that your viewers may not appreciate. Fortunately, you can easily remove these effects in the same setting where you can enable looping.
Now that we have provided a complete tutorial and highlighted common mistakes to avoid when creating PowerPoint slideshows, we can move forward to the best alternative tool for setting slideshows on a loop more easily. This will be made possible by AnyMP4 Video Converter Ultimate’s MV Maker editor.
Available for both Windows and macOS computers, AnyMP4 Video Converter Ultimate’s MV Maker feature was designed to make video slideshows easily, thanks to its pre-built themes, templates, effects, and other editing elements that are all optimized for beginner use.
Unlike PowerPoint slideshows that require setup to enable looping, this alternative eliminates the need for prior adjustments, as it produces video slideshows that can be set to play on repeat once you want to use them for display purposes.
When it comes to the video format, you won’t have to worry since AnyMP4 Video Converter Ultimate can import videos to over 500+ formats, including popular options like MP4, MKV, MOV, JPEG, PNG, GIF, and more.
To learn more about what makes AnyMP4 Video Converter Ultimate an excellent choice for producing video slideshows, make sure to read its main features below. Next, proceed to our three-step guide on using the MV Maker feature of the program.
Main Features:
• MV Maker feature is designed for producing video presentations with intuitive editing tools for making high-quality looped slideshows.
• It can be used to convert video formats to 500+ file types, making video slideshows easier to play on any device.
• Equipped with powerful DVD ripping features for converting DVD media to a digital format.
• It can improve video quality up to 4K UHD, ensuring that your slideshow video looks good even on larger screens.
• Equipped with 20+ multimedia tools in the Toolbox tab, which include practical options like watermark remover, cropper, merger, trimmer, and more, to refine your videos.
For an easier time following each step, we highly recommend downloading the software first, using the link below to learn how to edit with it.
Secure Download
Secure Download
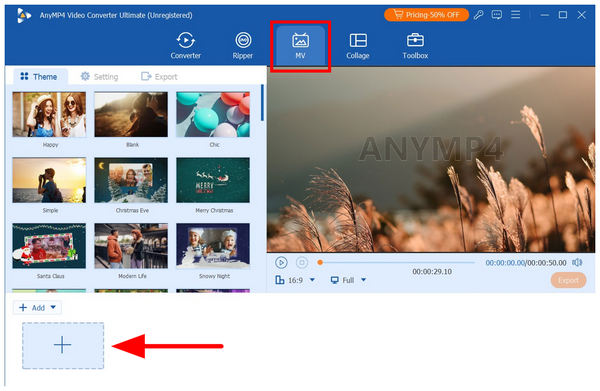
1. Open AnyMP4 Video Converter Ultimate and go to the MV Maker tab. Next, click on Add file button to import the media you want to use for the slideshow.
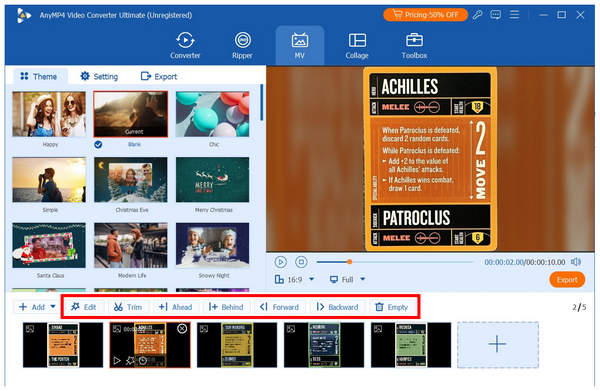
2. With the slideshow files added to the MV Maker editor, you can edit each media individually using the available tools, such as Edit, Trim, and Order Adjustment. To edit visual elements such as effects, graphics, or text, select the Edit tool.
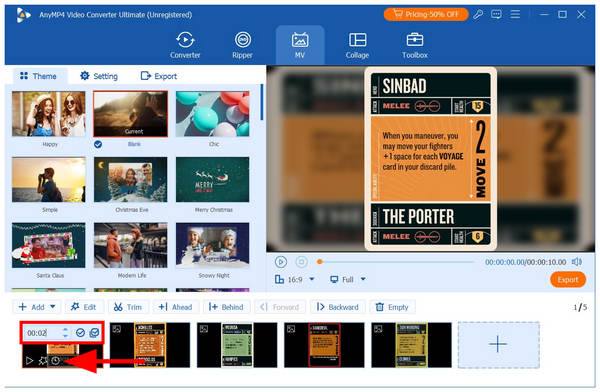
Once you have finished setting up the visual adjustments, you can edit the duration of each file by clicking on the media, selecting the Duration button, and then adjusting the time value for each file.
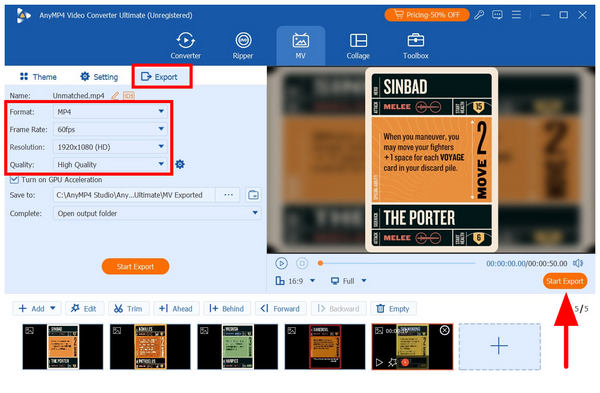
3. Once you have finished editing each media and setting its duration, proceed to the Export tab. Then, you can edit the video output’s Format, Frame Rate, Resolution, and Quality. Finally, select Start Export to begin creating your slideshow video.
Once the video slideshow you have produced is exported, you can now play the file on any display or device that you like. To loop it, simply set the video player of your choice to play in repeat mode and enjoy a much more seamless looping slideshow.
Can I make a PowerPoint presentation play continuously?
Yes, you can. PowerPoint can play slideshows on repeat by editing the Set Up Slide Show option. You can activate it for manual slide shows or for automatic slide advancing.
What is kiosk mode in PowerPoint?
Kiosk mode in PowerPoint enables you to play the entire slideshow continuously. You also need to edit the duration of each tab to set a standard duration for each page. However, this is more advisable if you just convert the slideshow to a video.
Can I loop a PowerPoint with music?
Yes, you can. Music files added to presentations, whether as a PowerPoint voiceover or a background audio, may play continuously in a loop. You only need to set the music to loop as well.
How to loop a slideshow in PowerPoint?
You need to edit the Set Up Slide Show option in the Slide Show tab. There, you can check the Loop Continuously option to enable looping. This will then replay your presentation back to the beginning after the last slide is reached.
Are video slideshows more suitable for presentations that are intended to be looped?
Yes, they are. Slideshows saved in video format will be easier to play and use. It will also be much simpler to operate since you only need a video player.
Now that we have provided the steps for creating PowerPoint slideshows on loop, we hope you will be able to create presentations for events, displays, kiosks, and other similar situations. However, if you are looking for a much more convenient option, you may use multimedia editors instead, such as AnyMP4 Video Converter Ultimate. You may download the program using the download link below.
Secure Download
Secure Download
 Updated by Mark Cristobal to Edit Video
More readings
 6 Steps to Make a Slideshow on TikTok
Learn how to make a slideshow on TikTok effortlessly. Add transitions, music, and effects to captivate your audience and boost your TikTok presence.
 Easy Step-by-step Tutorial How to Make a Slideshow on Facebook
This article tells you how to do a slideshow on Facebook for free in the fastest way possible. All you have to do is to follow the step-by-step procedure below.
 3 Best Ways to Embed MP4 in PowerPoint
Have you ever wondered why you cannot embed MP4 into PowerPoint successfully? This article will give you a comprehensive explanation and related solutions.
 Full Guide on How to Edit a Video in PowerPoint
Are you looking for a detailed guide on learning how to edit videos in PowerPoint? Read this article for a detailed guide about its limited editing tools.