Open Broadcaster Software (OBS) is one of the leading recording programs that most people use today. This software is a solid option for content creators looking for a tool to help stream their content to video streaming sites. Another function that most OBS users often like is the tool’s built-in recording feature, which can be used to capture computer screens and webcam footage. When looking for additional features, one slightly overlooked offering available in the software is the OBS Remux Recording feature. This option works as a file converter tool, which can be used to convert OBS recordings saved in MKV format by default into more common file formats that are easier to read, such as MP4. If you are interested in using this option, please continue reading the article down below.
OBS Remuxing is the built-in option of the OBS recording tool to convert recorded video files into five different formats that the tool supports. Since OBS video recordings are saved in an MKV file, the most common usage of remux recording is to convert these videos into an easily readable format, such as an MP4 file. In addition to MKV and MP4, this OBS function can also be used to convert files into FLV, MOV, and TS.
To learn the factors that make OBS remuxing worthwhile, make sure to read the factors that we have selected below:
By default, OBS recordings are saved in either MKV or FLV. These formats are selected since they are more resistant to file corruption in case OBS faces errors or crashing issues. Neither of the mentioned formats is easily corrupted in case your computer shuts down during recordings.
Although MKV and FLV are advantageous for recording preservation and avoiding crashes, they are unfortunately not compatible with most traditional video editors. When it comes to mainstream video editing software like Premiere Pro, Final Cut, DaVinci Resolve, and others, the most advisable video format is MP4.
The most reasonable cause for why remuxing is needed is to make your OBS recordings compatible with video editors. Fortunately, OBS offers format remuxing to highly supported video formats such as MP4 and MOV.
To learn how to use the Remux Recording function of the OBS recorder, we have featured a detailed tutorial on how to use this tool in the next section of this article.
Remuxing recordings in OBS is surprisingly simple to do, especially for a program that was designed to cater to users with technical experience. In fact, the procedure of MKV conversion in OBS can be done within three simple steps. However, learning was file format the software supports is quite tricky to learn for first-time users. This is because the supported formats in the OBS file converter were not specified. Fortunately, we provided all the supported formats of OBS in the third step of this guide.
Without further ado, please continue reading the guide below to learn how to use the remux recording feature of OBS.
1. Start recording on OBS and then select File > Settings.

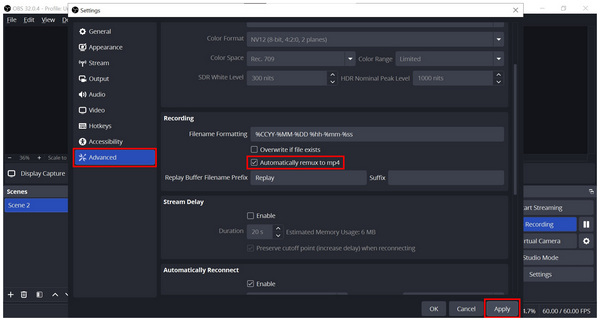
2. In the Settings tab, go to Advanced and then check the Automatically remux to MP4 option. Select Apply to confirm the automatic remux setting.
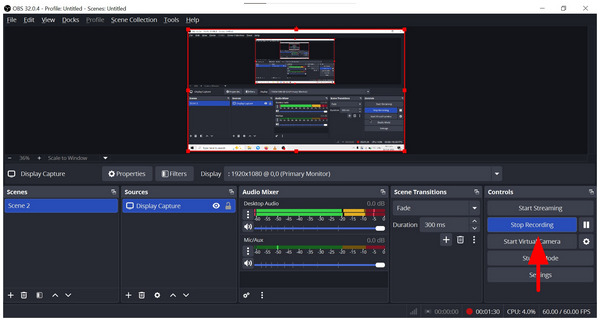
3. With the automatic remux setting now applied, you may select Stop Recording.
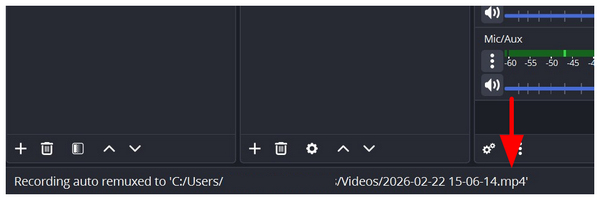
Once your file has been saved, OBS will notify you that your video has been automatically remuxed to MP4.
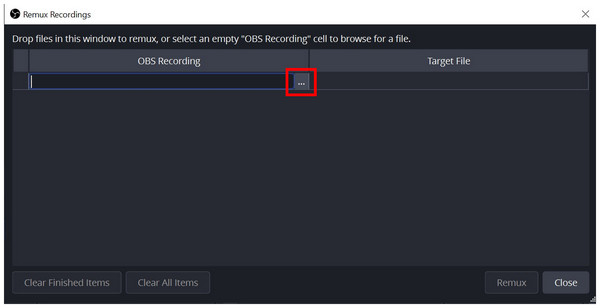
1. Open OBS and click on the File button. Then, select Remux Recordings on the dropdown menu.

2. When the Remux Recording menu appears, click on the Three Dots button to access your file manager and find the video that you want to convert.
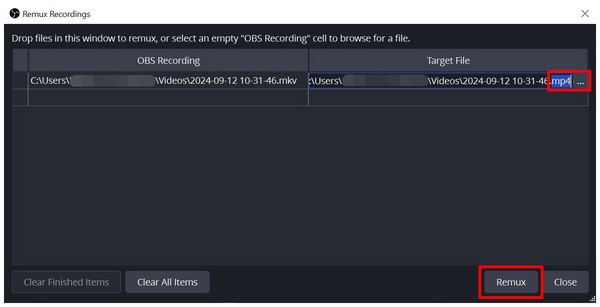
3. After the video that you want to convert has been added, you can change the file extension of the Target File video into FLV, MOV, or TS; you can also leave it to the default MP4 format. You can also click on the Three Dots button to set the save location of the video. If all the desired settings have been set, simply click on Remux to start the file conversion process.
Although OBS’ converter function is surprisingly simple to use, the file format that it can convert to is simply limited. Additionally, it does not support video-to-audio conversion, which is a highly practical conversion format that is useful for media production needs. To learn which is the best OBS alternative file converter that you can use, please read the next section of this article.
Since OBS is a recording software and its file conversion process is only a bonus feature, it is understandable if its limitations are quite low. If you are looking for a more powerful file converter tool, look no further than AnyMP4 Video Converter Ultimate, which will be the featured topic of the third section of this article.
Designed as an exclusive file converter, AnyMP4 Video Converter Ultimate is for users who want to convert various media files to multiple formats. Additionally, the tool can remux files to a different format, such as MKV to MP4. This feature opens up many possibilities, especially for multimedia practitioners such as media editors.
Although OBS offers security and professionalism thanks to its crash-resistant formats, the cost of additional steps to make recorded videos accessible for video editing may be too high. It also helps that remuxing is another skill users need to learn first. With that in mind, AnyMP4 Screen Recorder offers a one-stop solution that automatically records videos in a universal format with no extra remuxing required.
To learn how to use this powerful OBS alternative to convert recorded videos, please read our guide on how to use it below.
Download the software first before proceeding to the first step.
Secure Download
Secure Download
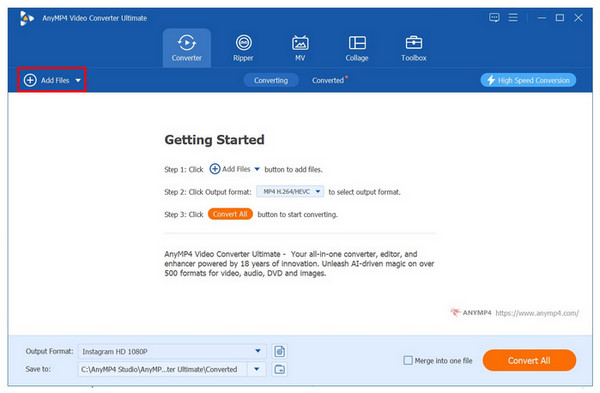
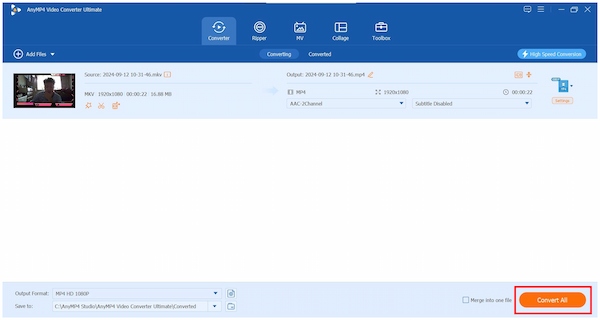
1. Open AnyMP4 Video Converter Ultimate and click on Add Files to import the recording that you want to convert.
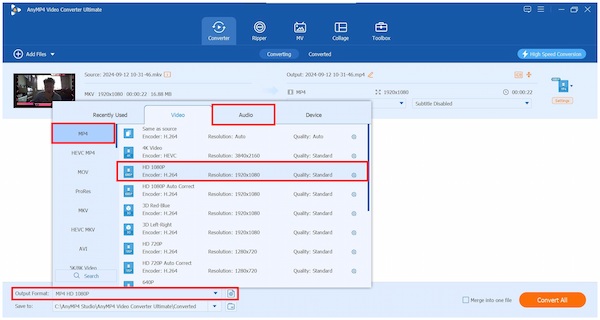
2. When the OBS recording that you want to convert has been added, click on Output Format and select the MP4 or other file types that you want to convert the video into. Afterward, select the output quality that you want to apply to the video that will be converted. You can also select the Audio section to convert the video file into audio format.
3. Now that the Output Format has been set, click on Convert All to start the file conversion process.
By following this three-step guide, you can now convert OBS recordings into any file type that you wish to use. This is a solid upgrade from OBS recording remux, which is highly limited in terms of supported file type.
| Default Format | Need for Remuxing | Steps Required from Recording to Editing | Crash Resistance | Built-in Editing Tools | |
|---|---|---|---|---|---|
| OBS Studio | MKV FLV |
Remuxing required. | Require video format remuxing before editing. | High crash resistance due to the MKV and FLV formats. | None. |
| AnyMP4 Screen Recorder | MP4 MOV |
Not required since the default format is MP4 or MOV. | No steps required. Videos are ready for traditional video editing tools. | Preserve recording settings used during a crash. | Video trimmer. Video compressor. Video merger. Essential video editing tools. |
To remove the need for file type conversion, using a screen and video recording tool that automatically saves videos into MP4 files is the most practical option. With that in mind, AnyMP4 Screen Recorder should be one of your top options when looking for a recorder that saves recordings as MP4 without remixing and can rival OBS's recording quality.
Although it's named a screen recorder, AnyMP4 Screen Recorder was designed as a versatile, all-around recording tool. This development vision has equipped the software with 7 recording modes, making it both practical and versatile. These recording modes are also supported by a practical built-in video editor, making simple adjustments easier to apply to the program right after recording. This is a major practical upgrade over OBS, since it has no editing tools.
The default recording format in AnyMP4 Screen Recorder is also set to MP4 or MOV. These are very convenient selections since both formats are widely supported, especially on traditional video editing programs. This essentially eliminates the need for remuxing MP4 and MOV videos
Finally, the program also has a built-in crash-resistance protocol that saves your previously set settings in case the app crashes.
If you are interested in using this alternative tool, we will present a short guide on how to use its Webcam Recorder mode. However, make sure to download the software first for a simpler time, following each step.
Secure Download
Secure Download
1. Open AnyMP4 Screen Recorder and switch the mode to the Webcam Recorder by clicking the mode selection dropdown menu.
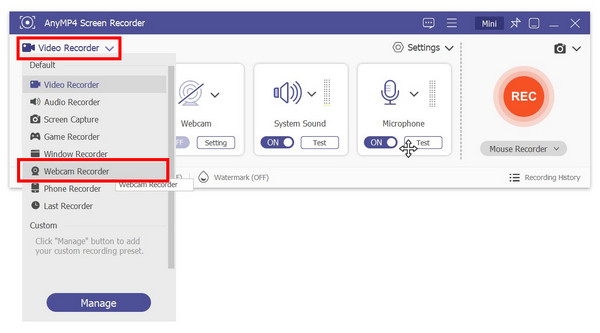
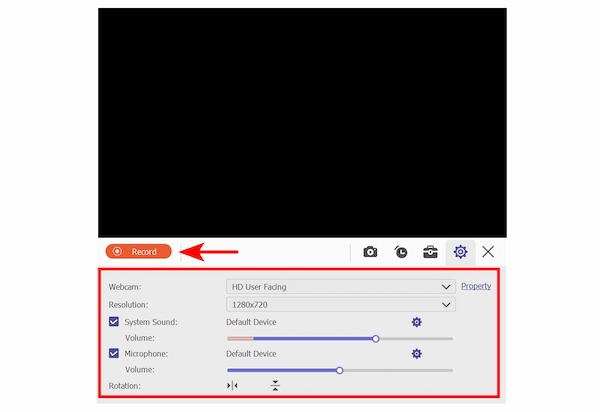
2. Inside the Webcam Recorder mode, click on the Record button to start recording. You can also adjust multiple recording options such as Webcam, Resolution, System Volume, Microphone Volume, and Webcam Rotation.
3. After the recording process, you can edit the recording using the available essential editing tools. You can also click on the Folder button to instantly locate the recorded file saved in MP4 format.
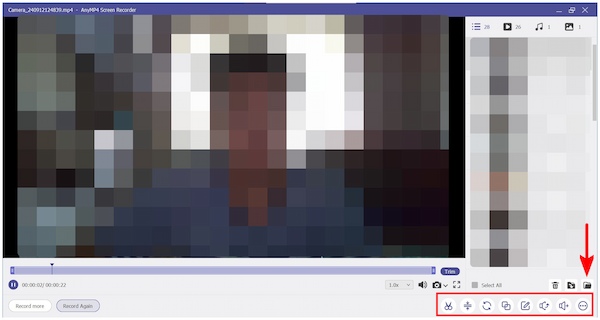
After the recording, you can edit it using the available essential editing tools. You can also click on the Folder button to instantly locate the recorded file saved in MP4 format.
Now that we have provided you with a comprehensive guide on remuxing OBS recordings saved in MKV format, we hope this article has been useful for your file conversion and recording needs. If you are looking for an effective OBS alternative, make sure to check out both AnyMP4 Video Converter Ultimate and AnyMP4 Screen Recorder.
Please share this article online to help other OBS users.
 Posted by Alice Thorne to Record Video
More readings
 Where You Can Find OBS Recording Video Files on PC and Mac
Cannot find the video files after screen recording in OBS? Here is a step-by-step guide to tell you where OBS recordings go on Windows and Mac.
 5 Verified Solutions to Fix OBS Encoder Overload Problem
In some cases, OBS says Encoding overloaded on its status bar, meaning that your computer can't encode your video. Here are five solutions to fix this issue.
 Tutorial to Record Blu-ray Movies on OBS Studio with High Quality
Read the detailed steps to record Blu-ray movies with OBS Studio. You can record and download all Blu-ray discs with the latest DRM protection successfully.
 OBS Crop Video - OBS Crop Video Capture and Resize Video
How to crop video in OBS? Can OBS crop video capture? How to resize game capture OBS? Learn more about OBS crop video, zoom video, and change the aspect ratio.