Recording screens has become essential in various scenarios. It can be helpful if you’re studying, working, or making content. With so many tools available, recording a single screen is not difficult today. How about recording two or multiple screens at the same time? Surely, you might not know how to deal with numerous screen recordings. Most screen recorder software only supports capturing a single screen/monitor. However, one popular tool fills this gap: the OBS Studio. In this post, we will show you how to get OBS to capture two screens at once. If you want to know how it works, continue reading to find the way. So, let’s cut it here and proceed to our main discussion in the following sections below.

OBS Studio is a highly popular open-source software for recording and live streaming. It’s renowned for its flexibility and ability to record multiple windows simultaneously. This lets you capture all the displays connected to your system simultaneously. Depending on your setup, you can record two, three, or as many screens. Just ensure to add each display as a separate Display Capture source.
What to Expect With OBS Studio:
Common Usage of OBS Studio:
OBS Studio is a handy software that can screen capture multiple monitors at once. The process can be overwhelming at first, but with the proper setup, you can master it easily. Check our detailed instructions below to learn how to get OBS to capture two screens at once:
1.Before recording, configure the settings to match the number of screens you plan to capture. Upon launching the OBS Studio, click the Settings button at the lower right pane. Proceed to the Video section and configure the Base (Canvas) Resolution and Output (Scaled) Resolution. Change the Base (Canvas) Resolution with the number of captured screens and click Apply.
| Base (Canvas) Resolution | 1080p Recording | 720p Recording |
| 1 monitor + webcam: 1920×1080 2 monitors + webcam: 3840×1080 3 monitors + webcam: 5760×1080 |
1 monitor + webcam: 1920×1080 2 monitors + webcam: 3840×1080 3 monitors + webcam: 5760×1080 |
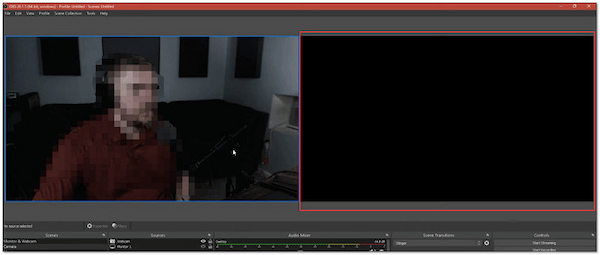
2.After you specify the number of screens, switch back to the OBS Studio’s main interface. You will see a split screen with a primary display and an empty area on the other side. You will drop the other window you want to capture in this blank area.
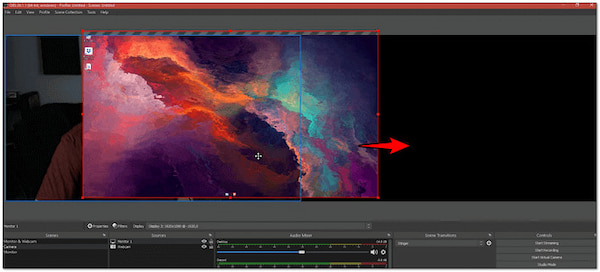
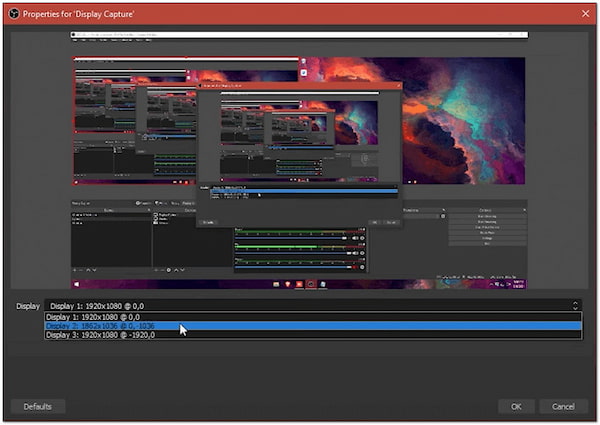
3.Drag and drop the original screen into the blank area to receive your capture. In the Sources panel, click + and select Display Capture to add another monitor. Select the correct parameter for your second monitor and click OK to confirm your selection.
4.Make sure that the screens are lined up and recording as you need. Finally, click the Start Recording button in the lower right pane to begin multiple-screen recording. Once you capture everything on both monitors, click the Stop Recording button.
Before initiating the recording, you can rearrange the sources by clicking and dragging the display boxes. Also, you can resize, align, or crop each display using the controls in the Transform options. After saving the recordings, check them to ensure the multiple-screen recordings match your objective. But where do OBS screen recordings go? Find out here!
Sometimes, OBS Studio isn’t recording multiple screens as expected. This frustrates you when the software fails to detect or record multiple screens correctly. In this section, we will explore common causes of this issue to help you avoid them in the future.
Did you find setting up multiple screen captures in OBS too complex? If yes, considering a more straightforward yet highly effective alternative to record two screens at once is a wise choice. AnyMP4 Screen Recorder is a one-stop screen recording software that easily captures two screens. It combines the primary screen and webcam feed into one recording, making it dual-screen. Plus, it supports full-screen recording or custom-sized areas to focus on specific parts of your screen.
Why Choose AnyMP4 Screen Recorder:
Here’s how to record multiple screens using AnyMP4 Screen Recorder:
1.First things first, download the AnyMP4 Screen Recorder for free. Install the multiple-screen recorder and allow the installation process to complete. After the installation, launch the AnyMP4 Screen Recorder on your computer immediately.
Secure Download
Secure Download
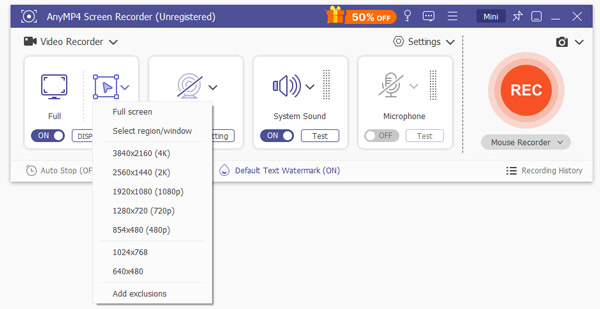
2.As you open the software, the Screen Recorder mode will be activated by default. In the Display tab, choose Full to capture the entire screen, including the second screen. Turn on your Webcam feed to enable the dual-screen recording. This setup lets you capture your primary screen and the webcam feed simultaneously.
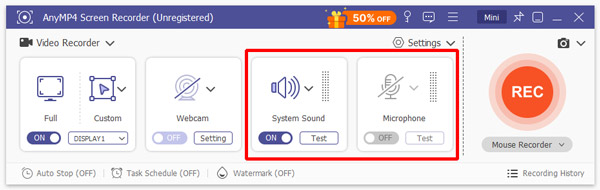
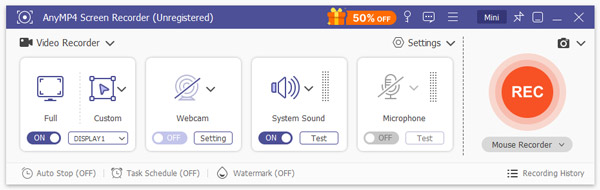
3.Now, set up your audio recording settings. Toggle the System sound on to capture your computer’s audio. Also, you can turn on the Microphone to include your voice in the recording.
4.When everything looks good, click the big REC to start the recording. The software will give you a three-second countdown, which indicates the dual-screen recording is about to begin. Just so you know, the recorded clips will be saved in MP4 format by default. But if you prefer a different format, you can change it in the Settings beforehand.
5.Once you finish your recording, click the Red Square button to stop. The software will take you to a preview window to watch the recording. If needed, use the additional tools to trim, compress, convert, merge, boost sound, etc.

AnyMP4 Screen Recorder provides a more convenient way to record two windows simultaneously. This software is perfect for those needing to record dual screens without hassle. On top of that, it exports the recordings in professional quality.
Knowing how to get OBS to capture two screens at once is a rewarding experience. OBS Studio makes it possible to record multiple screens to create unique clips. However, setting it up can be overwhelming for beginners. That said, we featured AnyMP4 Screen Recorder as an alternative. This user-oriented software lets you record dual screens effortlessly. It provides features like webcam integration, drawing/annotation tools, high-quality output, and more. This eliminates the complexity of setup and ensures a smooth dual-screen recording.
 Posted by Riley Mitchell to Record Video
Related Articles
 Verified Solutions to Fix Black Screen in OBS Studio When Recording
We did an extensive survey and analyzed why the OBS black screen occurs. This article helps you fix this problem and capture your favorite gameplay.
 5 Verified Solutions to Fix OBS Encoder Overload Problem
In some cases, OBS says Encoding overloaded on its status bar, meaning that your computer can't encode your video. Here are five solutions to fix this issue.
 Why OBS Game Capture Not Working and How to Fix It
If you find OBS game capture is not working, you will need to take certain steps to fix the problem. In this article, we will teach you how to do it in detail.
 Fix OBS Audio Not Working Via Quick Solutions and Settings
Are you having trouble with audio recordings in OBS? Read this article for a full guide on how to fix the most common audio-related issues in the software.