OBS Studio, which stands for Open Broadcaster Software, is a free open-source screen recording and live streaming program for Windows, macOS, and Linux. It provides real-time capture, recording, encoding, and live streaming, allowing users to capture and mix audio and video from sources such as webcams and computer screens, and live stream them to platforms such as YouTube, Facebook, and more. So, what are the best recording formats in OBS for users? And what are the reasons? This article will give you the details. Just keep reading to know more.

There are many formats suitable for OBS recording. Below, we will introduce them in detail and give you the best recommended one.
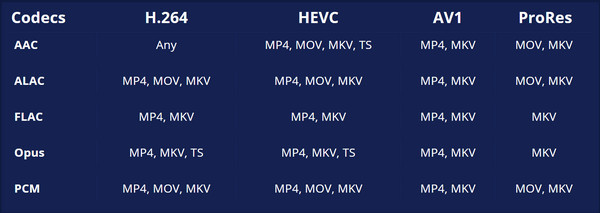
1. MKV (default): MKV, or Matroska video file. It is the default format and is compatible with all audio and video encoders supported by OBS Studio.
PROS
CONS
2. MP4: MP4, also known as MPEG-4 Part 14, is a widely used digital multimedia format and the de facto standard for Internet video.
PROS
CONS
3. MOV: MOV is a QuickTime multimedia file format developed by Apple, mainly used on Mac and iOS devices. It is similar to MP4, but the two differ slightly in terms of codec compatibility.
PROS
CONS
4. FLV: FLV is a file format developed by Adobe Systems for storing video and audio streams and metadata. It is similar to MKV in terms of flexibility, but its popularity has declined now.
PROS
CONS
In summary, considering their respective pros and cons, MP4 is the best recording format for OBS.
From the previous section, we have learned that MP4 is the best recording format for OBS. So, to make an OBS recording from MKV to MP4, you can change the output settings in OBS Studio or remux the OBS recording to MP4 format after recording. In this section, we will show you the specific steps for the first method.
1. Open OBS Studio and go to File in the top menu bar. Then, select Settings.
2. Click Output in the left sidebar of the Settings window.
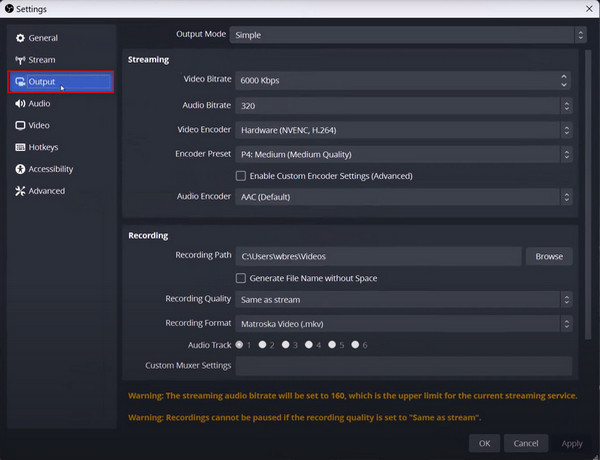
3. Find the Recording Format option under the Recording section and click the drop-down list to change it from MKV to MP4.
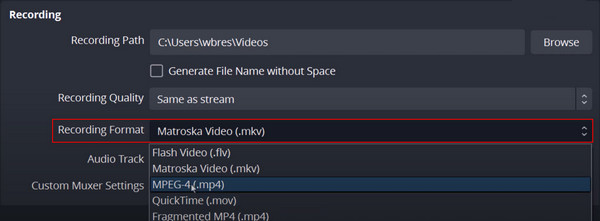
4. Click Apply and OK to save the changes. And now, all new recordings will be saved as MP4 files.
In this section, we will show you the steps for the second method of converting OBS recordings from MKV to MP4: using the built-in Automatically remux to MP4 option in OBS after recording.
1. Open OBS Studio. Go to File in the top left corner, then select Settings.
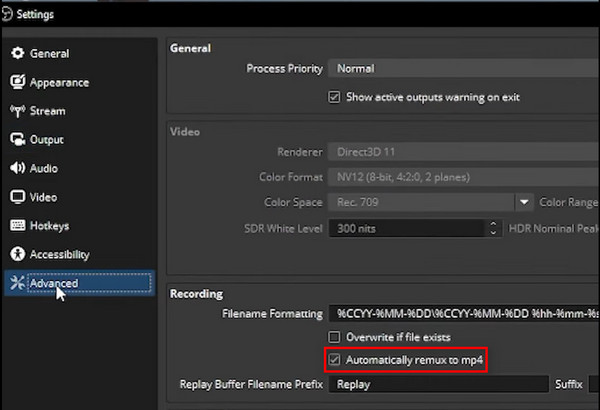
2. Click the Advanced tab and scroll down to the Recording section.
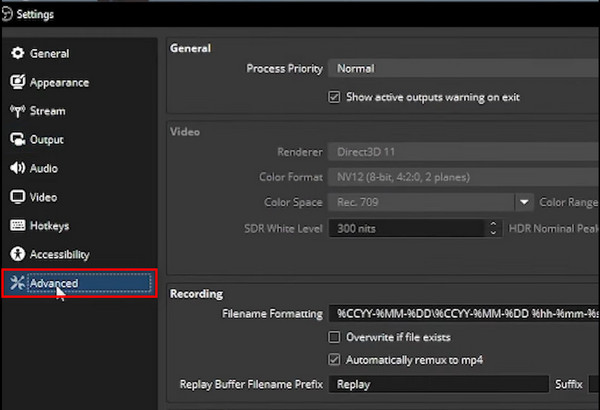
3. Check the Automatically remux to MP4 box under the Recording section.
4. Click Apply and then OK. Now, when you stop recording, OBS will automatically convert your MKV recording file to MP4.
In addition to the two methods mentioned above, you can also use the best third-party video recording software to record in OBS.
AnyMP4 Screen Recorder is a screen recorder compatible with Windows 11/10/8/7, macOS 10.12 and above. It can capture any activity in video and audio without delay and output in multiple video and audio formats, such as MP4, MOV, WMV, MKV, MP3, M4A, WMA, AAC, etc. It offers 7 different recording modes to record video, audio, gameplay, specific windows, or phone calls to meet various recording needs. Additionally, you can record your computer screen, webcam, or both. Similarly, recording with/without system sounds or using a microphone to record external audio are all supported. The recording area and size can also be freely customized according to your needs. With it, you can record in OBS easily and flexibly.
The steps for using it are as follows:
1. Download and install AnyMP4 Screen Recorder on your Windows/Mac computer. After installation, launch it.
Secure Download
Secure Download
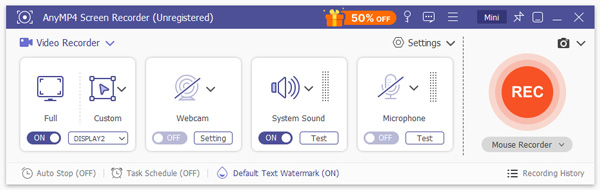
2. Open OBS Studio and display the content you want to record. Then configure some recording settings on the window, including selecting the screen area you want to record, enabling system sound, microphone, or both as audio sources, and setting the output format to MP4.
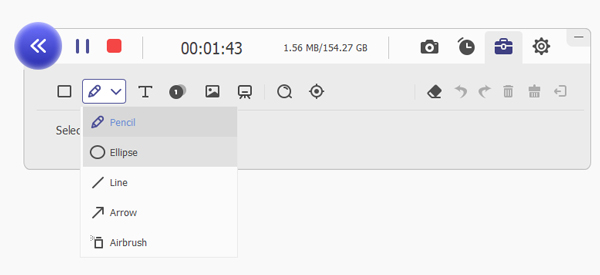
3. After configuring all settings, click the REC button to start recording. It will show you the hotkeys during recording, allowing you to take snapshots, draw, add annotations, text, and more.
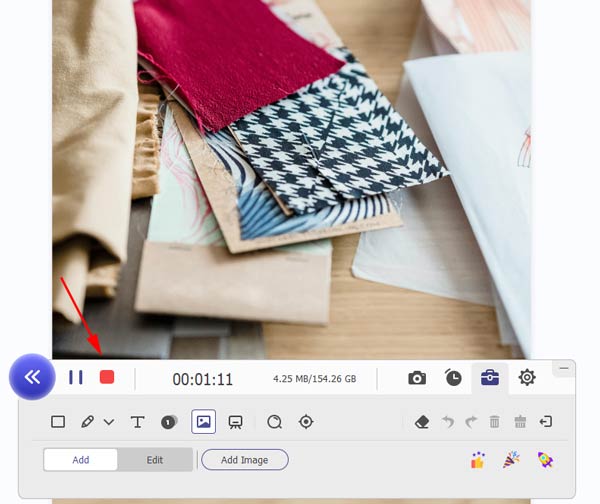
4. To stop recording, click the red square stop button in the upper left corner. A preview window will then open, where you can view, trim, or perform other edits on the recorded file.
5. Finally, the edited video and the original video will be automatically saved in the default folder. You can click the Open Folder button in the lower right corner to view them.

This article introduces the best recording format for OBS (MP4) and provides three methods to help users save OBS recording files in MP4 format. These methods include setting OBS to record in MP4 format, enabling OBS's built-in advanced automatically remux to MP4 feature, and using the best OBS video recording software, AnyMP4 Screen Recorder. You can choose one of these methods based on your needs and follow the steps provided above. We hope this article is helpful to you. If you have any questions, feel free to leave a comment below and interact with us!
 Posted by Riley Mitchell to Record Video
Related Articles
 How Do I Convert A QuickTime Screen Recording to A MP4 Format
When you want to record screen on your MacBook for an Android phone, how to save QuickTime recorded files in MP4 instead of MOV? Just learn the best methods.
 What Video Formats Can PS5 Play? Here is the Answer
Want to know what video formats can PS5 play, what its best audio format is, and how to play video and music on PS5 from USB? Read on to know the answer.
 HandBrake Won't Open? Try the 5 Fixes for the Issue
HandBrake won't be opened? Don't worry. This article will list 5 common causes and their corresponding solutions to solve this problem.
 Convert MOV to MP4 for Android Q/Pie/Oreo and Earlier Versions
When you get some movies with MOV, how to convert MOV to MP4 for Android phone with Android OS Q/Pie/Oreo? Here are the solutions you can take for reference.