How to Export Different Audio Tracks When Recording in Streamlabs
Streamlabs is a live-streaming and content creation-focused software that provides tools for live-streaming anchors and content creators. Their most famous product is Streamlabs Desktop (formerly known as Streamlabs OBS), a free open-source software built on the OBS Studio engine. Exporting different audio tracks when recording in Streamlabs Desktop is a crucial feature for content creators who want to have more control over their post-production. After all, recording with separate tracks transforms the original recording from a single, uneditable mess into layered, controlled, and professional-grade audio, thereby improving the overall quality of your post-production content. So next, we will show you the three best ways to use separate tracks on Streamlabs for recording audio.
Part 1. Why Need to Export Different Audio Tracks When Recording
Exporting different audio tracks while recording is an advantageous practice for content creators, which can significantly increase post-production flexibility and overall content quality. Specifically speaking, there are several reasons for separating audio tracks when recording:
1. Independent volume control.
Suppose your recorded audio is too loud or the microphone volume is too low during recording. In that case, you can adjust the specific track to change the audio volume in the video editor without affecting the rest of the sound.
2. Remove unwanted audio.
If there is any part of your recorded audio that you do not want or need, with separate audio tracks, you can easily mute or delete a specific one without losing the sound of the rest of the video.
3. Equalize and improve audio quality.
Separate tracks enable you to precisely balance all the elements of your voice, music, and more to create a clear, pleasing, and professional sound.
Part 2. Streamlabs Export Different Audio Tracks When Recording
To export different audio tracks when recording with Screamlabs, you could follow the steps below:
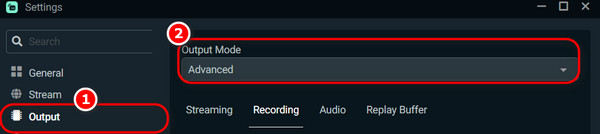
1. Enable Advanced output mode.
Go to Settings > Navigate to the Output option in the left sidebar > Change the Output Mode to Advanced.
2. Configure Recording settings.
Click the Recording tab and choose the audio tracks to record (up to six). You can also set the appropriate recording format, such as MP4 or MKV, but not FLV, as it does not support multiple audio tracks. Besides, you can set the file type, recording path, and more.
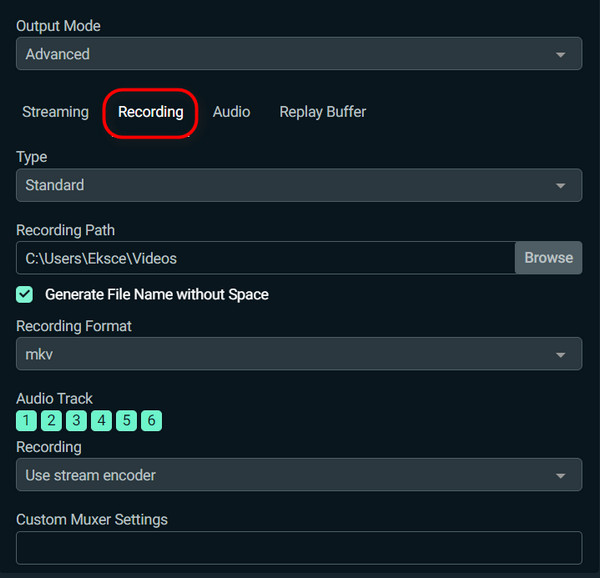
Tips
After selecting the number of tracks you want to record, you can also adjust the audio bitrate and manually name each track in the Audio tab.

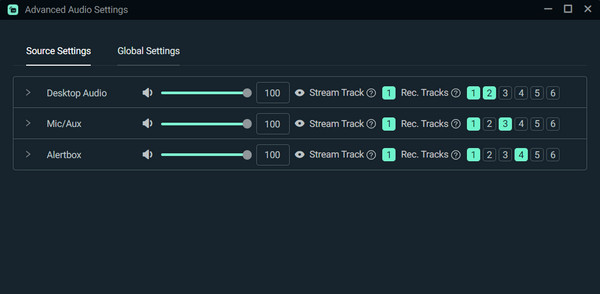
3. Assign audio sources to tracks.
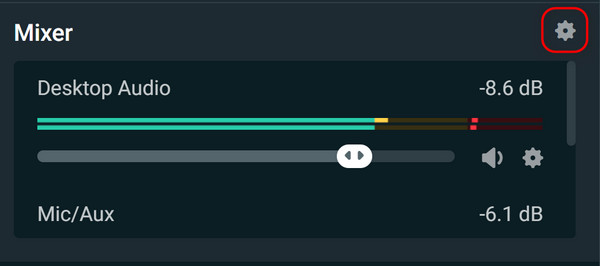
After adjusting the Output settings, click the Settings gear button in the upper-right corner of the mixer to open the advanced audio settings.
When you drag recorded audio into the software, separate tracks will appear on this page, allowing you to assign specific audio sources to specific audio tracks.
Part 3. AnyMP4 Video Converter Ultimate to Export Streamlabs Recording to Different Audio Tracks
AnyMP4 Video Converter Ultimate is a versatile audio and video editor compatible with Windows 11, 10, 8, and 7, as well as Mac OS X 10.12 or later. You can use it to add one or multiple files to the software, and then select an audio track to convert it to various audio formats, such as MP3, AAC, WMA, WMV, etc. In addition, it features a More Tools tab, which includes Volume Booster, Audio Sync, and other tools that can be used to adjust audio tracks, change volume, and resolve audio delay issues. It also utilizes GPU acceleration, which speeds up the conversion by up to 70 times. It mainly separates tracks recorded on Screamlabs by disabling the original track and adding a new one. Its detailed steps are as follows:
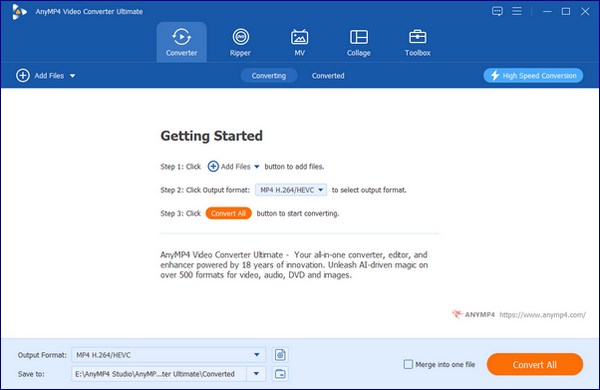
1. Download and install it on your Windows or Mac computer. Then, follow the instructions to install it. After installation, launch it.
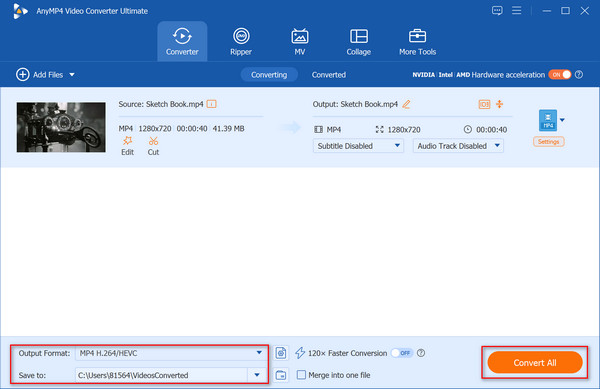
2. Click the Add Files button or drag and drop your Streamlabs MP4 or MKV recording into the program.
3. After successfully adding a file, click the drop-down menu of the Channel-related option of the added file > Audio Track Disabled > Add Audio Track.
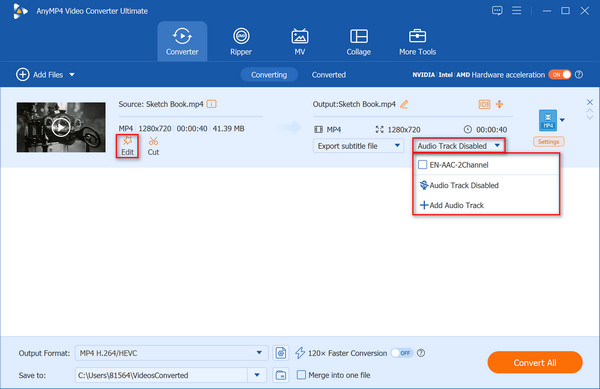
Or you can click the Edit button to open the editing window and click the Audio Track drop-down option to disable the original audio track under the Audio tab. Then, click the plus button next to this option to add a new one.
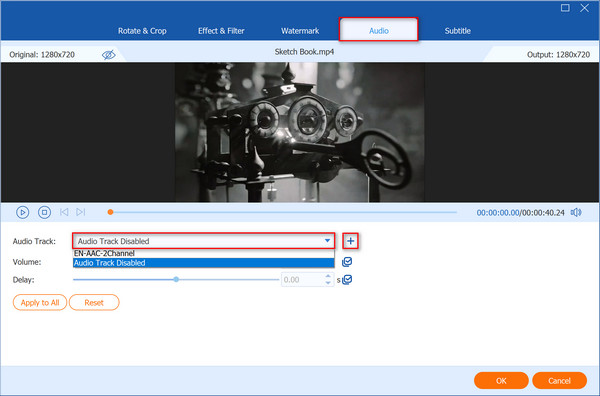
4. After adding and replacing the tracks, you can adjust the volume and delay time if necessary, and then click OK in the right corner. Next, select the file format you want to export and the location where you want to save the converted file in the lower-left corner. Finally, click the Convert All button to export the file.
Part 4. Adobe Premiere Pro to Export Streamlabs Recording to Different Audio Tracks
Adobe Premiere Pro is a video editing application developed by Adobe Inc. that is used to create high-quality videos in various industries. Additionally, it serves as an audio mixer and editor, offering capabilities such as volume adjustment, audio effect application, noise removal, and audio synchronization with video. Undoubtedly, it is also a tool that can be used to split and export audio tracks recorded in Screamlabs. In this section, we will guide you through a step-by-step instruction on how to use Adobe Premiere Pro to finish separating audio tracks of audio files recorded in Screamlabs.
1. Go to File > Import to add the Streamlabs recording files (containing multiple audio tracks) into Adobe Premiere Pro. You can also drag and drop it directly into the Project panel.
2. Ensure your sequence is set up as a multitrack sequence. Then, create a new multitrack sequence and copy your clips into it. After the recordings have been successfully imported, you should be able to see multiple individual tracks in the Streamlabs recording.
3. Then, you can configure the audio output channels to match the number of tracks in the Audio tab of the export settings.
4. Finally, navigate to File > Export > Media and select a format that supports multi-channel audio export, such as QuickTime or MXF OP1a. Click Export to export separate Streamlabs audio from Adobe Premiere Pro.

Conclusion
This article mainly introduces how to export different tracks when recording Streamlabs in three ways and provides a detailed step-by-step guide. You can choose one of the methods according to your needs. If you find this article helpful, please share it with people around you who need it, and like and comment on us in the comment section below!