Extended screen refers to stretching your computer's desktop across multiple monitors, allowing you to effectively create a larger workspace by opening different applications, windows, etc., on different monitors. Recording Extended Screen on OBS offers many significant benefits in terms of efficiency, professionalism, and overall quality of recorded or streamed content, making it especially suitable for content creators, educators, and anyone who needs to capture complex desktop workflows. If you want to learn how to capture a second monitor with OBS, you have come to the right place, and this article will provide detailed steps to help you do that. Read on to learn more information.

To prepare for setting up an extended monitor, you need to ensure that you have some of the necessary hardware and access to your computer's display settings. We will introduce you to each of these in detail below.
• Cables: Each external monitor requires a matching video cable. Make sure the cable type matches the ports on your computer and monitor.
• External monitor: Make sure your external monitor is turned on and working correctly in Extended Mode.
• Video output ports: Ensure the computer has an available video output port, common types such as HDMI, DisplayPort, VGA, DVI, USB-C, etc.
• Adapters (if needed): If your computer and monitor do not have matching ports, you will need an adapter (e.g., USB-C to HDMI, DisplayPort to VGA).
• The latest OS: Ensure your Windows or macOS operating system is up to date, which can let you have the latest display drivers and features.
• Graphics drivers: Updating your graphics drivers is critical for optimal performance and display detection. Visit the websites of graphics card manufacturers such as NVIDIA, AMD, Intel, etc., to download and install the latest drivers.
• Windows: Right-click on the desktop, select Display settings, or go to Start > Settings > System > Display.
• Mac: Go to System Settings > Displays.
This part will show you how to record the extended screen directly on OBS. Follow us to take a look!
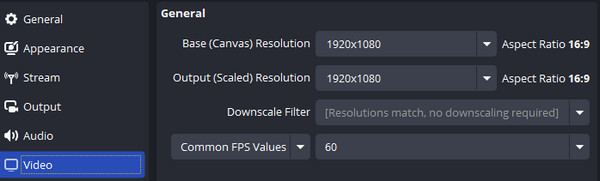
1. Open OBS Studio.
Launch OBS and go to Settings > the Video tab. Then, set Base (Canvas) Resolution and Output (Scaled) Resolution to the combined size of the screen according to the screen to be recorded.
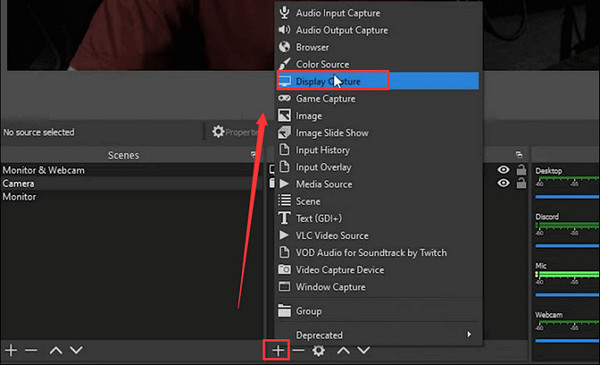
2. Add a display capture source.
Click the plus button in the Sources box at the bottom of OBS > select Display Capture to create and name the new source (such as Extended Monitor 1, 2, etc.).
3. Arrange the display and start.
Drag and drop the display capture source into the OBS preview and align it correctly according to the monitor. Finally click the Start Recording button to record the extended screen.
AnyMP4 Video Converter Ultimate is an all-in-one video processor compatible with Windows 11/10/8/7, Mac OS X 10.12 or above. It has a collage feature that supports splitting multiple videos and pictures by merging them side by side onto the same screen. In addition, it allows you to edit individual screens before splitting (rotate, crop, filter, add watermarks, edit subtitles, clip, and edit audio track). You can also preview and adjust the split screen effect in real time to optimize the output video file. So, this feature is very suitable for capturing a second monitor on OBS. Next, we will show you the steps in detail.
1. Click the download button below to download and install AnyMP4 Video Converter Ultimate on your Windows/Mac computer. After installation, launch it.
Secure Download
Secure Download
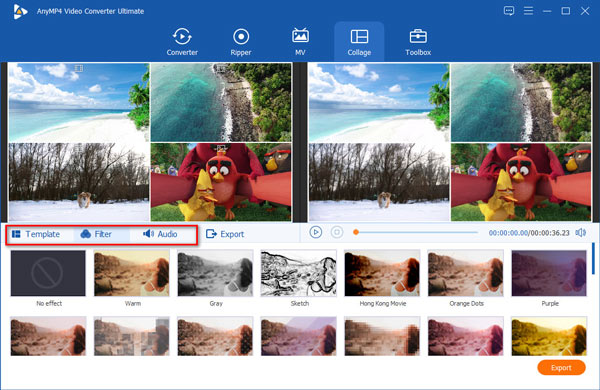
2. Select the Collage tab. And it lets you add up to 9 videos and images into this software to create multiple screens in video playback. You can also use various split-screen templates or customize the screen border color and ratio to suit your display.
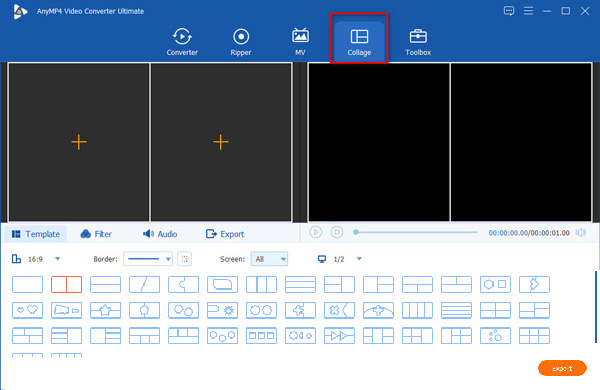
3. After choosing the split-screen template, click the plus button to add the videos individually to the screen.
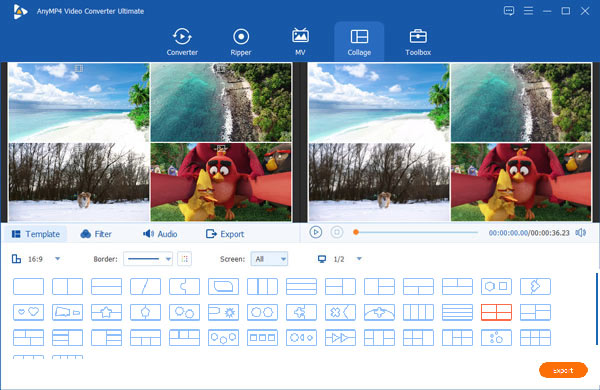
4. After importing videos and photos into this software, you can drag and move a video or picture frame on the screen to set the position. Then, you can edit all the screens by choosing Filter and Audio to apply the effects to all of them. You can also hover over a screen to edit it individually.
5. When all the settings are complete, go to the Export tab. And here, you can select the output format, frame rate, resolution, quality, destination, GPU acceleration, etc., options. Finally, click Start Export to get the extended screen recording and save it on your computer.

This article mainly introduces how to record an extended screen on OBS, which mainly includes two methods: direct recording and using the collage video function of the third-party software AnyMP4 Video Converter Ultimate to split the screen and record it. The former method is more direct but a bit confusing, while the latter is easier to understand, and we believe you will be able to capture the second monitor on OBS smoothly by following the steps in the above article. You can now download and try it for free by clicking the download button below, and if this article is helpful to you, please leave us a message in the comments section!
Secure Download
Secure Download
 Posted by Riley Mitchell to Edit Video
Related Articles
 Two Proven Ways to Record Gameplay on Play Station 4
In this tutorial, we will show you how to record PS4 gameplay either using the built-in digital video recorder or with a professional PS4 game recorder.
 4 Approaches to Record Xbox One Gameplay with The Best Quality
It's easier than ever to share your gameplay with the world. Here's how to record gameplay on Xbox One and Xbox 360 with a variety of different options.
 Top 6 Methods to Merge Two/Multiple Videos on iPhone
How to combine videos together on iPhone? Here are 6 ways to merge 2 or multiple videos on iPhone without quality loss.
 How to Merge MKV Files with Audio & Subtitle Tracks
This is the ultimate guide to merging two or more MKV files. Here you can learn some details about combining MKV videos with SRT and audio files.