[Solved] How to Remove Background Noise from Audio
Tips
Verdict: For the best balance of speed and professional AI results, AnyMP4 Video Converter Ultimate is the top choice.
While we think of film as a visual medium, psychological studies show that audiences are far more forgiving of poor video quality than poor audio quality. In fact, research suggests that when audio is clear and immersive, the human brain perceives the accompanying video as being higher resolution than it actually is. Conversely, muffled dialogue or distracting background noise creates 'cognitive load,' causing viewers to lose interest or even perceive the filmmaking as amateurish, regardless of how '4K' the visuals look.
Suppose you are new to this field and looking for a program that you can use to remove these unwanted background noises, lucky you! In 2026, you’ve arrived at a turning point in post-production. The mainstream solution is no longer just manual filtering, but Generative AI Speech Isolation. This article will share 5 efficient ways for you to remove background noise from audio to enjoy clear sounds!

| Tool Name |
Platform |
Price |
Ease of Use |
Output Quality |
File Size Limit |
Best For |
|---|
| AnyMP4 Video Converter |
Windows, macOS |
Paid (Free trial available) |
Moderate |
Professional |
No limit (on desktop) |
Batch processing & heavy video files |
| Audacity |
Windows, macOS, Linux |
Free (Open Source) |
Expert (Manual) |
Studio Grade |
No limit (Local storage) |
Advanced podcasting & audio restoration |
| CapCut |
iOS, Android, Desktop, Web |
Free / Pro (~$9.99/mo) |
Very Easy |
High (Social-ready) |
Unlimited |
TikTok, Reels, & Short-form video |
| iMovie |
macOS, iOS |
Free (Native) |
Easy |
Good |
No limit (Native) |
Mac/iPhone users wanting a zero-cost fix |
| Media.io |
Web Browser |
Free / Paid (Starts ~$6.99/mo) |
Very Easy |
AI Enhanced |
~25MB (Free) / High (Paid) |
Quick, online fixes with no installation |
Part 1. AnyMP4 Video Converter Ultimate: Best AI-Powered Noise Remover for PC/Mac
When you need to eliminate unwanted background noise from your audio, AnyMP4 Video Converter Ultimate is an all-in-one, AI-powered audio workstation designed for professional-grade noise elimination. Leveraging advanced Deep Learning algorithms, its Noise Remover tool intelligently distinguishes between human speech and unwanted environmental interference - instantly stripping away traffic, wind, hums, and animal noises with surgical precision.
Engineered for maximum efficiency, this cross-platform solution supports hundreds of audio formats, ensuring a seamless workflow regardless of your source file. With just a single click, the AI engine optimizes your tracks in real-time, delivering crystal-clear, studio-quality audio without the complexity of manual editing.
1. Downlaod and Open the Tool
First and foremost, get the AnyMP4 Video Converter Ultimate from the official website. After downloading it, install and launch it on your available operating system. This program is available with both Windows and Mac operating systems.
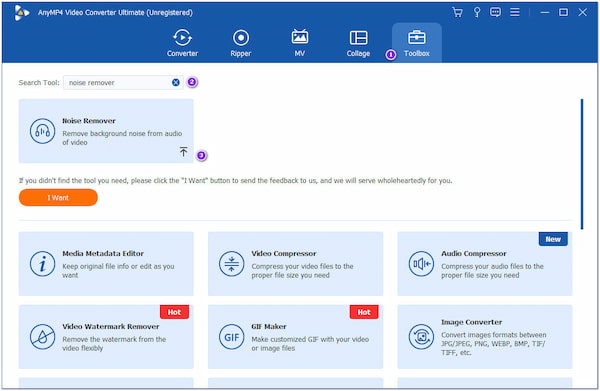
2. Choose the Noise Remover Tool
Once you are in, hover your cursor over the program's Toolbox and select the Noise Remover feature; click it. You can use the search bar to locate the feature easily.
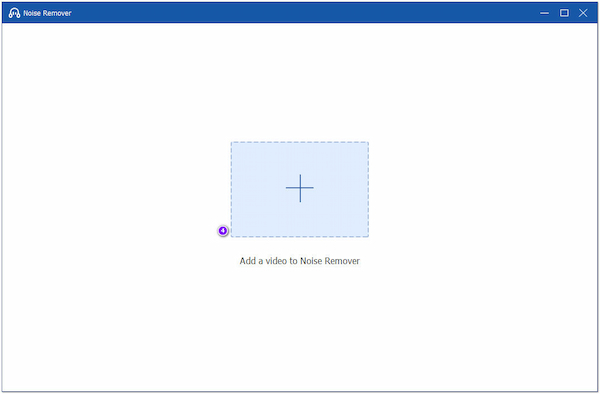
3. Import the Audio File
Click the Plus icon to add the audio file from your local drive from the new window on your screen.
4. Reduce the Noise
Once the audio file is added to the program, tick the box Enable audio noise reduction to apply the background noise removal from your audio file.

5. Preview and Export the Audio
You can preview the pre-output and hear out the result. You will hear a clearer audio file with no background noise than before. Afterward, click the Export button to save the new audio file on your computer.
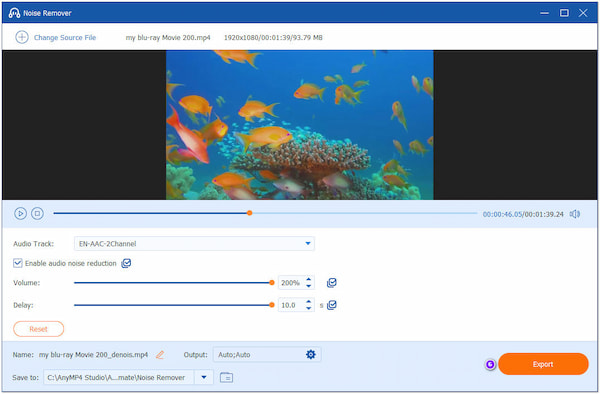
You can adjust the Delay and Volume sound of the audio file before exporting it on your computer. By adjusting them, you will have clearer audio with great sounds.
Part 2. Audacity: Best Free Open-Source Software for Professional Noise Reduction
Even the most careful recordings can be compromised by unexpected ambient interference. For creators who demand total control without a price tag, Audacity remains the industry standard for free, open-source audio restoration. Unlike basic automated tools, Audacity provides a sophisticated suite for precision manual tuning, allowing advanced users to surgically isolate and eliminate noise.
By utilizing the Noise Profile effect, a professional-grade tool that intelligently analyzes specific noise frequencies, you can transparently filter out unwanted sounds using Audacity while preserving the natural harmonics of your audio. If you are looking for a desktop-class solution that offers deep granular control over your soundstage, follow these expert steps to achieve a pristine, studio-ready output.
1. Isolate the Noise
First things first, create or open a test file for the program. Suppose you've got unwanted background noise running through the entire file. Highlight the timeline portion that does not contain voices or necessary sounds.
2. Capture Noise Profile
Click Effect, followed by Noise Reduction, which will open the pop-up. Next, click Get Noise Profile, then click OK.
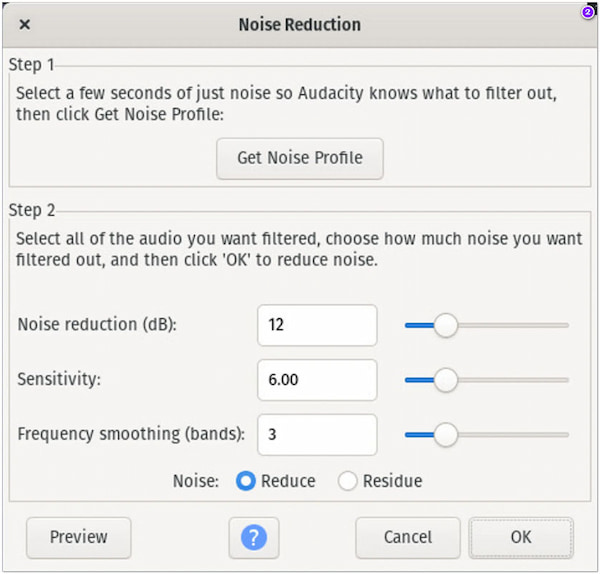
3. Select Target Audio
Select the entire track you wish to remove background noise. To do so, press Ctrl + A on your keys or use the cursor to select the background noise you want to remove.
4. Execute Restoration
Once done, go back to Effect, then Noise Reduction. When the pop-up appears on your screen, click OK.
The program will remove all the noise associated with your selected noise profile. You will hear a cleaner track than what you had before once it is finished.
Audacity is also powerful to edit audio tracks like compress audio, merge audio tracks, and more.
Part 3. CapCut: Quick Way to Remove Background Noise on iPhone & Android
CapCut is the premier choice for mobile-first video creators who need high-quality audio and video outputs on the go. As an all-in-one editor, it provides everything necessary for social media short-form content. For free users, the Reduce Noise feature is the most efficient way to instantly clean up your footage. Even without a Pro subscription, CapCut empowers you to remove unwanted background noise for free, ensuring your TikToks, Reels, and Shorts sound professional and clear before you post.
1. Install and Open CapCut on Phones
Beforehand, get the CapCut app from the App Store or Google Play Store. Afterward, install it on your device and tap the app to launch it on your mobile device.
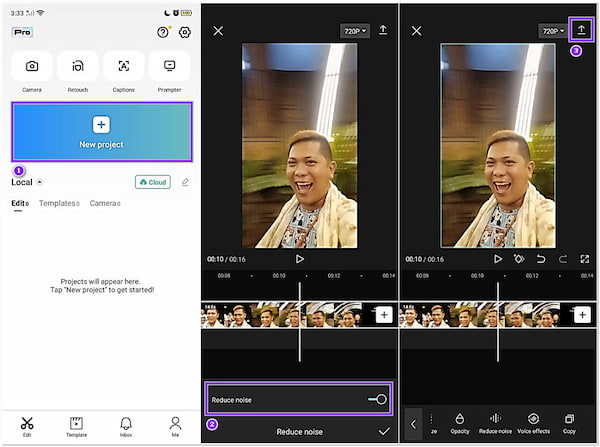
2. Start New Project
From the app's main display, tap the New Project and choose the video with audio you wish to reduce background noise. After selecting the video with audio, tap the Add button on the bottom right-hand corner to proceed.
3. ctivate Noise Reduction
Once the video with audio is added to the timeline, tap your video clip. Slide the tools to the left until you find the Reduce Noise tool, and tap on it. Then, toggle the Reduce Noise to activate the feature.
4. Export the Audio File
Preview the outcome by listening to the pre-output. If you're good with the result, tap the Arrow pointing upward in the upper-right-hand corner to export the result.
Part 4. iMovie: Built-in Audio Cleaning Solution for Mac & Apple Users
You can instantly elevate your audio using the built-in features of iMovie. As a native macOS and iOS application, it requires no additional installation and is completely zero-cost for Apple users. iMovie allows you to apply professional equalizer presets and intelligent noise reduction to suppress environmental distractions—like a plane flying over a party—without affecting the overall clip level. With its seamless integration, you can automatically reduce background noise and boost quiet dialogue, achieving high-quality results using the powerful tools already on your device.
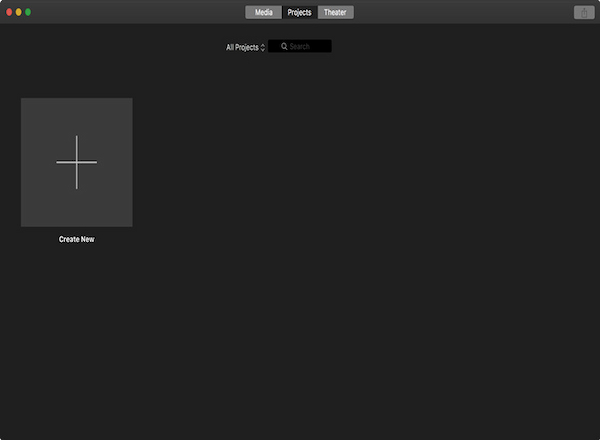
1. Launch iMovie and Import Audio
On your Mac, open the iMovie app. Select one or more audio files in the timeline. On the other hand, you can import video files with audio.
2. Access Audio Controls
Click the Noise Reduction and Equalizer buttons to display the noise reduction controls. Afterward, select the Reduce background noise checkbox.
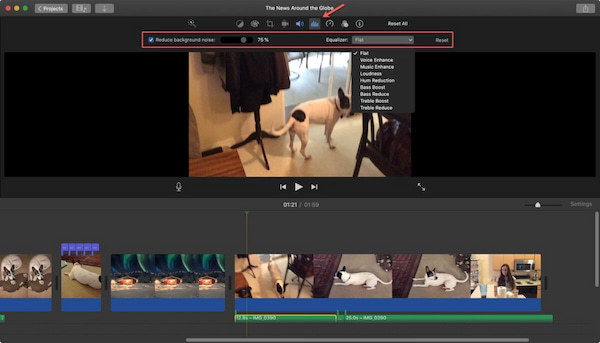
3. Access Audio Controls
Next, drag the slider to the left to decrease noise reduction. Otherwise, slide to the right to increase the value of background noise reduction.
4. Audit and Refine
As you desire, you can play back the audio to test the adjustments, then refine the position of the Reduce background noise slider.
You can change the background noise reduction as a proportion of the sound from the original clip. Between 0% and 100%, background noise reduction is expressed as a percentage.
Part 5. Media.io: Best Online AI Audio Cleaner (No Installation Required)
Media.io is a powerful web-based solution that allows you to remove audio noise directly in your browser for free. With no software to download or install, you can instantly clean up unwanted sounds from music, soundtracks, and environmental recordings. Supporting a vast array of formats like MP3, M4A, MP4, and MOV, this free online noise remover offers an online-ready workflow that works on any device. With just a couple of clicks, you can effortlessly adjust decibel levels and fine-tune your noise reduction settings to achieve your desired output without ever leaving your browser.
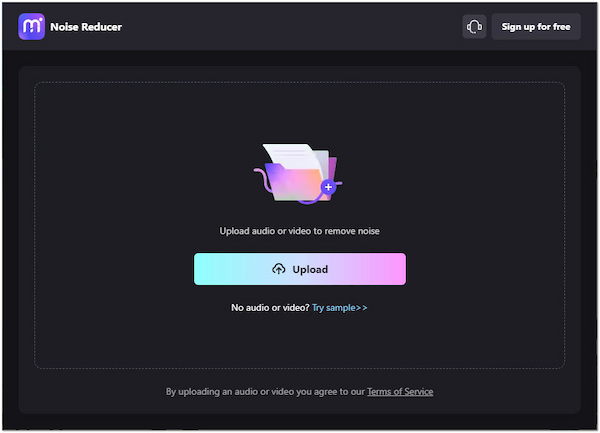
1. Access Media.io
Using your browser, visit the official website of the online-based program.
2. Import Your Audio
Click the Upload button to add the audio file you wish to remove background noise.
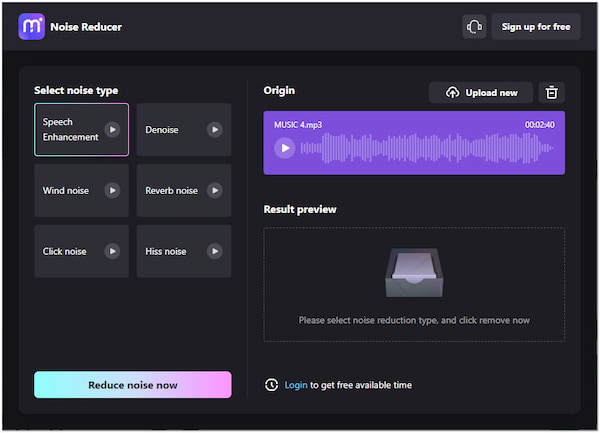
3. Select Noise Profile
From the left-hand side, choose the type of noise you wish to eliminate from the uploaded audio file.
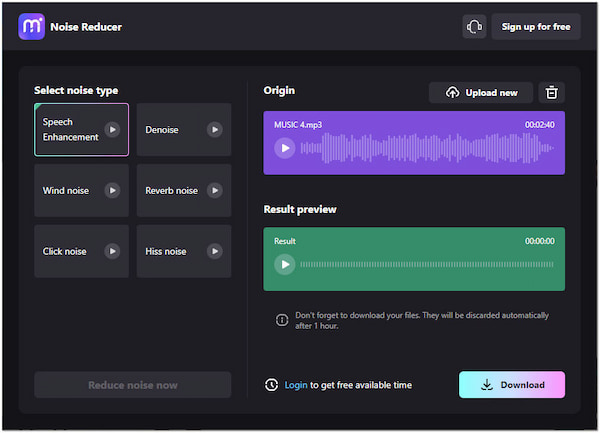
4. Preview and Export
Before downloading the output, the program will allow you to listen to the pre-output. If you're happy with the result, click the Download button to make a copy of the audio file.
Part 6. Tips to Prevent Background Noise Before Recording
Avoid 100% Reduction: Leave about 10 - 15% ambient noise to prevent your voice from sounding 'robotic' or 'tinny.'
Improve Signal-to-Noise Ratio (SNR): Stay 6 - 8 inches from the mic, so your voice significantly outweighs the background hum.
Use Soft Surfaces: Record in a room with rugs, curtains, or blankets to kill echoes (acoustic treatment).
Apply a Noise Gate: Use a 'Noise Gate' plugin to automatically mute the audio during the silent gaps between your words.
Identify Noise Types: Use a High-Pass Filter for low rumbles (AC/traffic) and a De-esser for high-pitched hisses.
Part 7. FAQs about Audio Noise Reduction
What is the easiest way to remove noise from audio?
Use AI-powered web tools (like Adobe Podcast or Podcastle). They provide professional results with a simple drag-and-drop interface, requiring zero technical skill.
Can I remove background noise without losing voice clarity?
Yes, by using AI Voice Isolators or applying manual noise reduction in small, incremental steps. Avoid '100% reduction' settings to prevent the voice from sounding robotic or muffled.
Which free noise remover is best for podcasts?
Adobe Podcast (Enhance Speech) is the best for sheer audio quality.
Conclusion
Now you learn 5 easy and effective ways to remove background noise from audio. All the tools in this post are reliable and dedicated to eliminating background noises with precision. One tool stands out among the five tools: the AnyMP4 Video Converter Ultimate. Besides the Noise Remover feature it offers, the tool provides various ways to polish video and audio once you explore its options.