Background noise may be quite upsetting to listeners and give editors a lot of trouble during post-production. That said, you will find a solution that will help you eliminate these unnecessary background noises from your recording. This post will walk you through a guide on how you will eliminate these annoying background noises with the help of a powerful program. In addition, we will show some tips that you can apply before recording. This way, you can reduce the unnecessary background noises that are not needed. So, if you wish to learn how to remove background noise from the mic, continue reading this post until the end!

How to reduce background noise on mic? The best way to reduce background noises on your recording is to block them out during the process. Though a noise-cancelation tool might help you in post-production, nothing beats a noise-free recording, to begin with. Here are several ways to use audio hardware and recording skill to provide a noise-free recording:
One effective way to improve the speech-to-noise ratio is by reducing the subject-to-mic distance. For example, if you’re doing a live performance with a microphone in your hand, try to keep your mouth the right distance from the microphone. That way, the short subject-to-mic distance can overcome the loud volume of the stage.
It might be the most common tip, but it is worth mentioning. The best place to go is in a soundproof studio isolation booth. These isolation booths are soundproofed so that no outside noise can enter. It also has padded walls to create an acoustically dead environment where sound does not reflect off the surface.
You can use a microphone that doesn’t pick up background noise. It’s best to use microphones with cardioid, super cardioid, and shotgun patterns, which are less sensitive to signals not in the microphone’s good pick-up area. Background noise can be reduced by using this attribute. When it is impossible to eliminate the noise sources, place the microphones so that the sources are in the null, or less sensitive, part of the polar pattern.
Pink noise, with more energy at low frequencies and less at higher frequencies, makes up most of the background noise. A high-pass, a low-cut filter, is useful for recording dialog because there is very little voice energy below 100 Hz. A more aggressive high-pass of up to 320 Hz can be used for applications where maintaining a natural, full-sounding voice signal is less critical than ensuring speech intelligibility. Remember that the frequency response of an audio-grade phone, which is 90% optimized for speech, is in the 300 to 3,000 Hz range.
Some people use the term open to describe microphones that are currently recording. The background level in the mix rises by 3 dB as the number of open microphones doubles. For instance, there is a 9 dB speech-to-noise penalty when all the mics are open compared to when only one microphone is open when recording a panel conversation with eight participants. In particular, manually controlling a scene with several talkers for unscripted material might be challenging.
If you have directly recorded to your computer, you can use microphone noise-canceling software to eliminate unnecessary background noises while recording. One best program you can use is AnyMP4 Video Converter Ultimate, which has a Noise Remover tool. The Noise Remover tool enables you to reduce extreme echoes on your recordings.
Besides that, it helps you to block out all unwanted background noises except the main speaker’s voice. That includes the sound of the streets, dog barking, bird chirping, traffic sounds, winds, etc. On top of that, you can adjust the Volume controller to set a better mood for your recordings. In addition, you can also adjust the Delay controller to synchronize it with your recording.
Recommendation
1.To begin with, hit the Free Download button below to download AnyMP4 Video Converter Ultimate. Next, install it on your available operating system and launch it afterward.
Secure Download
Secure Download
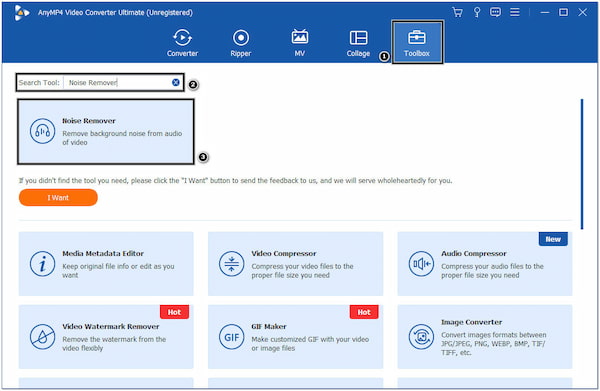
2.Please hover your mouse pointer over the program’s Toolbox, use the Search Tool to find the Noise Remover tool, and click it.
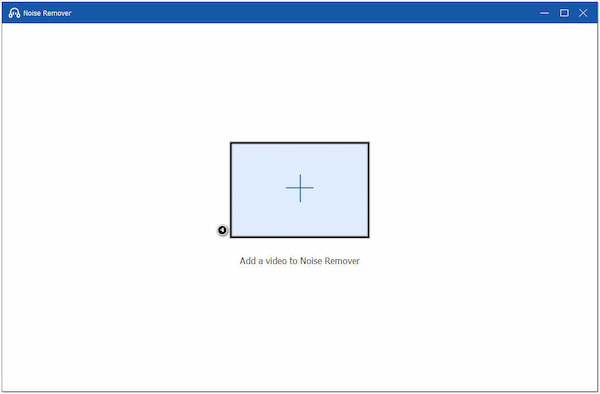
3.A new dialogue window with a + icon will appear on your screen. Clicking the icon will enable you to upload your recording to the program.
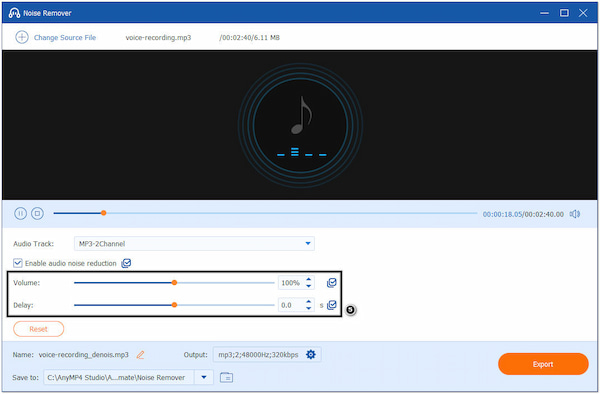
4.Once the recording is loaded, the program will automatically remove the unnecessary background noise on your recording. Optionally, you can adjust the Volume controller up to 200% and the Delay controller up to 10.0.
5.Once you are happy with the outcome, choose the destination of your file on the Save to option. You can also rename your file by editing it on the Name option. Finally, hit the Export button on the bottom right-hand corner to save your recording with no background noise.
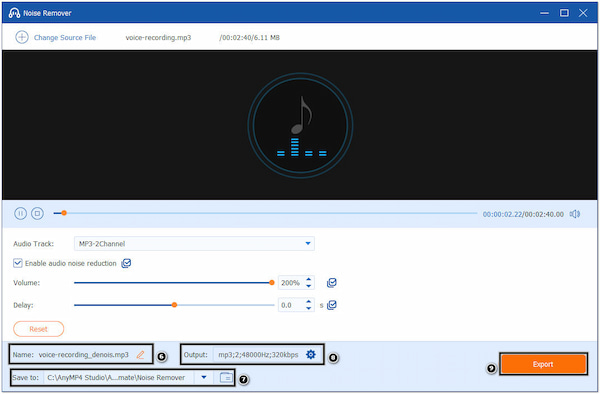
Before exporting the audio file, ensure the Enable audio noise reduction box is checked. Also, you can modify the audio setting like Audio format and Bitrate on the Output tab to guarantee a high-quality audio output.
For more audio noise reduction software, you can check it in this article.
Can I reduce background noise on a microphone in Windows 10?
Definitely YES! Many Windows PC users didn’t know that it has a built-in tool they can use to reduce background noise from videos. You can find it in your computer’s Hardware and Sound area of the Control Panel. Once you are there, hit the Recording tab, then choose your recording device. Next, hit the device’s Level tab. By then, you can reduce the boost that Windows gives your mic.
How can I get rid of microphone feedback?
When a live microphone hears the sound of its amplified signal coming from a loudspeaker, microphone feedback occurs. Reducing the volume of sound the microphone picks up from the speaker is necessary to eliminate feedback.
How can I reduce my microphone’s sensitivity?
Unless you change the microphone’s components, the sensitivity rating is fixed. However, Mic gain and loudness are called sensitivity in Windows OS.
How to remove background noise from the microphone? Your PC is your best option to fight against unwanted background noises. Fortunately, AnyMP4 Video Converter Ultimate is designed to help you eliminate these background noises on your audio. In addition, it can turn your noisy audio recordings into excellent quality. Above all, you can apply the tips mentioned in the first part of this post to at least lessen the background noises that will be included in your recordings.
Secure Download
Secure Download
 Posted by Angelica Liwanag to Edit Audio
More readings
 4 Ways to Remove Background Noise from Video
Does your video have annoying background noises? Do you want to learn how to remove background noise from a video? Check out the solutions here.
 5 Practical Ways to Remove Background Noise from Audio
Are you looking for a program with a noise-canceling sound tool? If yes, you are in the perfect place! Check the five programs we have listed here.
 Adobe Speech Enhancement Powered by AI - Is It Any Good?
Have you heard about the Adobe Podcast Audio Enhancer tool? If not, this is the right place to learn more about it and how it works to enhance your audio files.
 Why and How to Fix Squealing Noise from Audio Files
Let us ease the squealing noise from your audio files using these methods. See the step-by-step procedure below as we fix the issue.