Background noise affects everyone, regardless of how much-specialized equipment or manufacturing experience they have. There will always be some noise in your recording. It could be background rumbles from a low-quality microphone or distant car noises. Even if you film in a fully silent environment, you will obtain some strange room tone.
An otherwise excellent recording can be ruined by outside wind. It occurs; try not to be too hard on yourself about it. However, this does not imply that your audio is destroyed. There are methods for removing background noise from audio or video. It is primarily determined by the platform you are using. This tutorial will show you how to reduce background noise in Adobe Audition. We will give you the proper steps on different features plus a great alternative.
As we all know, Adobe Audition has different features that will help us make high-quality media, especially audio. There are several techniques to reduce background noise with Audition. It includes non-harmful utilities like equalization and more powerful background noise elimination capabilities. Adobe Audition is especially popular among video creators who utilize Adobe Premiere Pro or Adobe Premiere Pro CC. Generally, you should start with milder tools to avoid hurting your audio. With that, this post will give a lot of ways on how we can eradicate the background noise on your audio using Audition. Kindly proceed reading for it.
The background noise in your audio may sometimes appear like a persistent hiss. This is commonly referred to as a noise floor. For that, let us know how to remove noise in Adobe Audition using Hiss Reduction. Here are the easy steps to make it.
1. In Audition, open your audio recording. Then select Effects. You should see a Noise Reduction/Restoration tab.
2. Reduce Hiss by Clicking Here. After that, a dialogue box appears, allowing you to sample your hiss using the Capture Noise Floor function.
3. Now, please select Capture Noise Print from the Hiss Sample menu. Then, Control the noise removal effect with the sliders until you achieve the optimum results.

Apart from removing background noise, Adobe Audition can also compress audio file size to save storage.
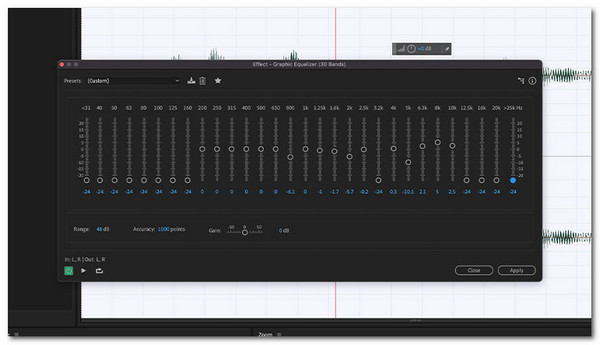
Adobe Audition has several equalizers; you should experiment with them to see which ones you favor for noise reduction. You can set the equalizer to one octave, one-half octave, or one-third octave in Audition. An equalizer is extremely effective at reducing low-frequency background noise from audio recordings. For that, here is how to use an Equalizer to remove background noise in Adobe Audition:
1. All of your recordings should be highlighted. Then, please navigate to the Effects tab and select Filter and EQ.
2. From there, please select your favorite equalizer setting. Graphic Equalizer is a favorite of many. (30 Bands)
3. Now, noise is used to remove frequencies. Take caution not to cut off vital parts of your audio.
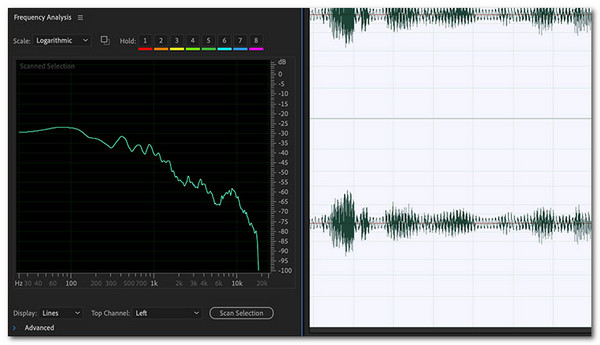
In Adobe Audition, frequency analysis is useful for locating and removing background noise. Unlike Equalizer, which requires you to locate the problematic frequency range manually, the Frequency Analysis tool assists you in locating the problematic frequencies. After you've determined the source of the noise, you can add a filter. Let us now see how to remove noise in Adobe Audition using the frequency analysis tool.
1. Select Frequency Analysis from the Window menu.
2. Now, let us hit the Logarithmic from the scale dropdown menu. The logarithmic scale corresponds to human hearing.
3. Lastly, use it to determine your frequency.
Having all the system requirements on your computer will help us get a smoother process of using Adobe Audition. That means if we want to have a good quality output, then our software must process properly first. For that, here are the requirements we need for smoother usage.
| Requirements | Windows | macOS |
|---|---|---|
| Processor | Multicore processor (64-bit Support). | Multicore processor (64-bit Support). |
| Operating System | Windows 10 with 64-bit V20H2 or later. | macOS Big Sur version 11.0 or later |
| RAM | 4 GB | 4 GB |
| Hard Disk Space | 4 GB Space. | 4 GB Space. |
| Minitor Resolution | 1920x1080 or more. | 1920x1080 or more. |
| OpenGL | OpenGL 2.0 Cable System. | OpenGL 2.0 Cable System. |
| Sound Card | USB Interface and MIDI Interface. | USB Interface and MIDI Interface. |
| Control Surface Support | OpenGL 2.0 Cable System. | OpenGL 2.0 Cable System. |
| CD Burning | Optical Drive | Optical Drive |
Having the right file format on your audio will give us a better-quality output. In line with that, Adobe Audition works better with AAC, SESX, AIF, AIFC, BW, AU, CDLX, CDA, IFF, MP3, OGG, M4A, and more. Kindly ensure your audio format is one of them before exporting your audio after removing the noise in the background.
We can see that Adobe Audition is rich in features, yet it is overwhelming and hard for most of us. That is why if you are one of the people who needs an alternative, then this portion is for you. We introduce you to AnyMP4 Video Converter Ultimate. A tool that possesses outstanding features yet is easy to use. This tool will help you remove the background noise in your video. That will be possible because it offers a Video Enhancer feature under its Toolbox. This feature allows us to remove noise and even enhance the resolution of their video audio with ease.
Recommendation
Secure Download
Secure Download
1. Is Adobe Audition superior to Premiere?
If you prefer to create audio projects, you should probably stick with Audition. However, if you make a lot of video content, Premiere Pro is useful. There is no correct or incorrect answer; try them both to see which works best for you.
2. Is Adobe Audition included with Adobe Premiere Pro?
Yes. In addition to color, audio, and graphics features, Premiere Pro integrates with other products and services such as After Effects, Adobe Audition, and Adobe Stock.
3. How much does Adobe Audition cost?
Adobe Audition is $20.99 per month on its own or $52.99 per month when purchased as part of the Adobe Creative Cloud suite. Is Adobe Audition available for free? Adobe Audition is a premium subscription service.
Background noise can be an annoyance. Noise from the environment, a poor-quality microphone, or a random cell phone ring can all damage your YouTube videos, but they don't have to. Adobe Audition includes numerous options for dealing with various types and degrees of background noise. However, AnyMP4 Video Converter Ultimate is here to help if the software is very hard to use. It will give you the easiest way to improve and remove the noise on your media audio. Try it now.
 Posted by Angelica Liwanag to Editor
More readings
 Ultimate Guide to Denoise Video in 2 Ways [Updated]
Click here to see the two greatest-enhancing tools to denoise video with ease. You may also see how we can make denoising more manageable and effective.
 What is and How to Use it in Photo Editing
What is image noise? How to remove noise from a picture? Can I add image noise? Get the full information about image noise here.
 Top 5 Video Background Editors Online and Offline
This article collects best video background changers that you can use to replace the original background with your favorite scenes on computer and mobile.
 Discord Audio Compression: Does it Really Exist
Does audio compression in Discord exist? Well, get into this article as we see the answer. Also, let us make a conversion process to ease the problem.