Quick Answer
When it comes to video clipping on Mac, one of the best options is AnyMP4 Video Converter Ultimate. Its lossless-quality editing makes it the best for editing videos without loss of quality.
The secret behind a good video clip is editing. Of course, the light, the directing, the photography, and other elements are all important when capturing a video. However, you usually have little control over those for home movies. Both ordinary people and professional photographers often shoot videos longer than necessary. So, trimming a video is the most basic of video edits. This tutorial shows you how to trim a video on a Mac.

| Video Trimmer for Mac | Ease of Use | Lossless Support | Supported Formats | Processing Speed | Best Used For |
|---|---|---|---|---|---|
| Finder | Very Easy | MOV, MP4 | Very fast | Quick trimming without opening any apps. | |
| QuickTime Player | Easy | MOV, MP4 | Slow | Basic trimming and simple editing adjustments. | |
| iMovie | Intermediate | MP4, MOV, M4V | Standard | Intermediate to advanced editing. | |
| AnyMP4 Video Converter Ultimate | Very Easy | MP4, MKV, AVI, MOV, 500+ formats. | Fast | Advanced video trimming for beginners. |
We will start this guide by showing you the fastest way to trim videos, using the Quick Actions tab in the Apple Finder app. This option essentially removes the need to open a video editor, since it automatically opens a trimming tool you can use for your video with a simple right-click. This is the fastest option if you want to apply basic video trimming adjustments.
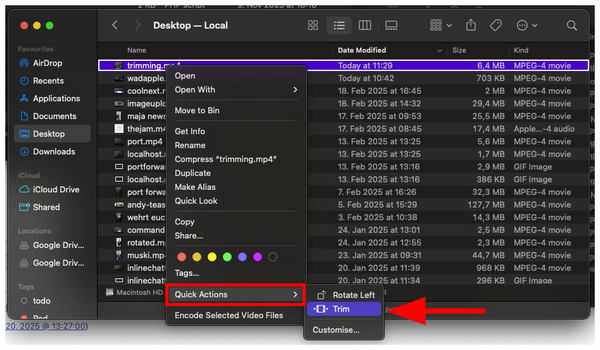
1. Open Apple Finder and locate the video file you want to trim.
2. Once you have found the video you want to edit, right-click on it and hover your cursor over Quick Actions. Then, select Trim.
3. In the Trimming window that will open, trimming handles will appear at the start and end portions of your video. Click and drag them to apply the video trimming adjustments.
4. With the trimming applied, click on Done to save the edited video.
Although Finder’s Quick Action feature is fast for individual files, it is not as fast when handling multiple files. It is best used for one-off format conversion.
QuickTime is the built-in media player on Mac. In addition to playing video and audio files, it also allows you to trim a video file. That makes it the easiest choice for beginners, but it offers no other video-editing features. Bear in mind that the media player only supports a limited set of video formats, such as MOV, M4V, MP4, etc.
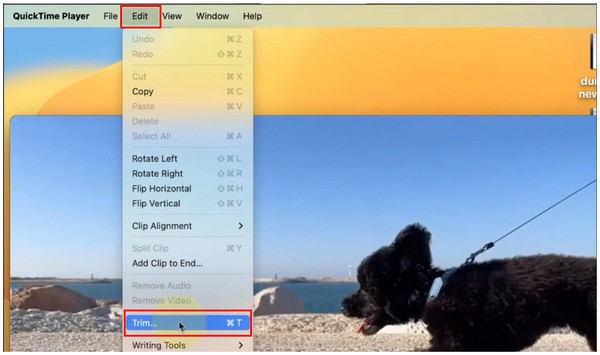
1. Run the media player app from your Applications folder, and open the target video.
2. Go to the Edit menu and choose the Trim option. Then you will see the timeline. Alternatively, you can use the Command+T shortcut to open video trim mode.
3. Drag the yellow handles to choose the clip that you want to keep. The content will be highlighted in yellow. Click the Trim button until you are satisfied.
4. At last, save the edited clip as a new video file.
When setting the new start and end positions, you can also use the left and right arrow keys on your keyboard to find the desired frame exactly. To zoom in on a specific frame, click and hold on the yellow slider.
Actually, QuickTime is a great player instead of a professional video editing tool. And it only provides the video trimming feature in the built-in version. If you want to compress or crop videos in QuickTime, upgrade to the Pro version for $30 to access more editing features.
QuickTime is an excellent choice for basic trimming. However, this is where its editing features end; it is not the most versatile solution, but it gets the job done.
iMovie is the built-in video editor on Mac, so it is another way to trim a video on Mac without extra apps. Although it is not as simple as QuickTime Player, you can follow the steps below to get it easily.
1. Open iMovie from your Applications folder, go to the Projects panel, click Create New, and select Movie to create a new project.
2. Drag and drop the video that you want to trim into the video editor, and put it on the timeline.
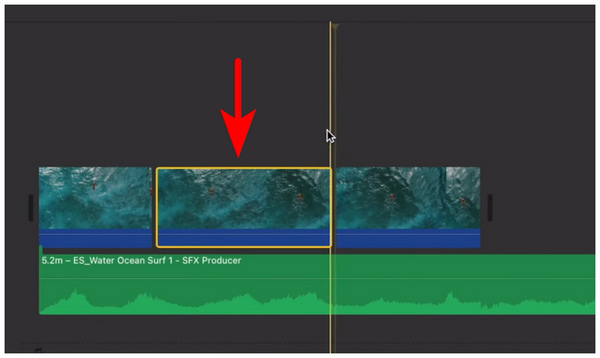
3. Drag the playhead bar to the new start point, right-click, and choose Split Clip on the context menu. Select the clip in front of the playhead, right-click, and choose Delete. You may use the Command + B shortcut for a faster split clipping option.
4. Next, drag the playhead to the new end position, right-click, and choose Split Clip too. Select the clip behind the playhead, right-click, and choose Delete.
5. Preview the clip in the composition panel, and click the Share icon at the top right side if you are satisfied. Now choose the appropriate channel to export the trimmed clip. To save it to your Mac, select File and follow the instructions to finish.
iMovie is easy to use for trimming a video, but it requires a lot of HDD space. It makes the platform slow and takes up plenty of storage. Sometimes, you must compress the video to reduce its size before exporting.
For balanced video editing, iMovie is a good option. It is equipped with essential editing tools, but its interface is accessible enough for beginner editors.
Many video editing software programs for Mac offer the ability to trim a video; however, only a few are easy to use. AnyMP4 Video Converter Ultimate, for example, is a flexible video editor software for both Mac and PC. The concise interface enables ordinary people to get what they want quickly. For advanced users, there are a variety of custom options.
When using this program as your video trimmer, you can ensure that the file is trimmed losslessly, keeping its original quality intact once a portion is removed. This was made possible because the video process in AnyMP4 Video Converter Ultimate does not undergo re-encoding to avoid loss of quality.
Key Features
Secure Download
Secure Download
How to Trim a Video on Mac without Quality Loss
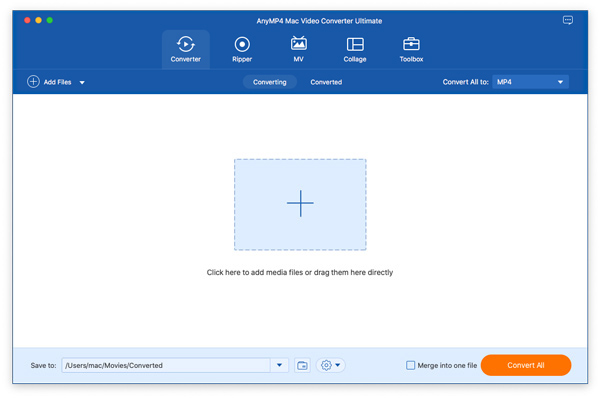
1. Import a video
Once you install it on your Mac computer, select the Add Files option. Then choose from either the Add Files or Add Folder selection to open the video you intend to trim on Mac. If you need to edit multiple videos, import them all at once.
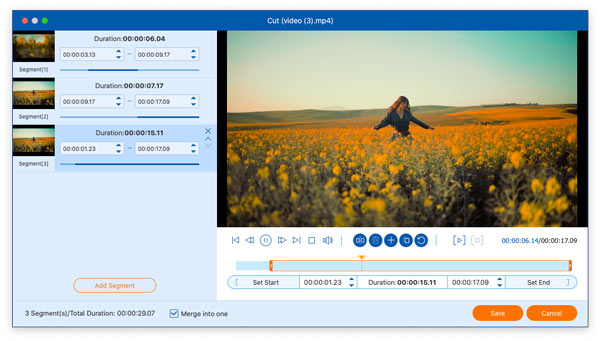
2. Trim the video
Next, click the Cut icon under the video title to open it in the video-trimmer window. Now, you can trim the video on the timeline. Move the left slider to the new beginning, and click Set Start. Then adjust the right slider to the new endpoint, and click Set End. Click the Add Segment button to add the clip to the list. Then trim another part of the video. When you are done trimming the video, click the Save button.
3. Export video clips
Now, set the output folder in the Save to box by hitting the Folder button. Finally, click on the Convert All button to export the clips to your computer. The Convert All to menu in the top-right corner is used to convert the video clip format.
In addition to trimming your video in seconds, the video editor provides a Toolbox with over 20 tools. So you can further edit the video as you like, using Media Metadata Editor, Video Watermark, Video Speed Controller, etc.
When handling large video files for trimming, you may expect the program to slow down. However, it will not be as bad as other traditional editor tools since AnyMP4 Video Converter Ultimate is equipped with hardware acceleration.
Why can’t I trim a video in iMovie on Mac?
iMovie cannot trim a video directly. You can only use the split feature in iMovie to remove unwanted clips. You can also trim a video with the built-in QuickTime Player.
How to trim a video on iPhone?
The preinstalled Photos app is the easiest way to trim a video on iPhone. You can take a video, open it in the Photos app, enter edit mode, and trim unwanted frames.
How to trim a video in the Photos app on Mac?
The new Photos app is another way to trim a video on Mac. Similar to the iOS Photos app, it can add a video to the timeline and quickly trim it.
What is the fastest way to trim a video on a Mac without downloading software?
The fastest way is the Finder tool. Simply right-click on the video and select the Trim option on Quick Actions. You will have access to basic video trimming software.
How to trim a screen recording on Mac using QuickTime?
Simply open the video you want to edit in QuickTime. Then, select the Edit tab and click on Trim. Alternatively, you may also use the Command + T shortcut to open the trim tool faster.
Why is my trimmed video in iMovie so large in file size?
This is usually caused by your export quality in iMovie. You might have selected the Best Quality option. As a result, your video will have higher quality, making it larger despite being trimmed.
Can I trim an MP4 on a Mac without losing original quality?
Yes, you can. The Finder Quick Action tool has minimal quality loss. You may also use third-party tools with lossless trimming like AnyMP4 Video Converter Ultimate.
This guide has told you three easy ways to trim a video on a Mac. The QuickTime Player is the easiest way to shorten a video and remove unwanted clips on a Mac. It does not require any extra software. Moreover, iMovie can help you trim a video with the split and delete features. AnyMP4 Video Converter Ultimate is the best option if you care about the output quality. More questions? Please leave a message below.
Secure Download
Secure Download
 Updated by Mark Cristobal to Edit Video
Related Articles
 Professional and Online Free Audio Cutters to Trim Audio Files
How to cut an audio file? Can you trim an MP3 file? How to cut audio files in iTunes? This post shares 2 ways to cut audio file on Windows 10, Mac and online.
 Detailed Guide on How to Change Aspect Ratio in Final Cut Pro and the Best Alternative
Can you change aspect ratio in Final Cut Pro? How do I resize in Final Cut Pro? This post shows you how to change aspect ratio in Final Cut Pro in details.
 Free Download 3 DVD VOB Cutters to Trim VOB Files
How can I cut a VOB file? What is a free VOB video cutter to extract long VOB clips in a few seconds? Get VOB file cutter and joiner software free download here.
 3 Best Online Audio Cutters to Trim MP3 Songs Free
What is the best online audio cutter? How to trim an MP3 song online free? This post lists 3 online MP3 audio splitters and a professional audio cutter for you.