
Quick Answer:
QuickTime Player cannot crop video. For a free built-in option, use the Photos app (Edit > Crop). For more advanced editing, iMovie or AnyMP4 Video Converter Ultimate are your best choices.
Can QuickTime crop video? If you've opened a clip in QuickTime Player and couldn't find a crop tool, you're not alone. Many users assume Apple's built-in media player can handle full video editing. But in reality, QuickTime only supports basic trimming and screen recording, not cropping. So, how do you actually crop a video on a Mac? In this guide, we'll clarify why QuickTime can't crop videos and show you the easiest working alternatives. Whether you want a quick, no-download solution, a more flexible workflow, or a professional tool for batch editing without quality loss, you'll find the right method here.

No, you cannot crop videos using QuickTime Player. The current version of QuickTime on macOS only supports basic editing functions, such as Trim and Split. It means you can only cut the beginning or end of a video, but not remove unwanted areas from the frame. If your goal is to crop a video, it's better to use professional software or a free QuickTime alternative for cropping.
Note: You might come across older guides mentioning QuickTime Player 7 Pro with Photoshop masks. Please be informed that this method is now outdated and no longer supported on modern macOS versions, such as Sonoma or Sequoia. It's complicated, inefficient, and not recommended today.
The Photos app is the best option to crop video on Mac without QuickTime Pro. Even after you save your cropped video, you can always restore the full frame at any time. On top of that, Photos includes built-in aspect-ratio presets such as 9:16 (ideal for TikTok), Square (Instagram), and 8:10. Additionally, it automatically syncs cropped videos via iCloud.
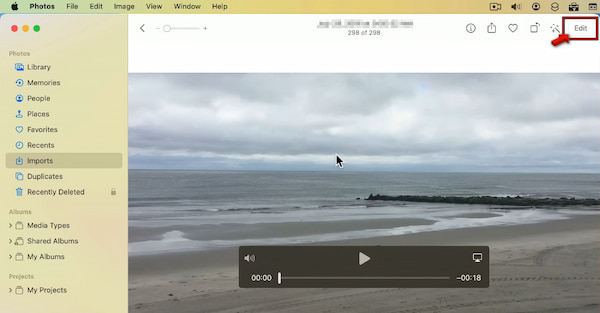
1. In the Photos app, open the video in Viewing Mode, and click Edit. Navigate to the Crop tab to display the cropping frame around your video.
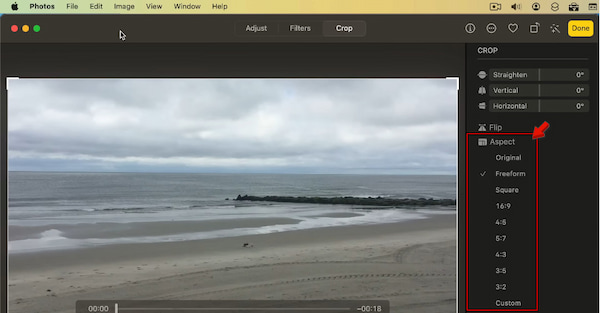
2. Select a preset like Square, 16:9, 4:5, 5:7, or Custom. Alternatively, you can drag the corners of the frame to manually crop the video.
Did you know? The Photos app isn't just for pictures. It's actually the fastest hidden video editor on your Mac. Since macOS Monterey, you can crop, rotate, and even apply filters to videos just like you do with your selfies; no export delays, no quality loss.
When comparing iMovie vs QuickTime for cropping, iMovie clearly wins. Unlike QuickTime Player, iMovie offers an intuitive timeline and a smooth drag-and-drop workflow. This method is especially useful for creating social media content. If you're preparing content for Instagram/TikTok, iMovie's Crop to Fill feature lets you reposition the frame while keeping your subject centered. It gives you more flexibility than simple cropping tools.
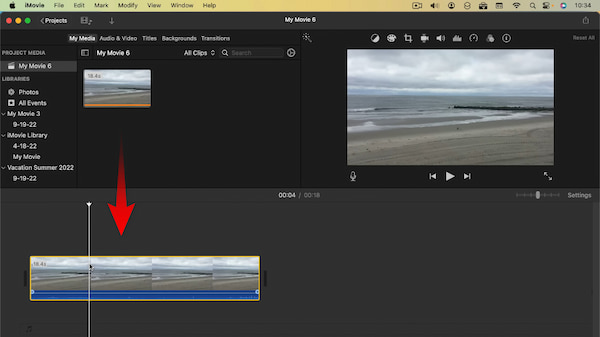
1. Open iMovie, click Create New, and select Movie to start a new project. Click the Import Media button and select your video file. Then, drag the clip into the timeline.
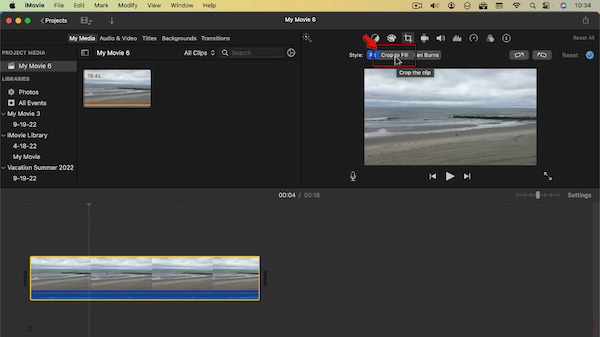
2. Click the video in the timeline and select the Crop option in the preview window. Select Crop to Fill to activate the cropping frame. Adjust the frame by dragging and resizing it to focus on the part of the video you want to keep.
Note: Heads up! iMovie automatically applies a Ken Burns effect when cropping. Choose Crop to Fill instead unless you want a slow zoom-in effect.
If you need more than basic editing, AnyMP4 Video Converter Ultimate is the most powerful option to crop QuickTime videos. Unlike Mac's built-in tools, this software prioritizes efficiency and quality. This makes it ideal for content creators, editors, and even office users handling large batches of videos. It supports batch processing, allowing you to crop 50+ videos simultaneously.
Additionally, ensures zero quality loss, preserving the original bitrate even for 4K and HDR videos. It also delivers an all-in-one editing experience. You get an interactive crop frame, precise crop area values, flexible aspect ratio presets (16:9, 4:3, 1:1, 21:9), and Zoom Mode options for complete control over how your video fits the frame.
Why Choose AnyMP4 Video Converter Ultimate
Secure Download
Secure Download
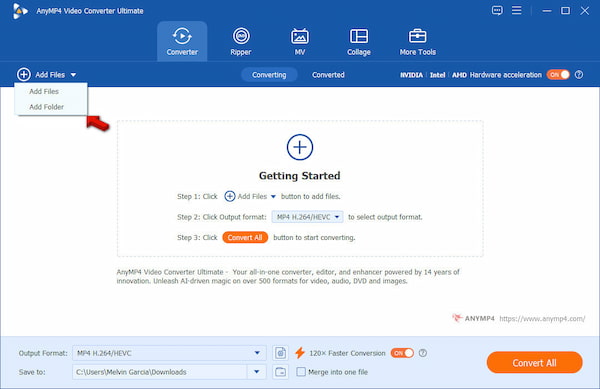
1. Run AnyMP4 Video Converter Ultimate on your system and click +Add Files. Choose Add Files to import a single video or Add Folder to batch upload them at once. All files will appear in the main interface for easy organization.
2. Click the Edit (magic wand) button next to your video to open the built-in editor. In the Rotate & Crop tab, you'll see several powerful tools:
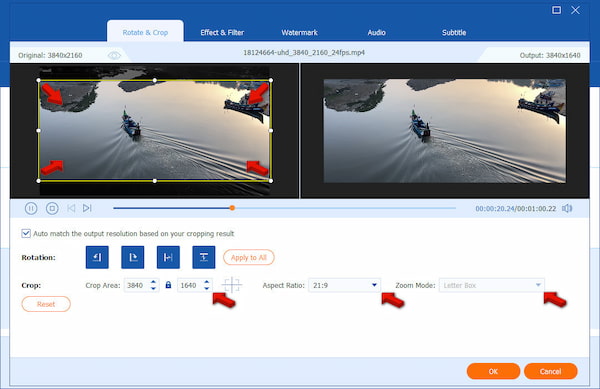
3. Preview your cropped video in real time to confirm the framing. Click OK, then return to the main interface. Select your desired format and quality from the Output Format menu. Then, choose a destination folder and click Convert All to export your videos.
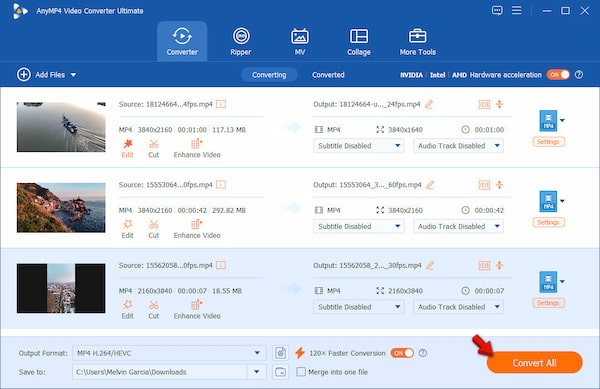
Expert Recommendation: Tired of cropping videos one by one? Use the Apply to All feature to instantly sync your crop settings across dozens of clips. It is a huge time-saver for YouTubers maintaining a consistent B-roll style.
What sets AnyMP4 Video Converter Ultimate apart as a video crop editor is its ability to retain maximum video quality. It supports high-bitrate encoding and full 4K/HDR workflows. It ensures your videos keep their original clarity and color depth. It crops only the visible frame area without degrading resolution.
How to change the aspect ratio in QuickTime?
Unfortunately, you can't directly change the aspect ratio in QuickTime Player through cropping. QuickTime only allows basic playback and trimming, not frame adjustments. To properly adjust the aspect ratio, you'll need the Mac Photos app, iMovie, or third-party editors.
Can you resize a video in QuickTime Player?
QuickTime Player does not offer a true resize or crop feature for video frames. You can scale the playback window or export the file in a different resolution. However, this method won't let you remove unwanted areas or reframe the shot.
What is the best video format for QuickTime?
The best video format for QuickTime Player is MOV. It is Apple's native format, ensuring maximum compatibility and performance. It also supports high-quality playback and editing. QuickTime can also handle MP4 and M4V files well.
Why can't I find the crop tool in QuickTime Player on my Mac?
You can't find a crop tool because it simply doesn't exist in QuickTime Player. Apple designed QuickTime as a lightweight media player with only essential editing features, such as trimming and splitting. The software never included the cropping feature in modern versions.
Is there a free way to crop a video on a Mac without downloading software?
Yes, you can use the Photos app on Mac to crop videos for free without installing anything. It provides a simple editing interface with cropping tools, aspect-ratio presets, and a real-time preview. Since macOS includes it by default, it offers the most accessible way to make quick edits.
How do I crop a video using the Mac Photos app instead of QuickTime?
Open the Photos app, import your video, and double-click it. Click Edit, then go to the Crop tab. From there, you can drag the frame manually or choose an aspect ratio preset, such as square or 9:16. Once satisfied, click Done to save.
QuickTime trim vs crop: What's the difference?
Trimming and cropping serve completely different purposes. Trim removes parts of the video timeline, while crop removes parts of the video frame. QuickTime supports trimming but not cropping, which is why you cannot use it to change framing or aspect ratio.
Can I crop a video in QuickTime Player 10.5?
No, QuickTime Player 10.5 does not support video cropping. Like other modern versions, it only includes basic editing tools such as trim and split. If you need to crop a video, you'll need to use alternative software, such as AnyMP4 Video Converter Ultimate.
QuickTime Player doesn't support video cropping, so if you're looking for a reliable way to crop video in QuickTime, you'll need alternatives. The Photos app is the fastest free solution for basic cropping. Meanwhile, iMovie provides advanced tools for precise frame adjustments and social media–ready edits. For professional needs, AnyMP4 Video Converter Ultimate is the best choice. It supports batch cropping, preserves 4K and HDR quality, and offers flexible aspect ratios with real-time previews. It's an all-in-one solution for Mac and Windows users who want efficient, high-quality cropping without losing resolution.
 Updated by Mark Cristobal to Edit Video
More readings
 Best Video Croppers and Editors
This post shares the best video croppers for you to consider, which are surprisingly good at cropping video on computers or mobile devices. Plus, you can find the methods to export videos without cropping.
 3 Free Ways to Crop a Video on iPhone
How do you crop on iPhone? Is there any free way to directly crop a video on iPhone like a picture? This post shows 3 simple ways to crop a video on iPhone.
 Top 3 Ways to Easily Crop a Video
How do I crop a video in my gallery? How to crop a video on iMovie? This post tells 3 methods to crop a video on iMovie, in Premiere, and online free.
 Review of Kapwing Resizer and 3 Best Kapwing Alternatives
What is Kapwing resizer? How to use Kapwing to crop video? How do I resize with Kapwing? Get a full review of Kapwing video resizer and its best alternatives.